本文首发于我的公众号 Linux云计算网络(id: cloud_dev),专注于干货分享,号内有 10T 书籍和视频资源,后台回复「1024」即可领取,欢迎大家关注,二维码文末可以扫。
上篇我们从进程 clone 的角度,结合代码简单分析了 Linux 提供的 6 种 namespace,本篇从源码上进一步分析 Linux namespace,让你对 Docker namespace 的隔离机制有更深的认识。我用的是 Linux-4.1.19 的版本,由于 namespace 模块更新都比较少,所以,只要 3.0 以上的版本都是差不多的。
从内核进程描述符 task_struct 开始切入
由于 Linux namespace 是用来做进程资源隔离的,所以在进程描述符中,一定有 namespace 所对应的信息,我们可以从这里开始切入代码。
首先找到描述进程信息 task_struct,找到指向 namespace 的结构 struct *nsproxy(sched.h):
struct task_struct {
......
/* namespaces */
struct nsproxy *nsproxy;
......
}
其中 nsproxy 结构体定义在 nsproxy.h 中:
/*
* A structure to contain pointers to all per-process
* namespaces - fs (mount), uts, network, sysvipc, etc.
*
* 'count' is the number of tasks holding a reference.
* The count for each namespace, then, will be the number
* of nsproxies pointing to it, not the number of tasks.
*
* The nsproxy is shared by tasks which share all namespaces.
* As soon as a single namespace is cloned or unshared, the
* nsproxy is copied.
*/
struct nsproxy {
 atomic_t count;
 struct uts_namespace *uts_ns;
 struct ipc_namespace *ipc_ns;
 struct mnt_namespace *mnt_ns;
 struct pid_namespace *pid_ns;
 struct net        *net_ns;
};
extern struct nsproxy init_nsproxy;
这个结构是被所有 namespace 所共享的,只要一个 namespace 被 clone 了,nsproxy 也会被 clone。注意到,由于 user namespace 是和其他 namespace 耦合在一起的,所以没出现在上述结构中。
同时,nsproxy.h 中还定义了一些对 namespace 的操作,包括 copy_namespaces 等。
int copy_namespaces(unsigned long flags, struct task_struct *tsk);
void exit_task_namespaces(struct task_struct *tsk);
void switch_task_namespaces(struct task_struct *tsk, struct nsproxy *new);
void free_nsproxy(struct nsproxy *ns);
int unshare_nsproxy_namespaces(unsigned long, struct nsproxy **,
 struct fs_struct *);
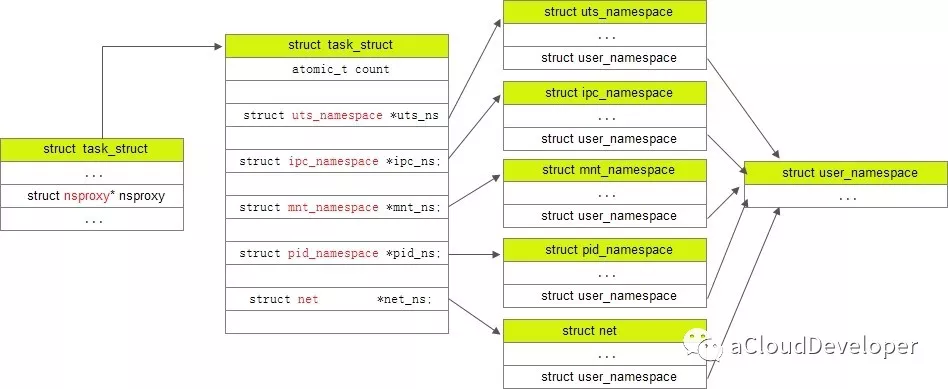
task_struct,nsproxy,几种 namespace 之间的关系如下所示:
各个 namespace 的初始化
在各个 namespace 结构定义下都有个 init 函数,nsproxy 也有个 init_nsproxy 函数,init_nsproxy 在 task 初始化的时候会被初始化,附带的,init_nsproxy 中定义了各个 namespace 的 init 函数,如下:
在 init_task 函数中(init_task.h):
/*
*  INIT_TASK is used to set up the first task table, touch at
* your own risk!. Base=0, limit=0x1fffff (=2MB)
*/
#define INIT_TASK(tsk)
{
......
 .nsproxy  = &init_nsproxy,
......
}
继续跟进 init_nsproxy,在 nsproxy.c 中:
struct nsproxy init_nsproxy = {
 .count      = ATOMIC_INIT(1),
 .uts_ns      = &init_uts_ns,
#if defined(CONFIG_POSIX_MQUEUE) || defined(CONFIG_SYSVIPC)
 .ipc_ns      = &init_ipc_ns,
#endif
 .mnt_ns      = NULL,
 .pid_ns_for_children  = &init_pid_ns,
#ifdef CONFIG_NET
 .net_ns      = &init_net,
#endif
};
可见,init_nsproxy 中,对 uts, ipc, pid, net 都进行了初始化,但 mount 却没有。
创建新的 namespace
初始化完之后,下面看看如何创建一个新的 namespace,通过前面的文章,我们知道是通过 clone 函数来完成的,在 Linux kernel 中,fork/vfork() 对 clone 进行了封装。如下:
#ifdef __ARCH_WANT_SYS_FORK
SYSCALL_DEFINE0(fork)
{
#ifdef CONFIG_MMU
 return do_fork(SIGCHLD, 0, 0, NULL, NULL);
#else
 /* can not support in nommu mode */
 return -EINVAL;
#endif
}
#endif

#ifdef __ARCH_WANT_SYS_VFORK
SYSCALL_DEFINE0(vfork)
{
 return do_fork(CLONE_VFORK | CLONE_VM | SIGCHLD, 0,
     0, NULL, NULL);
}
#endif

#ifdef __ARCH_WANT_SYS_CLONE
#ifdef CONFIG_CLONE_BACKWARDS
SYSCALL_DEFINE5(clone, unsigned long, clone_flags, unsigned long, newsp,
    int __user *, parent_tidptr,
    int, tls_val,
    int __user *, child_tidptr)
#elif defined(CONFIG_CLONE_BACKWARDS2)
SYSCALL_DEFINE5(clone, unsigned long, newsp, unsigned long, clone_flags,
    int __user *, parent_tidptr,
    int __user *, child_tidptr,
    int, tls_val)
#elif defined(CONFIG_CLONE_BACKWARDS3)
SYSCALL_DEFINE6(clone, unsigned long, clone_flags, unsigned long, newsp,
   int, stack_size,
   int __user *, parent_tidptr,
   int __user *, child_tidptr,
   int, tls_val)
#else
SYSCALL_DEFINE5(clone, unsigned long, clone_flags, unsigned long, newsp,
    int __user *, parent_tidptr,
    int __user *, child_tidptr,
    int, tls_val)
#endif
{
 return do_fork(clone_flags, newsp, 0, parent_tidptr, child_tidptr);
}
#endif
可以看到,无论是 fork() 还是 vfork(),最终都会调用到 do_fork() 函数:
/*
*  Ok, this is the main fork-routine.
*
* It copies the process, and if successful kick-starts
* it and waits for it to finish using the VM if required.
*/
long do_fork(unsigned long clone_flags,
       unsigned long stack_start,
       unsigned long stack_size,
       int __user *parent_tidptr,
       int __user *child_tidptr)
{
 // 创建进程描述符指针
 struct task_struct *p;
 int trace = 0;
 long nr;

 /*
  * Determine whether and which event to report to ptracer.  When
  * called from kernel_thread or CLONE_UNTRACED is explicitly
  * requested, no event is reported; otherwise, report if the event
  * for the type of forking is enabled.
  */
 if (!(clone_flags & CLONE_UNTRACED)) {
   if (clone_flags & CLONE_VFORK)
     trace = PTRACE_EVENT_VFORK;
   else if ((clone_flags & CSIGNAL) != SIGCHLD)
     trace = PTRACE_EVENT_CLONE;
   else
     trace = PTRACE_EVENT_FORK;

   if (likely(!ptrace_event_enabled(current, trace)))
     trace = 0;
 }

 // 复制进程描述符,返回值是 task_struct
 p = copy_process(clone_flags, stack_start, stack_size,
      child_tidptr, NULL, trace);
 /*
  * Do this prior waking up the new thread - the thread pointer
  * might get invalid after that point, if the thread exits quickly.
  */
 if (!IS_ERR(p)) {
   struct completion vfork;
   struct pid *pid;

   trace_sched_process_fork(current, p);

   // 得到新进程描述符的 pid
   pid = get_task_pid(p, PIDTYPE_PID);
   nr = pid_vnr(pid);

   if (clone_flags & CLONE_PARENT_SETTID)
     put_user(nr, parent_tidptr);

   // 调用 vfork() 方法,完成相关的初始化工作
   if (clone_flags & CLONE_VFORK) {
     p->vfork_done = &vfork;
     init_completion(&vfork);
     get_task_struct(p);
   }

   // 将新进程加入到调度器中,为其分配 CPU,准备执行
   wake_up_new_task(p);

   // fork() 完成,子进程开始运行,并让 ptrace 跟踪
   /* forking complete and child started to run, tell ptracer */
   if (unlikely(trace))
     ptrace_event_pid(trace, pid);

   // 如果是 vfork(),将父进程加入等待队列,等待子进程完成
   if (clone_flags & CLONE_VFORK) {
     if (!wait_for_vfork_done(p, &vfork))
       ptrace_event_pid(PTRACE_EVENT_VFORK_DONE, pid);
   }

   put_pid(pid);
 } else {
   nr = PTR_ERR(p);
 }
 return nr;
}
do_fork() 首先调用 copy_process 将父进程信息复制给子进程,然后调用 vfork() 完成相关的初始化工作,接着调用 wake_up_new_task() 将进程加入调度器中,为之分配 CPU。最后,等待子进程退出。
copy_process():
static struct task_struct *copy_process(unsigned long clone_flags,
         unsigned long stack_start,
         unsigned long stack_size,
         int __user *child_tidptr,
         struct pid *pid,
         int trace)
{
 int retval;
 // 创建进程描述符指针
 struct task_struct *p;

 // 检查 clone flags 的合法性,比如 CLONE_NEWNS 与 CLONE_FS 是互斥的
 if ((clone_flags & (CLONE_NEWNS|CLONE_FS)) == (CLONE_NEWNS|CLONE_FS))
   return ERR_PTR(-EINVAL);

 if ((clone_flags & (CLONE_NEWUSER|CLONE_FS)) == (CLONE_NEWUSER|CLONE_FS))
   return ERR_PTR(-EINVAL);

 /*
  * Thread groups must share signals as well, and detached threads
  * can only be started up within the thread group.
  */
 if ((clone_flags & CLONE_THREAD) && !(clone_flags & CLONE_SIGHAND))
   return ERR_PTR(-EINVAL);

 /*
  * Shared signal handlers imply shared VM. By way of the above,
  * thread groups also imply shared VM. Blocking this case allows
  * for various simplifications in other code.
  */
 if ((clone_flags & CLONE_SIGHAND) && !(clone_flags & CLONE_VM))
   return ERR_PTR(-EINVAL);

 /*
  * Siblings of global init remain as zombies on exit since they are
  * not reaped by their parent (swapper). To solve this and to avoid
  * multi-rooted process trees, prevent global and container-inits
  * from creating siblings.
  */
  // 比如CLONE_PARENT时得检查当前signal flags是否为SIGNAL_UNKILLABLE,防止kill init进程。
 if ((clone_flags & CLONE_PARENT) &&
       current->signal->flags & SIGNAL_UNKILLABLE)
   return ERR_PTR(-EINVAL);

 /*
  * If the new process will be in a different pid or user namespace
  * do not allow it to share a thread group or signal handlers or
  * parent with the forking task.
  */
 if (clone_flags & CLONE_SIGHAND) {
   if ((clone_flags & (CLONE_NEWUSER | CLONE_NEWPID)) ||
       (task_active_pid_ns(current) !=
       current->nsproxy->pid_ns_for_children))
     return ERR_PTR(-EINVAL);
 }

 retval = security_task_create(clone_flags);
 if (retval)
   goto fork_out;

 retval = -ENOMEM;
 // 复制当前的 task_struct
 p = dup_task_struct(current);
 if (!p)
   goto fork_out;

 ftrace_graph_init_task(p);

 rt_mutex_init_task(p);

#ifdef CONFIG_PROVE_LOCKING
 DEBUG_LOCKS_WARN_ON(!p->hardirqs_enabled);
 DEBUG_LOCKS_WARN_ON(!p->softirqs_enabled);
#endif
 retval = -EAGAIN;

 // 检查进程是否超过限制,由 OS 定义
 if (atomic_read(&p->real_cred->user->processes) >=
     task_rlimit(p, RLIMIT_NPROC)) {
   if (p->real_cred->user != INIT_USER &&
       !capable(CAP_SYS_RESOURCE) && !capable(CAP_SYS_ADMIN))
     goto bad_fork_free;
 }
 current->flags &= ~PF_NPROC_EXCEEDED;

 retval = copy_creds(p, clone_flags);
 if (retval < 0)
   goto bad_fork_free;

 /*
  * If multiple threads are within copy_process(), then this check
  * triggers too late. This doesn't hurt, the check is only there
  * to stop root fork bombs.
  */
 retval = -EAGAIN;
 // 检查进程数是否超过 max_threads,由内存大小定义
 if (nr_threads >= max_threads)
   goto bad_fork_cleanup_count;

 // ......

 // 初始化 io 计数器
 task_io_accounting_init(&p->ioac);
 acct_clear_integrals(p);

 // 初始化 CPU 定时器
 posix_cpu_timers_init(p);

 // ......

 // 初始化进程数据结构,并为进程分配 CPU,进程状态设置为 TASK_RUNNING
 /* Perform scheduler related setup. Assign this task to a CPU. */
 retval = sched_fork(clone_flags, p);

 if (retval)
   goto bad_fork_cleanup_policy;

 retval = perf_event_init_task(p);
 if (retval)
   goto bad_fork_cleanup_policy;
 retval = audit_alloc(p);
 if (retval)
   goto bad_fork_cleanup_perf;
 /* copy all the process information */
 // 复制所有进程信息,包括文件系统,信号处理函数、信号、内存管理等
 shm_init_task(p);
 retval = copy_semundo(clone_flags, p);
 if (retval)
   goto bad_fork_cleanup_audit;
 retval = copy_files(clone_flags, p);
 if (retval)
   goto bad_fork_cleanup_semundo;
 retval = copy_fs(clone_flags, p);
 if (retval)
   goto bad_fork_cleanup_files;
 retval = copy_sighand(clone_flags, p);
 if (retval)
   goto bad_fork_cleanup_fs;
 retval = copy_signal(clone_flags, p);
 if (retval)
   goto bad_fork_cleanup_sighand;
 retval = copy_mm(clone_flags, p);
 if (retval)
   goto bad_fork_cleanup_signal;
 // !!! 复制 namespace
 retval = copy_namespaces(clone_flags, p);
 if (retval)
   goto bad_fork_cleanup_mm;
 retval = copy_io(clone_flags, p);
 if (retval)
   goto bad_fork_cleanup_namespaces;
 // 初始化子进程内核栈
 retval = copy_thread(clone_flags, stack_start, stack_size, p);
 if (retval)
   goto bad_fork_cleanup_io;
 // 为新进程分配新的 pid
 if (pid != &init_struct_pid) {
   pid = alloc_pid(p->nsproxy->pid_ns_for_children);
   if (IS_ERR(pid)) {
     retval = PTR_ERR(pid);
     goto bad_fork_cleanup_io;
   }
 }

 // ......

 // 返回新进程 p
 return p;
}
copy_process 主要分为三步:首先调用 dup_task_struct() 复制当前的进程描述符信息 task_struct,为新进程分配新的堆栈,第二步调用 sched_fork() 初始化进程数据结构,为其分配 CPU,把进程状态设置为 TASK_RUNNING,最后一步就是调用 copy_namespaces() 复制 namesapces。我们重点关注最后一步 copy_namespaces():
/*
* called from clone.  This now handles copy for nsproxy and all
* namespaces therein.
*/
int copy_namespaces(unsigned long flags, struct task_struct *tsk)
{
 struct nsproxy *old_ns = tsk->nsproxy;
 struct user_namespace *user_ns = task_cred_xxx(tsk, user_ns);
 struct nsproxy *new_ns;

 if (likely(!(flags & (CLONE_NEWNS | CLONE_NEWUTS | CLONE_NEWIPC |
           CLONE_NEWPID | CLONE_NEWNET)))) {
   get_nsproxy(old_ns);
   return 0;
 }

 if (!ns_capable(user_ns, CAP_SYS_ADMIN))
   return -EPERM;

 /*
  * CLONE_NEWIPC must detach from the undolist: after switching
  * to a new ipc namespace, the semaphore arrays from the old
  * namespace are unreachable.  In clone parlance, CLONE_SYSVSEM
  * means share undolist with parent, so we must forbid using
  * it along with CLONE_NEWIPC.
  */
 if ((flags & (CLONE_NEWIPC | CLONE_SYSVSEM)) ==
   (CLONE_NEWIPC | CLONE_SYSVSEM))
   return -EINVAL;

 new_ns = create_new_namespaces(flags, tsk, user_ns, tsk->fs);
 if (IS_ERR(new_ns))
   return  PTR_ERR(new_ns);

 tsk->nsproxy = new_ns;
 return 0;
}
可见,copy_namespace() 主要基于“旧的” namespace 创建“新的” namespace,核心函数在于 create_new_namespaces:
/*
* Create new nsproxy and all of its the associated namespaces.
* Return the newly created nsproxy.  Do not attach this to the task,
* leave it to the caller to do proper locking and attach it to task.
*/
static struct nsproxy *create_new_namespaces(unsigned long flags,
 struct task_struct *tsk, struct user_namespace *user_ns,
 struct fs_struct *new_fs)
{
 struct nsproxy *new_nsp;
 int err;

// 创建新的 nsproxy
 new_nsp = create_nsproxy();
 if (!new_nsp)
   return ERR_PTR(-ENOMEM);

//创建 mnt namespace
 new_nsp->mnt_ns = copy_mnt_ns(flags, tsk->nsproxy->mnt_ns, user_ns, new_fs);
 if (IS_ERR(new_nsp->mnt_ns)) {
   err = PTR_ERR(new_nsp->mnt_ns);
   goto out_ns;
 }
//创建 uts namespace
 new_nsp->uts_ns = copy_utsname(flags, user_ns, tsk->nsproxy->uts_ns);
 if (IS_ERR(new_nsp->uts_ns)) {
   err = PTR_ERR(new_nsp->uts_ns);
   goto out_uts;
 }
//创建 ipc namespace
 new_nsp->ipc_ns = copy_ipcs(flags, user_ns, tsk->nsproxy->ipc_ns);
 if (IS_ERR(new_nsp->ipc_ns)) {
   err = PTR_ERR(new_nsp->ipc_ns);
   goto out_ipc;
 }
//创建 pid namespace
 new_nsp->pid_ns_for_children =
   copy_pid_ns(flags, user_ns, tsk->nsproxy->pid_ns_for_children);
 if (IS_ERR(new_nsp->pid_ns_for_children)) {
   err = PTR_ERR(new_nsp->pid_ns_for_children);
   goto out_pid;
 }
//创建 network namespace
 new_nsp->net_ns = copy_net_ns(flags, user_ns, tsk->nsproxy->net_ns);
 if (IS_ERR(new_nsp->net_ns)) {
   err = PTR_ERR(new_nsp->net_ns);
   goto out_net;
 }

 return new_nsp;
// 出错处理
out_net:
 if (new_nsp->pid_ns_for_children)
   put_pid_ns(new_nsp->pid_ns_for_children);
out_pid:
 if (new_nsp->ipc_ns)
   put_ipc_ns(new_nsp->ipc_ns);
out_ipc:
 if (new_nsp->uts_ns)
   put_uts_ns(new_nsp->uts_ns);
out_uts:
 if (new_nsp->mnt_ns)
   put_mnt_ns(new_nsp->mnt_ns);
out_ns:
 kmem_cache_free(nsproxy_cachep, new_nsp);
 return ERR_PTR(err);
}
在create_new_namespaces()中,分别调用 create_nsproxy(), create_utsname(), create_ipcs(), create_pid_ns(), create_net_ns(), create_mnt_ns() 来创建 nsproxy 结构,uts,ipcs,pid,mnt,net。
具体的函数我们就不再分析,基本到此为止,我们从子进程创建,到子进程相关的信息的初始化,包括文件系统,CPU,内存管理等,再到各个 namespace 的创建,都走了一遍,下面附上 namespace 创建的代码流程图。
具体流程图和更多的细节(包括各个 namespace 的创建过程)大家可以关注我的公众号阅读,那里的阅读体验会更好一些。
我的公众号 「Linux云计算网络」(id: cloud_dev) ,号内有 10T 书籍和视频资源,后台回复 「1024」 即可领取,分享的内容包括但不限于 Linux、网络、云计算虚拟化、容器Docker、OpenStack、Kubernetes、工具、SDN、OVS、DPDK、Go、Python、C/C++编程技术等内容,欢迎大家关注。
