
官方:https://www.ssh.com/ssh/
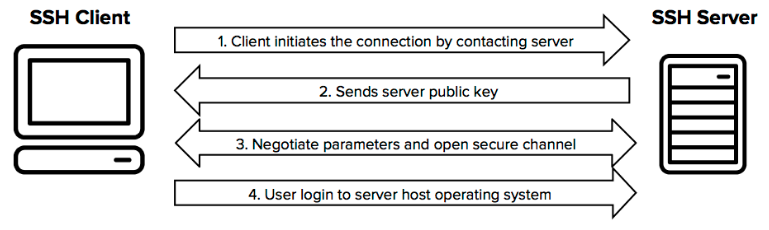
The SSH protocol uses encryption to secure the connection between a client and a server. All user authentication, commands, output, and file transfers are encrypted to protect against attacks in the network.
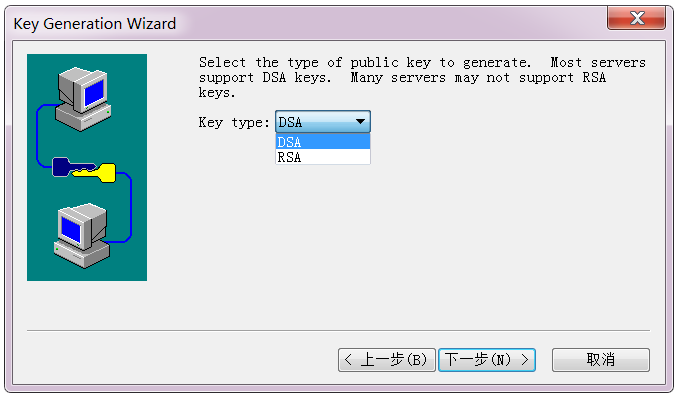
密钥类型包括rsa和dsa,详见 https://security.stackexchange.com/questions/5096/rsa-vs-dsa-for-ssh-authentication-keys
The security of the RSA algorithm is based on the fact that factorization of large integers is known to be "difficult", whereas DSA security is based on the discrete logarithm problem.
rsa基于大数分解,dsa基于离散对数;
RSA keys can go up to 4096 bits, where DSA has to be exactly 1024 bits (although OpenSSL allows for more.)
rsa key最高支持4096长度bit,dsa key只支持1024长度bit;
1 生成秘钥,rsa或者dsa
1.1 命令生成(linux或mac)
$ ssh-keygen -t rsa -b 4096
Generating public/private rsa key pair.
Enter file in which to save the key (/home/testuser/.ssh/id_rsa):
Enter passphrase (empty for no passphrase):
Enter same passphrase again:
Your identification has been saved in /home/testuser/.ssh/id_rsa.
Your public key has been saved in /home/testuser/.ssh/id_rsa.pub.
The key fingerprint is:
SHA256:mRMuErgh17o9EPe1gzdd/tFuj6L0rVsk7qTw1rrGFCc testuser@testserver
The key's randomart image is:
+---[RSA 4096]----+
| |
| o |
|. = + o . |
| o * o + *Eo. . |
| + . + S .+o o .|
| + . o +.. + o |
| . o .o..o o o|
| . ++=oo o.|
| o*+=+o .|
+----[SHA256]-----+
创建过程会输入密码;
创建完成后默认会在home目录的.ssh目录下创建两个秘钥文件,公钥(pub后缀)和私钥
$ ls .ssh
id_rsa id_rsa.pub
登录时私钥自己保存,公钥放到服务器上
1.2 securecrt或xshell界面生成(windows)
securecrt创建秘钥的地方在
Tools--Create Public Keys
2 上传公钥
将公钥上传到要登录的服务器的用户home目录下,同时将公钥加入authorized_keys
cat .ssh/id_rsa.pub >> .ssh/authorized_keys
chmod 600 .ssh/authorized_keys
3 本机私钥登录
3.1 ssh命令登录(linux或mac)
$ ssh -i /path/id_rsa user@remote_ip
另外还可以修改配置文件,配置key,这样就可以免掉-i
#vi /etc/ssh/ssh_config
IdentityFile ~/.ssh/id_rsa
3.2 securecrt或xshell登录(windows)
选择私钥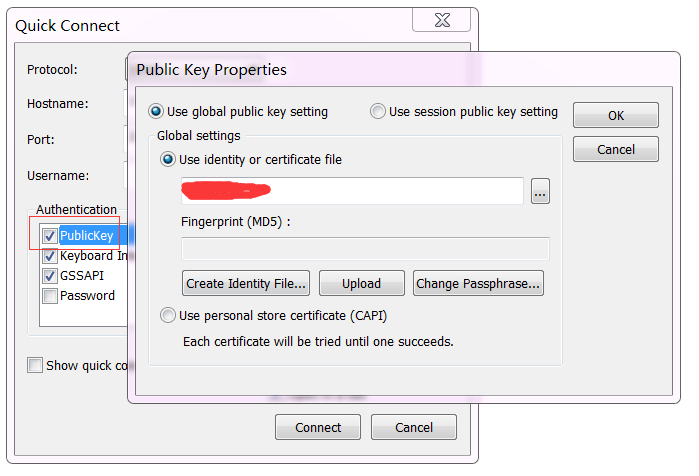
4 hadoop集群配置免密登录
4.1 root用户ssh免密登录
1 准备key
# ssh-keygen -t rsa -b 4096
# ls .ssh
authorized_keys id_rsa id_rsa.pub known_hosts
# cat .ssh/id_rsa.pub >> .ssh/authorized_keys
# chmod 600 .ssh/authorized_keys
2 拷贝
1)没有密码,但是可以登录到服务器,逐台登录服务器后nc接收文件
# nc -l $receive_port |tar -zxvf -
本机执行
# tar -zcvf - .ssh |nc $receive_ip $receive_port
2)有服务器的登录账号和密码,逐台拷贝
# scp .ssh/id_rsa.pub root@$server_ip:/root/.ssh
# scp .ssh/authorized_keys root@$server_ip:/root/.ssh
3 逐台ssh登录验证
# ssh $server_ip
4 逐台拷贝known_hosts
# scp .ssh/known_hosts $server_ip:/root/.ssh/
4.2 其他用户免密登陆,以hadoop为例
# ansible all-servers -m shell -a 'useradd hadoop'
# su - hadoop
$ ssh-keygen -t rsa -b 4096
$ cat .ssh/id_rsa.pub >> .ssh/authorized_keys
$ chmod 600 .ssh/authorized_keys
$ exit
# ansible other-servers -m copy -a 'src=/home/hadoop/.ssh dest=/home/hadoop/'
# ansible other-servers -m shell -a 'chown -R hadoop.hadoop /home/hadoop/.ssh && cd /home/hadoop/.ssh && chmod 600 id_rsa authorized_keys'
# su - hadoop
$ ssh $server
$ scp .ssh/known_host $server:/home/hadoop/.ssh