一、Nagios简介

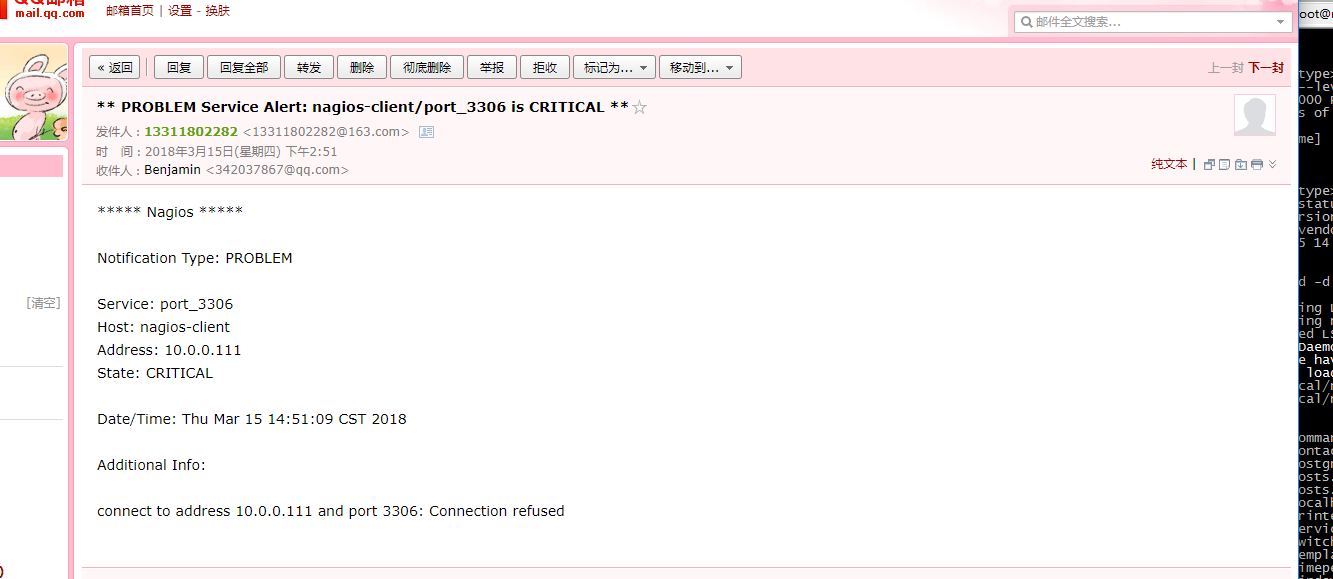
Nagios是一款开源的电脑系统和网络监视工具,能有效监控Windows、Linux和Unix的主机状态,交换机路由器等网络设置,打印机等。在系统或服务状态异常时发出邮件或短信报警第一时间通知网站运维人员,在状态恢复后发出正常的邮件或短信通知。
Nagios原名为NetSaint,由Ethan Galstad开发并维护至今。NAGIOS是一个缩写形式: "Nagios Ain't Gonna Insist On Sainthood" Sainthood 翻译为圣徒,而"Agios"是"saint"的希腊表示方法。Nagios被开发在Linux下使用,但在Unix下也工作得非常好。
主要功能
- 网络服务监控(SMTP、POP3、HTTP、NNTP、ICMP、SNMP、FTP、SSH)
- 主机资源监控(CPU load、disk usage、system logs),也包括Windows主机(使用NSClient++ plugin)
- 可以指定自己编写的Plugin通过网络收集数据来监控任何情况(温度、警告……)
- 可以通过配置Nagios远程执行插件远程执行脚本
- 远程监控支持SSH或SSL加通道方式进行监控
- 简单的plugin设计允许用户很容易的开发自己需要的检查服务,支持很多开发语言(shell scripts、C++、Perl、ruby、Python、PHP、C#等)
- 包含很多图形化数据Plugins(Nagiosgraph、Nagiosgrapher、PNP4Nagios等)
- 可并行服务检查
- 能够定义网络主机的层次,允许逐级检查,就是从父主机开始向下检查
- 当服务或主机出现问题时发出通告,可通过email, pager, sms 或任意用户自定义的plugin进行通知
- 能够自定义事件处理机制重新激活出问题的服务或主机
- 自动日志循环
- 支持冗余监控
- 包括Web界面可以查看当前网络状态,通知,问题历史,日志文件等
二、Nagios工作原理
Nagios的功能是监控服务和主机,但是他自身并不包括这部分功能,所有的监控、检测功能都是通过各种插件来完成的。
启动Nagios后,它会周期性的自动调用插件去检测服务器状态,同时Nagios会维持一个队列,所有插件返回来的状态信息都进入队列,Nagios每次都从队首开始读取信息,并进行处理后,把状态结果通过web显示出来。
Nagios提供了许多插件,利用这些插件可以方便的监控很多服务状态。安装完成后,在nagios主目录下的/libexec里放有nagios自带的可以使用的所有插件,如,check_disk是检查磁盘空间的插件,check_load是检查CPU负载的,等等。每一个插件可以通过运行./check_xxx –h 来查看其使用方法和功能。
Nagios可以识别4种状态返回信息,即 0(OK)表示状态正常/绿色、1(WARNING)表示出现警告/黄色、2(CRITICAL)表示出现非常严重的错误/红色、3(UNKNOWN)表示未知错误/深黄色。Nagios根据插件返回来的值,来判断监控对象的状态,并通过web显示出来,以供管理员及时发现故障。
四种监控状态

再说报警功能,如果监控系统发现问题不能报警那就没有意义了,所以报警也是nagios很重要的功能之一。但是,同样的,Nagios 自身也没有报警部分的代码,甚至没有插件,而是交给用户或者其他相关开源项目组去完成的。
Nagios 安装,是指基本平台,也就是Nagios软件包的安装。它是监控体系的框架,也是所有监控的基础。
打开Nagios官方的文档,会发现Nagios基本上没有什么依赖包,只要求系统是Linux或者其他Nagios支持的系统。不过如果你没有安装apache(http服务),那么你就没有那么直观的界面来查看监控信息了,所以apache姑且算是一个前提条件。关于apache的安装,网上有很多,照着安装就是了。安装之后要检查一下是否可以正常工作。
知道Nagios 是如何通过插件来管理服务器对象后,现在开始研究它是如何管理远端服务器对象的。Nagios 系统提供了一个插件NRPE。Nagios 通过周期性的运行它来获得远端服务器的各种状态信息。它们之间的关系如下图所示:
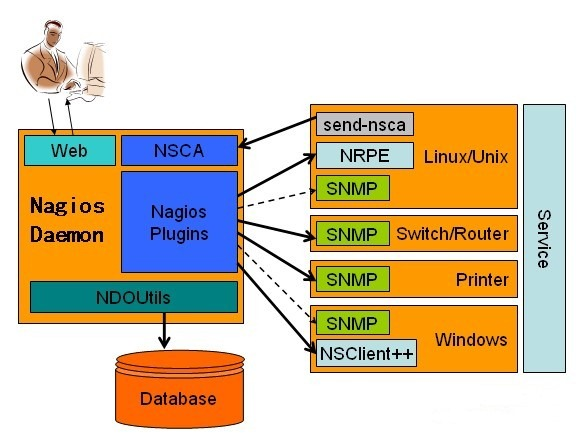
Nagios 通过NRPE 来远端管理服务
1. Nagios 执行安装在它里面的check_nrpe 插件,并告诉check_nrpe 去检测哪些服务。
2. 通过SSL,check_nrpe 连接远端机子上的NRPE daemon
3. NRPE 运行本地的各种插件去检测本地的服务和状态(check_disk,..etc)
4. 最后,NRPE 把检测的结果传给主机端的check_nrpe,check_nrpe 再把结果送到Nagios状态队列中。
5. Nagios 依次读取队列中的信息,再把结果显示出来。
三、实验环境
| Host Name | OS | IP | Software |
| Nagios-Server | CentOS release 7.2 (Final) | 10.0.0.108 | Apache、Php、Nagios、nagios-plugins nginx |
| Nagios-Linux | CentOS release 7.2 (Final) | 10.0.0.111 | nagios-plugins、nrpe |
Centos版本:CentOS Linux release 7.2 (Core) 64位
Apache版本:Apache/2.4.6
Nginx版本: nginx 1.12.0
Mysql版本:mysql 5.7.18
PHP版本:php 7.1.4
Server 安装了nagios软件,对监控的数据做处理,并且提供web界面查看和管理。当然也可以对本机自身的信息进行监控。
Client 安装了NRPE等客户端,根据监控机的请求执行监控,然后将结果回传给监控机。
防火墙已关闭/iptables: Firewall is not running.
SELINUX=disabled
LNMP环境省略。。。。。
四、Nagios服务端安装
下载安装 nagios nagios-plugin nrpe
# cd /software/
# wget https://assets.nagios.com/downloads/nagioscore/releases/nagios-4.3.1.tar.gz
# wget https://nagios-plugins.org/download/nagios-plugins-2.2.1.tar.gz
# wget https://sourceforge.net/projects/nagios/files/nrpe-3.x/nrpe-3.1.0.tar.gz
解压nagios源码包
# tar zxvf nagios-4.3.1.tar.gz
进入解压后的目录
# cd nagios-4.3.1/
创建ngaios用户和组(把nginx启动用户www加入到nagios相关组)
# useradd nagios -s /sbin/nologin
# id www
# groupadd nagcmd
# usermod -a -G nagcmd nagios
# usermod -a -G nagcmd www
# id -n -G nagios
# id -n -G www
配置nagios
# ./configure --with-command-group=nagcmd
编译和安装
# make all
# make install-init
# make install-commandmode
# make install-config
# make install# cp -R contrib/eventhandlers/ /usr/local/nagios/libexec/# chown -R nagios:nagios /usr/local/nagios/libexec/eventhandlers
# /usr/local/nagios/bin/nagios -v /usr/local/nagios/etc/nagios.cfg
生成apache配置文件
# make install-webconf
/usr/bin/install -c -m 644 sample-config/httpd.conf /etc/httpd/conf.d/nagios.conf
if [ 0 -eq 1 ]; then
    ln -s /etc/httpd/conf.d/nagios.conf /etc/apache2/sites-enabled/nagios.conf;
fi

*** Nagios/Apache conf file installed ***
生成nagios web界面的验证信息
# htpasswd -c /usr/local/nagios/etc/htpasswd.users nagios
New password:   ==> 输入密码,这里我输入的密码是nagios,记住这个密码
Re-type new password:  ==> 确认密码
Adding password for user nagios
修改apache配置文件
vi /etc/httpd/conf/httpd.conf

Listen 80    ===>    修改为    Listen 8080
User apache    ===>    修改为    User www
Group apache    ===>    修改为    Group www
DirectoryIndex index.html    ===>    修改为    DirectoryIndex index.php index.html
AddType application/x-gzip .gz .tgz    ===>    下面添加一行内容  AddHandler application/x-httpd-php .php
# LoadModule foo_module modules/mod_foo.so    ===>    下面添加一行内容
 LoadModule php7_module        modules/libphp7.so
apache配置文件参考
# grep -v '^$' /etc/httpd/conf/httpd.conf|grep -v '#'
ServerRoot "/etc/httpd"
Listen 8080
LoadModule php7_module        modules/libphp7.so
Include conf.modules.d/*.conf
User www
Group www
ServerAdmin root@localhost
<Directory />
    AllowOverride none
    Require all denied
</Directory>
DocumentRoot "/var/www/html"
<Directory "/var/www">
    AllowOverride None
    Require all granted
</Directory>
<Directory "/var/www/html">
    Options Indexes FollowSymLinks
    AllowOverride None
    Require all granted
</Directory>
<IfModule dir_module>
    DirectoryIndex index.php index.html
</IfModule>
<Files ".ht*">
    Require all denied
</Files>
ErrorLog "logs/error_log"
LogLevel warn
<IfModule log_config_module>
    LogFormat "%h %l %u %t "%r" %>s %b "%{Referer}i" "%{User-Agent}i"" combined
    LogFormat "%h %l %u %t "%r" %>s %b" common
    <IfModule logio_module>
      LogFormat "%h %l %u %t "%r" %>s %b "%{Referer}i" "%{User-Agent}i" %I %O" combinedio
    </IfModule>
    CustomLog "logs/access_log" combined
</IfModule>
<IfModule alias_module>
    ScriptAlias /cgi-bin/ "/var/www/cgi-bin/"
</IfModule>
<Directory "/var/www/cgi-bin">
    AllowOverride None
    Options None
    Require all granted
</Directory>
<IfModule mime_module>
    TypesConfig /etc/mime.types
    AddType application/x-compress .Z
    AddType application/x-gzip .gz .tgz
    AddHandler application/x-httpd-php .php
    AddType text/html .shtml
    AddOutputFilter INCLUDES .shtml
</IfModule>
AddDefaultCharset UTF-8
<IfModule mime_magic_module>
    MIMEMagicFile conf/magic
</IfModule>
EnableSendfile on
IncludeOptional conf.d/*.conf
重新编译一下php,使其直接apache(也就是编译参数加上--with-apxs2)
# cd /root/software/php-7.1.4/
# ./configure --prefix=/usr/local/php --enable-fpm --with-fpm-user=nginx --with-fpm-group=nginx --with-mysqli --with-zlib --with-curl --with-gd --with-jpeg-dir --with-png-dir --with-freetype-dir --with-openssl --enable-mbstring --enable-xml --enable-session --enable-ftp --enable-pdo -enable-tokenizer --enable-zip --with-apxs2
# make && make install
# cd /etc/httpd/
# ll /etc/httpd/modules/libphp7.so
-rwxr-xr-x 1 root root 38923369 Mar 14 16:15 /etc/httpd/modules/libphp7.so    ===>    可以看到这个模块已经生成
启动apache
# systemctl start httpd
# systemctl enable httpd
启动nagios
chkconfig nagios on
/etc/init.d/nagios start
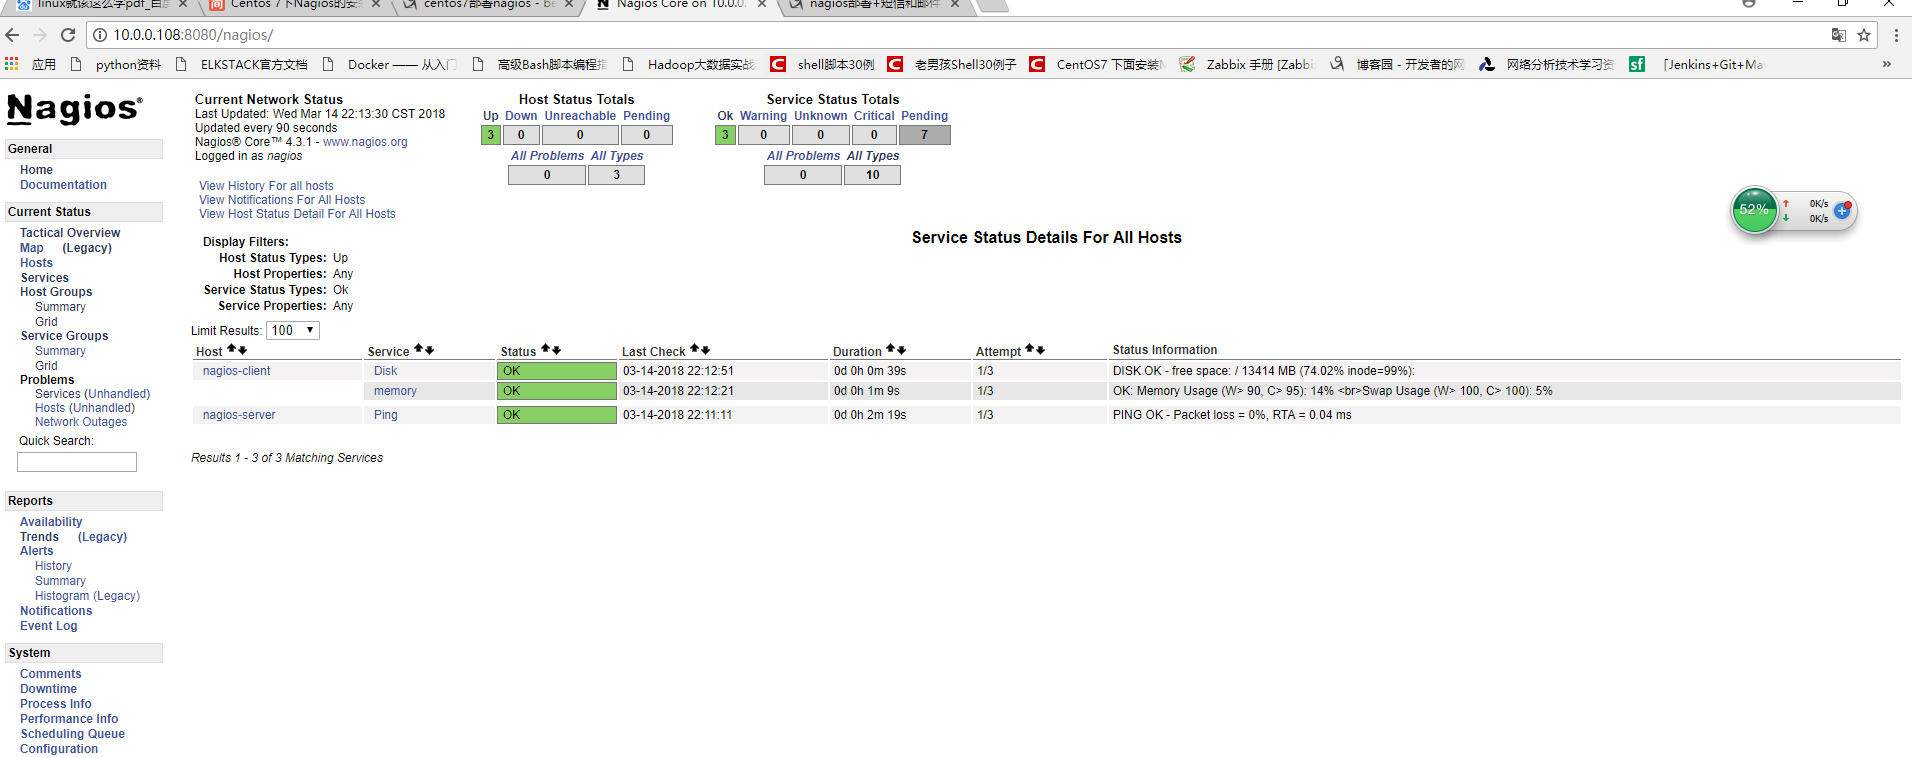
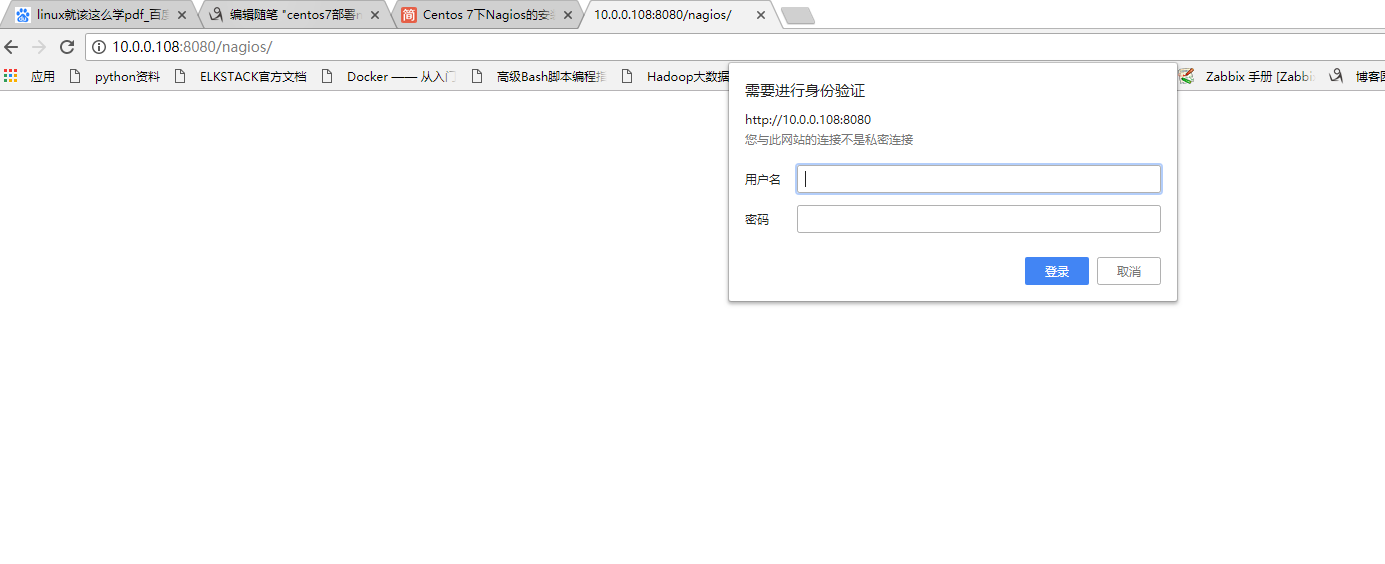
在浏览器输入ip:8080/nagios测试nagios-web页面是否可以打开
安装nagios-plugins插件
解压nagios-plugins源码包
# cd /software/
# tar zxvf nagios-plugins-2.2.1.tar.gz
进入解压后的目录进行配置
# cd nagios-plugins-2.2.1/
# ./configure --with-nagios-user=nagios --with-nagios-group=nagcmd --enable-perl-modules
编译及安装
# make && make install
安装nrpe
解压nrpe源码包
# cd /root/software/
# tar zxvf nrpe-3.1.0.tar.gz
进去解压后的目录进行配置
# cd nrpe-3.1.0/
# ./configure
编译及安装
# make all
# make install-plugin
# make install-daemon
# make install-daemon-config
# cp sample-config/nrpe.cfg /usr/local/nagios/etc/nrpe.cfg
安装完成后,查看下libexec下面是否有插件
# ls /usr/local/nagios/libexec/
check_apt       check_flexlm        check_log          check_ntp_peer  check_smtp    disable_active_service_checks
check_breeze    check_fping         check_mailq        check_ntp_time  check_spop    disable_notifications
check_by_ssh    check_ftp           check_mrtg         check_nwstat    check_ssh     distributed-monitoring
check_clamd     check_http          check_mrtgtraf     check_oracle    check_ssmtp   enable_active_service_checks
check_cluster   check_icmp          check_mysql        check_overcr    check_swap    enable_notifications
check_dhcp      check_ide_smart     check_mysql_query  check_ping      check_tcp     eventhandlers
check_dig       check_ifoperstatus  check_nagios       check_pop       check_time    negate
check_disk      check_ifstatus      check_nntp         check_procs     check_udp     redundancy-scenario1
check_disk_smb  check_imap          check_nntps        check_real      check_ups     submit_check_result
check_dns       check_ircd          check_nrpe         check_rpc       check_uptime  urlize
check_dummy     check_jabber        check_nt           check_sensors   check_users   utils.pm
check_file_age  check_load          check_ntp          check_simap     check_wave    utils.sh
启动nrpe,并测试服务端本地是否可以连通
# /usr/local/nagios/bin/nrpe -d -c /usr/local/nagios/etc/nrpe.cfg
# echo "/usr/local/nagios/bin/nrpe -d -c /usr/local/nagios/etc/nrpe.cfg" >> /etc/rc.local
# chmod +x /etc/rc.d/rc.local           # centos 7下需要这一步, 不然/etc/rc.local中的内容开机可能不执行
# netstat -lnput|grep 5666
tcp        0      0 0.0.0.0:5666            0.0.0.0:*               LISTEN      67176/nrpe
tcp6       0      0 :::5666                 :::*                    LISTEN      67176/nrpe
# /usr/local/nagios/libexec/check_nrpe -H localhost
NRPE v3.1.0-rc1
在查看网页

五.nagios客户端配置
下载nagios-plugin和nrpe
[root@nagios-client ~]# mkdir software
[root@nagios-client ~]# cd software/
[root@nagios-client software]# wget https://nagios-plugins.org/download/nagios-plugins-2.2.1.tar.gz
安装nagios-plugin
安装依赖包
[root@nagios-client software]# yum install perl-devel perl-CPAN -y
创建用户
[root@nagios-client software]# useradd nagios -M -s /sbin/nologin
解压编译安装nagios-plugin源码包
[root@nagios-client software]# useradd nagios -M -s /sbin/nologin
[root@nagios-client software]# tar xf nagios-plugins-2.2.1.tar.gz
[root@nagios-client software]# cd nagios-plugins-2.2.1/
[root@nagios-client nagios-plugins-2.2.1]#  ./configure --with-nagios-user=nagios --with-nagios-group=nagios --enable-perl-modules
[root@nagios-client nagios-plugins-2.2.1]# make && make install
安装nrpe插件
解压编译安装rpe源码包
[root@nagios-client nrpe-3.1.0]# ./configure
checking for SSL headers... configure: error: Cannot find ssl headers
# 编译报错缺少openssl 包
[root@nagios-client nrpe-3.1.0]# echo $?
1
[root@nagios-client nrpe-3.1.0]# yum install open-ssl*
安装完成后,查看下libexec下面是否有插件
[root@nagios-client nrpe-3.1.0]# ls /usr/local/nagios/libexec/
check_apt       check_dummy         check_imap         check_nagios    check_overcr   check_ssh     negate
check_breeze    check_file_age      check_ircd         check_nntp      check_ping     check_ssmtp   urlize
check_by_ssh    check_flexlm        check_jabber       check_nntps     check_pop      check_swap    utils.pm
check_clamd     check_fping         check_load         check_nrpe      check_procs    check_tcp     utils.sh
check_cluster   check_ftp           check_log          check_nt        check_real     check_time
check_dhcp      check_http          check_mailq        check_ntp       check_rpc      check_udp
check_dig       check_icmp          check_mrtg         check_ntp_peer  check_sensors  check_ups
check_disk      check_ide_smart     check_mrtgtraf     check_ntp_time  check_simap    check_uptime
check_disk_smb  check_ifoperstatus  check_mysql        check_nwstat    check_smtp     check_users
check_dns       check_ifstatus      check_mysql_query  check_oracle    check_spop     check_wave
启动nrpe,并测试服务端本地是否可以连通
[root@nagios-client nrpe-3.1.0]# /usr/local/nagios/bin/nrpe -d -c /usr/local/nagios/etc/nrpe.cfg
[root@nagios-client nrpe-3.1.0]# echo "/usr/local/nagios/bin/nrpe -d -c /usr/local/nagios/etc/nrpe.cfg" >> /etc/rc.local
[root@nagios-client nrpe-3.1.0]# chmod +x /etc/rc.d/rc.local           # centos 7下需要这一步, 不然/etc/rc.local中的内容开机可能不执行
[root@nagios-client nrpe-3.1.0]# netstat -lnput|grep 5666
tcp        0      0 0.0.0.0:5666            0.0.0.0:*               LISTEN      28296/nrpe
tcp6       0      0 :::5666                 :::*                    LISTEN      28296/nrpe
[root@nagios-client nrpe-3.1.0]# /usr/local/nagios/libexec/check_nrpe -H localhost
NRPE v3.1.0-rc1
修改配置文件
[root@nagios-client nrpe-3.1.0]# cd /usr/local/nagios/etc/
允许服务端IP和本机访问,10.0.0.108是nagios服务端IP地址
vi nrpe.cfg
allowed_hosts=127.0.0.1,::1 ===> 修改为 allowed_hosts=127.0.0.1,::1,10.0.0.108
注释下面几行内容
command[check_users]=/usr/local/nagios/libexec/check_users -w 5 -c 10
command[check_load]=/usr/local/nagios/libexec/check_load -r -w .15,.10,.05 -c .30,.25,.20
command[check_hda1]=/usr/local/nagios/libexec/check_disk -w 20% -c 10% -p /dev/hda1
command[check_zombie_procs]=/usr/local/nagios/libexec/check_procs -w 5 -c 10 -s Z
command[check_total_procs]=/usr/local/nagios/libexec/check_procs -w 150 -c 200
在nrpe.cfg文件末尾增加下面几行内容
# my custom monitor items
command[check_users]=/usr/local/nagios/libexec/check_users -w 5 -c 10
command[check_load]=/usr/local/nagios/libexec/check_load -r -w .15,.10,.05 -c .30,.25,.20
command[check_disk]=/usr/local/nagios/libexec/check_disk -w 20% -c 10% -p /
command[check_mem]=/usr/local/nagios/libexec/check_mem.pl -w 90% -c 95%
command[check_swap]=/usr/local/nagios/libexec/check_swap -w 20% -c 10%
创建一个监控内存的perl脚本
[root@nagios-client etc]# vi /usr/local/nagios/libexec/check_mem.pl


#! /usr/bin/perl -w
#
# $Id: check_mem.pl 8 2008-08-23 08:59:52Z rhomann $
#
# check_mem v1.7 plugin for nagios
#
# uses the output of `free` to find the percentage of memory used
#
# Copyright Notice: GPL
#
# History:
# v1.8 Rouven Homann - rouven.homann@cimt.de
# + added findbin patch from Duane Toler
# + added backward compatibility patch from Timour Ezeev
#
# v1.7 Ingo Lantschner - ingo AT boxbe DOT com
# + adapted for systems with no swap (avoiding divison through 0)
#
# v1.6 Cedric Temple - cedric DOT temple AT cedrictemple DOT info
# + add swap monitoring
#       + if warning and critical threshold are 0, exit with OK
#       + add a directive to exclude/include buffers
#
# v1.5 Rouven Homann - rouven.homann@cimt.de
# + perfomance tweak with free -mt (just one sub process started instead of 7)
# + more code cleanup
#
# v1.4 Garrett Honeycutt - gh@3gupload.com
# + Fixed PerfData output to adhere to standards and show crit/warn values
#
# v1.3 Rouven Homann - rouven.homann@cimt.de
#   + Memory installed, used and free displayed in verbose mode
# + Bit Code Cleanup
#
# v1.2 Rouven Homann - rouven.homann@cimt.de
# + Bug fixed where verbose output was required (nrpe2)
#       + Bug fixed where perfomance data was not displayed at verbose output
# + FindBin Module used for the nagios plugin path of the utils.pm
#
# v1.1 Rouven Homann - rouven.homann@cimt.de
#     + Status Support (-c, -w)
# + Syntax Help Informations (-h)
#       + Version Informations Output (-V)
# + Verbose Output (-v)
#       + Better Error Code Output (as described in plugin guideline)
#
# v1.0 Garrett Honeycutt - gh@3gupload.com
#   + Initial Release
#
use strict;
use FindBin;
FindBin::again();
use lib $FindBin::Bin;
use utils qw($TIMEOUT %ERRORS &print_revision &support);
use vars qw($PROGNAME $PROGVER);
use Getopt::Long;
use vars qw($opt_V $opt_h $verbose $opt_w $opt_c);

$PROGNAME = "check_mem";
$PROGVER = "1.8";

# add a directive to exclude buffers:
my $DONT_INCLUDE_BUFFERS = 0;

sub print_help ();
sub print_usage ();

Getopt::Long::Configure('bundling');
GetOptions ("V"   => $opt_V, "version"    => $opt_V,
  "h"   => $opt_h, "help"       => $opt_h,
        "v" => $verbose, "verbose"  => $verbose,
  "w=s" => $opt_w, "warning=s"  => $opt_w,
  "c=s" => $opt_c, "critical=s" => $opt_c);

if ($opt_V) {
  print_revision($PROGNAME,'$Revision: '.$PROGVER.' $');
  exit $ERRORS{'UNKNOWN'};
}

if ($opt_h) {
  print_help();
  exit $ERRORS{'UNKNOWN'};
}

print_usage() unless (($opt_c) && ($opt_w));

my ($mem_critical, $swap_critical);
my ($mem_warning, $swap_warning);
($mem_critical, $swap_critical) = ($1,$2) if ($opt_c =~ /([0-9]+)[%]?(?:,([0-9]+)[%]?)?/);
($mem_warning, $swap_warning)   = ($1,$2) if ($opt_w =~ /([0-9]+)[%]?(?:,([0-9]+)[%]?)?/);

# Check if swap params were supplied
$swap_critical ||= 100;
$swap_warning  ||= 100;

# print threshold in output message
my $mem_threshold_output = " (";
my $swap_threshold_output = " (";

if ( $mem_warning > 0 && $mem_critical > 0) {
  $mem_threshold_output .= "W> $mem_warning, C> $mem_critical";
}
elsif ( $mem_warning > 0 ) {
  $mem_threshold_output .= "W> $mem_warning";
}
elsif ( $mem_critical > 0 ) {
  $mem_threshold_output .= "C> $mem_critical";
}

if ( $swap_warning > 0 && $swap_critical > 0) {
  $swap_threshold_output .= "W> $swap_warning, C> $swap_critical";
}
elsif ( $swap_warning > 0 ) {
  $swap_threshold_output .= "W> $swap_warning";
}
elsif ( $swap_critical > 0 )  {
  $swap_threshold_output .= "C> $swap_critical";
}

$mem_threshold_output .= ")";
$swap_threshold_output .= ")";

my $verbose = $verbose;

my ($mem_percent, $mem_total, $mem_used, $swap_percent, $swap_total, $swap_used) = &sys_stats();
my $free_mem = $mem_total - $mem_used;
my $free_swap = $swap_total - $swap_used;

# set output message
my $output = "Memory Usage".$mem_threshold_output.": ". $mem_percent.'% <br>';
$output .= "Swap Usage".$swap_threshold_output.": ". $swap_percent.'%';

# set verbose output message
my $verbose_output = "Memory Usage:".$mem_threshold_output.": ". $mem_percent.'% '."- Total: $mem_total MB, used: $mem_used MB, free: $free_mem MB<br>";
$verbose_output .= "Swap Usage:".$swap_threshold_output.": ". $swap_percent.'% '."- Total: $swap_total MB, used: $swap_used MB, free: $free_swap MB<br>";

# set perfdata message
my $perfdata_output = "MemUsed=$mem_percent\%;$mem_warning;$mem_critical";
$perfdata_output .= " SwapUsed=$swap_percent\%;$swap_warning;$swap_critical";


# if threshold are 0, exit with OK
if ( $mem_warning == 0 ) { $mem_warning = 101 };
if ( $swap_warning == 0 ) { $swap_warning = 101 };
if ( $mem_critical == 0 ) { $mem_critical = 101 };
if ( $swap_critical == 0 ) { $swap_critical = 101 };


if ($mem_percent>$mem_critical || $swap_percent>$swap_critical) {
    if ($verbose) { print "<b>CRITICAL: ".$verbose_output."</b>|".$perfdata_output."
";}
    else { print "<b>CRITICAL: ".$output."</b>|".$perfdata_output."
";}
    exit $ERRORS{'CRITICAL'};
} elsif ($mem_percent>$mem_warning || $swap_percent>$swap_warning) {
    if ($verbose) { print "<b>WARNING: ".$verbose_output."</b>|".$perfdata_output."
";}
    else { print "<b>WARNING: ".$output."</b>|".$perfdata_output."
";}
    exit $ERRORS{'WARNING'};
} else {
    if ($verbose) { print "OK: ".$verbose_output."|".$perfdata_output."
";}
    else { print "OK: ".$output."|".$perfdata_output."
";}
    exit $ERRORS{'OK'};
}

sub sys_stats {
    my @memory = split(" ", `free -mt`);
    my $mem_total = $memory[7];
    my $mem_used;
    if ( $DONT_INCLUDE_BUFFERS) { $mem_used = $memory[15]; }
    else { $mem_used = $memory[8];}
    my $swap_total = $memory[18];
    my $swap_used = $memory[19];
    my $mem_percent = ($mem_used / $mem_total) * 100;
    my $swap_percent;
    if ($swap_total == 0) {
  $swap_percent = 0;
    } else {
  $swap_percent = ($swap_used / $swap_total) * 100;
    }
    return (sprintf("%.0f",$mem_percent),$mem_total,$mem_used, sprintf("%.0f",$swap_percent),$swap_total,$swap_used);
}

sub print_usage () {
    print "Usage: $PROGNAME -w <warn> -c <crit> [-v] [-h]
";
    exit $ERRORS{'UNKNOWN'} unless ($opt_h);
}

sub print_help () {
    print_revision($PROGNAME,'$Revision: '.$PROGVER.' $');
    print "Copyright (c) 2005 Garrett Honeycutt/Rouven Homann/Cedric Temple
";
    print "
";
    print_usage();
    print "
";
    print "-w <MemoryWarn>,<SwapWarn> = Memory and Swap usage to activate a warning message (eg: -w 90,25 ) .
";
    print "-c <MemoryCrit>,<SwapCrit> = Memory and Swap usage to activate a critical message (eg: -c 95,50 ).
";
    print "-v = Verbose Output.
";
    print "-h = This screen.

";
    support();
}

作者:君惜丶
链接:https://www.jianshu.com/p/3476d98a4703
來源:简书
著作权归作者所有。商业转载请联系作者获得授权,非商业转载请注明出处。
给脚本增加执行权限
[root@nagios-client etc]# chmod 755 /usr/local/nagios/libexec/check_mem.pl
重启nrpe服务
# 方法一[root@nagios-client etc]# killall nrpe [root@nagios-client etc]# /usr/local/nagios/bin/nrpe -d -c /usr/local/nagios/etc/nrpe.cfg # 方法二 [root@nagios-client etc]# kill -HUP `ps -ef|grep nrpe|awk 'NR==1{print $2}'`
在本机执行两个命令看下效果
[root@nagios-client etc]#  /usr/local/nagios/libexec/check_nrpe -H localhost -c check_mem
OK: Memory Usage (W> 90, C> 95): 14% <br>Swap Usage (W> 100, C> 100): 5%|MemUsed=14%;90;95 SwapUsed=5%;100;100
服务端配置
nrpe连接客户端机器测试是否可以连通,然后执行一个监控命令(如果不通的话可能是因为selinux和防火墙没关闭而造成的)
[root@nagios-server software]# /usr/local/nagios/libexec/check_nrpe -H 10.0.0.111
NRPE v3.1.0-rc1
[root@nagios-server software]# /usr/local/nagios/libexec/check_nrpe -H 10.0.0.111 -c check_disk
DISK OK - free space: / 13414 MB (74.02% inode=99%);| /=4706MB;14496;16308;0;18121
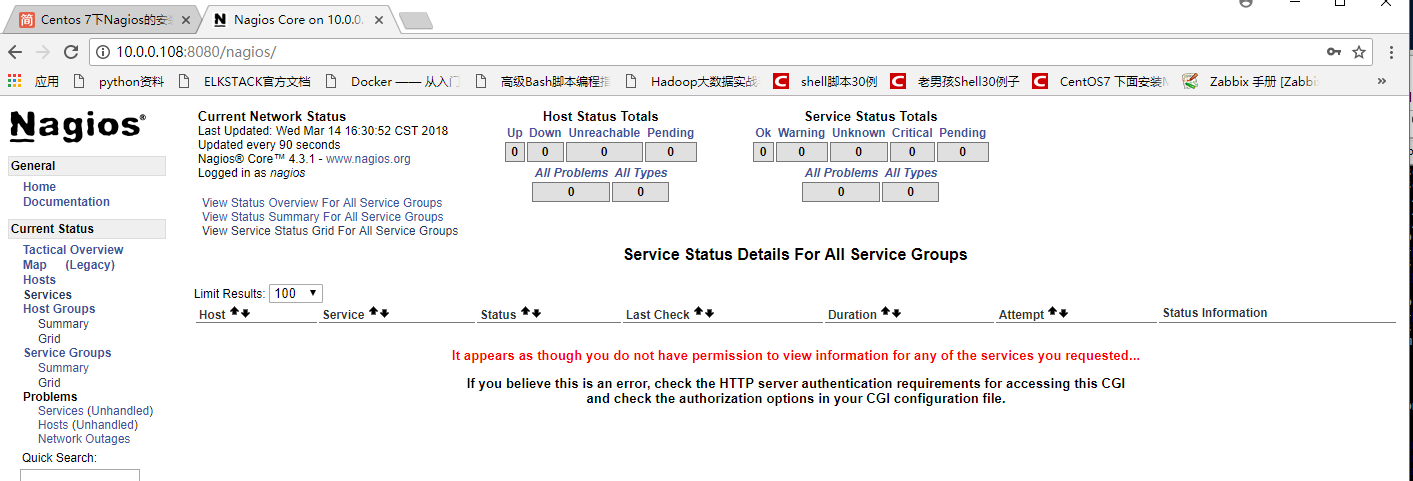
因为nagios默认把全部的权限给nagiosadmin,所以可以通过修改cgi.cfg文件赋予nagios权限,切换到/usr/local/nagios/etc目录下
[root@nagios-server software]# cd /usr/local/nagios/etc/
[root@nagios-server etc]# ls
cgi.cfg  htpasswd.users  nagios.cfg  nrpe.cfg  objects  resource.cfg
[root@nagios-server etc]# grep nagiosadmin cgi.cfg
authorized_for_system_information=nagiosadmin
authorized_for_configuration_information=nagiosadmin
authorized_for_system_commands=nagiosadmin
authorized_for_all_services=nagiosadmin
authorized_for_all_hosts=nagiosadmin
authorized_for_all_service_commands=nagiosadmin
authorized_for_all_host_commands=nagiosadmin
[root@nagios-server etc]# sed -i 's#nagiosadmin#nagiosadmin,nagios#g' cgi.cfg
[root@nagios-server etc]# grep nagiosadmin cgi.cfg
authorized_for_system_information=nagiosadmin,nagios
authorized_for_configuration_information=nagiosadmin,nagios
authorized_for_system_commands=nagiosadmin,nagios
authorized_for_all_services=nagiosadmin,nagios
authorized_for_all_hosts=nagiosadmin,nagios
authorized_for_all_service_commands=nagiosadmin,nagios
authorized_for_all_host_commands=nagiosadmin,nagios
修改nagios.cfg(自定义一些配置)
[root@nagios-server etc]# vi nagios.cfg +35
#注释掉这行
#cfg_file=/usr/local/nagios/etc/objects/localhost.cfg
#添加下面两行内容
cfg_file=/usr/local/nagios/etc/objects/services.cfg
cfg_file=/usr/local/nagios/etc/objects/hosts.cfg
创建hosts.cfg和services.cfg这两个文件
[root@nagios-server objects]# pwd
/usr/local/nagios/etc/objects
[root@nagios-server objects]# touch services.cfg
[root@nagios-server objects]# head -51 localhost.cfg > hosts.cfg
[root@nagios-server objects]# chown -R nagios.nagios *
修改nagios检查语法脚本
[root@nagios objects]# vim /etc/init.d/nagios +181
#check_config
$NagiosBin -v $NagiosCfgFile;
vi commands.cfg 进入后按shift+g切到结尾加入下面内容。
# 'check_nrpe' command definition
define command{
        command_name    check_nrpe
        command_line    $USER1$/check_nrpe -H $HOSTADDRESS$ -c $ARG1$
        }

# 'check_ping' command definition
define command{
        command_name    check-ping
        command_line    $USER1$/check_ping -H $HOSTADDRESS$ -w 100.0,20% -c 200.0,50% -p 3 -t 2
        }

# 'check_http' command definition
define command{
        command_name    check-weburl
        command_line    $USER1$/check_http -H $HOSTADDRESS$ $ARG1$ -w 5 -c 10
        }

# 'check_tcp' command definition
define command{
        command_name    check-tcp
        command_line    $USER1$/check_tcp -H $HOSTADDRESS$ -p $ARG1$ -w 0.02 -c 0.1
        }
查看有哪些cfg文件
[root@nagios-server objects]# ll
total 56
-rw-rw-r-- 1 nagios nagios  8407 Mar 14 18:55 commands.cfg
-rw-rw-r-- 1 nagios nagios  2138 Mar 14 16:05 contacts.cfg
-rw-r--r-- 1 nagios nagios  1843 Mar 14 18:51 hosts.cfg
-rw-rw-r-- 1 nagios nagios  5379 Mar 14 16:05 localhost.cfg
-rw-rw-r-- 1 nagios nagios  3070 Mar 14 16:05 printer.cfg
-rw-r--r-- 1 nagios nagios     0 Mar 14 18:50 services.cfg
-rw-rw-r-- 1 nagios nagios  3252 Mar 14 16:05 switch.cfg
-rw-rw-r-- 1 nagios nagios 10595 Mar 14 16:05 templates.cfg
-rw-rw-r-- 1 nagios nagios  3180 Mar 14 16:05 timeperiods.cfg
-rw-rw-r-- 1 nagios nagios  3991 Mar 14 16:05 windows.cfg
常用对象介绍
- 联系人
contact
出了问题像谁报告?一般当然是系统管理员了
- 监控时间段
timeperiod
7X24小时不间断还是周一至周五,或是自定义的其他时间段
- 被监控主机
host
所需要监控的服务器,当然可以是监控机自己
- 监控命令
command
nagios发出的哪个指令来执行某个监控,这也是自己定义的
- 被监控的服务
service
例如主机是否存活,80端口是否开,磁盘使用情况或者自定义的服务等
contacts.cfg文件介绍
- service_notification_period 24x7
服务出了状况通知的时间段,这个时间段就是上面在timeperiods.cfg中定义的.
- host_notification_period 24x7
主机出了状况通知的时间段, 这个时间段就是上面在timeperiods.cfg中定义的
- service_notification_options w,u,c,r
当服务出现w—报警(warning),u—未知(unkown),c—严重(critical),或者r—从异常情况恢复正常,在这四种情况下通知联系人.
- host_notification_options d,u,r
当主机出现d—当机(down),u—返回不可达(unreachable),r—从异常情况恢复正常,在这3种情况下通知联系人
- service_notification_commands notify- service -by-email
服务出问题通知采用的命令notify-by-email,这个命令是在commands.cfg中定义的,作用是给联系人发邮件.至于commands.cfg之后将专门介绍
- host_notification_commands host-notify-by-email notify- host--by-email
同上,主机出问题时采用的也是发邮件的方式通知联系人
- email 123456@qq.com
很明显,联系的人email地址
- pager 1338757xxxx
联系人的手机,如果支持短信的通知的话,这个就很有用了.
- alias是联系人别名,address是地址 .
contactgroups.cfg文件介绍
- define contactgroup{
contactgroup_name 组名 //联系人组的名称
alias 别名 //别名
members 用户名 //组的成员,来自于上面定义的contacts.cfg,如果有多个联系人则以逗号相隔
}
主机模板介绍(hosts.cfg)
> ```# host
define host{
       host_name                       主机名  //被监控主机的名称,最好别带空格nagios-server
       alias                           别名
       address                         IP  //被监控主机的IP地址
       check_command                   check-host-alive  //监控的命令check-host-alive,这个命令来自commands.cfg,用来监控主机是否存活
       max_check_attempts              5  //检查失败后重试的次数
       check_period                    24x7  //检查的时间段24x7,同样来自于我们之前在    timeperiods.cfg中定义的
       contact_groups                  组名  //联系人组,上面在contactgroups.cfg中定义的组名
       notification_interval           10  //提醒的间隔,每隔10秒提醒一次
       notification_period             24x7  //提醒的周期, 24x7,同样来自于我们之前在timeperiods.cfg中定义的
       notification_options            d,u,r  //指定什么情况下提醒,具体含义见之前contacts.cfg部分的介绍
       }
主机组模板介绍(hosts.cfg)
- define hostgroup{
hostgroup_name 主机组名
alias 别名
members 主机名 //组的成员主机,多个主机以逗号相隔,必须是上面hosts.cfg中定义的
}
服务模板介绍(services.cfg)
> ```# service definition
define service{
       host_name               主机名  //被监控的主机,hosts.cfg中定义的
       service_description     check-host-alive  //这个监控项目的描述(也可以说是这个项目的名称),可以空格,我们这里定义的是监控这个主机是不是存活
       check_command           check-host-alive  //所用的命令,是commands.cfg中定义的
       max_check_attempts      5
       normal_check_interval   3
       retry_check_interval    2
       check_period            24x7  //监控的时间段,是timeperiods.cfg中定义的
       notification_interval   10
       notification_period     24x7  //通知的时间段, ,是timeperiods.cfg中定义的
       notification_options    w,u,c,r  //在监控的结果是wucr时通知联系人,具体含义看前文.
       contact_groups          组名  //联系人组,是contactgroups.cfg中定义的
       }
主机模板配置
[root@nagios-server objects]# vi hosts.cfg +21
删除下面11行内容
添加下面内容

# Define some hosts

###########10.0.0.108##################

define host {
        use                      linux-server
        host_name                nagios-server
        alias                    nagios-server
        address                  10.0.0.108
        check_command            check-host-alive
        max_check_attempts        3
        normal_check_interval     2
        retry_check_interval      2
        check_period              24x7
        notification_interval     300
        notification_period       24x7
        notification_options      d,u,r
        contact_groups            admins
        process_perf_data         1
}

###########10.0.0.111 ##################

define host {
        use                      linux-server
        host_name                nagios-client
        alias                    nagios-client
        address                  10.0.0.111
        check_command            check-host-alive
        max_check_attempts        3
        normal_check_interval     2
        retry_check_interval      2
        check_period              24x7
        notification_interval     300
        notification_period       24x7
        notification_options      d,u,r
        contact_groups            admins
        process_perf_data         1
}
把监控的主机添加到主机组里面
[root@nagios-server objects]# vi hosts.cfg +76
define hostgroup{
        hostgroup_name  linux-servers ; The name of the hostgroup
        alias           Linux Servers ; Long name of the group
        members         nagios,nagios-client     ; Comma separated list of hosts that belong to this group
        }
服务模板配置
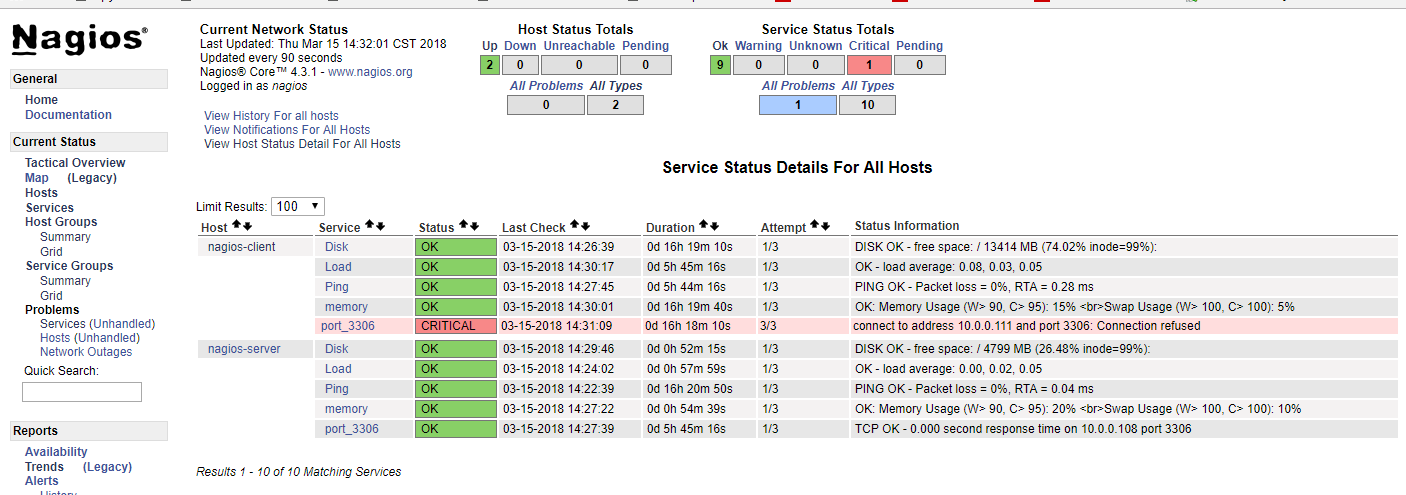
[root@nagios objects]# pwd
/usr/local/nagios/etc/objects
[root@nagios objects]# vi services.cfg
添加下面内容

###########10.0.0.108##################

define service{
        use                     generic-service
        host_name               nagios-server
        service_description     Load
        check_command           check_nrpe!check_load       #这里的check_nrpe不是服务端/usr/local/nagios/libexec/check_nrpe,而是command.cfg里定义的命令
        }

define service{
        use                     generic-service
        host_name               nagios-server
        service_description     Disk
        check_command           check_nrpe!check_disk
        }

define service{
        use                     generic-service
        host_name               nagios-server
        service_description     memory
        check_command           check_nrpe!check_mem
        }
define service{
        use                     generic-service
        host_name               nagios-server
        service_description     Ping
        check_command           check-ping!10.0.0.108
}

define service{
        use                     generic-service
        host_name               nagios-server
        service_description     port_3306
        check_command           check-tcp!3306
}

###########10.0.0.111##################

define service{
        use                     generic-service
        host_name               nagios-client
        service_description     Load
        check_command           check_nrpe!check_load
        }

define service{
        use                     generic-service
        host_name               nagios-client
        service_description     Disk
        check_command           check_nrpe!check_disk
        }

define service{
        use                     generic-service
        host_name               nagios-client
        service_description     memory
        check_command           check_nrpe!check_mem
        }
define service{
    use             generic-service
        host_name               nagios-client
        service_description     Ping
        check_command           check-ping!10.0.0.111
}
define service{
        use                     generic-service
        host_name               nagios-client
        service_description     port_3306
        check_command           check-tcp!3306
}
重启nagios服务
[root@nagios-sever objects]# /etc/init.d/nagios restart