2017-2018-1 201553334 实验四 外设驱动程序设计
实验目的:
- 学习资源中全课中的“hqyj.嵌入式Linux应用程序开发标准教程.pdf”中的第十一章,提交康奈尔笔记的照片。
- 在Ubuntu完成资源中全课中的“hqyj.嵌入式Linux应用程序开发标准教程.pdf”中的第十一章的test试验。提交编译,加载模块,卸载模块,测试运行的截图
实验过程
1.康奈尔笔记的照片:

2. test测试实验:
该实验要求实现对虚拟设备(一段内存)的打开、关闭、读写的操作,并要通过编写测试程序来测试虚拟设备及其驱动运行是否正常。
源代码:
驱动程序的源代码 test_drv.c :
/* test_drv.c */
#include <linux/module.h>
#include <linux/init.h>
#include <linux/fs.h>
#include <linux/kernel.h>
#include <linux/slab.h>
#include <linux/types.h>
#include <linux/errno.h>
#include <linux/cdev.h>
#include <asm/uaccess.h>
#define     TEST_DEVICE_NAME    "test_dev"
#define        BUFF_SZ                1024

/*全局变量*/
static struct cdev test_dev;
unsigned int major =0;
static char *data = NULL;

/*读函数*/
static ssize_t test_read(struct file *file, char *buf, size_t count, loff_t *f_pos)
{
    int len;
    if (count < 0 )
    {
        return -EINVAL;
    }
    len = strlen(data);
    count = (len > count)?count:len;
    if (copy_to_user(buf, data, count)) /* 将内核缓冲的数据拷贝到用户空间*/
    {
        return -EFAULT;
    }
    return count;
}
/*写函数*/
static ssize_t test_write(struct file *file, const char *buffer,size_t count, loff_t *f_pos)
{

    if(count < 0)
    {
        return -EINVAL;
    }
    memset(data, 0, BUFF_SZ);
        count = (BUFF_SZ > count)?count:BUFF_SZ;
    if (copy_from_user(data, buffer, count)) /* 将用户缓冲的数据复制到内核空间*/
    {
        return -EFAULT;
    }
    return count;
}

/*打开函数*/
static int test_open(struct inode *inode, struct file *file)
{
    printk("This is open operation
");
    /* 分配并初始化缓冲区*/
    data = (char*)kmalloc(sizeof(char) * BUFF_SZ, GFP_KERNEL);
    if (!data)
    {
        return -ENOMEM;
    }
    memset(data, 0, BUFF_SZ);
    return 0;
}

/*关闭函数*/
static int test_release(struct inode *inode,struct file *file)
{
    printk("This is release operation
");
    if (data)
    {
        kfree(data); /* 释放缓冲区*/
        data = NULL; /* 防止出现野指针 */
    }
    return 0;
}
/* 创建、初始化字符设备,并且注册到系统*/
static void test_setup_cdev(struct cdev *dev, int minor, struct file_operations *fops)
{
    int err, devno = MKDEV(major, minor);
    cdev_init(dev, fops);
    dev->owner = THIS_MODULE;
    dev->ops = fops;
    err = cdev_add (dev, devno, 1);
    if (err)
    {
        printk (KERN_NOTICE "Error %d adding test %d", err, minor);
    }
}

/* 虚拟设备的file_operations结构 */
static struct file_operations test_fops =
{
    .owner   = THIS_MODULE,
    .read    = test_read,
    .write   = test_write,
    .open    = test_open,
    .release = test_release,
};

/*模块注册入口*/
int init_module(void)
{
    int result;
    dev_t dev = MKDEV(major, 0);
    if (major)
    {/* 静态注册一个设备,设备号先前指定好,并设定设备名,用cat /proc/devices来查看 */
        result = register_chrdev_region(dev, 1, TEST_DEVICE_NAME);
    }
    else
    {
        result = alloc_chrdev_region(&dev, 0, 1, TEST_DEVICE_NAME);
    }
    if (result < 0)
    {
        printk(KERN_WARNING "Test device: unable to get major %d
", major);
        return result;
    }
    test_setup_cdev(&test_dev, 0, &test_fops);
    printk("The major of the test device is %d
", major);
    return 0;
}

/*卸载模块*/
void cleanup_module(void)
{
    cdev_del(&test_dev);
    unregister_chrdev_region(MKDEV(major, 0), 1);
    printk("Test device uninstalled
");
}
虚拟设备的驱动程序的 Makefile :
ifeq ($(KERNELRELEASE),)
KERNELDIR ?= /lib/modules/$(shell uname -r)/build /*内核代码编译路径*/
PWD := $(shell pwd)
modules:
	$(MAKE) -C $(KERNELDIR) M=$(PWD) modules
modules_install:
	$(MAKE) -C $(KERNELDIR) M=$(PWD) modules_install
clean:
	rm -rf *.o *~ core .depend .*.cmd *.ko *.mod.c .tmp_versions
.PHONY: modules modules_install clean
else
     obj-m := test_drv.o    /* 将生成的模块为test_drv.ko*/
endif
加载和卸载模块:
通过下面两个脚本代码分别实现驱动模块的加载和卸载。
加载脚本 test_drv_load 如下所示:
#!/bin/sh
# 驱动模块名称
module="test_drv"
# 设备名称。在/proc/devices中出现
device="test_dev"
# 设备文件的属性
mode="664"
group="david"

# 删除已存在的设备节点
rm -f /dev/${device}
# 加载驱动模块
/sbin/insmod -f ./$module.ko $* || exit 1
# 查到创建设备的主设备号
major=`cat /proc/devices | awk "\$2=="$device" {print \$1}"`
# 创建设备文件节点
mknod /dev/${device} c $major 0
# 设置设备文件属性
chgrp $group /dev/${device}
chmod $mode  /dev/${device}
卸载脚本 test_drv_unload 如下所示:
#!/bin/sh
module="test_drv"
device="test_dev"
# 卸载驱动模块
/sbin/rmmod $module $* || exit 1
# 删除设备文件
rm -f /dev/${device}
exit 0
编写测试代码:也就是用户空间的程序,该程序调用设备驱动来测试驱动的运行是否正常。测试代码如下所示:
test.c
/* test.c */
#include <stdio.h>
#include <stdlib.h>
#include <string.h>
#include <sys/stat.h>
#include <sys/types.h>
#include <unistd.h>
#include <fcntl.h>
#define TEST_DEVICE_FILENAME "/dev/test_dev" /* 设备文件名*/
#define BUFF_SZ 1024 /* 缓冲大小 */
int main()
{
int fd, nwrite, nread;
char buff[BUFF_SZ]; /*缓冲区*/
/* 打开设备文件 */
fd = open(TEST_DEVICE_FILENAME, O_RDWR);
if (fd < 0)
{
perror("open");
exit(1);
}
do
{
printf("Input some words to kernel(enter 'quit' to exit):");
memset(buff, 0, BUFF_SZ);
if (fgets(buff, BUFF_SZ, stdin) == NULL)
{
perror("fgets");
break;
}
buff[strlen(buff) - 1] = '�';
if (write(fd, buff, strlen(buff)) < 0) /* 向设备写入数据 */
{
perror("write");
break;
}
if (read(fd, buff, BUFF_SZ) < 0) /* 从设备读取数据 */
{
perror("read");
break;
}
else
{
printf("The read string is from kernel:%s
", buff);
}
} while(strncmp(buff, "quit", 4));
close(fd);
exit(0);
}
操作:
首先在虚拟设备驱动源码目录下编译并加载驱动模块。
$ make clean;make
$ ./test_drv_load
接下来,编译并运行测试程序
$ gcc –o test test.c
$ ./test
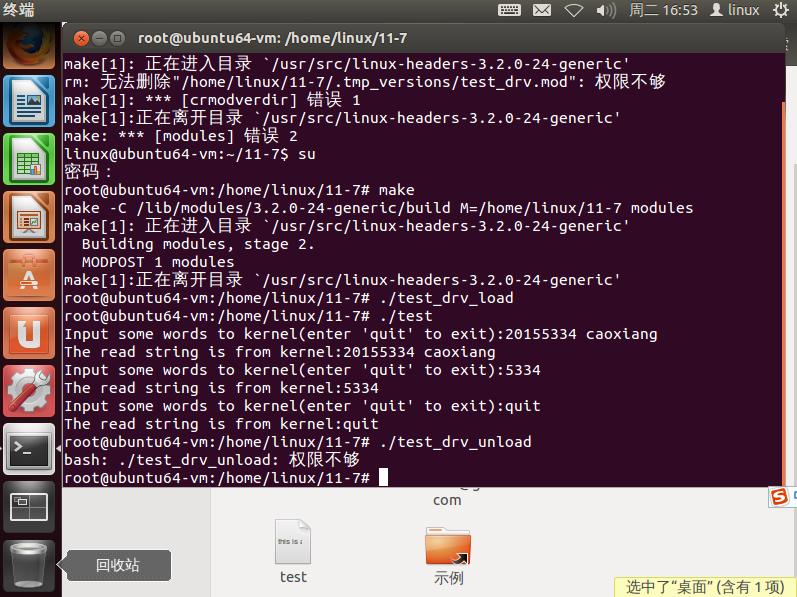
测试程序运行效果如下:
Input some words to kernel(enter 'quit' to exit):Hello, everybody!
The read string is from kernel:Hello, everybody! /* 从内核读取的数据 */
Input some words to kernel(enter 'quit' to exit):This is a simple driver
The read string is from kernel: This is a simple driver
Input some words to kernel(enter 'quit' to exit):quit
The read string is from kernel:quit
最后,卸载驱动程序
$ ./test_drv_unload
运行截图:
收获:
主要了解了嵌入式Linux设备驱动程序的开发。明白了设备驱动程序的概念及Linux对设备驱动的处理、字符设备驱动程序的编写、字符设备驱动程序的编写流程、重要的数据结构、设备驱动程序的主要组成以及proc文件系统。通过该实验,了解到编写驱动程序的完整流程。
| 代码行数(新增/累积) | 博客量(新增/累积) | 学习时间(新增/累积) | 重要成长 | |
|---|---|---|---|---|
| 目标 | 5000行 | 30篇 | 400小时 | |
| 第一周 | 75/75 | 1/1 | 5/0 | |
| 第二周 | 135/210 | 1/2 | 4/9 | |
| 第三周 | 234/444 | 1/3 | 6/15 | |
| 第四周 | 486/930 | 1/4 | 8/23 | |
| 第五周 | 753/1683 | 3/7 | 43/66 | |
| 第六周 | 503/2186 | 2/9 | 54/120 | |
| 第七周 | 823/3006 | 2/11 | 43/163 | |
| 第八周 | 756/3762 | 1/12 | 52/215 | |
| 第九周 | 1120/4882 | 3/15 | 63/278 | |
| 第十周 | 420/5302 | 0/15 | 32/310 | |
| 第十一周 | 531/5833 | 2/17 | 46/356 |
尝试一下记录「计划学习时间」和「实际学习时间」,到期末看看能不能改进自己的计划能力。这个工作学习中很重要,也很有用。
耗时估计的公式
:Y=X+X/N ,Y=X-X/N,训练次数多了,X、Y就接近了。
-
计划学习时间:XX小时
-
实际学习时间:XX小时
-
改进情况:
(有空多看看现代软件工程 课件
软件工程师能力自我评价表)