1、RC(Replication Controller)副本控制器,Replication Controller的作用。
应用托管在kubernetes之后,kubernetes需要保证应用能够持续运行,这是RC的工作内容,它会确保任何时间kubernetes中都有指定数量的Pod在运行。在此基础上,RC还提供了一些更高级的特性,比如滚动升级,升级回滚等等。
通俗的理解就是,当将应用通过K8s运行起来之后,我们的k8s是需要保证容器一直处于持续运行,保证它的高可用,那么我们的RC就可以确保容器的高可用,RC的工作原理就是,RC是会一直监控我们的K8S容器,也就是说POD资源它的运行状态,一旦发现这个Pod资源有异常了,那么我们的RC就会控制k8s在其他的Node节点上启动一个新的Pod,以此来保证这个业务的高可用运行。RC除了保证Pod高可用之外,还提供了更高级的特性,比如滚动升级,升级回滚等等。
2、首先,查看你的k8s各个节点状态是否正常运行,然后创建一个rc的目录,用于存放RC(Replication Controller)的yaml配置文件。
 1 [root@k8s-master ~]# kubectl get nods
 2 the server doesn't have a resource type "nods"
 3 [root@k8s-master ~]# kubectl get node
 4 NAME         STATUS    AGE
 5 k8s-master   Ready     6d
 6 k8s-node2    Ready     6d
 7 k8s-node3    Ready     6d
 8 [root@k8s-master ~]# kubectl get nodes
 9 NAME         STATUS    AGE
10 k8s-master   Ready     6d
11 k8s-node2    Ready     6d
12 k8s-node3    Ready     6d
13 [root@k8s-master ~]# clear
14 [root@k8s-master ~]# kubectl get componentstatus
15 NAME                 STATUS    MESSAGE             ERROR
16 scheduler            Healthy   ok
17 controller-manager   Healthy   ok
18 etcd-0               Healthy   {"health":"true"}
19 [root@k8s-master ~]# clear
20 [root@k8s-master ~]# cd k8s/
21 [root@k8s-master k8s]# ls
22 pod
23 [root@k8s-master k8s]# mkdir rc
24 [root@k8s-master k8s]# cd rc/
25 [root@k8s-master rc]# ls
26 [root@k8s-master rc]# vim nginx_rc_yaml
27 [root@k8s-master rc]# kubectl create -f nginx_rc_yaml
28 replicationcontroller "myweb" created
29 [root@k8s-master rc]# kubectl get rc
30 NAME      DESIRED   CURRENT   READY     AGE
31 myweb     2         2         1         13s
32 [root@k8s-master rc]#
创建nginx_rc_yaml配置文件,配置内容,如下所示。
 1 # 声明api的版本。
 2 apiVersion: v1
 3 # kind代表资源的类型,资源是ReplicationController。
 4 kind: ReplicationController
 5 # 资源叫什么名字,是在其属性metadata里面的。
 6 metadata:
 7   # 第一个属性name的值是myweb,即ReplicationController的名字就叫做myweb。
 8   name: myweb
 9 # spec是详细,详细里面定义了一个容器。
10 spec:
11   # 声明副本数量是2,代表了RC会启动两个相同的Pod。
12   replicas: 2
13   # 选择器。
14   selector:
15     app: myweb
16   # Pod的启动模板,和Pod的yaml配置信息基本差不多的,几乎一样,但是这里没有名称,是因为两个Pod名称不能完全一样的。
17   # 没有指定名称,RC会随机生成一个名称。
18   template:
19     # 资源叫什么名字,是在其属性metadata里面的。但是这里让RC随机生成指定数量的名称。
20     metadata:
21       # 给Pod贴上了一个标签,标签是app: web,标签是有一定的作用的。
22       labels:
23         app: myweb
24     # spec是详细,详细里面定义了一个容器。
25     spec:
26       # 定义一个容器,可以声明多个容器的。
27       containers:
28         # 容器的名称叫做myweb
29         - name: myweb
30         # 使用了什么镜像,可以使用官方公有的,也可以使用私有的。
31           image: 192.168.110.133:5000/nginx:1.13
32         # ports定义容器的端口。
33           ports:
34         # 容器的端口是80,如果容器有多个端口,可以在后面接着写一行即可。
35             - containerPort: 80
配置,如下所示:
如果如何控制yaml的格式,可以使用notepad++的yaml语言格式,或者在线yaml解析,或者idea的yaml配置文件,idea的yaml配置文件也推荐使用哦。

创建好RC(Replication Controller)之后,可以进行检查。可以看到RC创建了两个Pod,可以查看一下Pod的数量和状态。
 1 [root@k8s-master rc]# kubectl get rc
 2 NAME      DESIRED   CURRENT   READY     AGE
 3 myweb     2         2         1         7m
 4 [root@k8s-master rc]# kubectl get pods
 5 NAME          READY     STATUS             RESTARTS   AGE
 6 myweb-0hqc5   0/1       ImagePullBackOff   0          8m
 7 myweb-2np4k   1/1       Running            0          8m
 8 nginx         1/1       Running            1          3d
 9 test1         0/1       ImagePullBackOff   0          2d
10 test2         2/2       Running            1          2d
11 test4         1/1       Running            0          2d
12 [root@k8s-master rc]#
很明显,我这里创建的两个Pod,有一个启动失败了。此时,我想将失败的Pod删除掉,但是我删除了一个,RC又帮助你启动了一个,嗯,真的是高可用啊,然后我将RC删除掉,这两个Pod就随着被删除掉了。
 1 [root@k8s-master ~]# kubectl get rc
 2 NAME      DESIRED   CURRENT   READY     AGE
 3 myweb     2         2         1         17m
 4 [root@k8s-master ~]# kubectl get pod -o wide
 5 NAME          READY     STATUS             RESTARTS   AGE       IP            NODE
 6 myweb-8cp7h   0/1       ImagePullBackOff   0          5m        172.16.85.3   k8s-master
 7 myweb-qcgjl   1/1       Running            1          14m       172.16.5.2    k8s-node2
 8 nginx         1/1       Running            2          3d        172.16.38.3   k8s-node3
 9 test1         0/1       ImagePullBackOff   0          2d        172.16.85.2   k8s-master
10 test2         2/2       Running            3          2d        172.16.38.2   k8s-node3
11 test4         1/1       Running            1          2d        172.16.5.3    k8s-node2
12 [root@k8s-master ~]# kubectl delete rc myweb
13 replicationcontroller "myweb" deleted
14 [root@k8s-master ~]# kubectl get rc
15 No resources found.
16 [root@k8s-master ~]#
这里我将没有用的测试Pod都删除掉,因为我笔记本只有8g内存,可能内存不够用了。搞了一个小时,不是内存的问题,是之前部署k8s的时候,测试nginx的时候将nginx拼错了,尴尬。
1 [root@k8s-node2 ~]# docker images
2 REPOSITORY                                TAG                 IMAGE ID            CREATED             SIZE
3 docker.io/busybox                         latest              1c35c4412082        8 days ago          1.22 MB
4 192.168.110.133:5000/nginx                1.13                ae513a47849c        2 years ago         109 MB
5 docker.io/nginx                           1.13                ae513a47849c        2 years ago         109 MB
6 192.168.110.133:5000/pod-infrastructure   latest              34d3450d733b        3 years ago         205 MB
7 docker.io/tianyebj/pod-infrastructure     latest              34d3450d733b        3 years ago         205 MB
8 [root@k8s-node2 ~]#
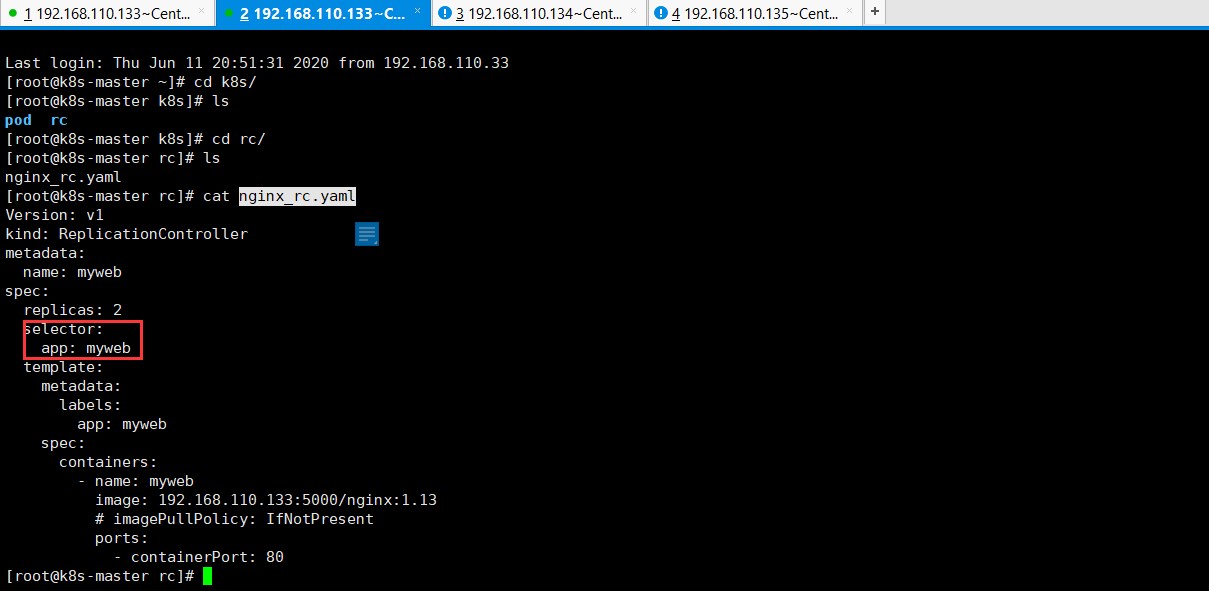
而我的RC的yaml的配置文件,如下所示:
 1 Version: v1
 2 kind: ReplicationController
 3 metadata:
 4   name: myweb
 5 spec:
 6   replicas: 2
 7   selector:
 8     app: myweb
 9   template:
10     metadata:
11       labels:
12         app: myweb
13     spec:
14       containers:
15         - name: myweb
16           image: 192.168.110.133:5000/nginx:1.13
17           # imagePullPolicy: IfNotPresent
18           ports:
19             - containerPort: 80
但是主节点的docker镜像是192.168.110.133:5000/ngnix,造成了每次创建RC,在主节点的Pod都无法启动,尴尬,还排查了这么久。真打脸。
1 [root@k8s-master ~]# docker images
2 REPOSITORY                                            TAG                 IMAGE ID            CREATED             SIZE
3 docker.io/busybox                                     latest              1c35c4412082        8 days ago          1.22 MB
4 docker.io/registry                                    latest              708bc6af7e5e        4 months ago        25.8 MB
5 192.168.110.133:5000/ngnix                            1.13                ae513a47849c        2 years ago         109 MB
6 registry.access.redhat.com/rhel7/pod-infrastructure   latest              99965fb98423        2 years ago         209 MB
7 192.168.110.133:5000/pod-infrastructure               latest              34d3450d733b        3 years ago         205 MB
8 [root@k8s-master ~]#
报错信息,也贴一下吧,方便自己以后使用,如下所示:
 1 [root@k8s-master ~]# kubectl describe pod myweb-qwgsf
 2 Name:        myweb-qwgsf
 3 Namespace:    default
 4 Node:        k8s-master/192.168.110.133
 5 Start Time:    Thu, 11 Jun 2020 17:21:45 +0800
 6 Labels:        app=myweb
 7 Status:        Pending
 8 IP:        172.16.85.2
 9 Controllers:    ReplicationController/myweb
10 Containers:
11   myweb:
12     Container ID:
13     Image:            192.168.110.133:5000/nginx:1.13
14     Image ID:
15     Port:            80/TCP
16     State:            Waiting
17       Reason:            ErrImagePull
18     Ready:            False
19     Restart Count:        0
20     Volume Mounts:        <none>
21     Environment Variables:    <none>
22 Conditions:
23   Type        Status
24   Initialized     True
25   Ready     False
26   PodScheduled     True
27 No volumes.
28 QoS Class:    BestEffort
29 Tolerations:    <none>
30 Events:
31   FirstSeen    LastSeen    Count    From            SubObjectPath        Type        Reason            Message
32   ---------    --------    -----    ----            -------------        --------    ------            -------
33   12m        12m        1    {kubelet k8s-master}                Warning        MissingClusterDNS    kubelet does not have ClusterDNS IP configured and cannot create Pod using "ClusterFirst" policy. Falling back to DNSDefault policy.
34   12m        12m        1    {default-scheduler }                Normal        Scheduled        Successfully assigned myweb-qwgsf to k8s-master
35   12m        6m        6    {kubelet k8s-master}    spec.containers{myweb}    Normal        Pulling            pulling image "192.168.110.133:5000/nginx:1.13"
36   12m        6m        6    {kubelet k8s-master}    spec.containers{myweb}    Warning        Failed            Failed to pull image "192.168.110.133:5000/nginx:1.13": Error while pulling image: Get http://192.168.110.133:5000/v1/repositories/nginx/images: dial tcp 192.168.110.133:5000: connect: connection refused
37   12m        6m        6    {kubelet k8s-master}                Warning        FailedSync        Error syncing pod, skipping: failed to "StartContainer" for "myweb" with ErrImagePull: "Error while pulling image: Get http://192.168.110.133:5000/v1/repositories/nginx/images: dial tcp 192.168.110.133:5000: connect: connection refused"
38
39   12m    4m    31    {kubelet k8s-master}    spec.containers{myweb}    Normal    BackOff        Back-off pulling image "192.168.110.133:5000/nginx:1.13"
40   12m    4m    31    {kubelet k8s-master}                Warning    FailedSync    Error syncing pod, skipping: failed to "StartContainer" for "myweb" with ImagePullBackOff: "Back-off pulling image "192.168.110.133:5000/nginx:1.13""
41
42   32s    32s    1    {kubelet k8s-master}                Warning    MissingClusterDNS    kubelet does not have ClusterDNS IP configured and cannot create Pod using "ClusterFirst" policy. Falling back to DNSDefault policy.
43   31s    20s    2    {kubelet k8s-master}    spec.containers{myweb}    Normal    Pulling            pulling image "192.168.110.133:5000/nginx:1.13"
44   31s    20s    2    {kubelet k8s-master}    spec.containers{myweb}    Warning    Failed            Failed to pull image "192.168.110.133:5000/nginx:1.13": Error while pulling image: Get http://192.168.110.133:5000/v1/repositories/nginx/images: dial tcp 192.168.110.133:5000: connect: connection refused
45   31s    20s    2    {kubelet k8s-master}                Warning    FailedSync        Error syncing pod, skipping: failed to "StartContainer" for "myweb" with ErrImagePull: "Error while pulling image: Get http://192.168.110.133:5000/v1/repositories/nginx/images: dial tcp 192.168.110.133:5000: connect: connection refused"
46
47   30s    8s    2    {kubelet k8s-master}    spec.containers{myweb}    Normal    BackOff        Back-off pulling image "192.168.110.133:5000/nginx:1.13"
48   30s    8s    2    {kubelet k8s-master}                Warning    FailedSync    Error syncing pod, skipping: failed to "StartContainer" for "myweb" with ImagePullBackOff: "Back-off pulling image "192.168.110.133:5000/nginx:1.13""
此处,将主节点的Docker镜像删除掉。
 1 [root@k8s-master ~]# docker images
 2 REPOSITORY                                            TAG                 IMAGE ID            CREATED             SIZE
 3 docker.io/busybox                                     latest              1c35c4412082        8 days ago          1.22 MB
 4 docker.io/registry                                    latest              708bc6af7e5e        4 months ago        25.8 MB
 5 192.168.110.133:5000/ngnix                            1.13                ae513a47849c        2 years ago         109 MB
 6 registry.access.redhat.com/rhel7/pod-infrastructure   latest              99965fb98423        2 years ago         209 MB
 7 192.168.110.133:5000/pod-infrastructure               latest              34d3450d733b        3 years ago         205 MB
 8 [root@k8s-master ~]# docker ps
 9 CONTAINER ID        IMAGE               COMMAND             CREATED             STATUS              PORTS               NAMES
10 [root@k8s-master ~]# docker ps -a
11 CONTAINER ID        IMAGE               COMMAND                  CREATED             STATUS                    PORTS               NAMES
12 a27987d97039        registry            "/entrypoint.sh /e..."   5 days ago          Exited (2) 3 days ago                         registry
13 ee95778bd5d9        busybox             "sh"                     6 days ago          Exited (127) 6 days ago                       friendly_payne
14 6d459781a3e5        busybox             "sh"                     6 days ago          Exited (137) 5 days ago                       gracious_nightingale
15 [root@k8s-master ~]# docker rmi -f ae513a47849c
16 Untagged: 192.168.110.133:5000/ngnix:1.13
17 Untagged: 192.168.110.133:5000/ngnix@sha256:e4f0474a75c510f40b37b6b7dc2516241ffa8bde5a442bde3d372c9519c84d90
18 Deleted: sha256:ae513a47849c895a155ddfb868d6ba247f60240ec8495482eca74c4a2c13a881
19 Deleted: sha256:160a8bd939a9421818f499ba4fbfaca3dd5c86ad7a6b97b6889149fd39bd91dd
20 Deleted: sha256:f246685cc80c2faa655ba1ec9f0a35d44e52b6f83863dc16f46c5bca149bfefc
21 Deleted: sha256:d626a8ad97a1f9c1f2c4db3814751ada64f60aed927764a3f994fcd88363b659
22 [root@k8s-master ~]# docker images
23 REPOSITORY                                            TAG                 IMAGE ID            CREATED             SIZE
24 docker.io/busybox                                     latest              1c35c4412082        8 days ago          1.22 MB
25 docker.io/registry                                    latest              708bc6af7e5e        4 months ago        25.8 MB
26 registry.access.redhat.com/rhel7/pod-infrastructure   latest              99965fb98423        2 years ago         209 MB
27 192.168.110.133:5000/pod-infrastructure               latest              34d3450d733b        3 years ago         205 MB
28 [root@k8s-master ~]# docker images
29 REPOSITORY                                            TAG                 IMAGE ID            CREATED             SIZE
30 docker.io/busybox                                     latest              1c35c4412082        8 days ago          1.22 MB
31 docker.io/registry                                    latest              708bc6af7e5e        4 months ago        25.8 MB
32 registry.access.redhat.com/rhel7/pod-infrastructure   latest              99965fb98423        2 years ago         209 MB
33 192.168.110.133:5000/pod-infrastructure               latest              34d3450d733b        3 years ago         205 MB
34 [root@k8s-master ~]#
此时,将三台节点重启了,或者重启服务,我这里直接重启了三台机器,其所有服务全部重启。
 1 [root@k8s-master ~]# free -h
 2               total        used        free      shared  buff/cache   available
 3 Mem:           2.2G        880M        453M         12M        953M        1.1G
 4 Swap:          2.0G          0B        2.0G
 5 [root@k8s-master ~]# kubectl get node
 6 NAME         STATUS    AGE
 7 k8s-master   Ready     6d
 8 k8s-node2    Ready     6d
 9 k8s-node3    Ready     6d
10 [root@k8s-master ~]# kubectl get componentstatus
11 NAME                 STATUS    MESSAGE             ERROR
12 scheduler            Healthy   ok
13 controller-manager   Healthy   ok
14 etcd-0               Healthy   {"health":"true"}
15 [root@k8s-master ~]# kubectl get rc
16 NAME      DESIRED   CURRENT   READY     AGE
17 myweb     2         2         2         16m
18 [root@k8s-master ~]# docker images
19 REPOSITORY                                            TAG                 IMAGE ID            CREATED             SIZE
20 docker.io/nginx                                       latest              2622e6cca7eb        41 hours ago        132 MB
21 docker.io/busybox                                     latest              1c35c4412082        8 days ago          1.22 MB
22 docker.io/registry                                    latest              708bc6af7e5e        4 months ago        25.8 MB
23 192.168.110.133:5000/nginx                            1.13                ae513a47849c        2 years ago         109 MB
24 docker.io/nginx                                       1.13                ae513a47849c        2 years ago         109 MB
25 registry.access.redhat.com/rhel7/pod-infrastructure   latest              99965fb98423        2 years ago         209 MB
26 192.168.110.133:5000/pod-infrastructure               latest              34d3450d733b        3 years ago         205 MB
27 [root@k8s-master ~]# kubectl get node -o wide
28 NAME         STATUS    AGE       EXTERNAL-IP
29 k8s-master   Ready     6d        <none>
30 k8s-node2    Ready     6d        <none>
31 k8s-node3    Ready     6d        <none>
32 [root@k8s-master ~]# kubectl get pod -o wide
33 NAME          READY     STATUS    RESTARTS   AGE       IP            NODE
34 myweb-2h8b1   1/1       Running   1          17m       172.16.85.2   k8s-master
35 myweb-lfkmp   1/1       Running   1          17m       172.16.5.2    k8s-node2
36 test4         1/1       Running   1          13m       172.16.38.2   k8s-node3
37 [root@k8s-master ~]#

RC(Replication Controller)会始终保持Pod的数量为2,可以自己删除一个Pod,k8s的RC(Replication Controller)会里面帮助你启动一个新的Pod,RC(Replication Controller)会时刻监控Pod的状态,少了就启动,多了就进行删除,数量和配置文件yaml的数量一致。
3、RC(Replication Controller)如何与Pod进行关联呢?
答:使用到的标签Label(标签选择器)。在nginx_rc.yaml配置文件中,定义了RC的选择器是通过标签app:myweb来选择的,每一个Pod在运行的时候会自动加上一个标签叫做app:myweb,这样的话,RC会自动根据标签来选择我们的Pod。
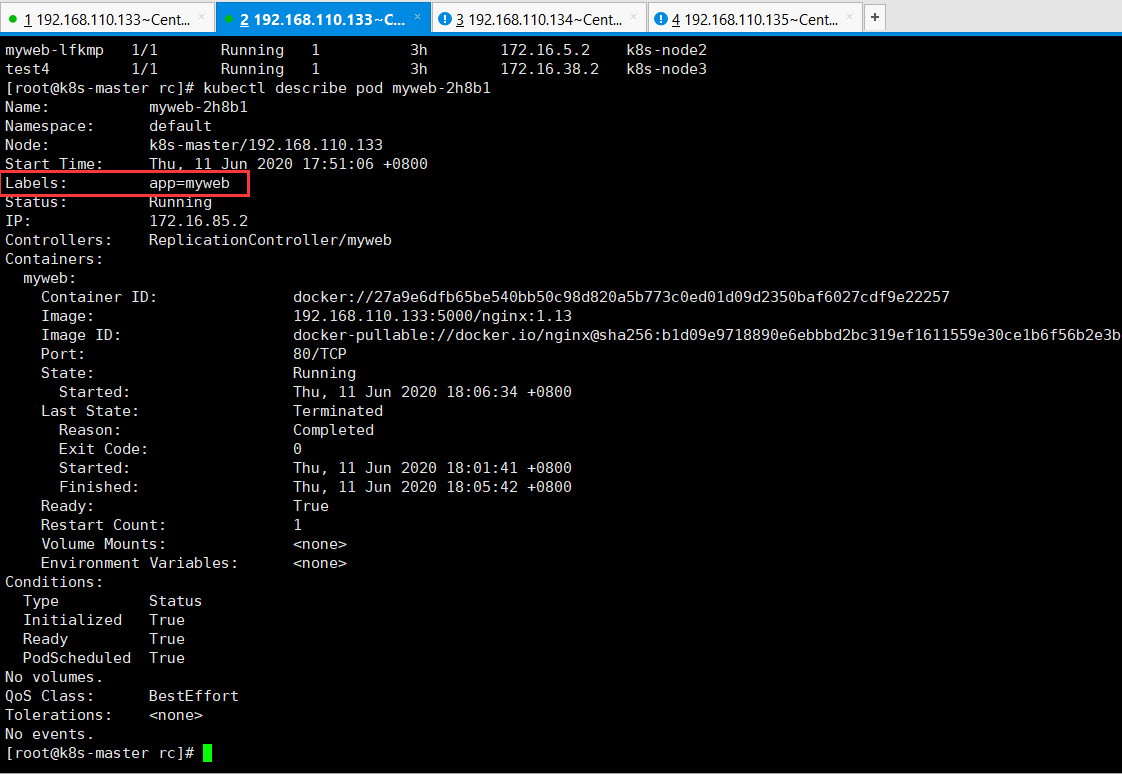
可以通过命令kubectl describe pod myweb-2h8b1来查看标签。
 1 [root@k8s-master rc]# kubectl describe pod myweb-2h8b1
 2 Name:        myweb-2h8b1
 3 Namespace:    default
 4 Node:        k8s-master/192.168.110.133
 5 Start Time:    Thu, 11 Jun 2020 17:51:06 +0800
 6 Labels:        app=myweb
 7 Status:        Running
 8 IP:        172.16.85.2
 9 Controllers:    ReplicationController/myweb
10 Containers:
11   myweb:
12     Container ID:        docker://27a9e6dfb65be540bb50c98d820a5b773c0ed01d09d2350baf6027cdf9e22257
13     Image:            192.168.110.133:5000/nginx:1.13
14     Image ID:            docker-pullable://docker.io/nginx@sha256:b1d09e9718890e6ebbbd2bc319ef1611559e30ce1b6f56b2e3b479d9da51dc35
15     Port:            80/TCP
16     State:            Running
17       Started:            Thu, 11 Jun 2020 18:06:34 +0800
18     Last State:            Terminated
19       Reason:            Completed
20       Exit Code:        0
21       Started:            Thu, 11 Jun 2020 18:01:41 +0800
22       Finished:            Thu, 11 Jun 2020 18:05:42 +0800
23     Ready:            True
24     Restart Count:        1
25     Volume Mounts:        <none>
26     Environment Variables:    <none>
27 Conditions:
28   Type        Status
29   Initialized     True
30   Ready     True
31   PodScheduled     True
32 No volumes.
33 QoS Class:    BestEffort
34 Tolerations:    <none>
35 No events.
36 [root@k8s-master rc]#
通过查看RC的标签。
1 [root@k8s-master rc]# kubectl get rc -o wide
2 NAME      DESIRED   CURRENT   READY     AGE       CONTAINER(S)   IMAGE(S)                          SELECTOR
3 myweb     2         2         2         3h        myweb          192.168.110.133:5000/nginx:1.13   app=myweb
4 [root@k8s-master rc]#

RC(Replication Controller)是通过标签(标签选择器)来选择Pod,通过标签来决定这个Pod是归我来管理的。
通过修改创建好的Pod可以测试,如果多于指定数量的Pod数量,就会被删除掉,注意,删除掉的Pod是最年轻的那个Pod。kubectl edit pod test4命令可以修改创建好的Pod。
 1 [root@k8s-master rc]# kubectl get all
 2 NAME       DESIRED   CURRENT   READY     AGE
 3 rc/myweb   2         2         2         3h
 4
 5 NAME             CLUSTER-IP   EXTERNAL-IP   PORT(S)   AGE
 6 svc/kubernetes   10.254.0.1   <none>        443/TCP   6d
 7
 8 NAME             READY     STATUS    RESTARTS   AGE
 9 po/myweb-2h8b1   1/1       Running   1          3h
10 po/myweb-lfkmp   1/1       Running   1          3h
11 po/test4         1/1       Running   1          3h
12 [root@k8s-master rc]# kubectl edit pod test4
13 pod "test4" edited
14 [root@k8s-master rc]# kubectl get all
15 NAME       DESIRED   CURRENT   READY     AGE
16 rc/myweb   2         2         2         3h
17
18 NAME             CLUSTER-IP   EXTERNAL-IP   PORT(S)   AGE
19 svc/kubernetes   10.254.0.1   <none>        443/TCP   6d
20
21 NAME             READY     STATUS    RESTARTS   AGE
22 po/myweb-lfkmp   1/1       Running   1          3h
23 po/test4         1/1       Running   1          3h
24 [root@k8s-master rc]#
4、RC(Replication Controller)的滚动升级。
答:滚动升级是一种平滑过渡的升级方式,通过逐步替换的策略,保证整体系统的稳定,在初始升级的时候就可以及时发现,调整问题,以保证问题影响度不好扩大。Kubernetes中滚动升级的命令如下所示:
首先,这里将配置文件nginx_rc.yaml进行拷贝,然后修改配置文件nginx_rc2.yaml,将myweb替换为myweb2。
1 [root@k8s-master rc]# cp nginx_rc.yaml nginx_rc2.yaml
2 [root@k8s-master rc]# ls
3 nginx_rc2.yaml  nginx_rc.yaml
4 [root@k8s-master rc]# vim nginx_rc2.yaml
5 [root@k8s-master rc]#
具体配置,如下所示:
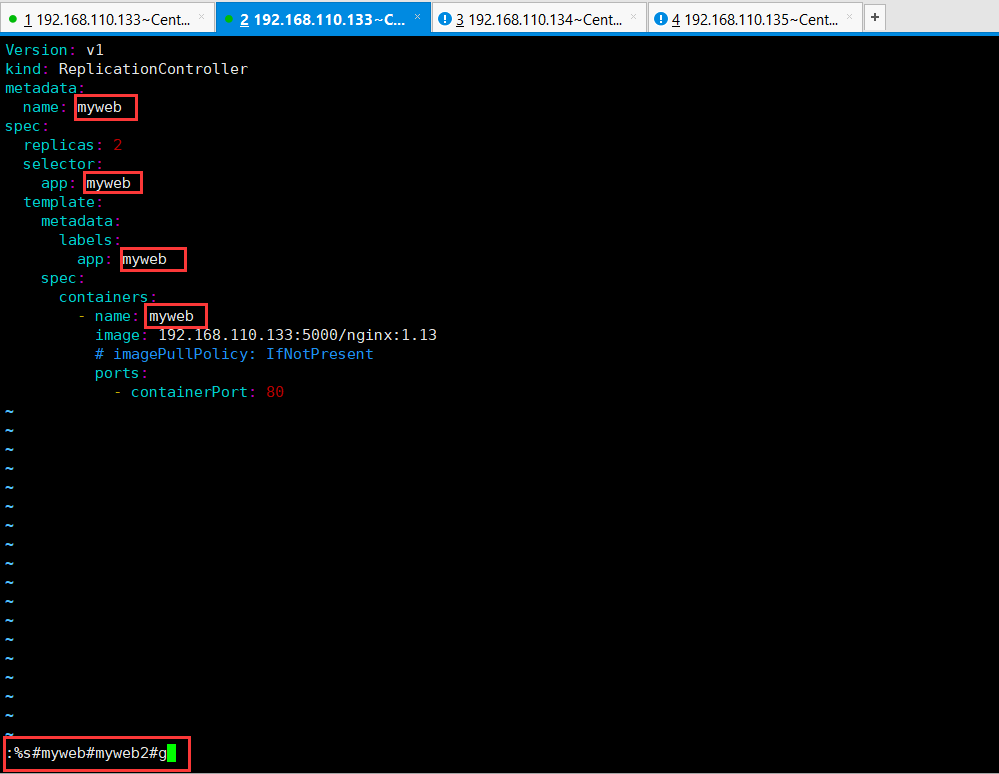
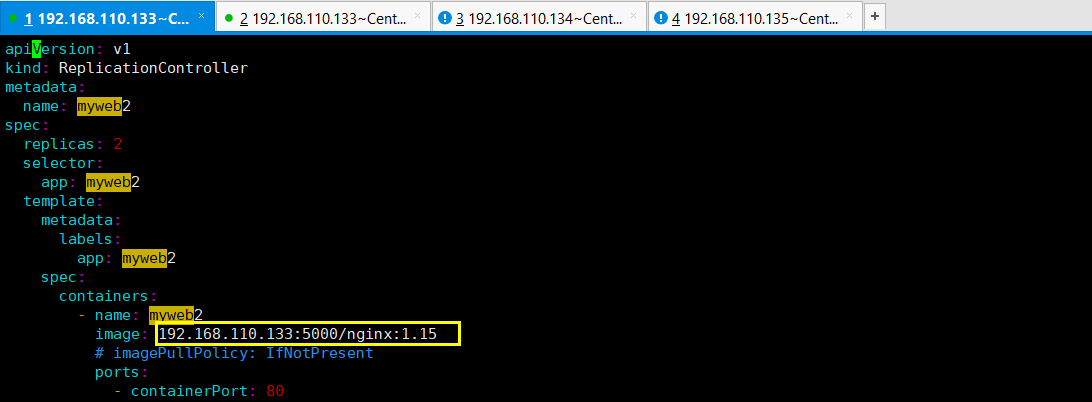
将myweb替换为myweb2,替换过后,然后将镜像版本修改为latest版本,如下所示:
将Nginx的latest版本镜像拉取下来docker pull docker.io/nginx:latest。然后将镜像上传到私有仓库里面,方便下载。
这里需要注意的是,我之前在配置Docker镜像加速的时候,在三台机器的vim /etc/sysconfig/docker。
1 [root@k8s-node3 ~]# vim /etc/sysconfig/docker
我在这个配置文件里面加的镜像加速和配置私有仓库地址。貌似并不是很好使的。
下面,在三台机器的上面,进行如下配置,将Docker镜像加速和私有仓库配置到下面这里。
1 [root@k8s-node3 ~]# docker pull docker.io/nginx:1.15
2 Trying to pull repository docker.io/library/nginx ...
3 Get https://registry-1.docker.io/v2/: net/http: request canceled while waiting for connection (Client.Timeout exceeded while awaiting headers)
修改配置文件,在三台机器上面都配置如下所示配置,[root@k8s-node3 ~]# vim /etc/docker/daemon.json
1 { "insecure-registries":["192.168.110.133:5000"] ,"registry-mirrors":["https://docker.mirrors.ustc.edu.cn"]}
然后重启三台机器的Docker服务systemctl restart docker。如果实在下载不下来,需要自己从网上找个https://hub.docker.com/
1 [root@k8s-master ~]# docker pull docker.io/nginx:1.15
2 Trying to pull repository docker.io/library/nginx ...
3 sha256:23b4dcdf0d34d4a129755fc6f52e1c6e23bb34ea011b315d87e193033bcd1b68: Pulling from docker.io/library/nginx
4 743f2d6c1f65: Pull complete
5 6bfc4ec4420a: Pull complete
6 688a776db95f: Pull complete
7 Digest: sha256:23b4dcdf0d34d4a129755fc6f52e1c6e23bb34ea011b315d87e193033bcd1b68
8 Status: Downloaded newer image for docker.io/nginx:1.15
9 [root@k8s-master ~]#
然后将ngnix1.15上传到私有仓库里面。可以使用docker images命令查看是否已经上传到私有仓库。
 1 [root@k8s-master rc]# docker images
 2 REPOSITORY                                            TAG                 IMAGE ID            CREATED             SIZE
 3 docker.io/busybox                                     latest              1c35c4412082        8 days ago          1.22 MB
 4 docker.io/registry                                    latest              708bc6af7e5e        4 months ago        25.8 MB
 5 docker.io/nginx                                       1.15                53f3fd8007f7        13 months ago       109 MB
 6 192.168.110.133:5000/nginx                            1.13                ae513a47849c        2 years ago         109 MB
 7 docker.io/nginx                                       1.13                ae513a47849c        2 years ago         109 MB
 8 registry.access.redhat.com/rhel7/pod-infrastructure   latest              99965fb98423        2 years ago         209 MB
 9 192.168.110.133:5000/pod-infrastructure               latest              34d3450d733b        3 years ago         205 MB
10 [root@k8s-master rc]# docker tag docker.io/nginx:1.15 192.168.110.133:5000/nginx:1.15
11 [root@k8s-master rc]# docker push 192.168.110.133:5000/nginx:1.15
12 The push refers to a repository [192.168.110.133:5000/nginx]
13 Put http://192.168.110.133:5000/v1/repositories/nginx/: dial tcp 192.168.110.133:5000: connect: connection refused
14 [root@k8s-master rc]# docker images
15 REPOSITORY                                            TAG                 IMAGE ID            CREATED             SIZE
16 docker.io/busybox                                     latest              1c35c4412082        8 days ago          1.22 MB
17 docker.io/registry                                    latest              708bc6af7e5e        4 months ago        25.8 MB
18 docker.io/nginx                                       1.15                53f3fd8007f7        13 months ago       109 MB
19 192.168.110.133:5000/nginx                            1.15                53f3fd8007f7        13 months ago       109 MB
20 docker.io/nginx                                       1.13                ae513a47849c        2 years ago         109 MB
21 192.168.110.133:5000/nginx                            1.13                ae513a47849c        2 years ago         109 MB
22 registry.access.redhat.com/rhel7/pod-infrastructure   latest              99965fb98423        2 years ago         209 MB
23 192.168.110.133:5000/pod-infrastructure               latest              34d3450d733b        3 years ago         205 MB
24 [root@k8s-master rc]#
滚动升级是一种平滑过渡的升级方式,通过逐步替换的策略,保证整体系统的稳定,在初始升级的时候就可以及时发现,调整问题,以保证问题影响度不好扩大。Kubernetes中滚动升级的命令如下所示:
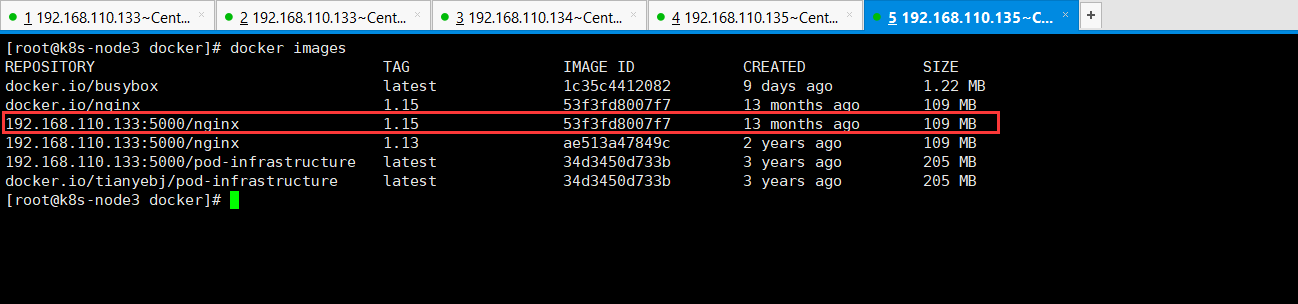
这里需要注意的是,想要看看Docker私有仓库是否有你想要的镜像,可以使用如下所示查看:
1 [root@k8s-node3 docker]# docker images
2 REPOSITORY                                TAG                 IMAGE ID            CREATED             SIZE
3 docker.io/busybox                         latest              1c35c4412082        9 days ago          1.22 MB
4 192.168.110.133:5000/nginx                1.15                53f3fd8007f7        13 months ago       109 MB
5 docker.io/nginx                           1.15                53f3fd8007f7        13 months ago       109 MB
6 192.168.110.133:5000/nginx                1.13                ae513a47849c        2 years ago         109 MB
7 docker.io/tianyebj/pod-infrastructure     latest              34d3450d733b        3 years ago         205 MB
8 192.168.110.133:5000/pod-infrastructure   latest              34d3450d733b        3 years ago         205 MB
9 [root@k8s-node3 docker]#
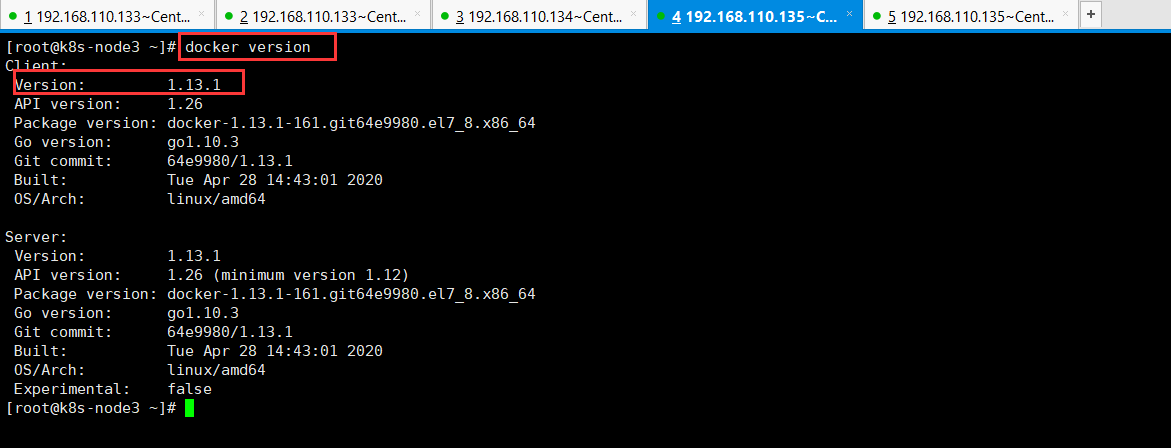
还有关于使用镜像加速和私有仓库的配置,这里需要说明的是,我的Docker的版本是1.13.1。
 1 [root@k8s-node3 ~]# docker version
 2 Client:
 3  Version:         1.13.1
 4  API version:     1.26
 5  Package version: docker-1.13.1-161.git64e9980.el7_8.x86_64
 6  Go version:      go1.10.3
 7  Git commit:      64e9980/1.13.1
 8  Built:           Tue Apr 28 14:43:01 2020
 9  OS/Arch:         linux/amd64
10
11 Server:
12  Version:         1.13.1
13  API version:     1.26 (minimum version 1.12)
14  Package version: docker-1.13.1-161.git64e9980.el7_8.x86_64
15  Go version:      go1.10.3
16  Git commit:      64e9980/1.13.1
17  Built:           Tue Apr 28 14:43:01 2020
18  OS/Arch:         linux/amd64
19  Experimental:    false
20 [root@k8s-node3 ~]#
关于镜像加速和私有仓库的配置,我此时由于不需要从网上下载所需的软件,这里将三台机器的/etc/docker/daemon.json配置文件全部后面加上了_bak,这里不需要使用它们了。
1 [root@k8s-node3 ~]# cat /etc/docker/daemon.json_bak
2 { "insecure-registries":["192.168.110.133:5000"]}
3 [root@k8s-node3 ~]# cd /etc/docker/
4 [root@k8s-node3 docker]# ls
5 certs.d  daemon.json_20200612  daemon.json_bak  key.json  seccomp.json
6 [root@k8s-node3 docker]#

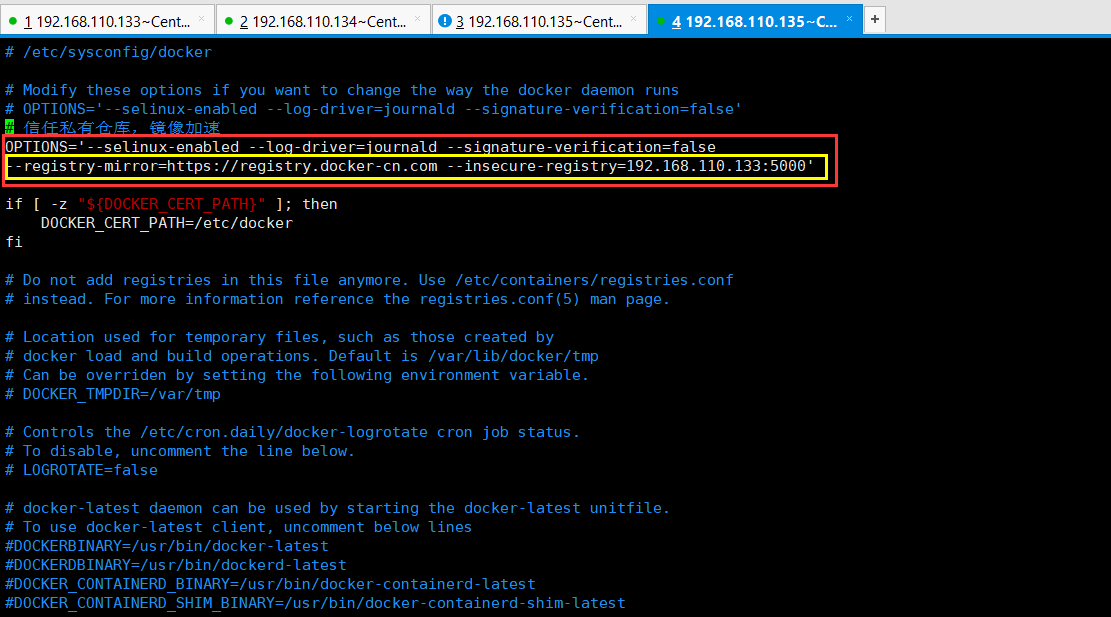
关于镜像加速和私有仓库的配置,如果配置不好,真的难为si你的。所以这里说了很多次。此时,三台机器的镜像加速和私有中心在这个里面还进行了配置。特此说明。
 1 [root@k8s-master docker]# cat /etc/sysconfig/docker
 2 # /etc/sysconfig/docker
 3
 4 # Modify these options if you want to change the way the docker daemon runs
 5 # OPTIONS='--selinux-enabled --log-driver=journald --signature-verification=false'
 6 # 信任私有仓库,镜像加速
 7 OPTIONS='--selinux-enabled --log-driver=journald --signature-verification=false
 8 --registry-mirror=https://registry.docker-cn.com --insecure-registry=192.168.110.133:5000'
 9
10
11
12 if [ -z "${DOCKER_CERT_PATH}" ]; then
13     DOCKER_CERT_PATH=/etc/docker
14 fi
15
16 # Do not add registries in this file anymore. Use /etc/containers/registries.conf
17 # instead. For more information reference the registries.conf(5) man page.
18
19 # Location used for temporary files, such as those created by
20 # docker load and build operations. Default is /var/lib/docker/tmp
21 # Can be overriden by setting the following environment variable.
22 # DOCKER_TMPDIR=/var/tmp
23
24 # Controls the /etc/cron.daily/docker-logrotate cron job status.
25 # To disable, uncomment the line below.
26 # LOGROTATE=false
27
28 # docker-latest daemon can be used by starting the docker-latest unitfile.
29 # To use docker-latest client, uncomment below lines
30 #DOCKERBINARY=/usr/bin/docker-latest
31 #DOCKERDBINARY=/usr/bin/dockerd-latest
32 #DOCKER_CONTAINERD_BINARY=/usr/bin/docker-containerd-latest
33 #DOCKER_CONTAINERD_SHIM_BINARY=/usr/bin/docker-containerd-shim-latest
34 [root@k8s-master docker]#

饶了一大圈,此时进行滚动升级,滚动升级是一种平滑过渡的升级方式,通过逐步替换的策略,保证整体系统的稳定,在初始升级的时候就可以及时发现,调整问题,以保证问题影响度不好扩大。Kubernetes中滚动升级的命令如下所示:
 1 [root@k8s-master rc]# kubectl rolling-update myweb -f nginx_rc2.yaml --update-period=10s
 2 Created myweb2
 3 Scaling up myweb2 from 0 to 2, scaling down myweb from 2 to 0 (keep 2 pods available, don't exceed 3 pods)
 4 Scaling myweb2 up to 1
 5 Scaling myweb down to 1
 6 Scaling myweb2 up to 2
 7 Scaling myweb down to 0
 8 Update succeeded. Deleting myweb
 9 replicationcontroller "myweb" rolling updated to "myweb2"
10 [root@k8s-master rc]#
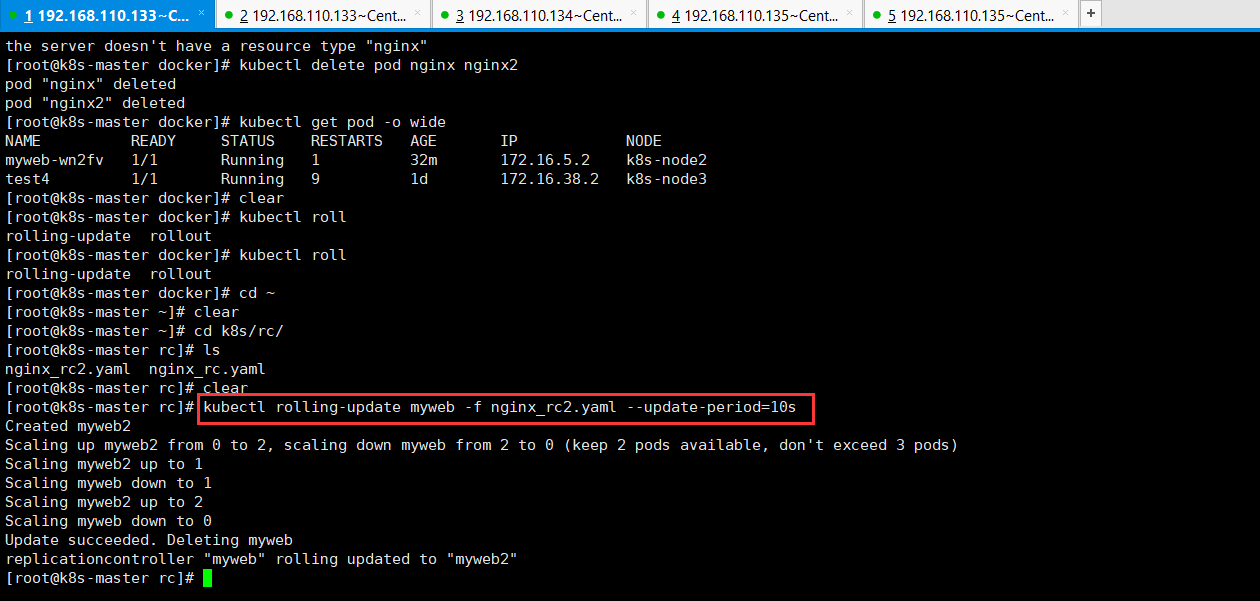
创建一个myweb2的RC,将myweb2的RC的Pod数量由0调整为2,把myweb的RC的Pod数量由2调整为0。当myweb2存活了30秒以上就会删掉一个myweb,nginx也是myweb的容器,删除也是比较慢的。
升级开始后,首先依据提供的定义文件创建V2版本的RC,然后每隔10s(--update-period=10s)逐步的增加V2版本的Pod副本数,逐步减少V1版本Pod的副本数。升级完成之后,删除V1版本的RC,保留V2版本的RC,以及实现滚动升级。
1 [root@k8s-master ~]# kubectl get pod -o wide
2 NAME           READY     STATUS    RESTARTS   AGE       IP            NODE
3 myweb2-f5400   1/1       Running   0          15s       172.16.38.3   k8s-node3
4 myweb2-mg9sk   1/1       Running   0          26s       172.16.85.2   k8s-master
5 [root@k8s-master ~]#
升级之后还可以进行回滚,如下所示:
 1 [root@k8s-master rc]# kubectl rolling-update myweb2 -f nginx_rc.yaml --update-period=10s
 2 Created myweb
 3 Scaling up myweb from 0 to 2, scaling down myweb2 from 2 to 0 (keep 2 pods available, don't exceed 3 pods)
 4 Scaling myweb up to 1
 5 Scaling myweb2 down to 1
 6 Scaling myweb up to 2
 7 Scaling myweb2 down to 0
 8 Update succeeded. Deleting myweb2
 9 replicationcontroller "myweb2" rolling updated to "myweb"
10 [root@k8s-master rc]#
升级过程中,发生了错误中途退出时候,可以选择继续升级。Kubernetes能够智能的判断升级中断之前的状态,然后紧接着继续执行升级。当然,也可以进行退出,命令如下所示:
1 [root@k8s-master rc]# kubectl rolling-update myweb myweb2 --update-period=10s --rollback
2 Setting "myweb" replicas to 2
3 Continuing update with existing controller myweb.
4 Scaling up myweb from 2 to 2, scaling down myweb2 from 1 to 0 (keep 2 pods available, don't exceed 3 pods)
5 Scaling myweb2 down to 0
6 Update succeeded. Deleting myweb2
7 replicationcontroller "myweb" rolling updated to "myweb2"
8 [root@k8s-master rc]#