Blockchain is one of the buzzwords in IT world during some last months. This term is related to cryptocurrencies, and was created together with Bitcoins. It is decentralized, immutable data structure divided into blocks, which are linked and secured using cryptographic algorithms. Every single block in this structure typically contains a cryptographic hash of the previous block, a timestamp, and transaction data. Blockchain is managed by peer-to-peer network, and during inter-node communication every new block is validated before adding. This is short portion of theory about blockchain. In a nutshell, this is a technology which allows us to managed transactions between two parties in a decentralized way. Now, the question is how we can implement it in our system.
Here comes Ethereum. It is a decentralized platform created by Vitarik Buterin that provides scripting language for a development of applications. It is based on ideas from Bitcoin, and is driven by the new cryptocurrency called Ether. Today, Ether is the second largest cryptocurrency after Bitcoin. The heart of Ethereum technology is EVM (Ethereum Virtual Machine), which can be treated as something similar to JVM, but using a network of fully decentralized nodes. To implement transactions based Ethereum in Java world we use web3j library. This is a lightweight, reactive, type safe Java and Android library for integrating with nodes on Ethereum blockchains. More details can be found on its websitehttps://web3j.io.
1. Running Ethereum locally
Although there are many articles on the Web about blockchain and ethereum it is not easy to find a solution describing how to run ready-for-use instance of Ethereum on the local machine. It is worth to mention that generally there are two most popular Ethereum clients we can use: Geth and Parity. It turns out we can easily run Geth node locally using Docker container. By default it connects the node to the Ethereum main network. Alternatively, you can connect it to test network or Rinkeby network. But the best option for beginning is just to run it in development mode by setting--dev parameter on Docker container running command.
Here’s the command that starts Docker container in development mode and exposes Ethereum RPC API on port 8545.
$ docker run -d --name ethereum -p 8545:8545 -p 30303:30303 ethereum/client-go --rpc --rpcaddr "0.0.0.0" --rpcapi="db,eth,net,web3,personal" --rpccorsdomain "*" --dev
The one really good message when running that container in development mode is that you have plenty of Ethers on your default, test account. In that case, you don’t have to mine any Ethers to be able to start tests. Great! Now, let’s create some other test accounts and also check out some things. To achieve it we need to run Geth’s interactive JavaScript console inside Docker container.
$ docker exec -it ethereum geth attach ipc:/tmp/geth.ipc
2. Managing Ethereum node using JavaScript console
After running JavaScript console you can easily display default account (coinbase), the list of all available accounts and their balances. Here’s the screen illustrating results for my Ethereum node.
Now, we have to create some test accounts. We can do it by callingpersonal.newAccount(password) function. After creating required accounts, you can perform some test transactions using JavaScript console, and transfer some funds from base account to the newly created accounts. Here are the commands used for creating accounts and executing transactions.
3. System architecture
The architecture of our sample system is very simple. I don’t want to complicate anything, but just show you how to send transaction to Geth node and receive notifications. While transaction-servicesends new transaction to Ethereum node, bonus-service observe node and listening for incoming transactions. Then it send bonus to the sender’s account once per 10 transactions received from his account. Here’s the diagram that illustrates an architecture of our sample system.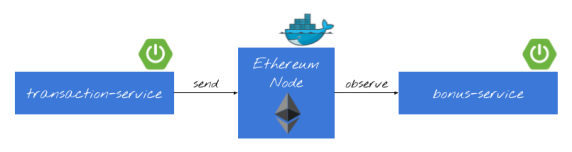
4. Enable Web3j for Spring Boot app
I think that now we have clarity what exactly we want to do. So, let’s proceed to the implementation. First, we should include all required dependencies in order to be able to use web3j library inside Spring Boot application. Fortunately, there is a starter that can be included.
<dependency>
	<groupId>org.web3j</groupId>
	<artifactId>web3j-spring-boot-starter</artifactId>
	<version>1.6.0</version>
</dependency>
Because we are running Ethereum Geth client on Docker container we need to change auto-configured client’s address for web3j.
spring:
  application:
    name: transaction-service
server:
  port: ${PORT:8090}
web3j:
  client-address: http://192.168.99.100:8545
5. Building applications
If we included web3j starter to the project dependencies all you need is to autowire Web3j bean. Web3j is responsible for sending transaction to Geth client node. It receives response with transaction hash if it has been accepted by the node or error object if it has been rejected. While creating transaction object it is important to set gas limit to minimum 21000. If you sent lower value, you will probably receive error Error: intrinsic gas too low.
@Service
public class BlockchainService {

    private static final Logger LOGGER = LoggerFactory.getLogger(BlockchainService.class);

    @Autowired
    Web3j web3j;

    public BlockchainTransaction process(BlockchainTransaction trx) throws IOException {
        EthAccounts accounts = web3j.ethAccounts().send();
        EthGetTransactionCount transactionCount = web3j.ethGetTransactionCount(accounts.getAccounts().get(trx.getFromId()), DefaultBlockParameterName.LATEST).send();
        Transaction transaction = Transaction.createEtherTransaction(accounts.getAccounts().get(trx.getFromId()), transactionCount.getTransactionCount(), BigInteger.valueOf(trx.getValue()), BigInteger.valueOf(21_000), accounts.getAccounts().get(trx.getToId()),BigInteger.valueOf(trx.getValue()));
        EthSendTransaction response = web3j.ethSendTransaction(transaction).send();
        if (response.getError() != null) {
            trx.setAccepted(false);
            return trx;
        }
        trx.setAccepted(true);
        String txHash = response.getTransactionHash();
        LOGGER.info("Tx hash: {}", txHash);
        trx.setId(txHash);
        EthGetTransactionReceipt receipt = web3j.ethGetTransactionReceipt(txHash).send();
        if (receipt.getTransactionReceipt().isPresent()) {
            LOGGER.info("Tx receipt: {}", receipt.getTransactionReceipt().get().getCumulativeGasUsed().intValue());
        }
        return trx;
    }

}
The @Service bean visible above is invoked by the controller. The implementation of POST method takes BlockchainTransaction object as parameter. You can send there sender id, receiver id, and transaction amount. Sender and receiver ids are equivalent to index in query eth.account[index].
@RestController
public class BlockchainController {

    @Autowired
    BlockchainService service;

    @PostMapping("/transaction")
    public BlockchainTransaction execute(@RequestBody BlockchainTransaction transaction) throws NoSuchAlgorithmException, NoSuchProviderException, InvalidAlgorithmParameterException, CipherException, IOException {
        return service.process(transaction);
    }

}
You can send a test transaction by calling POST method using the following command.
$ curl --header "Content-Type: application/json" --request POST --data '{"fromId":2,"toId":1,"value":3}' http://localhost:8090/transaction
Before sending any transactions you should also unlock sender account.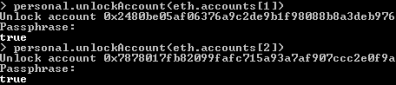
Application bonus-service listens for transactions processed by Ethereum node. It subscribes for notifications from Web3j library by calling web3j.transactionObservable().subscribe(...) method. It returns the amount of received transaction to the sender’s account once per 10 transactions sent from that address. Here’s the implementation of observable method inside application bonus-service.
@Autowired
Web3j web3j;

@PostConstruct
public void listen() {
	Subscription subscription = web3j.transactionObservable().subscribe(tx -> {
		LOGGER.info("New tx: id={}, block={}, from={}, to={}, value={}", tx.getHash(), tx.getBlockHash(), tx.getFrom(), tx.getTo(), tx.getValue().intValue());
		try {
			EthCoinbase coinbase = web3j.ethCoinbase().send();
			EthGetTransactionCount transactionCount = web3j.ethGetTransactionCount(tx.getFrom(), DefaultBlockParameterName.LATEST).send();
			LOGGER.info("Tx count: {}", transactionCount.getTransactionCount().intValue());
			if (transactionCount.getTransactionCount().intValue() % 10 == 0) {
				EthGetTransactionCount tc = web3j.ethGetTransactionCount(coinbase.getAddress(), DefaultBlockParameterName.LATEST).send();
				Transaction transaction = Transaction.createEtherTransaction(coinbase.getAddress(), tc.getTransactionCount(), tx.getValue(), BigInteger.valueOf(21_000), tx.getFrom(), tx.getValue());
				web3j.ethSendTransaction(transaction).send();
			}
		} catch (IOException e) {
			LOGGER.error("Error getting transactions", e);
		}
	});
	LOGGER.info("Subscribed");
}
Conclusion
Blockchain and cryptocurrencies are not the easy topics to start. Ethereum simplifies development of applications that use blockchain, by providing a complete, scripting language. Using web3j library together with Spring Boot and Docker image of Ethereum Geth client allows to quickly start local development of solution implementing blockchain technology. IF you would like to try it locally just clone my repository available on GitHubhttps://github.com/piomin/sample-spring-blockchain.git
转自:https://piotrminkowski.wordpress.com/2018/06/22/introduction-to-blockchain-with-java-using-ethereum-web3j-and-spring-boot/