OSGi 系列(六)之服务的使用
1. 为什么使用服务
- 降低服务提供者和服务使用者直接的耦合,这样更容易重用组件
- 隐藏了服务的实现细节
- 支持多个服务的实现、这样你可以互换这实现
2. 服务的使用
2.1 服务的注册
bundle 通过在框架的服务注册中心注册一个服务对象来发布一个服务。安装在 OSGi 环境下的其它 bundle 就可以访问到在框架中注册的服务对象。
bundle 通过使用 BundleContext.registerService,在框架中注册一个服务对象:
registerService(String, Object, Dictionary)   //用于一个服务接口的服务注册
registerService(String[], Object, Dictionary) //用于多个服务接口的服务注册
String表示服务的接口Object表示服务的实现类Dictionary表示服务属性- 调用之后,返回 ServiceRegistration 对象
2.2 服务的销毁
ServiceRegistration.unregister()
2.3 服务的属性
| 属性 | 类型 | 常量 | 描述 |
|---|---|---|---|
| objectClass | String[] | OBJECTCLASS | objectClass 属性包含了注册到框架中的服务对象所有实现的接口的集合。这个属性必须由框架自动设置 |
| service.id | Long | SERVICE_ID | 每一个注册了的服务对象都由框架分配了一个惟一的service.id。将这个标志数字添加到服务对象的属性中。框架给每一个注册的服务对象分配一个惟一的标志值,这个值要比原来分配的任何值要大,也就是说是递增分配的。 |
| service.pid | String | SERVICE_PID | service.pid属性是可选的,标记了服务对象的持久惟一标记。 |
| service.ranking | Integer | SERVICE_RANKING | 服务的排行,当有多个服务的时候,会返回service.ranking值最大的那个服务 |
| service.description | String | SERVICE_DESCRIPTION | service.description属性用于文档性的描述,这个属性是可选的 |
| service.vendor | String | SERVICE_VENDOR | 这是一个可选属性,描述服务对象的开发商信息 |
2.4 服务的查找
查找服务时要分两步:
bundleContext.getServiceReference() //1. 获取 ServiceReference 对象
bundleContext.getService()          //2. 获取真实的服务对象
查找单个服务:
bundleContext.getServiceReference() 要么返回 null,要么返回一个服务。如果有多个服务匹配,也只会返回一个服务。
- 找 service.ranking 属性最高的。如果注册时为指定该属性,则默认值为0
- 找 service ID 属性最小的。也就是最先注册的服务。
查找多个服务:
bundleContext.getServiceReferences(Clazz clazz, String filter)
bundleContext.getServiceReferences(String clazz, String filter)
第二个参数接受标准的LDAP过滤字符串。示例:
属性匹配:(vendor=Apache)、(count>3)
通配符:(vendor=Apache*)
判断某个属性是否存在:(vendor=)
条件非:(!(vendor=Apache))
条件与:(&(objectClass=com.edu.osgi.user.IUserService)(type=1))
条件或:(|(type=1)(type=2))
3.实战演示
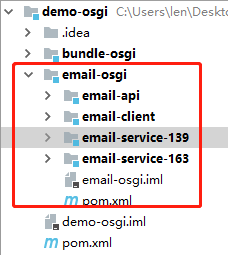
3.1 新建 4 个 bundle,目录结构如下:
3.2 email-api 为接口
package com.github.binarylei.email.api;

public interface EmailService {
    void sendEmail(String to, String title, String content);
}
注意: email-api 要将接口暴露出去,配制如下:
<Import-Package>org.osgi.framework</Import-Package>
<Export-Package>com.github.binarylei.email.api</Export-Package>
3.3 email-service-139 实现
package com.github.binarylei.email.service;

import com.github.binarylei.email.api.EmailService;

public class EmailService139 implements EmailService {

    public void sendEmail(String dest, String title, String content) {
        System.out.println("139 email send. dest=" + dest + ",title=" + title + ",content=" + content);
    }
}
BundleActivator 如下:
package com.github.binarylei.email.internal;

import com.github.binarylei.email.api.EmailService;
import com.github.binarylei.email.service.EmailService139;
import org.osgi.framework.BundleActivator;
import org.osgi.framework.BundleContext;
import org.osgi.framework.ServiceRegistration;

public class Activator implements BundleActivator {
    ServiceRegistration<EmailService> serviceRegistration;

    @Override
    public void start(BundleContext context) throws Exception {
        serviceRegistration = context.registerService(EmailService.class, new EmailService139(), null);
    }

    @Override
    public void stop(BundleContext context) throws Exception {
        serviceRegistration.unregister();
    }
}
注意: email-service-139 要将引入 email-api 接口,配制如下:
<Import-Package>org.osgi.framework,com.github.binarylei.email.api</Import-Package>
<Bundle-Activator>com.github.binarylei.email.internal.Activator</Bundle-Activator>
3.4 email-service-163 实现
与 email-service-139 类似
3.5 email-client 服务的使用
package com.github.binarylei.email.internal;

import com.github.binarylei.email.api.EmailService;
import org.osgi.framework.BundleActivator;
import org.osgi.framework.BundleContext;
import org.osgi.framework.ServiceReference;

public class Activator implements BundleActivator {
    @Override
    public void start(BundleContext context) throws Exception {
        //1. 获取所有的服务
        ServiceReference<?>[] refs = context.getAllServiceReferences(EmailService.class.getName(), null);
        if (refs != null) {
            for (ServiceReference ref : refs) {
                EmailService emailService = (EmailService) context.getService(ref);
                emailService.sendEmail("binarylei@qq.com", "OSGi", "OSGi Service");
            }
        }
        //2. 获取单个服务
        ServiceReference<?> ref = context.getServiceReference(EmailService.class.getName());
        if (ref != null) {
            EmailService emailService = (EmailService) context.getService(ref);
            emailService.sendEmail("binarylei@qq.com", "OSGi", "OSGi Service");
        }
    }

    @Override
    public void stop(BundleContext context) throws Exception {

    }
}
注意: email-client 要将引入 email-api 接口,配制如下:
<Import-Package>org.osgi.framework,com.github.binarylei.email.api</Import-Package>
<Bundle-Activator>com.github.binarylei.email.internal.Activator</Bundle-Activator>
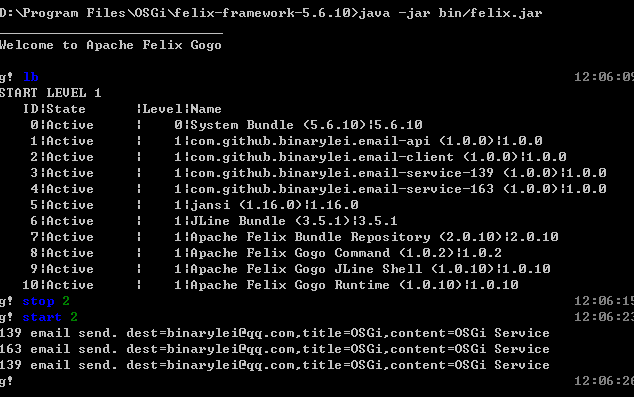
3.6 felix 测试
将这 4 个 bundle 拷贝到 felix-framework-5.6.10/bundle 下,启动 felix
4. 服务的属性使用
4.1 服务添加属性
分别给 email-service-163 和 email-service-139 添加属性 vendor
@Override
public void start(BundleContext context) throws Exception {
    Dictionary properties = new Hashtable<>();
    properties.put("vendor", "163"); // 139
    serviceRegistration = context.registerService(EmailService.class, new EmailService163(), properties);
}
4.2 根据服务属性获取对应的服务
email-client 获取属性
@Override
public void start(BundleContext context) throws Exception {
    // 根据属性获取163的服务
    ServiceReference<?>[] refs = context.getServiceReferences(EmailService.class.getName(), "(vendor=163)");
    if (refs != null) {
        for (ServiceReference ref : refs) {
            EmailService emailService = (EmailService) context.getService(ref);
            emailService.sendEmail("binarylei@qq.com", "OSGi", "OSGi Service");
        }
    }
}
5. 服务工厂
使用传统的方式获取的服务都是单例的,同一个服务,不管是在同一个 bundle, 还是在不同 bundle 中间获取。
5.1 测试单例
将 email-client-1.0.0.jar 复制一份 email-client-2.0.0.jar,修改 META-INF/MANIFEST.MF 的 Bundle-Version 为 2.0.0

5.2 ServiceFactory
org.osgi.framework.ServiceFactory,使用服务工厂好处:
- 有时 service 需要知道是哪个 bundle 在使用它。例如 logger 服务,它需要在日志中记录是哪个 bundle 调用它的。
- 延迟初始化 Service
- 这对消费者是透明的,它不能知道提供服务的是普通 Service 还是 ServiceFactory
- 可以创建多种服务,根据参数 ServiceRegistration 来判断
5.3 实例
(1) email-service-163 添加 EmailServiceFactory 类:
package com.github.binarylei.email.service;

import com.github.binarylei.email.api.EmailService;
import org.osgi.framework.Bundle;
import org.osgi.framework.ServiceFactory;
import org.osgi.framework.ServiceRegistration;

public class EmailServiceFactory implements ServiceFactory<EmailService> {

    @Override
    public EmailService getService(Bundle bundle, ServiceRegistration<EmailService> registration) {
        return new EmailService163();
    }

    @Override
    public void ungetService(Bundle bundle, ServiceRegistration<EmailService> registration, EmailService service) {
    }
}
(2) 修改 Activator 类:
@Override
public void start(BundleContext context) throws Exception {
    Dictionary properties = new Hashtable<>();
    properties.put("vendor", "163");
    serviceRegistration = context.registerService(EmailService.class.getName(), new EmailServiceFactory(), properties);
}
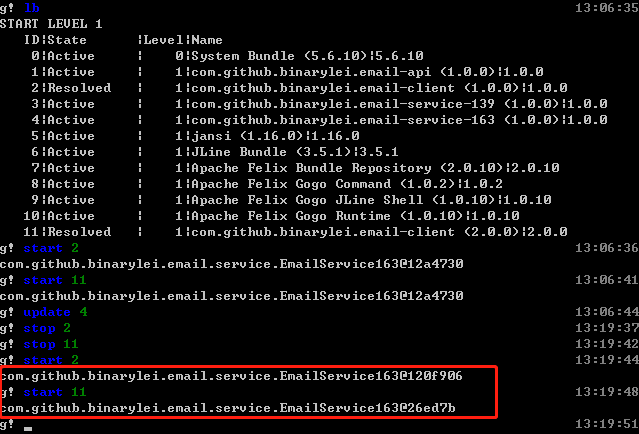
(3) 更新 email-service-163,重启 email-client-1.0.0.jar 和 email-client-2.0.0.jar ,结果如下:
6. OSGi 服务
核心服务:包管理、启动级别、权限管理、URL处理
compendium 服务:
- LOG Service(日志服务)
- HTTP Service(注册servlet和资源)
- Configuration Admin(配置管理)
- Event Admin(事件通知)
- Declarative Services(定义轻量级的面向服务的组件模型)
- Blueprint(一个类似 IOC 容器的实现)