实现结果:
1:搭建单点登录服务端,开发单点登录客户端
2:实现CAS 认证数据源设置
3:更换CAS 登录页面
4:CAS与SpringSecurity集成
1.开源单点登录系统CAS入门
1.1 什么是单点登录
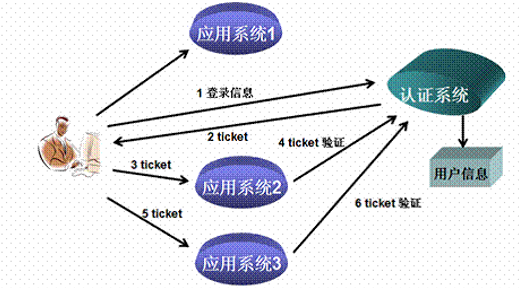
单点登录(Single Sign On),简称为 SSO,是目前比较流行的企业业务整合的解决方案之一。SSO的定义是在多个应用系统中,用户只需要登录一次就可以访问所有相互信任的应用系统。
我们目前的系统存在诸多子系统,而这些子系统是分别部署在不同的服务器中,那么使用传统方式的session是无法解决的,我们需要使用相关的单点登录技术来解决。
1.2 什么是CAS
CAS 是 Yale 大学发起的一个开源项目,旨在为 Web 应用系统提供一种可靠的单点登录方法,CAS 在 2004 年 12 月正式成为 JA-SIG 的一个项目。CAS 具有以下特点:
【1】开源的企业级单点登录解决方案。
【2】CAS Server 为需要独立部署的 Web 应用。
【3】CAS Client 支持非常多的客户端(这里指单点登录系统中的各个 Web 应用),包括 Java, .Net, PHP, Perl, Apache, uPortal, Ruby 等。
从结构上看,CAS 包含两个部分: CAS Server 和 CAS Client。CAS Server 需要独立部署,主要负责对用户的认证工作;CAS Client 负责处理对客户端受保护资源的访问请求,需要登录时,重定向到 CAS Server。下图是 CAS 最基本的协议过程:
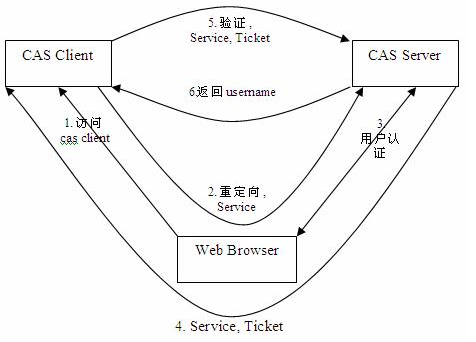
SSO单点登录访问流程主要有以下步骤:
1. 访问服务:SSO客户端发送请求访问应用系统提供的服务资源。
2. 定向认证:SSO客户端会重定向用户请求到SSO服务器。
3. 用户认证:用户身份认证。
4. 发放票据:SSO服务器会产生一个随机的Service Ticket。
5. 验证票据:SSO服务器验证票据Service Ticket的合法性,验证通过后,允许客户端访问服务。
6. 传输用户信息:SSO服务器验证票据通过后,传输用户认证结果信息给客户端。
1.3 CAS服务端部署
Cas服务端其实就是一个war包。
在资源cassourcecas-server-4.0.0-releasecas-server-4.0.0modules目录下
cas-server-webapp-4.0.0.war 将其改名为cas.war放入tomcat目录下的webapps下。启动tomcat自动解压war包。浏览器输入http://localhost:8080/cas/login ,可看到登录页面

不要嫌弃这个页面丑,我们后期可以再提升它的颜值。暂时把注意力放在功能实现上。
这里有个固定的用户名和密码 casuser /Mellon
登录成功后会跳到登录成功的提示页面

1.4 CAS服务端配置
1.4.1端口修改
如果我们不希望用8080端口访问CAS, 可以修改端口
(1)修改TOMCAT的端口
打开tomcat 目录 confserver.xml 找到下面的配置

将端口8080,改为9100
(2)修改CAS配置文件
修改cas的WEB-INF/cas.properties
|
server.name=http://localhost:9100 |
1.4.2去除https认证
CAS默认使用的是HTTPS协议,如果使用HTTPS协议需要SSL安全证书(需向特定的机构申请和购买) 。如果对安全要求不高或是在开发测试阶段,可使用HTTP协议。我们这里讲解通过修改配置,让CAS使用HTTP协议。
(1)修改cas的WEB-INF/deployerConfigContext.xml
找到下面的配置
|
<bean class="org.jasig.cas.authentication.handler.support.HttpBasedServiceCredentialsAuthenticationHandler" |
这里需要增加参数p:requireSecure="false",requireSecure属性意思为是否需要安全验证,即HTTPS,false为不采用
(2)修改cas的/WEB-INF/spring-configuration/ticketGrantingTicketCookieGenerator.xml
找到下面配置
|
<bean id="ticketGrantingTicketCookieGenerator" class="org.jasig.cas.web.support.CookieRetrievingCookieGenerator" p:cookieSecure="true" p:cookieMaxAge="-1" p:cookieName="CASTGC" p:cookiePath="/cas" /> |
参数p:cookieSecure="true",同理为HTTPS验证相关,TRUE为采用HTTPS验证,FALSE为不采用https验证。
参数p:cookieMaxAge="-1",是COOKIE的最大生命周期,-1为无生命周期,即只在当前打开的窗口有效,关闭或重新打开其它窗口,仍会要求验证。可以根据需要修改为大于0的数字,比如3600等,意思是在3600秒内,打开任意窗口,都不需要验证。
我们这里将cookieSecure改为false , cookieMaxAge 改为3600
(3)修改cas的WEB-INF/spring-configuration/warnCookieGenerator.xml
找到下面配置
|
<bean
id="warnCookieGenerator"
class="org.jasig.cas.web.support.CookieRetrievingCookieGenerator" |
我们这里将cookieSecure改为false , cookieMaxAge 改为3600
1.5 CAS客户端入门小Demo
1.5.1客户端工程1搭建
(1)搭建工程引入依赖
创建Maven工程 (war)casclient_demo1 引入cas客户端依赖并制定tomcat运行端口为9001
|
<dependencies> <!-- cas --> <dependency> <groupId>org.jasig.cas.client</groupId> <artifactId>cas-client-core</artifactId> <version>3.3.3</version> </dependency> <dependency> <groupId>javax.servlet</groupId> <artifactId>servlet-api</artifactId> <version>2.5</version> <scope>provided</scope> </dependency> </dependencies> <build> <plugins> <plugin> <groupId>org.apache.maven.plugins</groupId> <artifactId>maven-compiler-plugin</artifactId> <version>2.3.2</version> <configuration> <source>1.7</source> <target>1.7</target> </configuration> </plugin> <plugin> <groupId>org.apache.tomcat.maven</groupId> <artifactId>tomcat7-maven-plugin</artifactId> <configuration> <!-- 指定端口 --> <port>9001</port> <!-- 请求路径 --> <path>/</path> </configuration> </plugin> </plugins> </build> |
(2)添加web.xml
|
<?xml version="1.0" encoding="UTF-8"?> <web-app xmlns:xsi="http://www.w3.org/2001/XMLSchema-instance" xmlns="http://java.sun.com/xml/ns/javaee" xsi:schemaLocation="http://java.sun.com/xml/ns/javaee http://java.sun.com/xml/ns/javaee/web-app_2_5.xsd" version="2.5"> <!-- 用于单点退出,该过滤器用于实现单点登出功能,可选配置 --> <listener> <listener-class>org.jasig.cas.client.session.SingleSignOutHttpSessionListener</listener-class> </listener> <!-- 该过滤器用于实现单点登出功能,可选配置。 --> <filter> <filter-name>CAS Single Sign Out Filter</filter-name> <filter-class>org.jasig.cas.client.session.SingleSignOutFilter</filter-class> </filter> <filter-mapping> <filter-name>CAS Single Sign Out Filter</filter-name> <url-pattern>/*</url-pattern> </filter-mapping> <!-- 该过滤器负责用户的认证工作,必须启用它 --> <filter> <filter-name>CASFilter</filter-name> <filter-class>org.jasig.cas.client.authentication.AuthenticationFilter</filter-class> <init-param> <param-name>casServerLoginUrl</param-name> <param-value>http://localhost:9100/cas/login</param-value> <!--这里的server是服务端的IP --> </init-param> <init-param> <param-name>serverName</param-name> <param-value>http://localhost:9001</param-value> </init-param> </filter> <filter-mapping> <filter-name>CASFilter</filter-name> <url-pattern>/*</url-pattern> </filter-mapping> <!-- 该过滤器负责对Ticket的校验工作,必须启用它 --> <filter> <filter-name>CAS Validation Filter</filter-name> <filter-class> org.jasig.cas.client.validation.Cas20ProxyReceivingTicketValidationFilter</filter-class> <init-param> <param-name>casServerUrlPrefix</param-name> <param-value>http://localhost:9100/cas</param-value> </init-param> <init-param> <param-name>serverName</param-name> <param-value>http://localhost:9001</param-value> </init-param> </filter> <filter-mapping> <filter-name>CAS Validation Filter</filter-name> <url-pattern>/*</url-pattern> </filter-mapping> <!-- 该过滤器负责实现HttpServletRequest请求的包裹, 比如允许开发者通过HttpServletRequest的getRemoteUser()方法获得SSO登录用户的登录名,可选配置。 --> <filter> <filter-name>CAS HttpServletRequest Wrapper Filter</filter-name> <filter-class> org.jasig.cas.client.util.HttpServletRequestWrapperFilter</filter-class> </filter> <filter-mapping> <filter-name>CAS HttpServletRequest Wrapper Filter</filter-name> <url-pattern>/*</url-pattern> </filter-mapping> <!-- 该过滤器使得开发者可以通过org.jasig.cas.client.util.AssertionHolder来获取用户的登录名。 比如AssertionHolder.getAssertion().getPrincipal().getName()。 --> <filter> <filter-name>CAS Assertion Thread Local Filter</filter-name> <filter-class>org.jasig.cas.client.util.AssertionThreadLocalFilter</filter-class> </filter> <filter-mapping> <filter-name>CAS Assertion Thread Local Filter</filter-name> <url-pattern>/*</url-pattern> </filter-mapping> </web-app> |
(3)编写index.jsp
|
<%@ page language="java" contentType="text/html; charset=utf-8" pageEncoding="utf-8"%> <!DOCTYPE html PUBLIC "-//W3C//DTD HTML 4.01 Transitional//EN" "http://www.w3.org/TR/html4/loose.dtd"> <html> <head> <meta http-equiv="Content-Type" content="text/html; charset=utf-8"> <title>一登风网</title> </head> <body> 欢迎来到一登风网 <%=request.getRemoteUser()%> </body> </html> |
request.getRemoteUser()为获取远程登录名
1.5.2客户端工程2搭建
(1)创建Maven工程 (war)casclient_demo2 引入cas客户端依赖并制定tomcat运行端口为9002
(2)创建web.xml,参照casclient_demo1 ,将serverName的值改为http://localhost:9002,一共两处
(3)创建index.jsp ,内容显示“欢迎来到二登风网”
1.5.3单点登录测试
(1)启动cas部署的tomcat
(2)启动客户端工程1和客户端工程2
(3)地址栏输入http://localhost:9001/ 和http://localhost:9002/ ,地址均会跳转到CAS登录页
(4)输入用户名和密码后,页面跳转回9002 ,再次访问9001也可以打开主页面。
1.5.4单点退出登录
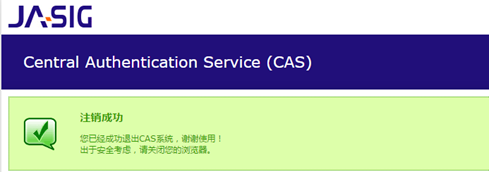
地址栏输入 http://localhost:9100/cas/logout
即可看到退出后的提示页面
我们可以将这个链接添加到index.jsp中
|
<a href="http://localhost:9100/cas/logout">退出登录</a> |
但我们更希望退出登录后,能自动跳转到某个页面,那如何处理呢?
修改cas系统的配置文件cas-servlet.xml
|
<bean id="logoutAction" class="org.jasig.cas.web.flow.LogoutAction" p:servicesManager-ref="servicesManager" p:followServiceRedirects="${cas.logout.followServiceRedirects:true}"/> |
改为true后,可以在退出时跳转页面到目标页面,修改index.jsp的退出链接
|
<a href="http://localhost:9100/cas/logout?service=http://www.baidu.com">退出登录</a> |
2.CAS服务端数据源设置
2.1需求分析
我们现在让用户名密码从我们的登风网的user表里做验证
2.2配置数据源
(1)修改cas服务端中web-inf下deployerConfigContext.xml ,添加如下配置
|
<bean id="dataSource" class="com.mchange.v2.c3p0.ComboPooledDataSource" p:driverClass="com.mysql.jdbc.Driver" p:jdbcUrl="jdbc:mysql://127.0.0.1:3306/pinyougoudb?characterEncoding=utf8" p:user="root" p:password="123456" /> <bean id="passwordEncoder" class="org.jasig.cas.authentication.handler.DefaultPasswordEncoder" c:encodingAlgorithm="MD5" p:characterEncoding="UTF-8" /> <bean id="dbAuthHandler" class="org.jasig.cas.adaptors.jdbc.QueryDatabaseAuthenticationHandler" p:dataSource-ref="dataSource" p:sql="select password from tb_user where username = ?" p:passwordEncoder-ref="passwordEncoder"/> |
然后在配置文件开始部分找到如下配置
|
<bean id="authenticationManager" class="org.jasig.cas.authentication.PolicyBasedAuthenticationManager"> <constructor-arg> <map> <entry key-ref="proxyAuthenticationHandler" value-ref="proxyPrincipalResolver" /> <entry key-ref="primaryAuthenticationHandler" value-ref="primaryPrincipalResolver" /> </map> </constructor-arg> <property name="authenticationPolicy"> <bean class="org.jasig.cas.authentication.AnyAuthenticationPolicy" /> </property> </bean> |
其中
|
<entry key-ref="primaryAuthenticationHandler" value-ref="primaryPrincipalResolver" /> |
一句是使用固定的用户名和密码,我们在下面可以看到这两个bean ,如果我们使用数据库认证用户名和密码,需要将这句注释掉。
添加下面这一句配置
|
<entry key-ref="dbAuthHandler" value-ref="primaryPrincipalResolver"/> |
(2)将以下三个jar包放入webappscasWEB-INFlib下
(这三个jar包在资源casjar目录下)
用数据库中的用户名和密码进行测试
3.CAS服务端界面改造
3.1需求分析
我们现在动手将CAS默认的登录页更改为自己的登风网登陆页
3.2改头换面
3.2.1拷贝资源
(1)将登风网的登陆页login.html拷贝到cas系统下WEB-INFviewjspdefaultui 目录下
(2)将css js等文件夹拷贝到 cas目录下
(3) 将原来的casLoginView.jsp 改名(可以为之后的修改操作做参照),将login.html改名为casLoginView.jsp
3.2.2修改页面
编辑casLoginView.jsp 内容
(1)添加指令
|
<%@ page pageEncoding="UTF-8" %> <%@ page contentType="text/html; charset=UTF-8" %> <%@ taglib prefix="c" uri="http://java.sun.com/jsp/jstl/core" %> <%@ taglib prefix="spring" uri="http://www.springframework.org/tags" %> <%@ taglib prefix="form" uri="http://www.springframework.org/tags/form" %> <%@ taglib prefix="fn" uri="http://java.sun.com/jsp/jstl/functions" %> |
(2)修改form标签
|
<form:form method="post" id="fm1" commandName="${commandName}" htmlEscape="true" class="sui-form"> ...... </form:form> |
(3)修改用户名框
|
<form:input id="username" tabindex="1" accesskey="${userNameAccessKey}" path="username" autocomplete="off" htmlEscape="true" placeholder="邮箱/用户名/手机号" class="span2 input-xfat" /> |
(4)修改密码框
|
<form:password id="password" tabindex="2" path="password" accesskey="${passwordAccessKey}" htmlEscape="true" autocomplete="off" placeholder="请输入密码" class="span2 input-xfat" /> |
(5)修改登陆按钮
|
<input type="hidden" name="lt" value="${loginTicket}" /> <input type="hidden" name="execution" value="${flowExecutionKey}" /> <input type="hidden" name="_eventId" value="submit" /> <input class="sui-btn btn-block btn-xlarge btn-danger" accesskey="l" value="登陆" type="submit" /> |
修改后效果如下:

3.3错误提示
在表单内加入错误提示框
|
<form:errors path="*" id="msg" cssClass="errors" element="div" htmlEscape="false" /> |
测试:输入错误的用户名和密码,提示是英文。这个提示信息是在WEB-INFclasses目录下的messages.properties文件中
|
authenticationFailure.AccountNotFoundException=Invalid credentials. authenticationFailure.FailedLoginException=Invalid credentials. |
设置国际化为zn_CN ,修改cas-servlet.xml
|
<bean id="localeResolver" class="org.springframework.web.servlet.i18n.CookieLocaleResolver" p:defaultLocale="zh_CN" /> |
我们需要将此信息拷贝到messages_zh_CN.properties下,并改为中文提示(转码)
|
authenticationFailure.AccountNotFoundException=u7528u6237u4E0Du5B58u5728. authenticationFailure.FailedLoginException=u5BC6u7801u9519u8BEF. |
第一个是用户名不存在时的错误提示
第二个是密码错误的提示
4. CAS客户端与SpringSecurity集成
4.1 Spring Security测试工程搭建
(1)建立Maven项目casclient_demo3 ,引入spring依赖和spring secrity 相关依赖 ,tomcat端口设置为9003
(2)建立web.xml ,添加过滤器等配置
(3)创建配置文件spring-security.xml
(4)添加html页面

index.html
<!DOCTYPE html>
<html>
<head>
<meta charset="UTF-8">
<title>首页</title>
</head>
<body>
欢迎进入神奇的spring security世界1~~~  <a href="logout/cas">退出</a>
</body>
</html>
index2.html
<!DOCTYPE html>
<html>
<head>
<meta charset="UTF-8">
<title>首页</title>
</head>
<body>
你已退出神奇的spring security世界~~~ 再见!
</body>
</html>
login_error.html
<!DOCTYPE html>
<html>
<head>
<meta charset="UTF-8">
<title>首页</title>
</head>
<body>
用户名或密码错误~~~
</body>
</html>
以上步骤参照我们第4章的spring-security-demo
4.2 Spring Security与 CAS集成
(1)引入依赖
|
<dependency> <groupId>org.springframework.security</groupId> <artifactId>spring-security-cas</artifactId> <version>4.1.0.RELEASE</version> </dependency> <dependency> <groupId>org.jasig.cas.client</groupId> <artifactId>cas-client-core</artifactId> <version>3.3.3</version> <exclusions> <exclusion> <groupId>org.slf4j</groupId> <artifactId>log4j-over-slf4j</artifactId> </exclusion> </exclusions> </dependency> |
(2)修改spring-security.xml
|
<?xml version="1.0" encoding="UTF-8"?> <beans:beans xmlns="http://www.springframework.org/schema/security" xmlns:beans="http://www.springframework.org/schema/beans" xmlns:xsi="http://www.w3.org/2001/XMLSchema-instance" xsi:schemaLocation="http://www.springframework.org/schema/beans http://www.springframework.org/schema/beans/spring-beans.xsd http://www.springframework.org/schema/security http://www.springframework.org/schema/security/spring-security.xsd">
<!-- entry-point-ref 入口点引用 --> <http use-expressions="false" entry-point-ref="casProcessingFilterEntryPoint"> <intercept-url pattern="/**" access="ROLE_USER"/> <csrf disabled="true"/> <!-- custom-filter为过滤器, position 表示将过滤器放在指定的位置上,before表示放在指定位置之前 ,after表示放在指定的位置之后 --> <custom-filter ref="casAuthenticationFilter" position="CAS_FILTER" /> <custom-filter ref="requestSingleLogoutFilter" before="LOGOUT_FILTER"/> <custom-filter ref="singleLogoutFilter" before="CAS_FILTER"/> </http>
<!-- CAS入口点 开始 --> <beans:bean id="casProcessingFilterEntryPoint" class="org.springframework.security.cas.web.CasAuthenticationEntryPoint"> <!-- 单点登录服务器登录URL --> <beans:property name="loginUrl" value="http://localhost:9100/cas/login"/> <beans:property name="serviceProperties" ref="serviceProperties"/> </beans:bean> <beans:bean id="serviceProperties" class="org.springframework.security.cas.ServiceProperties"> <!--service 配置自身工程的根地址+/login/cas --> <beans:property name="service" value="http://localhost:9003/login/cas"/> </beans:bean> <!-- CAS入口点 结束 -->
<!-- 认证过滤器 开始 --> <beans:bean id="casAuthenticationFilter" class="org.springframework.security.cas.web.CasAuthenticationFilter"> <beans:property name="authenticationManager" ref="authenticationManager"/> </beans:bean> <!-- 认证管理器 --> <authentication-manager alias="authenticationManager"> <authentication-provider ref="casAuthenticationProvider"> </authentication-provider> </authentication-manager> <!-- 认证提供者 --> <beans:bean id="casAuthenticationProvider" class="org.springframework.security.cas.authentication.CasAuthenticationProvider"> <beans:property name="authenticationUserDetailsService"> <beans:bean class="org.springframework.security.core.userdetails.UserDetailsByNameServiceWrapper"> <beans:constructor-arg ref="userDetailsService" /> </beans:bean> </beans:property> <beans:property name="serviceProperties" ref="serviceProperties"/> <!-- ticketValidator 为票据验证器 --> <beans:property name="ticketValidator"> <beans:bean class="org.jasig.cas.client.validation.Cas20ServiceTicketValidator"> <beans:constructor-arg index="0" value="http://localhost:9100/cas"/> </beans:bean> </beans:property> <beans:property name="key" value="an_id_for_this_auth_provider_only"/> </beans:bean> <!-- 认证类 --> <beans:bean id="userDetailsService" class="cn.itcast.demo.service.UserDetailServiceImpl"/>
<!-- 认证过滤器 结束 --> <!-- 单点登出 开始 --> <beans:bean id="singleLogoutFilter" class="org.jasig.cas.client.session.SingleSignOutFilter"/> <beans:bean id="requestSingleLogoutFilter" class="org.springframework.security.web.authentication.logout.LogoutFilter"> <beans:constructor-arg value="http://localhost:9100/cas/logout?service=http://www.baidu.com"/> <beans:constructor-arg> <beans:bean class="org.springframework.security.web.authentication.logout.SecurityContextLogoutHandler"/> </beans:constructor-arg> <beans:property name="filterProcessesUrl" value="/logout/cas"/> </beans:bean> <!-- 单点登出 结束 --> </beans:beans> |
(3)创建UserDetailsServiceImpl
|
/** * 认证类 */ public class UserDetailServiceImpl implements UserDetailsService { @Override public UserDetails loadUserByUsername(String username) throws UsernameNotFoundException { //构建角色集合 List<GrantedAuthority> authorities=new ArrayList(); authorities.add(new SimpleGrantedAuthority("ROLE_USER")); return new User(username, "" , authorities); } } |
这个类的主要作用是在登陆后得到用户名,可以根据用户名查询角色或执行一些逻辑。
4.3获取登录名
我们在处理后端逻辑需要获得登录名,那么如何获取单点登录的用户名呢? 其实和我们之前获得用户名的方式是完全相同的,我们下面来做个测试。
(1)web.xml 添加springmvc
|
<servlet> <servlet-name>springmvc</servlet-name> <servlet-class>org.springframework.web.servlet.DispatcherServlet</servlet-class> <!-- 指定加载的配置文件 ,通过参数contextConfigLocation加载--> <init-param> <param-name>contextConfigLocation</param-name> <param-value>classpath:springmvc.xml</param-value> </init-param> </servlet>
<servlet-mapping> <servlet-name>springmvc</servlet-name> <url-pattern>*.do</url-pattern> </servlet-mapping> |
(2)创建springmvc.xml
|
<context:component-scan base-package="cn.itcast.demo" /> <mvc:annotation-driven /> |
(3)创建UserController
|
@RestController public class UserController { @RequestMapping("/findLoginUser") public void findLoginUser(){ String name = SecurityContextHolder.getContext().getAuthentication().getName(); System.out.println(name); } } |
地址栏输入http://localhost:9003/findLoginUser.do 即可在控制台看到输出的登录名。
4.4退出登录
修改spring-security.xml
|
<beans:bean id="requestSingleLogoutFilter" class="org.springframework.security.web.authentication.logout.LogoutFilter"> <beans:constructor-arg value="http://localhost:9100/cas/logout?service=http://localhost:9003/index2.html"/> <beans:constructor-arg> <beans:bean class="org.springframework.security.web.authentication.logout.SecurityContextLogoutHandler"/> </beans:constructor-arg> <beans:property name="filterProcessesUrl" value="/logout/cas"/> </beans:bean> |
在页面上添加链接
|
<a href="/logout/cas">退出登录</a> |
创建index2.html,将index2.html设置为可匿名访问
|
<http pattern="/index2.html" security="none"></http> |