一般大家调试都是在浏览器端调试js的,不过有些时候也想和后台一样在代码工具里面调试js或者node.js,下面介绍下怎样在vscode里面走断点。
1,用来调试js
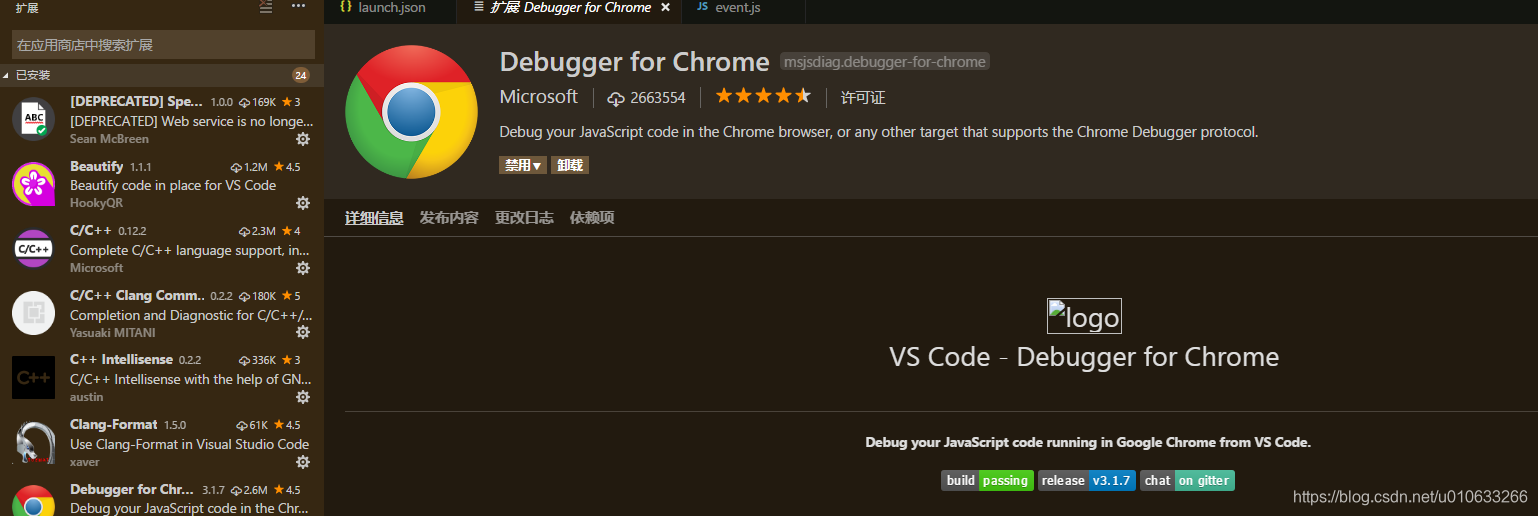
一:在左侧扩展中搜索Debugger for Chrome并点击安装:
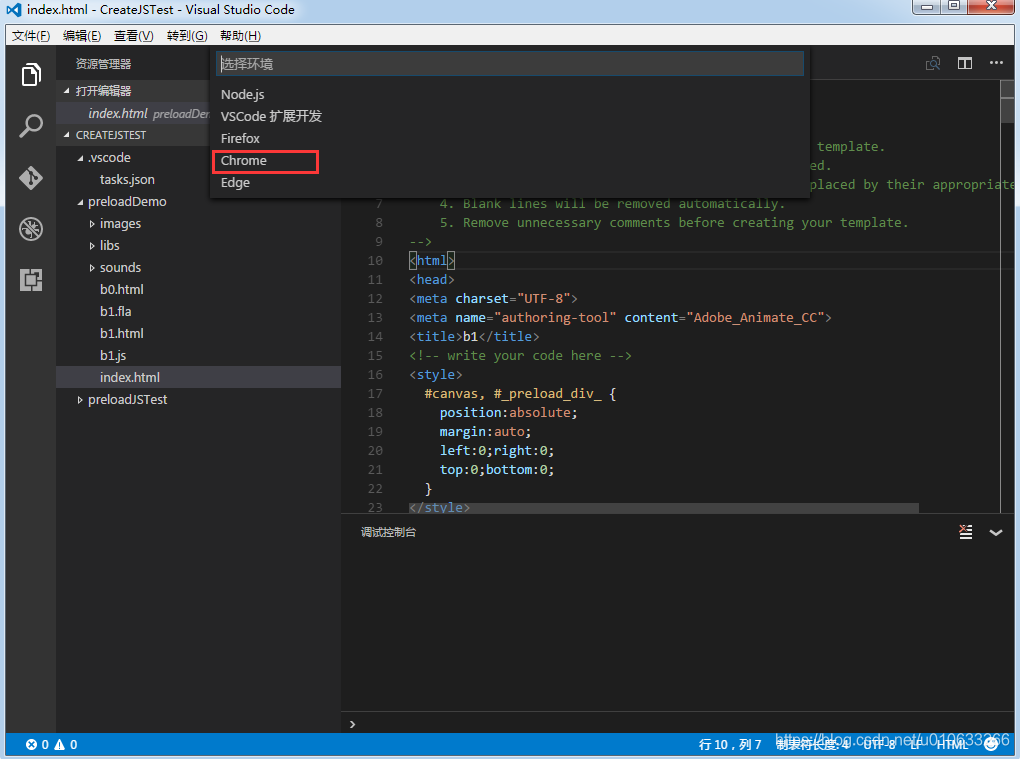
二:在自己的html工程目录下面点击f5,或者在左侧选择调试按钮

,在上方

,选择下拉按钮,会有一个添加,选择chrome
3:之后会出现laungh.json的配置文件在自己的项目目录下面

4:不过对于不同的代码文件要调试的话,每次都需要修改一下配置文件
{
    "version": "0.2.0",
    "configurations": [{
            "type": "chrome",
            "request": "launch",
            "name": "Launch Chrome against localhost",
            "url": "http://localhost:8080",
            "webRoot": "${workspaceRoot}"
        },
        {
            "type": "chrome",
            "request": "attach",
            "name": "Attach to Chrome",
            "port": 9222,
            "webRoot": "${workspaceRoot}"
        },
        {
            "name": "Launch index.html (disable sourcemaps)",
            "type": "chrome",
            "request": "launch",
            "sourceMaps": false,
            "file": "${workspaceRoot}/jsTest/test1/test1.html"  #每次需要修改这里的文件地址
        }
    ]
}
5:到这里就可以进行调试了,在

中选择 Launch index.html (disable sourcemaps) 调试项,按f5调试,会出现,同时打开goole浏览器,点击

,即可进入调试阶段
2,用来调试node.js
调试nodejs有很多方式,可以看这一篇 https://blog.risingstack.com/how-to-debug-nodej-js-with-the-best-tools-available/,
其中我最喜欢使用的还是V8 Inspector和vscode的方式。
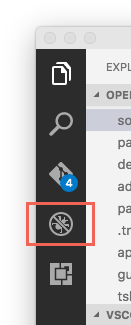
在vscode中,点击那个蜘蛛的按钮
就能看出现debug的侧栏,接下来添加配置
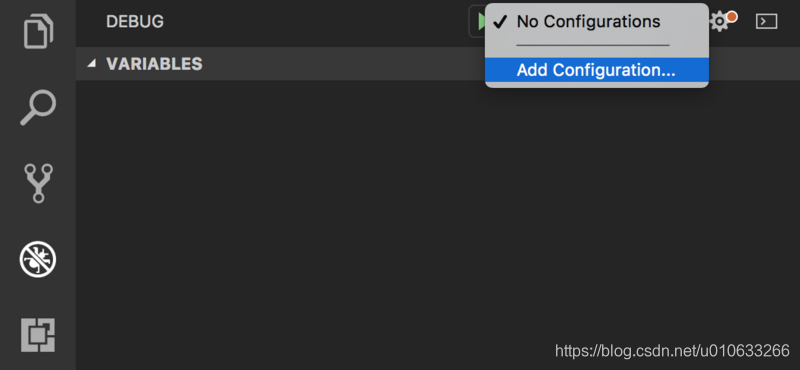
选择环境
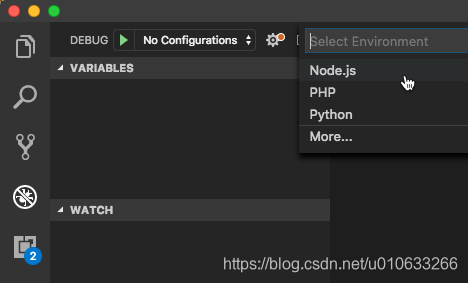
就能看到launch.json的文件了。
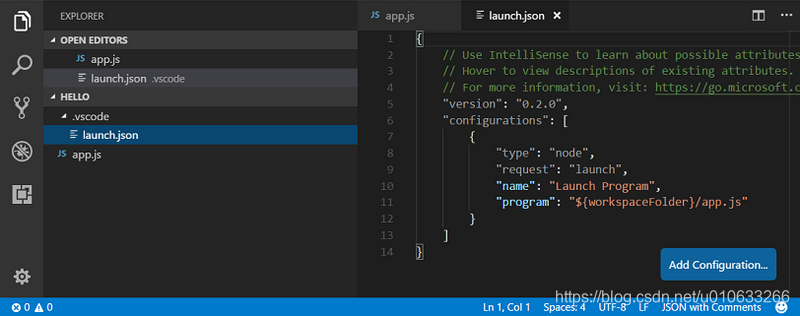
启动的时候,选择相应的配置,然后点击指向右侧的绿色三角

launch模式与attach模式
{
  "version": "0.2.0",
  "configurations": [
    {
      "type": "node",
      "request": "launch",
      "name": "Launch Program",
      "program": "${workspaceRoot}/index.js"
    },
    {
      "type": "node",
      "request": "attach",
      "name": "Attach to Port",
      "address": "localhost",
      "port": 5858
    }
  ]
}
当request为launch时,就是launch模式了,这是程序是从vscode这里启动的,如果是在调试那将一直处于调试的模式。而attach模式,是连接已经启动的服务。比如你已经在外面将项目启动,突然需要调试,不需要关掉已经启动的项目再去vscode中重新启动,只要以attach的模式启动,vscode可以连接到已经启动的服务。当调试结束了,断开连接就好,明显比launch更方便一点。
在debug中使用npm启动
很多时候我们将很长的启动命令及配置写在了package.json的scripts中,比如
"scripts": {
  "start": "NODE_ENV=production PORT=8080 babel-node ./bin/www",
  "dev": "nodemon --inspect --exec babel-node --presets env ./bin/www"
},
我们希望让vscode使用npm的方式启动并调试,这就需要如下的配置
{
  "name": "Launch via NPM",
  "type": "node",
  "request": "launch",
  "runtimeExecutable": "npm",
  "runtimeArgs": [
    "run-script", "dev"    //这里的dev就对应package.json中的scripts中的dev
  ],
    "port": 9229    //这个端口是调试的端口,不是项目启动的端口
},
在debug中使用nodemon启动
仅仅使用npm启动,虽然在dev命令中使用了nodemon,程序也可以正常的重启,可重启了之后,调试就断开了。所以需要让vscode去使用nodemon启动项目。
{
  "type": "node",
  "request": "launch",
  "name": "nodemon",
  "runtimeExecutable": "nodemon",
  "args": ["${workspaceRoot}/bin/www"],
  "restart": true,
  "protocol": "inspector",    //相当于--inspect了
  "sourceMaps": true,
  "console": "integratedTerminal",
  "internalConsoleOptions": "neverOpen",
  "runtimeArgs": [    //对应nodemon --inspect之后除了启动文件之外的其他配置
    "--exec",
    "babel-node",
    "--presets",
    "env"
  ]
},
注意这里的runtimeArgs,如果这些配置是写在package.json中的话,就是这样的
nodemon --inspect --exec babel-node --presets env ./bin/www
这样就很方便了,项目可以正常的重启,每次重启一样会开启调试功能。
可是,我们并不想时刻开启调试功能怎么办?
这就需要使用上面说的attach模式了。
使用如下的命令正常的启动项目
nodemon --inspect --exec babel-node --presets env ./bin/www
当我们想要调试的时候,在vscode的debug中运行如下的配置
{
  "type": "node",
  "request": "attach",
  "name": "Attach to node",
  "restart": true,
  "port": 9229
}