https://blog.csdn.net/weixin_42024288/article/details/80364441
1.安装webpy模块:
pip install web.py==0.40.dev
另外将:
C:Python34Libsite-packagesweb.py-0.40.dev0-py3.4.eggweb emplate.py
中约1022行return Template(open(path).read(), filename=path, **self._keywords)
修改为:
return Template(open(path,encoding='utf-8').read(), filename=path, **self._keywords)
不然会引发编码error。
2.设置urls.
-
import web
-
urls=('/index','index','/login','login')
有网友写到,urls是一个元组变量,成员必须成对出现,奇数元素表示url,其后的元素表示对应的处理类。可见urls的规范必须是你的html(名称为/html作为url),后面跟着这个url里面对应的类,上述代码对应的类名字叫index,还可以起其他名字。那么下面就必须对index和login两个类加以定义(注意,类的大小写不要错,还有,请注意,/之后的网站后缀名一定要是html,htm是不行的。)
3.设置类。
代码标准的框架为
-
class index:
-
def GET(self):
-
return render.index()
当然,return或者raise这种函数是必须要写的,但可以写多种内容,比如 return render.index()的含义就是在客户端显示出index.html这个页面。但是如果index页面本身就是一个空页面,我想返回文字该怎么办呢?那么可以改成:
-
class index():
-
def GET(self):
-
return '<h1>hello world!</h1>'
当然,现在基本很多稍微复杂一些的网站会有登录和注册页面。这就需要去设置session了,记录登录的状态。比如这个python代码。
-
#!/usr/bin/env python
-
#coding=utf-8
-
import web
-
from web import form
-
urls = (
-
'/','Index',
-
'/login','Login',
-
)
-
render =web.template.render("templates")
-
'''为什么一定要把这些html
-
放在与py文件同一目录下的templates文件夹中?
-
其实不放在这个文件夹中也是可以实现的,
-
但是在有引入css,jQuery的时候必须保证html放在templates文件夹,
-
而且还要把css,jQuery放在跟templates文件夹相同目录的static文件夹下,
-
文件夹名都是不允许变动的,不要问我为什么,webpy就是这样不善解人意。'''
-
web.config.debug = False
-
#非调试模式,不加这行代码会经常报错的。
-
app = web.application(urls, locals())
-
session=web.session.Session(app,web.session.DiskStore('sessions'))
-
#建立sessions文件夹
下面就到了写“类”的环节了。
先看一下完整代码:(一开始写了一个不用cookie计时的代码,不太规范,下面还有一个使用cookie,不用import time的代码)
-
#!/usr/bin/env python
-
#coding=utf-8
-
import web
-
from web import form
-
import time
-
urls = (
-
'/','Index',
-
'/login','Login',
-
)
-
-
render = web.template.render("templates")
-
allowed = (
-
('admin','123123'),('111111','111111'),
-
)
-
web.config.debug = False
-
app = web.application(urls, locals())
-
Time1=0
-
Time2=0
-
session = web.session.Session(app, web.session.DiskStore('sessions'))
-
a=session.get('logged_in',False)
-
class Index:
-
def GET(self):
-
global a,Time2,Time1
-
if a==True:
-
Time2=time.time()/60
-
changeTime=Time2-Time1
-
if changeTime<=1:
-
return '<h1>Login Success!!!</h1>'
-
else:
-
raise web.seeother('/login')
-
else:
-
raise web.seeother('/login')
-
class Login:
-
def GET(self):
-
return render.login()
-
def POST(self):
-
global a,Time1
-
message = web.input()
-
username = message.get('username')
-
passwd = message.get('passwd')
-
if (username,passwd) in allowed:
-
a = True
-
Time1=time.time()/60
-
raise web.seeother('/')
-
else:
-
return '<h1>Login Error!!!</h1></br><a href="/login">Login</a>'
-
-
-
if __name__ == '__main__':
-
app.run()
我会在此说一下我对session.get()的理解,相信有很多人对此还不是很明白。首先,要知道的一点是session.get("logged_in",False)和session.get("logged_in",True)的含义。
session是用户请求得到页面时产生的,这个session是类似于字典的一个东西,大家可能会问,这个logged_in是从哪来的?实际上,这个logged_in根本不存在,换句话说,我把logged_in换成任何一个自己定义的变量都可以。
测试一下
a=session.get('logged_in',True)
print(a)
结果是True
a=session.get('logged_in',False)
print(a)
结果是False
通俗来讲session.get("logged_in",False)就是在session里面找logged_in,如果找不到就返回后面的参数。
-
if express:
-
语句1
-
else:
-
语句2
我们可以想象成express=session.get("logged_in",False) ,session里找不到logged_in,所以返回False,
对于express=session.get("logged_in",True) 的解释大概相同,从session里面找logged_in, 不能找到,所以返回True。并执行语句1。
总的来讲,session.get('xxx',xxxx)有两个参数,第一个是表明在session中查找xxx,第二个参数为false/true,表明的是如果没找到,返回的默认值为False or True。
我们再来看一下,设置成if session.get("logged_in",False) :和设置成if session.get("logged_in",True) :的区别。
if session.get("logged_in",False) :
-
a=session.get('logged_in',False)
-
class Index:
-
def GET(self):
-
global a
-
if a==False:
-
raise web.seeother('/login')
-
return '<h1>Login Success!!!</h1>'
-
class Login:
-
def GET(self):
-
return render.login()
-
def POST(self):
-
global a
-
message = web.input()
-
username = message.get('username')
-
passwd = message.get('passwd')
-
if (username,passwd) in allowed:
-
a = True
-
raise web.seeother('/')
-
else:
-
return '<h1>Login Error!!!</h1></br><a href="/login">Login</a>'
if session.get("logged_in",True) : 这种写法亲测有效,后文会讲一下如果发现错误的解决方式。
顺便提醒一句,raise web.seeother()是标准写法,raise一般是排除错误用的,返回错误信息。这里可以理解成返回了一个303异常。但是raise不是必须有的,我可以写成return web.seeother()或者前面啥都不写,直接web.seeother()都是可行的,但加上raise的写法是最标准的。
-
a=session.get('logged_in',True)
-
class Index:
-
def GET(self):
-
global a
-
if a==True:
-
raise web.seeother('/login')
-
return '<h1>Login Success!!!</h1>'
-
class Login:
-
def GET(self):
-
return render.login()
-
def POST(self):
-
global a
-
message = web.input()
-
username = message.get('username')
-
passwd = message.get('passwd')
-
if (username,passwd) in allowed:
-
a = False
-
raise web.seeother('/')
-
else:
-
return '<h1>Login Error!!!</h1></br><a href="/login">Login</a>'
做到这步想再深入地研究一下,session是什么时候产生的呢?
session = web.session.Session(app, web.session.DiskStore('sessions'))这一步只能生成一个名叫sessions的文件夹
那么session是什么时候产生的?经检验,session是用户输入localhost:8080去get网页内容时产生的。并且输入一次localhost:8080,只能得到一个session文件,截图为证:
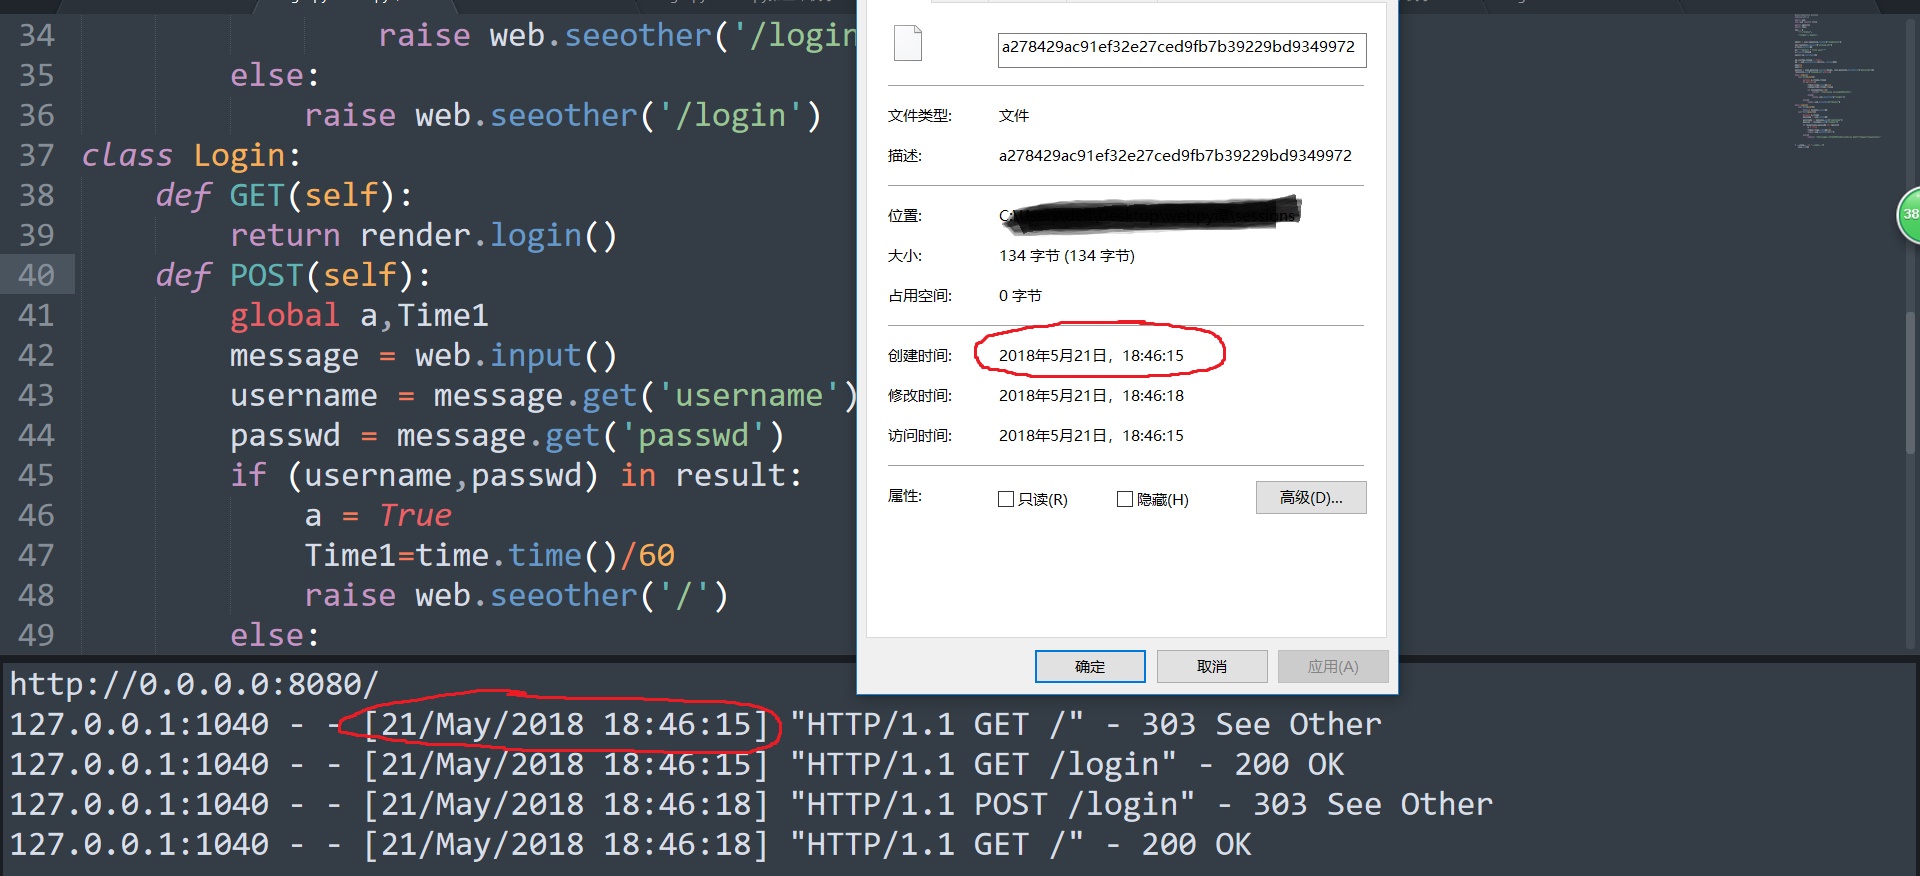
至于为什么get网站时会自动生成session的原理就希望大家百度解决了。
其实这里头的session没什么用,完全可以一开始设置a=False,通过改a的值实现网页跳转,session只有在里面存储值的时候才能发挥它真正的作用。比如存个用户名密码啥的。
还有一件事情要提一下吧,看上面的截图,你会发现总会有什么:
"HTTP/1.1 GET /favicon.ico" - 404 Not Found
可是index login html代码中也没有设置这个啊!这是从哪来的呢?看完这个解释你们可能不会觉得奇怪了,favicon.ico就是那个显示在你网页的title文字左面的那个小图片,比如CSDN左面的那个红白相间的图案C, 每次用户请求页面时,webpy都会自动查找有没有这个小图片。这个东西不是必须需要的,如果你自己想添加自行百度。
讲完了session,看一下我还用了python中的time模块,是为了让用户可以在1分钟内保持登录状态,不用重新输入用户名和密码。time.time()是获取1970年到现在的秒数,以秒为单位。
还有用cookie设置过期时间的方式。如下:(先设置一个过期时间为60s的cookie,获取这个cookie,如果这个cookie不存在,是获取不到的,用这个原理设置用于登录状态。)
-
#!/usr/bin/env python
-
#coding=utf-8
-
import web
-
from web import form
-
import sqlite3
-
import time
-
urls = (
-
'/','Index',
-
'/login','Login',
-
)
-
-
render = web.template.render("templates")
-
result=(('admin','123123'),('111111','111111'),)
-
web.config.debug = False
-
app = web.application(urls, locals())
-
class Index:
-
def GET(self):
-
if web.cookies().get("hellocookie")==None:
-
raise web.seeother('/login')
-
else:
-
return '<h1>Login Success!!!</h1>'
-
class Login:
-
def GET(self):
-
return render.login()
-
def POST(self):
-
message = web.input()
-
username = message.get('username')
-
passwd = message.get('passwd')
-
if (username,passwd) in result:
-
web.setcookie("hellocookie","",30)
-
raise web.seeother('/')
-
else:
-
return '<h1>Login Error!!!</h1></br><a href="/login">Login</a>'
-
-
-
if __name__ == '__main__':
-
app.run()
然后附上index.html和login.html的代码。
index.html
-
-
<html xmlns="http://www.w3.org/1999/xhtml">
-
<head>
-
<meta http-equiv="Content-Type" content="text/html; charset=utf-8" />
-
<title></title>
-
</head>
-
<body>
-
-
</body>
-
</html>
login.html
-
<html>
-
<head>
-
<title></title>
-
</head>
-
-
<h1>Login</h1>
-
<FORM method=POST>
-
<table id="login">
-
<tr>
-
<td>User: </td>
-
<td><input type=text name='username'></td>
-
</tr>
-
<tr>
-
<td>Password: </td>
-
<td><input type="password" name=passwd></td>
-
</tr>
-
<tr>
-
<td></td>
-
<td><input type=submit></td>
-
</tr>
-
</table>
-
</form>
-
</html>
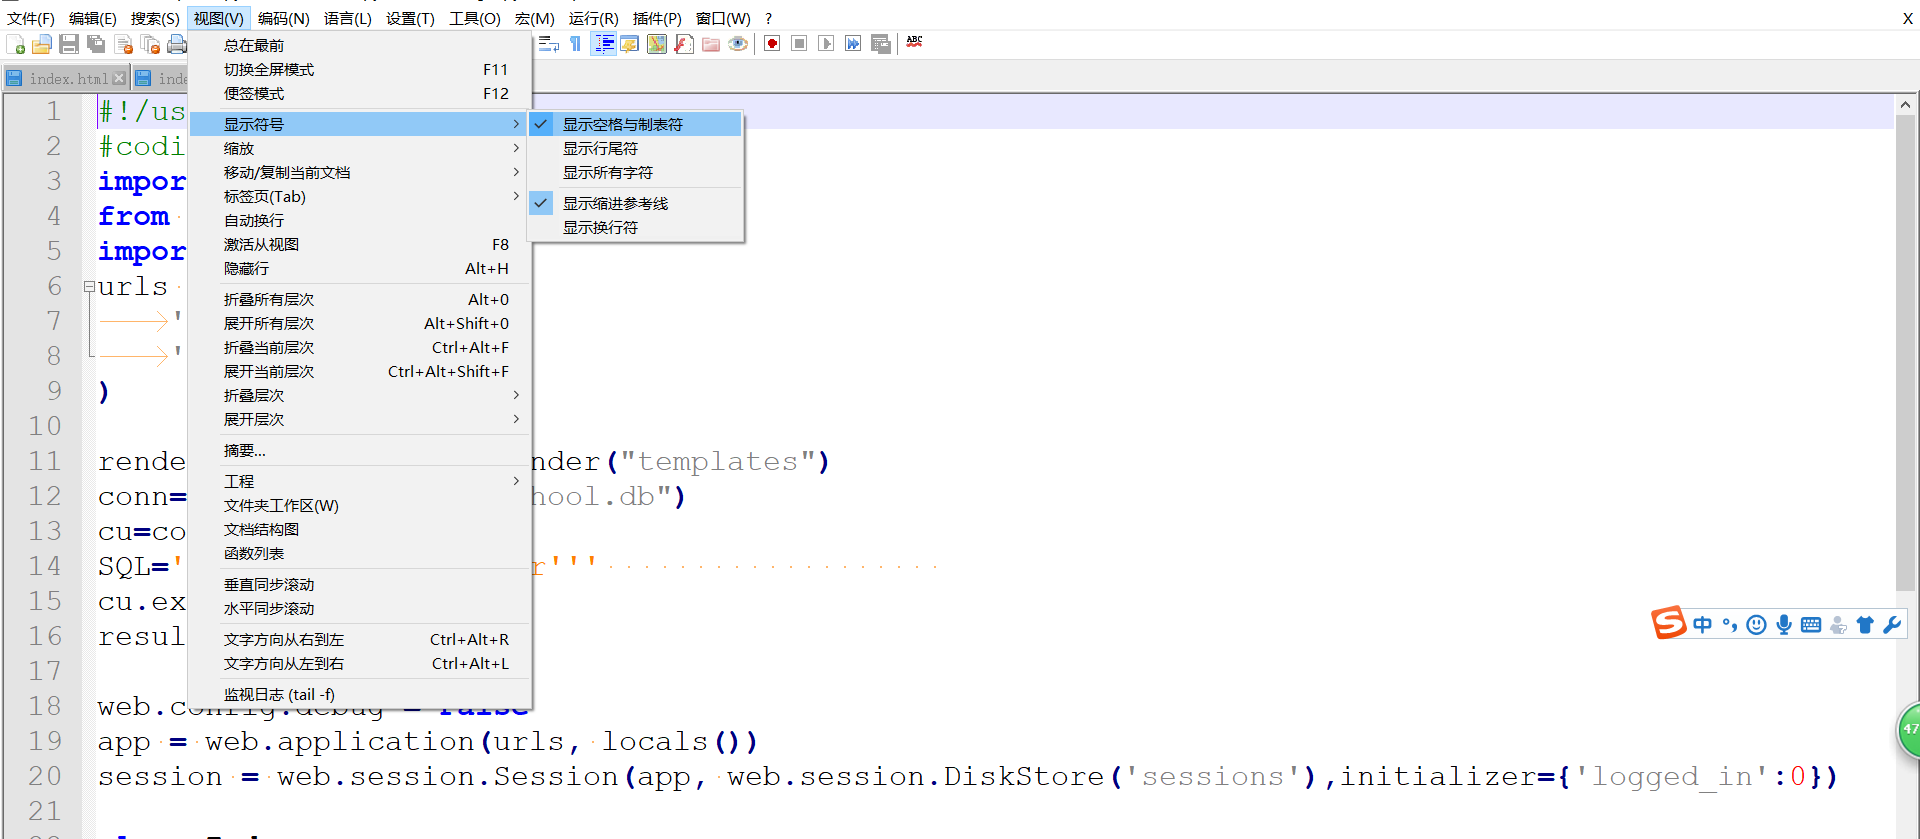
最后的最后,尽量不要复制上面的这些代码,因为很容易就会发生syntax error,因为本人为了简单也是反复复制了一些代码,tab和space混用,这些用眼睛看是看不出来的,但是一运行就标红,最好的解决办法是下载一个notepad++,点击“视图”——“显示符号”——“显示空格和制表符”,看到有不一样的空格改掉就好了