从Python内部生成HTML并不是一件有趣的事情,并且实际上非常麻烦,因为您必须自己进行HTML转义以确保应用程序的安全。因此,Flask 会自动为您配置Jinja2模板引擎。
from flask import render_template

@app.route('/hello/')
@app.route('/hello/<name>')
def hello(name=None):
    return render_template('hello.html', name=name)
案例1:一个模块:
/application.py
/templates
    /hello.html
案例2:一个包:
/application
    /__init__.py
    /templates
        /hello.html
这是一个示例模板:
<!doctype html>
<title>Hello from Flask</title>
{% if name %}
  <h1>Hello {{ name }}!</h1>
{% else %}
  <h1>Hello, World!</h1>
{% endif %}
1. 语法
-
语句, 比如if判断、for循环等:
{% ... %} -
表达式, 比如字符串、变量、函数调用等:
{{ ... }} -
注释
{# ... #}
另外,在模板中,Jinja2支持使用“.”获取变量的属性,比如user字典中的username键值通过“.”获取,即user.username,在效果上等同于user['username']。
{% if user.bio %}
    <i>{{ user.bio }}</i>
{% else %}
    <i>This user has not provided a bio.</i>
{% endif %}
<ul>
    {% for movie in movies %}
    <li>{{ movie.name }} - {{ movie.year }}</li>
    {% endfor %}
</ul>
2. 从实例入门
2.1. html模板
templates/index.html:主页模板
<!DOCTYPE html>
<html lang="en">
<head>
<title>{{ name }}'s Watchlist</title>
</head>
<body>
<h2>{{ name }}'s Watchlist</h2>
{# 使用 length 过滤器获取 movies 变量的长度 #}
<p>{{ movies|length }} Titles</p>
<ul>
{% for movie in movies %} {# 迭代 movies 变量 #}
<li>{{ movie.title }} - {{ movie.year }}</li> {# 等同于 movie['title'] #}
{% endfor %} {# 使用 endfor 标签结束 for 语句 #}
</ul>
<footer>
<small>© 2018 <a href="http://helloflask.com/tutorial">HelloFlask</a></small>
</footer>
</body>
</html>
2.2. 过滤器
为了方便对变量进行处理,Jinja2 提供了一些过滤器,语法形式如下:
{{ 变量|过滤器 }}
左侧是变量,右侧是过滤器名。比如,上面的模板里使用 length 过滤器来获取 movies 的长度,类似 Python 里的 len() 函数。
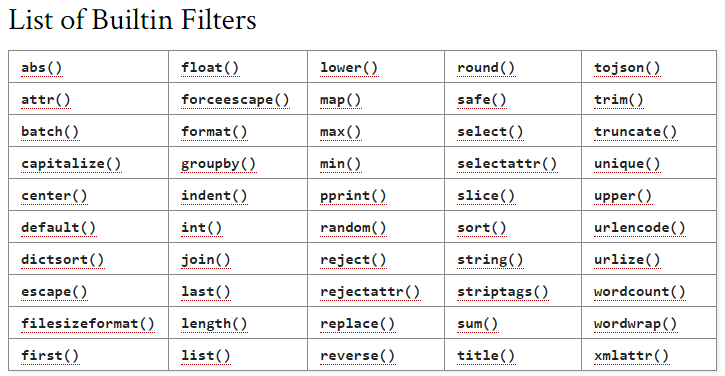
提示: 访问 http://jinja.pocoo.org/docs/2.10/templates/#list-of-builtin-filters 查看所有可用的过滤器。
2.3. 准备虚拟数据
为了模拟页面渲染,我们需要先创建一些虚拟数据,用来填充页面内容:
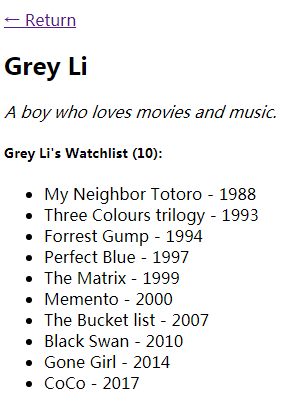
name = 'Grey Li'
movies = [
    {'title': 'My Neighbor Totoro', 'year': '1988'},
    {'title': 'Dead Poets Society', 'year': '1989'},
    {'title': 'A Perfect World', 'year': '1993'},
    {'title': 'Leon', 'year': '1994'},
    {'title': 'Mahjong', 'year': '1996'},
    {'title': 'Swallowtail Butterfly', 'year': '1996'},
    {'title': 'King of Comedy', 'year': '1999'},
    {'title': 'Devils on the Doorstep', 'year': '1999'},
    {'title': 'WALL-E', 'year': '2008'},
    {'title': 'The Pork of Music', 'year': '2012'},
]
2.4. 渲染主页模板
使用 render_template() 函数可以把模板渲染出来,必须传入的参数为模板文件名(相对于 templates 根目录的文件路径),这里即 'index.html'。为了让模板正确渲染,我们还要把模板内部使用的变量通过关键字参数传入这个函数,如下所示:
from flask import Flask, render_template

# ...

@app.route('/')
def index():
    return render_template('index.html', name=name, movies=movies)
在传入 render_template() 函数的关键字参数中,左边的 movies 是模板中使用的变量名称,右边的 movies 则是该变量指向的实际对象。这里传入模板的 name 是字符串,movies 是列表,但能够在模板里使用的不只这两种 Python 数据结构,你也可以传入元组、字典、函数等。
render_template() 函数在调用时会识别并执行 index.html 里所有的 Jinja2 语句,返回渲染好的模板内容。在返回的页面中,变量会被替换为实际的值(包括定界符),语句(及定界符)则会在执行后被移除(注释也会一并移除)。
3. 模板上下文处理函数
对于多个模板内都需要使用的变量,我们可以使用 app.context_processor 装饰器注册一个模板上下文处理函数,如下所示:
@app.context_processor
def inject_user():  # 函数名可以随意修改
    user = User.query.first()
    return dict(user=user)  # 需要返回字典,等同于return {'user': user}
这个函数返回的变量(以字典键值对的形式)将会统一注入到每一个模板的上下文环境中,因此可以直接在模板中使用。
现在我们可以删除 404 错误处理函数和主页视图函数中的 user 变量定义,并删除在 render_template() 函数里传入的关键字参数:
@app.context_processor
def inject_user():
    user = User.query.first()
    return dict(user=user)

@app.errorhandler(404)
def page_not_found(e):
    return render_template('404.html'), 404

@app.route('/')
def index():
    movies = Movie.query.all()
    return render_template('index.html', movies=movies)
同样的,后面我们创建的任意一个模板,都可以在模板中直接使用 user 变量。
4. 使用模板继承组织模板
对于模板内容重复的问题,Jinja2 提供了模板继承的支持。这个机制和 Python 类继承非常类似:我们可以定义一个父模板,一般会称之为基模板(base template)。基模板中包含完整的 HTML 结构和导航栏、页首、页脚都通用部分。在子模板里,我们可以使用 extends 标签来声明继承自某个基模板。
基模板中需要在实际的子模板中追加或重写的部分则可以定义成块 block 。
{% block 块名称 %}作为开始标记{% endblock %}或{% endblock 块名称 %}作为结束标记
通过在子模板里定义一个同样名称的块,你可以向基模板的对应块位置追加或重写内容。
4.1. 编写基础模板
<!DOCTYPE html>
<html lang="en">
<head>
{% block head %}
<title>{{ user.name }}'s Watchlist</title>
<link rel="icon" href="{{ url_for('static', filename='favicon.ico') }}">
<link rel="stylesheet" href="{{ url_for('static', filename='style.css') }}" type="text/css">
{% endblock %}
</head>
<body>
<h2>
<img alt="Avatar" class="avatar" src="{{ url_for('static', filename='images/avatar.png') }}">
{{ user.name }}'s Watchlist
</h2>
<nav>
<ul>
<li><a href="{{ url_for('index') }}">Home</a></li>
</ul>
</nav>
{% block content %}{% endblock %}
<footer>
<small>© 2018 <a href="http://helloflask.com/tutorial">HelloFlask</a></small>
</footer>
</body>
</html>
在基模板里,我们添加了两个块,一个是包含 内容的 head 块,另一个是用来在子模板中插入页面主体内容的 content 块。在复杂的项目里,你可以定义更多的块,方便在子模板中对基模板的各个部分插入内容。另外,块的名字没有特定要求,你可以自由修改。
4.2. 编写子模板
创建了基模板后,子模板的编写会变得非常简单。下面是新的主页模板(index.html):
templates/index.html:继承基模板的主页模板
{% extends 'base.html' %}

{% block content %}
<p>{{ movies|length }} Titles</p>
<ul class="movie-list">
    {% for movie in movies %}
    <li>{{ movie.title }} - {{ movie.year }}
        <span class="float-right">
            <a class="imdb" href="https://www.imdb.com/find?q={{ movie.title }}" target="_blank" title="Find this movie on IMDb">IMDb</a>
        </span>
    </li>
    {% endfor %}
</ul>
<img alt="Walking Totoro" class="totoro" src="{{ url_for('static', filename='images/totoro.gif') }}" title="to~to~ro~">
{% endblock %}
第一行使用 extends 标签声明扩展自模板 base.html,可以理解成“这个模板继承自 base.html”。接着我们定义了 content 块,这里的内容会插入到基模板中 content 块的位置。
提示 默认的块重写行为是覆盖,如果你想向父块里追加内容,可以在子块中使用
super()声明,即{{ super() }}。
404 错误页面的模板类似,如下所示:
templates/404.html:继承基模板的 404 错误页面模板
{% extends 'base.html' %}

{% block content %}
<ul class="movie-list">
    <li>
        Page Not Found - 404
        <span class="float-right">
            <a href="{{ url_for('index') }}">Go Back</a>
        </span>
    </li>
</ul>
{% endblock %}
因为基模板会被所有其他页面模板继承,如果你在基模板中使用了某个变量,那么这个变量也需要使用模板上下文处理函数注入到模板里。