磁盘知识体系概括
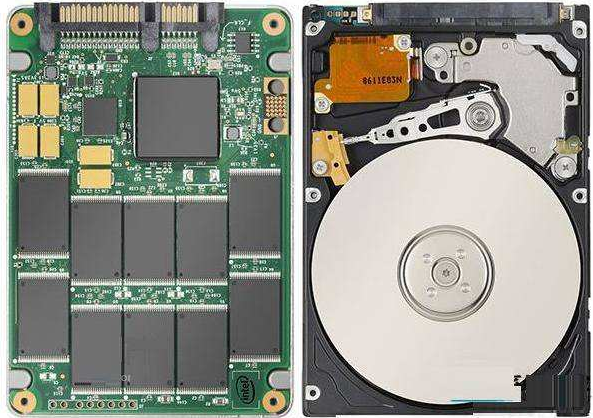
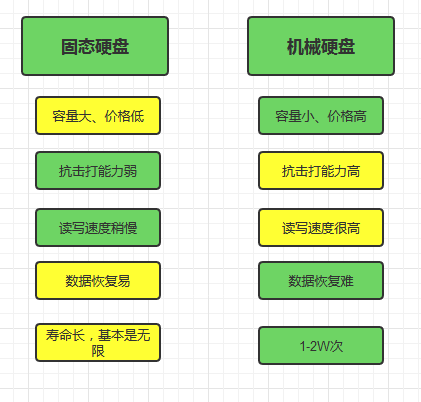
机械硬盘和固态硬盘
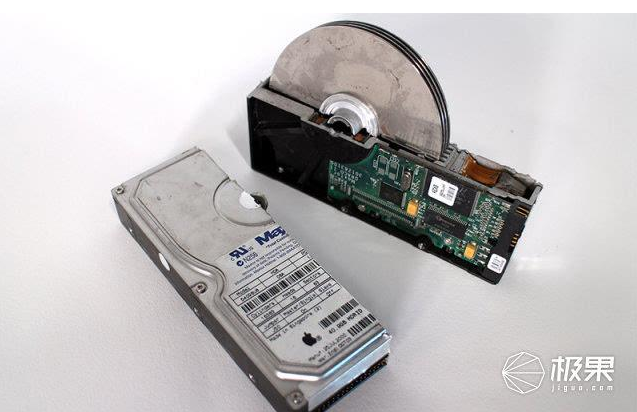
机械磁盘剖开图
磁盘工作的视频动画,主轴转动,机械手读写
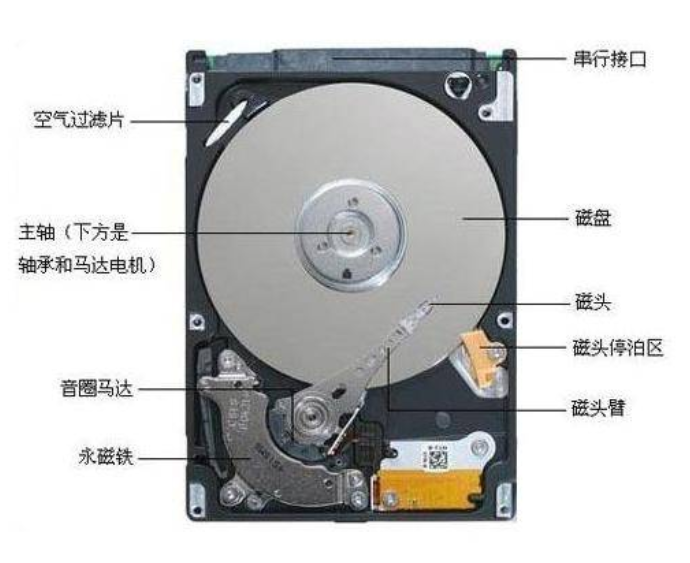
磁盘结构详解
磁盘外部结构
组成
主要由三部分组成:盘片、主轴(机械硬盘)、磁头。
转速
SAS硬盘,根据转速来划分,有常见的三种
7200转 容量在1TB~10TB
10K转 容量在300G~1.8T
15k转 容量在300G~900G
注:转速的表达用rpm,即round per minute
接口类型
磁盘接口:水壶的壶嘴,定义与服务器如何连接,将决定数据的读写速度
SATA, 也叫串口
SCSI,最早用于高端服务器,特点就是速度快,造价高
SAS,既要scsi的性能,又要sata的方便,就诞生了SAS
PCI-E,最初主要用于快速的设备价格最高,速度最快,网卡、显卡。慢慢的出现了硬盘,现在主要用于固态硬盘
机械硬盘一般用SATA、SAS;固态硬盘sata、sas、pci-e都有用
百度不同接口的图片,以他们的区别不同
磁盘内部组成

磁头(Head)
由上到下,从0开始编号
盘面数量 == 磁头数量
作用:用来写入和读取数据的
磁道(Track)
由外向内,从0开始编号
以主轴为中心的不同的圆环区域(呼啦圈)
扇区(Sector)
一个磁道上面的最小单位,从数字1开始
默认大小512字节
柱面(Cylinder)
不同盘面上相同的磁道,组成的图形(圆柱体)。
柱面的数量 == 磁道的数量
磁盘默认是按照柱面进行读写。
两种读写的方式:
磁头的切换---0磁头切换为1磁头,由电信号控制
磁道的变化(寻道)--- 机械的变化
单元块(Units)
表示一个柱面的大小(其实是固定的)
计算磁盘的大小
磁盘的大小 = 柱面数量 * 每个柱面的大小
柱面的大小 = 磁道的大小 * 磁头的数量
磁道的大小 = 扇区的大小 * 每个磁道的扇区数量
[root@learn-Linux001 ~]# fdisk -l

Disk /dev/sda: 8589 MB, 8589934592 bytes
255 heads, 63 sectors/track, 1044 cylinders
# 255磁头    63扇区/磁道        1044柱面
Units = cylinders of 16065 * 512 = 8225280 bytes
# 一个单元块的大小(柱面的大小)

Sector size (logical/physical): 512 bytes / 512 bytes
I/O size (minimum/optimal): 512 bytes / 512 bytes
Disk identifier: 0x000ad34b

   Device Boot      Start         End      Blocks   Id  System
/dev/sda1   *           1          26      204800   83  Linux
Partition 1 does not end on cylinder boundary.
/dev/sda2              26         124      786432   82  Linux swap / Solaris
Partition 2 does not end on cylinder boundary.
/dev/sda3             124        1045     7396352   83  Linux
计算
[root@learn-Linux001 ~]# echo 512*63|bc
32256
[root@learn-Linux001 ~]# #磁道的大小
[root@learn-Linux001 ~]# echo 512*63|bc
32256
[root@learn-Linux001 ~]# #柱面的大小
[root@learn-Linux001 ~]# echo 512*63*255|bc
8225280
[root@learn-Linux001 ~]# #磁盘的大小
[root@learn-Linux001 ~]# echo 512*63*255*1044|bc
8587192320
磁盘容量单位与常见的计算方法
位:bit
字节:Byte ,等于8bit
1kb = 1024Byte
1mb = 1024kb = 1024*1024 Byte
GB、TB、.......
但是硬件厂商的是按照1000来计算的。所以,买回来的硬盘500GB硬盘实际可以使用的是465GB左右。
[root@learn-Linux001 ~]# #将上面的结果换算成G

[root@learn-Linux001 ~]# echo 512*63*255*1044/1024/1024/1024|bc
7
[root@learn-Linux001 ~]# #结果不对,变成了7.因为bc是基础计算器,只能算整数
[root@learn-Linux001 ~]# #我们需要使用awk

[root@learn-Linux001 ~]# awk 'BEGIN{print 1/3}'
0.333333
[root@learn-Linux001 ~]# awk 'BEGIN{print 512*63*255*1044/1024/1024/1024}'
7.99745
[root@learn-Linux001 ~]#
磁盘的选择

固态硬盘和机械硬盘的区别
diy.pconline.com.cn/750/7501340.html 固态硬盘的颗粒详细介绍
https://www.mydigitaldiscount.com/everything-you-need-to-know-about-slc-mlc-and-tlc-nand-flash.html
一、Raid卡之初识
又叫磁盘冗余阵列,阵列卡。他的主要作用有三点
1、获取更高的容量
2、获取更高的性能
3、获取更强的安全性
raid卡按支持的raid级别不同和raid卡的缓存容量不同,分为基础raid卡和高级raid卡
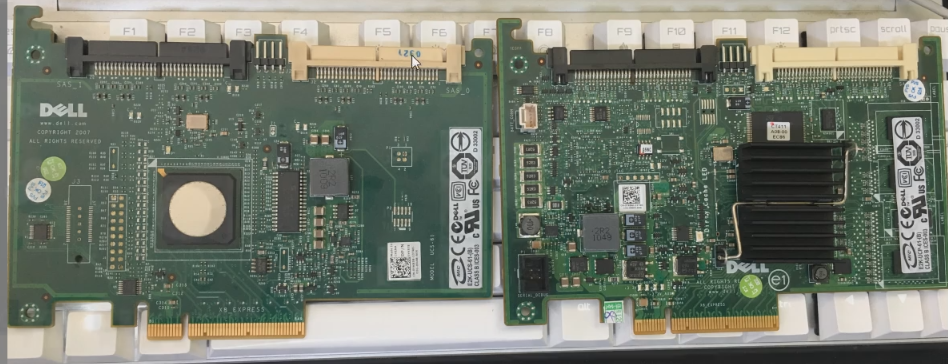
左边是raid基础卡,右边是高级卡。
基础卡只支持raid0和raid1
高级卡支持0、1、3、5、10、11或者更多
常见的raid级别

raid0
主要是为了应对不做raid用不了的情况。
硬盘不做raid,识别不了硬盘。所以如果只有一块硬盘,就做个raid0吧。
安全性最低,其中一个硬盘坏掉了,所有数据都会报废。
用于安全性需求低的数据,不怕丢失的数据。优点就是读写快
raid0:容量是所有硬盘之和,性能是最快的,安全性最差(只要有一块硬盘损坏,所有数据都无法使用)
raid1
只能有两块硬盘
算是个鸡肋,因为只能同时给两个硬盘做raid1。
raid1:容量是两块硬盘的一半(只能给两块硬盘做raid0),性能,读取OK,写入慢(相当于一块硬盘的性能),最多能损坏一块硬盘,两块硬盘的关系是互为镜像,
raid5
最少需要3块硬盘,在写入之前有一个校验的过程。有一块硬盘用来做校验,用来保护数据的安全性,当其中一块硬盘坏了,就可以使用校验数据恢复丢失的数据。
可以在添加一块热位盘(RAID5 + spare),当坏了一块硬盘之后,可以启动热位盘来替换坏的硬盘。
三个优点都占一点,在并发量不高的时候,可以使用
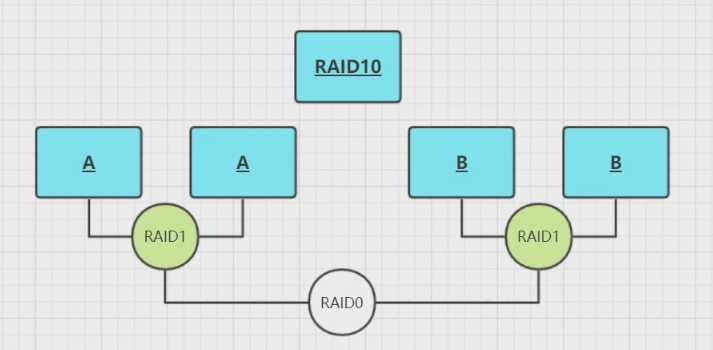
raid10
读取速度和安全性都很高,但是很奢侈,并发量很大的时候可以使用
raid10的基本原理如下:
二、磁盘分区
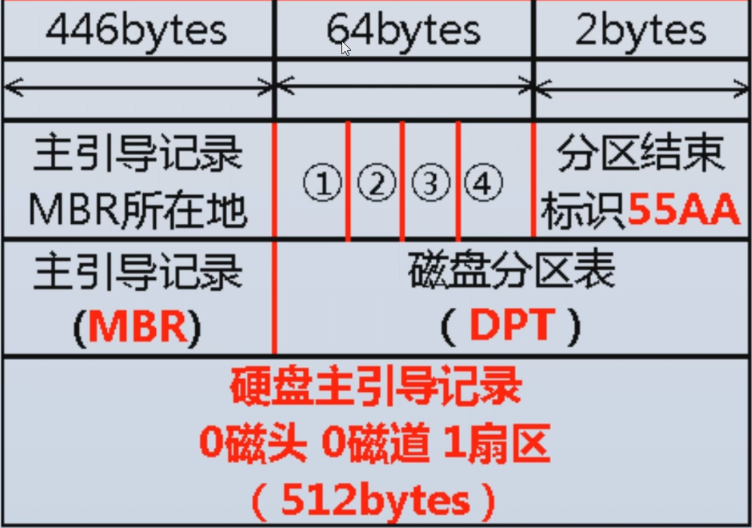
磁盘分区表
所在位置:0磁头0磁道1扇区的秘密
我们已经知道一个扇区的大小是512字节,那么这512字节是如何划分的呢?
前446字节:mbr主引导记录
64字节:分区表,分区一创建,表便生成
55AA:表示结束标记
主分区-扩展分区-逻辑分区的关系
系统的主分区最多有4个。
因为一个主分区一旦创立,就要在64字节的分区表中占用16个字节。
鉴于此,就有了扩展分区。
所以,扩展分区就是为了解决主分区只有4个的问题。
主分区+扩展分区最多也就是4个。
扩展分区是没法直接使用的。
要想使用,需要在扩展分区下面创建逻辑分区。
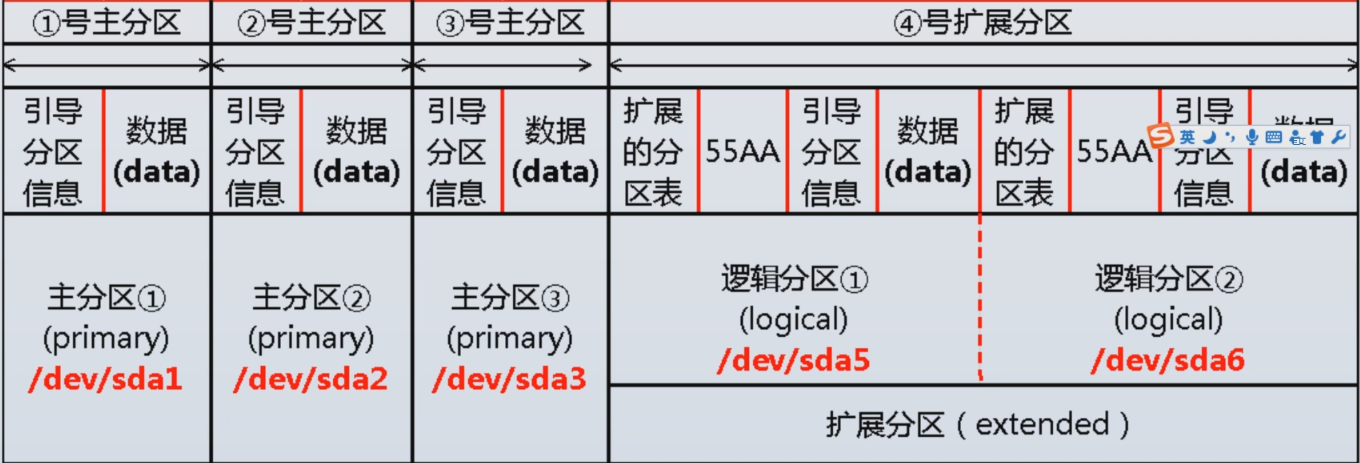
主分区
存放数据分区,最多有4个
扩展分区
无法直接使用
最多只能有一个
必须要在扩展分区中创建逻辑分区
逻辑分区
存放数据
在功能上和主分区没有什么区别
硬盘分区命令规则
硬盘命名
sas/sata/scsi接口,以sd开头sd?
第一块sas硬盘,取名sda
第三块sas硬盘,取名sdc
分区命名
主分区/扩展分区,1-4,如sda1
逻辑分区,从5开始
例子
第一块SAS硬盘的第一个主分区
/dev/sda1
第三块SAS硬盘的第二个扩展分区
/dev/sdc6
第四块SATA硬盘的第一个扩展分区
/dev/sdd5
fdisk进行磁盘分区详解
首先创建环境
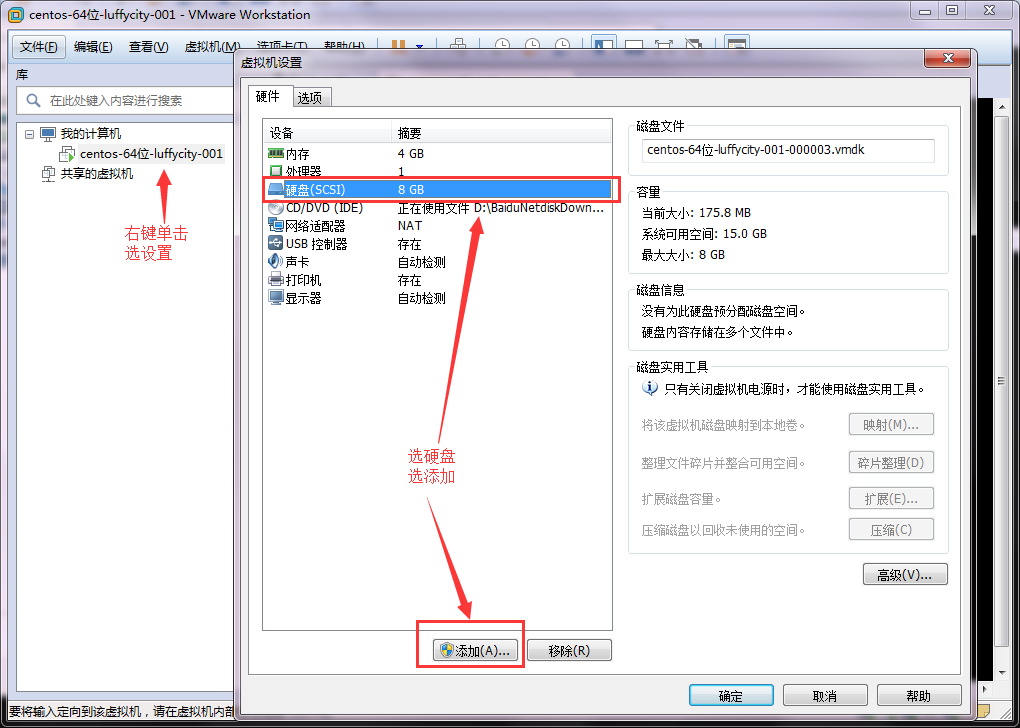
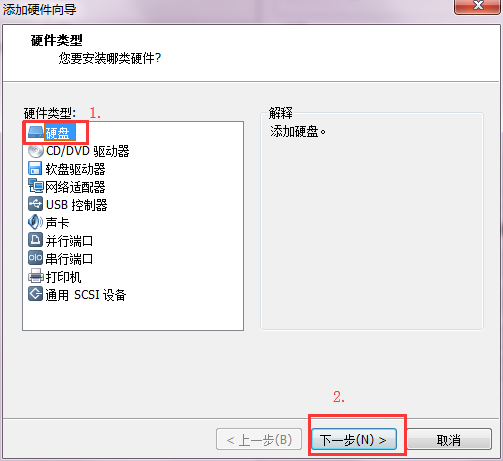
一直点下一步
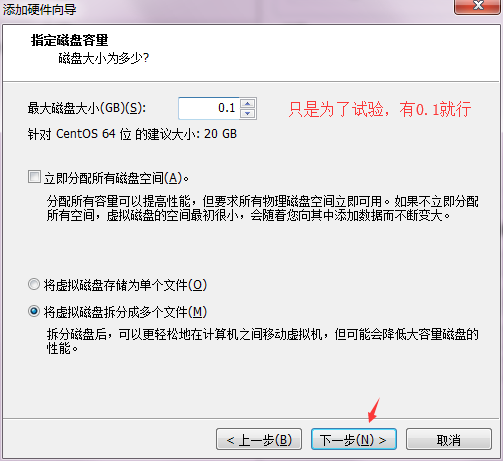
创建2-3个新硬盘
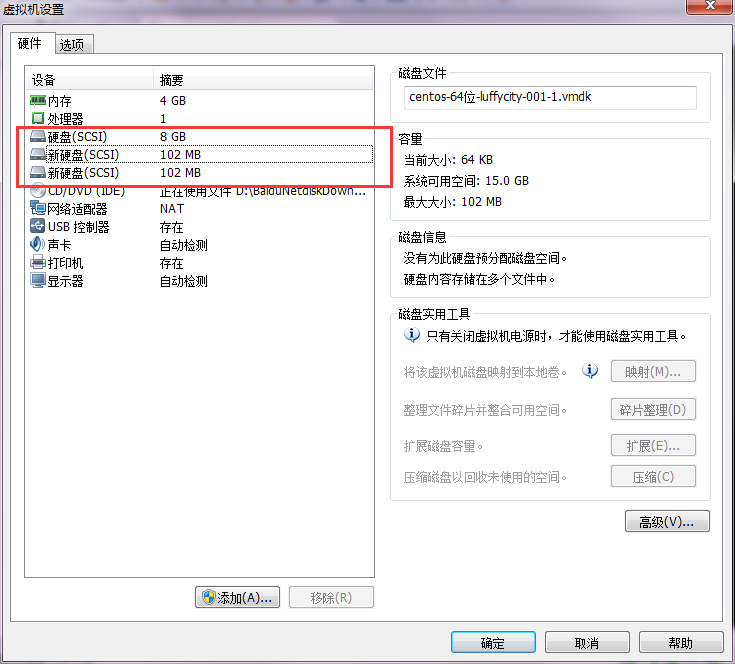
最后点确定
reboot
重启了查看一下
[root@luffy-001 ~]# fdisk -l|grep 'sd[a-d]:'
Disk /dev/sda: 8589 MB, 8589934592 bytes
Disk /dev/sdb: 106 MB, 106954752 bytes
Disk /dev/sdc: 106 MB, 106954752 bytes
Disk /dev/sdd: 106 MB, 106954752 bytes
分区工具的使用
小于2个T的使用fdisk,大于2T就使用parted
fdisk支持MBR
题目:创建一个100M分区,把他挂载到/mnt上面
[root@luffy-001 ~]# fdisk /dev/sdb
# 首先是警告信息:磁盘没有分区表

Device contains neither a valid DOS partition table, nor Sun, SGI or OSF disklabel
Building a new DOS disklabel with disk identifier 0xfed34d83.
Changes will remain in memory only, until you decide to write them.
After that, of course, the previous content won't be recoverable.

Warning: invalid flag 0x0000 of partition table 4 will be corrected by w(rite)
# 有一个模式已经过时了,你可以关掉。默认磁盘在分区或者是进行读写的时候,是按照扇区,柱面,还是磁道来进行的...
# 然后,告诉了我们两个参数c和u
WARNING: DOS-compatible mode is deprecated. It's strongly recommended to
         switch off the mode (command 'c') and change display units to
         sectors (command 'u').

Command (m for help):  m  # 按下m显示帮助信息
[: unknown command
Command action
   a   toggle a bootable flag
   b   edit bsd disklabel
   c   toggle the dos compatibility flag  # 关闭DOS的兼容模式
   d   delete a partition   # 删除
   l   list known partition types
   m   print this menu
   n   add a new partition    # 表示创建一个分区
   o   create a new empty DOS partition table
   p   print the partition table  # 显示分区信息
   q   quit without saving changes   # 退出不保存
   s   create a new empty Sun disklabel
   t   change a partition's system id
   u   change display/entry units  # 按照扇区进行磁盘分区
   v   verify the partition table
   w   write table to disk and exit   # 退出并保存
   x   extra functionality (experts only)
100M的分区,30M的主分区,30M的逻辑分区
## 加上推荐的参数cu
[root@luffy-001 ~]# fdisk -cu /dev/sdb
Device contains neither a valid DOS partition table, nor Sun, SGI or OSF disklabel
Building a new DOS disklabel with disk identifier 0x1bbbfcff.
Changes will remain in memory only, until you decide to write them.
After that, of course, the previous content won't be recoverable.

Warning: invalid flag 0x0000 of partition table 4 will be corrected by w(rite)
## p显示分区信息:
Command (m for help): p

Disk /dev/sdb: 106 MB, 106954752 bytes
64 heads, 32 sectors/track, 102 cylinders, total 208896 sectors
Units = sectors of 1 * 512 = 512 bytes
Sector size (logical/physical): 512 bytes / 512 bytes
I/O size (minimum/optimal): 512 bytes / 512 bytes
Disk identifier: 0x1bbbfcff

   Device Boot      Start         End      Blocks   Id  System
## 添加主分区30M:
Command (m for help): n
Command action
   e   extended   # 扩展分区
   p   primary partition (1-4)  # 主分区
p
Partition number (1-4): 1  # 编号
First sector (2048-208895, default 2048):   # 不填就是默认的2048
Using default value 2048
Last sector, +sectors or +size{K,M,G} (2048-208895, default 208895): +30M
## 显示分区信息,已经创建好了
Command (m for help): p

Disk /dev/sdb: 106 MB, 106954752 bytes
64 heads, 32 sectors/track, 102 cylinders, total 208896 sectors
Units = sectors of 1 * 512 = 512 bytes
Sector size (logical/physical): 512 bytes / 512 bytes
I/O size (minimum/optimal): 512 bytes / 512 bytes
Disk identifier: 0x1bbbfcff

   Device Boot      Start         End      Blocks   Id  System
/dev/sdb1            2048       63487       30720   83  Linux

Command (m for help): n
Command action
   e   extended
   p   primary partition (1-4)
e
Partition number (1-4): 2
First sector (63488-208895, default 63488):
Using default value 63488
Last sector, +sectors or +size{K,M,G} (63488-208895, default 208895):
Using default value 208895

Command (m for help): p

Disk /dev/sdb: 106 MB, 106954752 bytes
64 heads, 32 sectors/track, 102 cylinders, total 208896 sectors
Units = sectors of 1 * 512 = 512 bytes
Sector size (logical/physical): 512 bytes / 512 bytes
I/O size (minimum/optimal): 512 bytes / 512 bytes
Disk identifier: 0x1bbbfcff

   Device Boot      Start         End      Blocks   Id  System
/dev/sdb1            2048       63487       30720   83  Linux
/dev/sdb2           63488      208895       72704    5  Extended
## 再创建逻辑分区
Command (m for help): n
Command action
   l   logical (5 or over)
   p   primary partition (1-4)
l
First sector (65536-208895, default 65536):
Using default value 65536
Last sector, +sectors or +size{K,M,G} (65536-208895, default 208895): +30M

Command (m for help): P

Disk /dev/sdb: 106 MB, 106954752 bytes
64 heads, 32 sectors/track, 102 cylinders, total 208896 sectors
Units = sectors of 1 * 512 = 512 bytes
Sector size (logical/physical): 512 bytes / 512 bytes
I/O size (minimum/optimal): 512 bytes / 512 bytes
Disk identifier: 0x1bbbfcff

   Device Boot      Start         End      Blocks   Id  System
/dev/sdb1            2048       63487       30720   83  Linux
/dev/sdb2           63488      208895       72704    5  Extended
/dev/sdb5           65536      126975       30720   83  Linux

Command (m for help):

## 此时,并没有在系统中生效,改变只是暂时放在内存中
Command (m for help): w   # 按w保存并退出
The partition table has been altered!

Calling ioctl() to re-read partition table.
Syncing disk
在w之前,检查一次,是不是在新的磁盘上创建分区。无误之后再按回车键,否则会发生无法挽回的错误。
在系统中已经可以查看创建的分区了
[root@luffy-001 ~]# ls -l /dev/sdb*
brw-rw---- 1 root disk 8, 16 Feb 17 17:00 /dev/sdb
brw-rw---- 1 root disk 8, 17 Feb 17 17:00 /dev/sdb1
brw-rw---- 1 root disk 8, 18 Feb 17 17:00 /dev/sdb2
brw-rw---- 1 root disk 8, 21 Feb 17 17:00 /dev/sdb5
磁盘分区--格式化--挂载流程
[root@luffy-001 ~]# fdisk -cu /dev/sdb
# 第一次的提示信息已经没有了
## 工作中一般怎么用? 创建一个100M分区,把他挂载到/mnt上面
### 1、分区

## 先删除之前的分区
Command (m for help): d
Partition number (1-5): 1

Command (m for help): d
Partition number (1-5): 2

Command (m for help): p

Disk /dev/sdb: 106 MB, 106954752 bytes
64 heads, 32 sectors/track, 102 cylinders, total 208896 sectors
Units = sectors of 1 * 512 = 512 bytes
Sector size (logical/physical): 512 bytes / 512 bytes
I/O size (minimum/optimal): 512 bytes / 512 bytes
Disk identifier: 0x1bbbfcff

   Device Boot      Start         End      Blocks   Id  System

Command (m for help): n
Command action
   e   extended
   p   primary partition (1-4)
p
Partition number (1-4): 1
First sector (2048-208895, default 2048):    # 把空间全部分给一个分区,直接回车
Using default value 2048
Last sector, +sectors or +size{K,M,G} (2048-208895, default 208895):   # 直接回车
Using default value 208895

Command (m for help): p

Disk /dev/sdb: 106 MB, 106954752 bytes
64 heads, 32 sectors/track, 102 cylinders, total 208896 sectors
Units = sectors of 1 * 512 = 512 bytes
Sector size (logical/physical): 512 bytes / 512 bytes
I/O size (minimum/optimal): 512 bytes / 512 bytes
Disk identifier: 0x1bbbfcff

   Device Boot      Start         End      Blocks   Id  System
/dev/sdb1            2048      208895      103424   83  Linux
Command (m for help): w
The partition table has been altered!

Calling ioctl() to re-read partition table.
Syncing disks.


### 2、通知系统,/dev/sdb硬盘的磁盘分区表变化了
[root@luffy-001 ~]# partprobe /dev/sdb
[root@luffy-001 ~]# # 默认没有任何反应


### 3、格式化创建文件系统make filesystem
[root@luffy-001 ~]# mkfs.ext4 /dev/sdb1
mke2fs 1.41.12 (17-May-2010)
Filesystem label=
OS type: Linux
Block size=1024 (log=0)
Fragment size=1024 (log=0)
Stride=0 blocks, Stripe width=0 blocks
25896 inodes, 103424 blocks   # 诞生了inode和block
5171 blocks (5.00%) reserved for the super user
First data block=1
Maximum filesystem blocks=67371008
13 block groups
8192 blocks per group, 8192 fragments per group
1992 inodes per group
Superblock backups stored on blocks:
    8193, 24577, 40961, 57345, 73729

Writing inode tables: done
Creating journal (4096 blocks): done
Writing superblocks and filesystem accounting information: done
## 下面这段话,主要意思是讲磁盘会定期自动检查,在下一步可以关闭它,提示中已经给出了命令
This filesystem will be automatically checked every 20 mounts or
180 days, whichever comes first.  Use tune2fs -c or -i to override.
[root@luffy-001 ~]#

### 4、关闭磁盘分区的自动检查功能
[root@luffy-001 ~]# tune2fs -c 0 -i 0 /dev/sdb1
tune2fs 1.41.12 (17-May-2010)
Setting maximal mount count to -1
Setting interval between checks to 0 seconds

-c 0 count # 关闭每挂载多少次进行磁盘检查的功能
-i 0 interval # 关闭每180天进行磁盘检查功能

### 5、使用mount进行磁盘分区挂载
## 先检查是不是在使用
[root@luffy-001 ~]# df -h
Filesystem      Size  Used Avail Use% Mounted on
/dev/sda3       6.9G  1.9G  4.7G  29% /
tmpfs           1.9G     0  1.9G   0% /dev/shm
/dev/sda1       190M   40M  141M  22% /boot

## 如果在使用可以用umount 切掉
## 使用mount 挂载
[root@luffy-001 ~]# mount /dev/sdb1 /mnt/
[root@luffy-001 ~]# df -h
Filesystem      Size  Used Avail Use% Mounted on
/dev/sda3       6.9G  1.9G  4.7G  29% /
tmpfs           1.9G     0  1.9G   0% /dev/shm
/dev/sda1       190M   40M  141M  22% /boot
/dev/sdb1        94M  1.6M   88M   2% /mnt
如何进行开机自动挂载
重启服务器后,我挂载的磁盘不见了,这可如何是好?
[root@luffy-001 ~]# reboot
[root@luffy-001 ~]#
Broadcast message from root@luffy-001
    (/dev/pts/0) at 17:42 ...

The system is going down for reboot NOW!
Connection closing...Socket close.

Connection closed by foreign host.

Disconnected from remote host(study_luffy001) at 09:49:19.

Type `help' to learn how to use Xshell prompt.
[D:~]$

Connecting to 10.0.0.200:22...
Connection established.
To escape to local shell, press 'Ctrl+Alt+]'.

WARNING! The remote SSH server rejected X11 forwarding request.
Last login: Sun Feb 17 17:43:57 2019
[root@luffy-001 ~]# df -h
Filesystem      Size  Used Avail Use% Mounted on
/dev/sda3       6.9G  1.9G  4.7G  29% /
tmpfs           1.9G     0  1.9G   0% /dev/shm
/dev/sda1       190M   40M  141M  22% /boot
[root@luffy-001 ~]#
自动挂载的方法
1、/etc/rc.local
开机自启动的目录
将命令/bin/mount /dev/sdb1 /mnt/ 放在 /etc/rc.local 里面
2、/etc/fstab
开机自动挂载的目录
[root@luffy-001 ~]# cat /etc/fstab

#
# /etc/fstab
# Created by anaconda on Thu Jan 10 14:45:14 2019
#
# Accessible filesystems, by reference, are maintained under '/dev/disk'
# See man pages fstab(5), findfs(8), mount(8) and/or blkid(8) for more info
# 我们可以使用 man fstab 得到这些信息
设备或者磁盘的名字                          入口/挂载点          磁盘分区的类型   挂载参数     是否备份    开机是否检查
UUID=30ef1485-38f4-4bac-80c9-1812eddcb1f1 /                       ext4    defaults        1         1
UUID=94102f2f-e731-4636-81bc-7cb023db0068 /boot                   ext4    defaults        1         2
UUID=fac5852c-baa7-425c-b513-591de82cdb14 swap                    swap    defaults        0         0
tmpfs                   /dev/shm                tmpfs   defaults        0 0
devpts                  /dev/pts                devpts  gid=5,mode=620  0 0
sysfs                   /sys                    sysfs   defaults        0 0
proc                    /proc                   proc    defaults        0 0
按照上面的格式将我们要挂载的磁盘写进去
vim /etc/fstab
加入:
/dev/sdb1 /mnt ext4 defaults 0 0
卸载磁盘
[root@luffy-001 ~]# umount /mnt
磁盘分区工具parted和GPT分区表
parted主要是给磁盘大于2TB的进行分区,当然2TB一下的也是可以使用的。
还有一点就是,parted是基于GPT分区表
GPT与MBR兼容,支持的容量级别是ZB
Parted
[root@luffy-001 ~]# parted
GNU Parted 2.1
Using /dev/sda
Welcome to GNU Parted! Type 'help' to view a list of commands.
(parted) help     # 查看帮助
  align-check TYPE N                        check partition N for TYPE(min|opt) alignment
  check NUMBER                             do a simple check on the file system
  cp [FROM-DEVICE] FROM-NUMBER TO-NUMBER   copy file system to another partition
  help [COMMAND]                           print general help, or help on COMMAND
  mklabel,mktable LABEL-TYPE               create a new disklabel (partition table)   # 创建磁盘分区表
  mkfs NUMBER FS-TYPE                      make a FS-TYPE file system on partition NUMBER
  mkpart PART-TYPE [FS-TYPE] START END     make a partition    # 创建分区
  mkpartfs PART-TYPE FS-TYPE START END     make a partition with a file system
  move NUMBER START END                    move partition NUMBER
  name NUMBER NAME                         name partition NUMBER as NAME
  print [devices|free|list,all|NUMBER]     display the partition table, available devices, free space,
        all found partitions, or a particular partition      # 显示磁盘分区表信息
  quit                                     exit program      # 退出不保存
  rescue START END                         rescue a lost partition near START and END
  resize NUMBER START END                  resize partition NUMBER and its file system
  rm NUMBER                                delete partition NUMBER   # 删除分区
  select DEVICE                            choose the device to edit
  set NUMBER FLAG STATE                    change the FLAG on partition NUMBER
  toggle [NUMBER [FLAG]]                   toggle the state of FLAG on partition NUMBER
  unit UNIT                                set the default unit to UNIT
  version                                  display the version number and copyright information of GNU
        Parted
(parted)
创建 30M 30M (因为gpt支持很多主分区,一百多个,所以扩展和逻辑分区就没用了
[root@luffy-001 ~]# parted /dev/sdc    # 给sdc做分区
GNU Parted 2.1
Using /dev/sdc
Welcome to GNU Parted! Type 'help' to view a list of commands.
(parted) p            # P也可以使用
Error: /dev/sdc: unrecognised disk label
(parted) print
Error: /dev/sdc: unrecognised disk label
(parted) mklabel
New disk label type? gpt    #支持两种格式====>gpt和msdos(mbr)
(parted) p                  #可以查看分区了
Model: VMware, VMware Virtual S (scsi)
Disk /dev/sdc: 107MB
Sector size (logical/physical): 512B/512B
Partition Table: gpt

Number  Start  End  Size  File system  Name  Flags
## 创建分区30M,默认单位就是MB
(parted) mkpart primary 0 30
Warning: The resulting partition is not properly aligned for best performance.
Ignore/Cancel? I       # I表示忽略
(parted) print
Model: VMware, VMware Virtual S (scsi)
Disk /dev/sdc: 107MB
Sector size (logical/physical): 512B/512B
Partition Table: gpt

Number  Start   End     Size    File system  Name     Flags
 1      17.4kB  30.0MB  30.0MB               primary

## 创建下一个30M分区
(parted) mkpart primary 30 60
(parted) p
Model: VMware, VMware Virtual S (scsi)
Disk /dev/sdc: 107MB
Sector size (logical/physical): 512B/512B
Partition Table: gpt

Number  Start   End     Size    File system  Name     Flags
 1      17.4kB  30.0MB  30.0MB               primary
 2      30.4MB  59.8MB  29.4MB               primary
## 使用parted的时候,是实时生效的,所以没有保存并退出的命令
(parted) q
Information: You may need to update /etc/fstab.
[root@luffy-001 ~]# ls -l /dev/sdc*
brw-rw---- 1 root disk 8, 32 Feb 17 18:23 /dev/sdc
brw-rw---- 1 root disk 8, 33 Feb 17 18:22 /dev/sdc1
brw-rw---- 1 root disk 8, 34 Feb 17 18:22 /dev/sdc2

##parted命令在命令行中也能显示和使用
[root@luffy-001 ~]# parted /dev/sdc mklabel gpt
Warning: The existing disk label on /dev/sdc will be destroyed and all data on this disk will be lost.
Do you want to continue?
Yes/No? y
Information: You may need to update /etc/fstab.

[root@luffy-001 ~]# parted /dev/sdc mkpart primary 0 30 Ignore
Warning: The resulting partition is not properly aligned for best performance.
Information: You may need to update /etc/fstab.

[root@luffy-001 ~]# parted /dev/sdc mkpart primary 30 60
Warning: You requested a partition from 30.0MB to 60.0MB.
The closest location we can manage is 30.0MB to 30.4MB.
Is this still acceptable to you?
Yes/No? y
Warning: The resulting partition is not properly aligned for best performance.
Ignore/Cancel? I
Information: You may need to update /etc/fstab.

[root@luffy-001 ~]# parted /dev/sdc p
Model: VMware, VMware Virtual S (scsi)
Disk /dev/sdc: 107MB
Sector size (logical/physical): 512B/512B
Partition Table: gpt

Number  Start   End     Size    File system  Name     Flags
 1      17.4kB  30.0MB  30.0MB               primary
 3      30.0MB  30.4MB  409kB                primary
 2      30.4MB  59.8MB  29.4MB               primary

## fsdisk也可以这么使用(非交互式应用),只是比较麻烦,可以了解一下
故障案例:java环境内存不足大量使用swap
内存不足的一种解决方法是增加内存,但是增加内存需要关机,另一种方法就是使用swap。
一般服务器会有swap空间,以防止内存使用不足。
但是有些服务器没有设置swap,比如云服务器。
这时候,需要我们临时增加swap。
1、创建一个文件块
[root@luffy-001 ~]# dd if=/dev/zero of=/tmp/100m bs=1M count=100
100+0 records in
100+0 records out
104857600 bytes (105 MB) copied, 0.317705 s, 330 MB/s

# dd 创建一个文件块
# if 输入文件,从哪里获取数据
# of 输出文件,数据放在哪里
# bs 每次复制多少数据
# count 复制多少次
## 查看文件类型
[root@luffy-001 ~]# file /tmp/100m
/tmp/100m: data
2、变成swap
[root@luffy-001 ~]# mkswap /tmp/100m
mkswap: /tmp/100m: warning: don't erase bootbits sectors
        on whole disk. Use -f to force.
Setting up swapspace version 1, size = 102396 KiB
no label, UUID=36c6f74c-ff57-4746-be67-b9c98b575ee3
[root@luffy-001 ~]# file /tmp/100m
/tmp/100m: Linux/i386 swap file (new style) 1 (4K pages) size 25599 pages
3、查看swap使用情况
[root@luffy-001 ~]# free -h
             total       used       free     shared    buffers     cached
Mem:          3.7G       284M       3.4G       252K        12M       155M
-/+ buffers/cache:       116M       3.6G
Swap:         767M         0B       767M
# 如果之前查看过,就知道,这次更改并没有生效
4、swap生效
[root@luffy-001 ~]# swapon /tmp/100m
[root@luffy-001 ~]# free -h
             total       used       free     shared    buffers     cached
Mem:          3.7G       284M       3.4G       252K        12M       155M
-/+ buffers/cache:       116M       3.6G
Swap:         867M         0B       867M
5、查看swap组成
[root@luffy-001 ~]# swapon -s
Filename                Type        Size    Used    Priority
/dev/sda2              partition    786428    0       -1
/tmp/100m              file         102396    0       -2
6、swap永久生效
## 方法一、/etc/rc.local
swapon /tmp/100m
## 方法二、/etc/fstab
/tmp/100m   swap       swap      defaults      0    0
Linux把我的内存吃了
linux特点:会把使用过的命令和数据临时存放在内存中 (cache和buffer)
以方便在下次使用的时候可以更快,提升效率
[root@luffy-001 ~]# free -h
             total       used       free     shared    buffers     cached
Mem:          3.7G       284M       3.4G       252K        12M       155M
-/+ buffers/cache:       116M       3.6G     # 这是减去buffer和cache的容量
Swap:         867M         0B       867M
www.linuxatemyram.com 尝试阅读并翻译
三、Linux文件系统
分区就是给房子打隔断,创建文件系统就是给房子装修,文件系统的类型就是装修风格,
文件在磁盘上面怎么放。
文件系统就是一种存储和组织计算机数据文件袋额机制或者方法。
之前已经说过了,我们很容易理解,通过fdisk命令对一个磁盘进行分区后,并不能直接挂在目录存放数据实体,还需要格式化操作,才可以进行挂载并存放数据。
为什么需要格式化呢?这是因为磁盘分区在没有格式化之前,操作系统是无法识别系统上磁盘分区格式的,也就无法存取文件目录属性和权限等内容,把分区格式化成操作系统支持的某个文件系统后,再存放数据,系统就会根据这个文件系统的格式化进行存取文件了。
文件系统细节
我们都知道,操作系统中的数据分为文件内容和文件属性两部分,其中文件内容就是文件的实体数据(block里),而文件属性就是文件类型、权限、属主、修改时间等信息。操作系统会将上述文件的属性内容放入磁盘文件系统的inode中,而把文件的实体数据存放在对应的block中。除了inode和block信息外,操作系统还会记录文件系统的整体信息于superblock中,这个superblock包括整个文件系统的inode和block的总的数量,已经使用的数量,剩余数量等(称之为metadata元数据)。
文件系统的每一个inode和block都有对应且唯一的数字编号,而superblock则存在于整个文件系统的最前面,它负责管理记录整个文件系统的相关信息,例如:上述的整个文件系统的inode和block的总数量,已经使用的数量,剩余数量等。
有关文件系统的inode和block知识,在linux文件属性一节,软链接和硬链接属性章节
查看文件系统的内部细节
[root@luffy-001 ~]# dumpe2fs -h /dev/sda1
dumpe2fs 1.41.12 (17-May-2010)
Filesystem volume name:   <none>
Last mounted on:          /boot
Filesystem UUID:          94102f2f-e731-4636-81bc-7cb023db0068
Filesystem magic number:  0xEF53
Filesystem revision #:    1 (dynamic)
Filesystem features:      has_journal ext_attr resize_inode dir_index filetype needs_recovery extent flex_bg sparse_super huge_file uninit_bg dir_nlink extra_isize
Filesystem flags:         signed_directory_hash
Default mount options:    user_xattr acl
Filesystem state:         clean
Errors behavior:          Continue
Filesystem OS type:       Linux
Inode count:              51200
Block count:              204800
Reserved block count:     10240
Free blocks:              154246
Free inodes:              51161
First block:              1
Block size:               1024
Fragment size:            1024
Reserved GDT blocks:      256
Blocks per group:         8192
Fragments per group:      8192
Inodes per group:         2048
Inode blocks per group:   256
Flex block group size:    16
Filesystem created:       Thu Jan 10 14:42:18 2019
Last mount time:          Sun Feb 17 17:43:30 2019
Last write time:          Sun Feb 17 17:43:30 2019
Mount count:              11
Maximum mount count:      -1
Last checked:             Thu Jan 10 14:42:18 2019
Check interval:           0 (<none>)
Lifetime writes:          43 MB
Reserved blocks uid:      0 (user root)
Reserved blocks gid:      0 (group root)
First inode:              11
Inode size:              128
Journal inode:            8
Default directory hash:   half_md4
Directory Hash Seed:      cbc9b2e9-0a58-4fbe-b35e-7118e5eafd96
Journal backup:           inode blocks
Journal features:         (none)
Journal size:             4096k
Journal length:           4096
Journal sequence:         0x00000034
Journal start:            0
一块硬盘在文件系统角度的名词解释

常见的文件系统
openSUSE linux 的默认文件系统 ReiserFS 文件系统
IBM 的AIX使用的 jfs 日志文件系统
Centos7 采用 XFS 文件系统
Centos6 采用 ext4 文件系统
Centos5 采用 ext3 文件系统
文件系统的小结
1、文件系统是对一个存储设备上的数据和元数据进行组织的一种机制
2、分区必须格式化创建文件系统才能存放数据
3、一个分区只能有一种文件系统
4、linux下常见的文件系统ext2、ext3、ext4、zfs、xfs(centos7)和Reiserfs(单独安装)。
windos下常见的额文件系统:NTFS、FAT32、exFAT
文件系统选型简单介绍
1、SAS/SATA硬盘文件系统选择
- reiserfs 大量小文件业务首选reiserfs(100k以内),如果是Centos需要单独安装
- xfs 有的门户的数据库MySQL 业务会选择xfs,最数据库的支持比较好
- ext4 视频下载,流媒体,数据库,小文件业务也OK,默认的,通用的
- ext2 没有日志(丢失了数据无法恢复,但是数据的读写速度回提高),蓝汛的cache业务,CDN网站加速服务(相当于缓存)
常规应用:
对于 Centos5.x 系列,常规应用就选默认的 ext3 文件系统即可
对于 Centos6.x 系列,常规应用就选默认的 ext4 文件系统即可
对于 Centos7.x 系列,常规应用就选默认的 xfs 文件系统即可
注意:如果服务器数量少,怎么选择都可以
如果是海量服务器,考虑维护成本和性能,选择其中一个折中。
选择小结:
- Centos 默认的文件系统都是比较优秀的。
- xfs、reiserfs 需要单独安装,默认不支持的。
- 海量服务器使用多种文件系统维护可能不方便
- 大并发做磁盘系统的优化是一方面,但更多的还是在网站前端增加缓存服务器(squid、varnish),存储数据库的前端增加缓存(memcache、redis),这是架构师的能力。
2、SSD固态文件系统的选择
Ext4、Reiserfs可以作为SSD文件系统,但未对SSD做优化,不能充分发挥SSD的性能,影响SSD的使用时间。
Btrfs对SSD做了优化,mount通过参数启用。但Btrfs仍处于试验阶段,生产环境谨慎使用。
JEFS2/Nilfs2/YAFFS是常用的 flash file system,在嵌入式环境(手机、智能电器)广泛应用,建议使用。性能目前还未做测试评估。
在Linux中制作文件系统
看系统默认是否支持,如果支持就直接用对用命令格式化即可
磁盘部分总结与磁盘命令总结
磁盘知识体系
磁盘结构
raid
磁盘分区
磁盘格式化
文件系统
命令
 1     fdisk:磁盘分区工具                       ★★★★☆
 2     parted:磁盘分区工具                      ★★★★☆
 3     partprobe:通知系统磁盘的分区信息变化 更新内核的硬盘分区表信息            ★★★☆☆
 4     tune2fs:调整ext2/ext3/ext4文件系统参数        ★★☆☆☆
 5         -c 0 count    关闭每挂载多少次进行磁盘检查
 6         -i 0 interval 关闭每个多久进行磁盘检查
 7         关闭磁盘分区的自动检查
 8     mkfs:make filesystem 创建Linux文件系统                   ★★★☆☆
 9         -t 指定文件系统类型
10         mkfs.ext4 == mkfs -t ext4
11     dumpe2fs:显示文件系统信息       ★★☆☆☆
12     resize2fs:调整ext2/ext3/ext4文件系统大小                       ★★☆☆☆   会影响业务
13     fsck:检查并修复Linux文件系统                       ★★★☆☆  硬盘没问题不要用
14         -a
15     dd:转换或复制文件                                   ★★★☆☆
16     od  查看二进制文件的内容
17         -xa
18         dd if=/dev/sda  of=/tmp/512.bin  bs=512 count=1
19
20         od -xa /tmp/512.bin
21
22     mount:挂载文件系统                       ★★★★★
23     umount:卸载文件系统                       ★★★☆☆
24         umount /mnt
25     df:报告文件系统磁盘空间的使用情况                       ★★★★★
26     mkswap:创建交换分区                       ★★☆☆☆
27     swapon:激活交换分区                       ★★☆☆☆
28     swapoff:关闭交换分区                       ★★★☆☆
29     sync:刷新文件系统缓冲区                      ★★☆☆☆
30     top :查看系统性能信息
31     iotop 查看系统的磁盘读写速度 显示出进程使用swap的情况
32         io input/output 输入/输出 读写
33     htop  top升级版
34     iftop 查询网卡流量情况
35         -i 指定监视网卡