1. 介绍
三种验证客户端的方式选一种就行了
2. 安装
2.1 创建对象存储网关系统
步骤1:安装文档安装ceph
步骤2:初始化缓存网关
[root@node1 my-cluster]# ceph-deploy rgw create node1


[ceph_deploy.conf][DEBUG ] found configuration file at: /root/.cephdeploy.conf
[ceph_deploy.cli][INFO  ] Invoked (1.5.38): /usr/bin/ceph-deploy rgw create node1
[ceph_deploy.cli][INFO  ] ceph-deploy options:
[ceph_deploy.cli][INFO  ]  username                      : None
[ceph_deploy.cli][INFO  ]  verbose                       : False
[ceph_deploy.cli][INFO  ]  rgw                           : [('node1', 'rgw.node1')]
[ceph_deploy.cli][INFO  ]  overwrite_conf                : False
[ceph_deploy.cli][INFO  ]  subcommand                    : create
[ceph_deploy.cli][INFO  ]  quiet                         : False
[ceph_deploy.cli][INFO  ]  cd_conf                       : <ceph_deploy.conf.cephdeploy.Conf instance at 0xe233f8>
[ceph_deploy.cli][INFO  ]  cluster                       : ceph
[ceph_deploy.cli][INFO  ]  func                          : <function rgw at 0xd67758>
[ceph_deploy.cli][INFO  ]  ceph_conf                     : None
[ceph_deploy.cli][INFO  ]  default_release               : False
[ceph_deploy.rgw][DEBUG ] Deploying rgw, cluster ceph hosts node1:rgw.node1
[node1][DEBUG ] connected to host: node1
[node1][DEBUG ] detect platform information from remote host
[node1][DEBUG ] detect machine type
[ceph_deploy.rgw][INFO  ] Distro info: CentOS Linux 7.3.1611 Core
[ceph_deploy.rgw][DEBUG ] remote host will use systemd
[ceph_deploy.rgw][DEBUG ] deploying rgw bootstrap to node1
[node1][DEBUG ] write cluster configuration to /etc/ceph/{cluster}.conf
[node1][DEBUG ] create path recursively if it doesn't exist
[node1][INFO  ] Running command: ceph --cluster ceph --name client.bootstrap-rgw --keyring /var/lib/ceph/bootstrap-rgw/ceph.keyring auth get-or-create client.rgw.node1 osd allow rwx mon allow rw -o /var/lib/ceph/radosgw/ceph-rgw.node1/keyring
[node1][INFO  ] Running command: systemctl enable ceph-radosgw@rgw.node1
[node1][INFO  ] Running command: systemctl start ceph-radosgw@rgw.node1
[node1][INFO  ] Running command: systemctl enable ceph.target
[ceph_deploy.rgw][INFO  ] The Ceph Object Gateway (RGW) is now running on host node1 and default port 7480
步骤3:验证是否安装成功并启动:
[root@node1 my-cluster]# lsof -i:7480
COMMAND PID USER FD TYPE DEVICE SIZE/OFF NODE NAME
radosgw 1075 ceph 27u IPv4 21579 0t0 TCP *:7480 (LISTEN)
2.2 初始化
创建一个用户
[root@node1 my-cluster]# sudo radosgw-admin user create --secret="123456" --uid="zhangsan" --display-name="zhangsan"
{
    "user_id": "zhangsan",
    "display_name": "dongwang",
    "email": "",
    "suspended": 0,
    "max_buckets": 1000,
    "auid": 0,
    "subusers": [],
    "keys": [
        {
            "user": "zhangsan",
            "access_key": "X26CBB6ZDSMHZEBRCYCI",
            "secret_key": "123456"
        }
    ],
    "swift_keys": [],
    "caps": [],
    "op_mask": "read, write, delete",
    "default_placement": "",
    "placement_tags": [],
    "bucket_quota": {
        "enabled": false,
        "max_size_kb": -1,
        "max_objects": -1
    },
    "user_quota": {
        "enabled": false,
        "max_size_kb": -1,
        "max_objects": -1
    },
    "temp_url_keys": []
}
3. 客户端对接
3.1 S3cmd客户端
步骤1:安装s3cmd
[root@node1 ~]# yum -y install s3cmd
步骤2:配置s3cmd
[root@node1 ~]# s3cmd --configure
Enter new values or accept defaults in brackets with Enter.
Refer to user manual for detailed description of all options.

Access key and Secret key are your identifiers for Amazon S3. Leave them empty for using the env variables.
Access Key: X26CBB6ZDSMHZEBRCYCI
Secret Key: 123456
Default Region [US]:

Use "s3.amazonaws.com" for S3 Endpoint and not modify it to the target Amazon S3.
S3 Endpoint [s3.amazonaws.com]: node1:7480

Use "%(bucket)s.s3.amazonaws.com" to the target Amazon S3. "%(bucket)s" and "%(location)s" vars can be used
if the target S3 system supports dns based buckets.
DNS-style bucket+hostname:port template for accessing a bucket [%(bucket)s.s3.amazonaws.com]: buket

Encryption password is used to protect your files from reading
by unauthorized persons while in transfer to S3
Encryption password:
Path to GPG program [/usr/bin/gpg]:

When using secure HTTPS protocol all communication with Amazon S3
servers is protected from 3rd party eavesdropping. This method is
slower than plain HTTP, and can only be proxied with Python 2.7 or newer
Use HTTPS protocol [Yes]: No

On some networks all internet access must go through a HTTP proxy.
Try setting it here if you can't connect to S3 directly
HTTP Proxy server name:

New settings:
  Access Key: X26CBB6ZDSMHZEBRCYCI
  Secret Key: 123456
  Default Region: US
  S3 Endpoint: node1:7480
  DNS-style bucket+hostname:port template for accessing a bucket: buket
  Encryption password:
  Path to GPG program: /usr/bin/gpg
  Use HTTPS protocol: False
  HTTP Proxy server name:
  HTTP Proxy server port: 0

Test access with supplied credentials? [Y/n] n

Save settings? [y/N] y
Configuration saved to '/root/.s3cfg'
[root@node1 ~]#
如果配置有误,修改/root/.s3cfg文件。
步骤3:增删改查:
[root@node1 my-cluster]# s3cmd mb s3://first_bucket
Bucket 's3://first_bucket/' created
[root@node1 my-cluster]# s3cmd -v  ls
2018-10-19 03:47  s3://first_bucket
[root@node1 my-cluster]# echo "aaaaa" > file.txt
[root@node1 my-cluster]#  s3cmd put file.txt s3://first_bucket
upload: 'file.txt' -> 's3://first_bucket/file.txt'  [1 of 1]
 6 of 6   100% in    1s     3.68 B/s  done
[root@node1 my-cluster]# s3cmd rb s3://first_bucket --force --recursive
WARNING: Bucket is not empty. Removing all the objects from it first. This may take some time...
delete: 's3://first_bucket/file.txt'
Bucket 's3://first_bucket/' removed
3.2 python客户端
安装客户端程序:
[root@node1 s3]# sudo yum -y install python-boto
写python实例:
#-- coding: utf-8 --
import boto
import boto.s3.connection
access_key = 'X26CBB6ZDSMHZEBRCYCI'
secret_key = '123456'
conn = boto.connect_s3(
    aws_access_key_id = access_key,
    aws_secret_access_key = secret_key,
    host = 'node1',port=7480,
    is_secure=False,
    calling_format = boto.s3.connection.OrdinaryCallingFormat()
)
bucket = conn.create_bucket('my-new-bucket')
for bucket in conn.get_all_buckets():
        print "{name}	{created}".format(
                name = bucket.name,
                created = bucket.creation_date,
)
运行查看结果
[root@node1 s3]# python s3client.py
my-new-bucket 2018-10-19T06:23:18.313Z
从其他客户端查看结果
[root@node1 my-cluster]# s3cmd -v ls
2018-10-19 06:23 s3://my-new-bucket
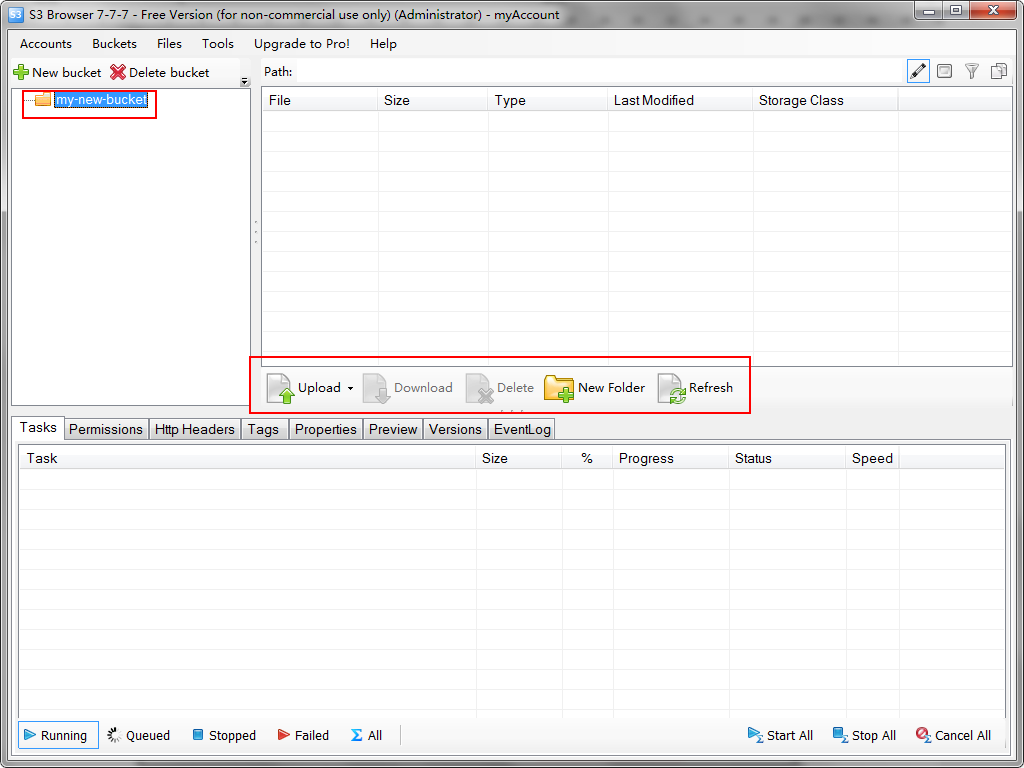
3.3 Windows客户端
下载客户端:https://s3browser.com/download/s3browser-7-7-7.exe
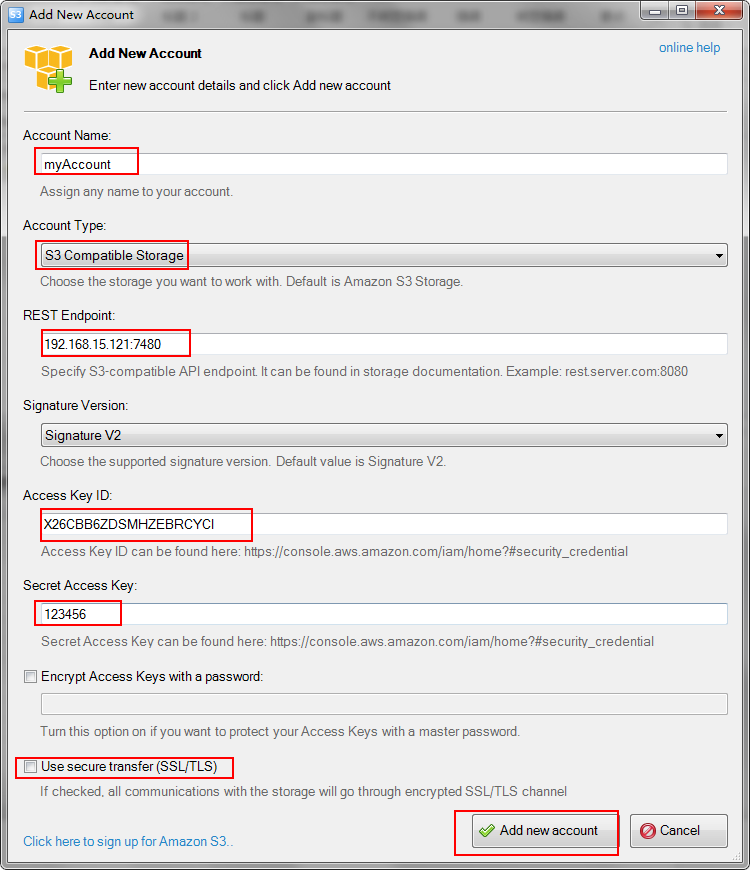
点击Add new account之后,就可以看到刚才python客户端建的buket了,使用客户端可以上传和下载文件了。