◆版权声明:本文出自胖喵~的博客,转载必须注明出处。
转载请注明出处:http://www.cnblogs.com/by-dream/p/6113059.html
需求
这两天遇到这样一个事情,因为某测试任务,需要在操作过程中连续的截图,最终分析截图。之前同事用的工具兼容性特别的不好,需要root,并且只适配固定几个版本的机型,因此我决定自己实现一个。首先最先想到的就是使用Uiautomator 1中自带的API来截图。
我们看下Uiautomator 1.0中提供的截图相关的API是什么样子的,在UiDevice中,我们找到了这个函数:
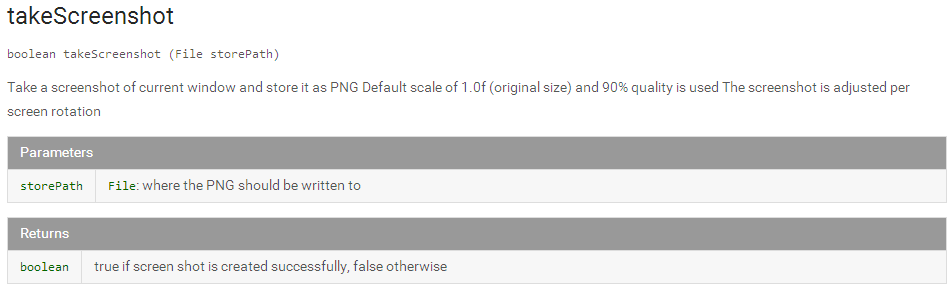
很明显,这个函数的调用就会截图一次,并且每一次截图图片质量肯定很大,会消耗很多的时间,因此不能达到快速连续的截图。不过我们又发现另外一个函数,貌似可以控制图片质量:
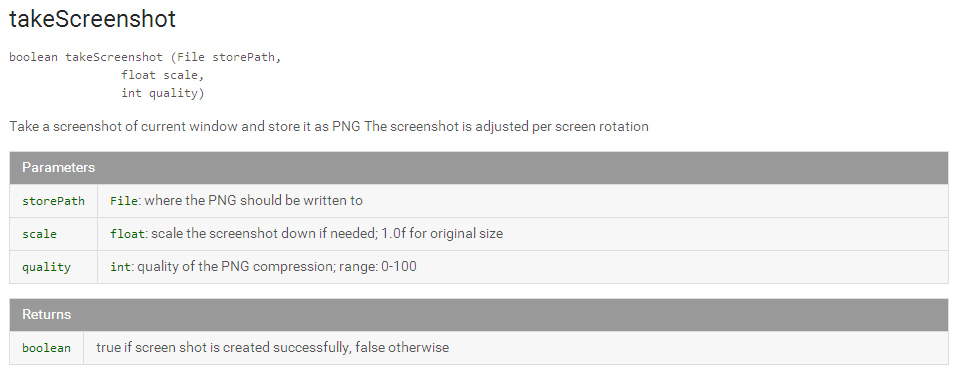
那我们就试试这两个截图的效果吧。
开始动手
这里我在Uiautomator(对Uiautomator还不熟悉的同学请参考我的Uiautomator系列的三篇文章)中实现了如下的代码:

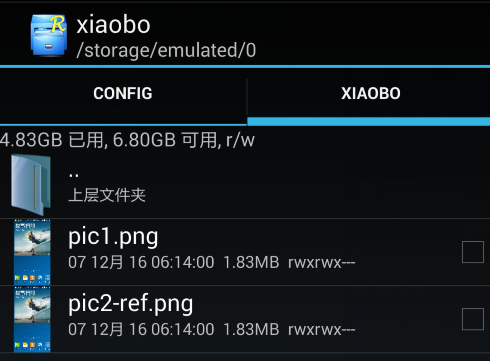
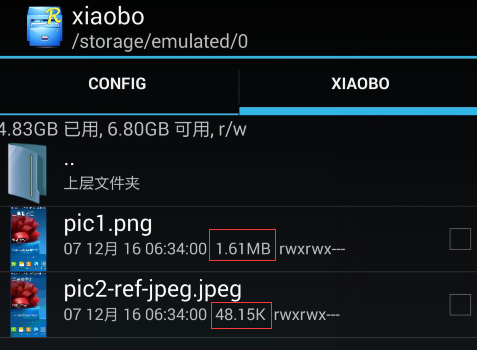
我们去手机的目录下看看这两个图片:

我们可以看到图片的大小是一样大的,咦真是奇怪,打开图片看看图片的真实效果如何呢?

对比了下两张图片的清晰度,几乎没什么区别,那怎么回事呢?因此我决定看看这块的代码一探究竟。
源码剖析
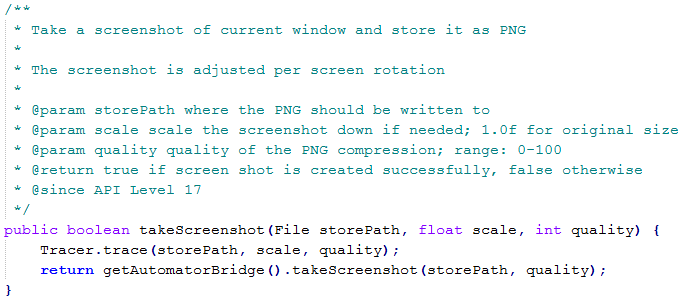
这里给大家也提供一些源码(点击下载),拿到Uiautomator1.0版本的源码后,我们去找UiDevice。

这里可以看到不带参数的tackscreenshot就是调用了带参数的,只不过给了个默认值而已,那么两张图更应该一样啊,我们接着再往后看:
这里说一下 Tracer 是用来记录跟踪log的,可以忽略。因此我们继续跟进 getAutomatorBridge():
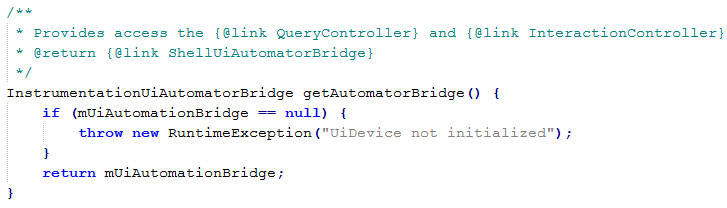
我们看看这个函数返回的变量是什么:

这里在源码中,我没看到这个类,不过看到了一个 abstract 的UiAutomatorBridge 一个抽象类,那么基本上就确定这二者是集成的关系了,于是打开UiAutomatorBridge,继续寻找 takeScreenshot 函数,果然就找到:
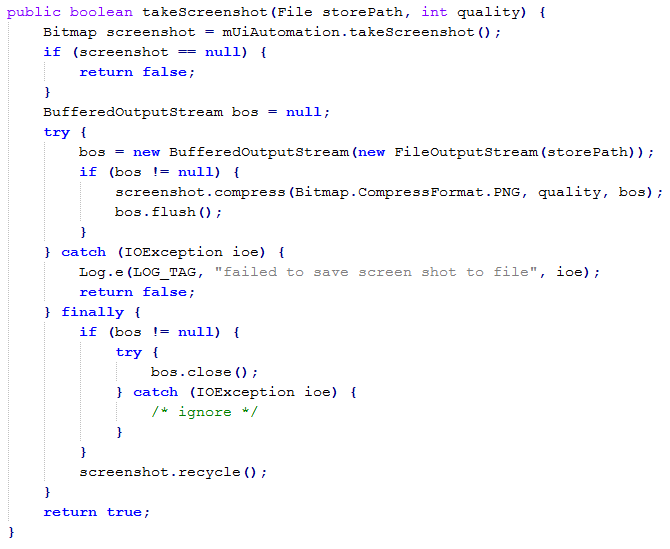
这里面第一步获得Bitmap对象是核心,而获取Bitmap的方法,又和下面这个变量有关系:
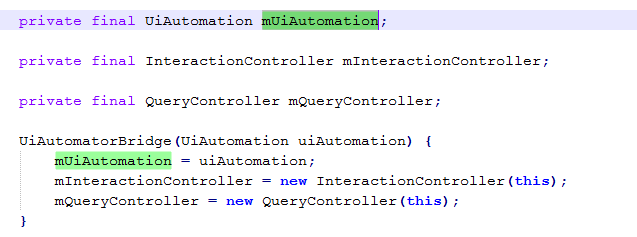
看它初始化的位置,那么我们自己构造就有点难了,因此我决定这里按照这个思路来进行反射。
反射获取
如果还不懂反射的话,建议先看看我的另一篇讲反射的文章《反射技术引入》。这里我的思路是这样的:
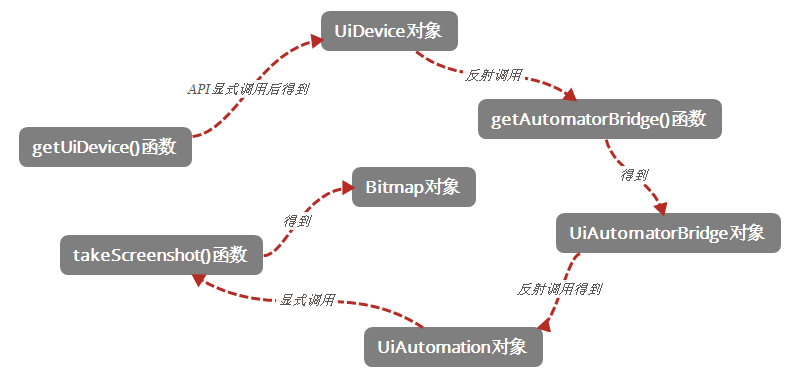
从提供的API getUiDevice()入手,直到拿到Bitmap对象。话不多说,直接看整个的代码实现的过程吧。
 1     void takeScreenShot()
 2     {
 3         File files1 = new File("/mnt/sdcard/xiaobo/pic1.png");
 4         File files2 = new File("/mnt/sdcard/xiaobo/pic2-ref.png");
 5
 6         getUiDevice().takeScreenshot(files1);
 7
 8         try
 9         {
10             reflectTakeScreenshot(files2);
11
12         } catch (NoSuchMethodException e)    {
13             e.printStackTrace();
14         } catch (SecurityException e)    {
15             e.printStackTrace();
16         } catch (IllegalAccessException e)    {
17             e.printStackTrace();
18         } catch (IllegalArgumentException e)    {
19             e.printStackTrace();
20         } catch (InvocationTargetException e)    {
21             e.printStackTrace();
22         } catch (ClassNotFoundException e)    {
23             e.printStackTrace();
24         } catch (NoSuchFieldException e)        {
25             e.printStackTrace();
26         }
27     }
28
29     /**
30      * 反射方式拿到Bitmap截图
31      * */
32     void reflectTakeScreenshot(File files) throws NoSuchMethodException, SecurityException, IllegalAccessException, IllegalArgumentException, InvocationTargetException, ClassNotFoundException, NoSuchFieldException
33     {
34         // 得到UiDevice 对象
35         UiDevice mdevice = getUiDevice();
36
37         // 反射getAutomatorBridge()得到InstrumentationUiAutomatorBridge对象
38         Method method = mdevice.getClass().getDeclaredMethod("getAutomatorBridge", new Class[] {});
39         method.setAccessible(true);
40         Object bridge = method.invoke(mdevice, new Object[] {});
41
42         // 反射得到UiAutomation对象
43         Class tmp = Class.forName("com.android.uiautomator.core.UiAutomatorBridge");
44         Field fields = tmp.getDeclaredField("mUiAutomation");
45         fields.setAccessible(true);
46         UiAutomation mUiAutomation = (UiAutomation)fields.get(bridge);
47
48         // 显式调用
49         Bitmap screenshot = mUiAutomation.takeScreenshot();
50
51         save(screenshot, files);
52     }
53
54     /**
55      * 参考谷歌的源代码进行保存
56      * */
57     void save(Bitmap screenshot, File files)
58     {
59         if (screenshot == null) {
60             return ;
61        }
62        BufferedOutputStream bos = null;
63         try {
64             bos = new BufferedOutputStream(new FileOutputStream(files));
65             if (bos != null) {
66                 screenshot.compress(Bitmap.CompressFormat.PNG, 5, bos);
67                 bos.flush();
68             }
69         } catch (IOException ioe) {
70             Log.e("bryan", "failed to save screen shot to file", ioe);
71             return ;
72         } finally {
73             if (bos != null) {
74                 try {
75                     bos.close();
76                 } catch (IOException ioe) {
77                     /* ignore */
78                 }
79             }
80             screenshot.recycle();
81         }
82     }
83
拿到Bitmap对象后,我们也参考谷歌的写法,保存到本地,这里可以看到(66行)quality的值我依然给传5。我们执行一下看看结果:
可以看到大小还是一样的,并且我自己打开后发现清晰度也是一样的。这就奇怪了,究竟是怎么回事呢?
Google工程师的bug
在图片压缩还不生效的情况下,我们就得仔细看看压缩的代码了。这里我们重点看下高亮的那句代码:
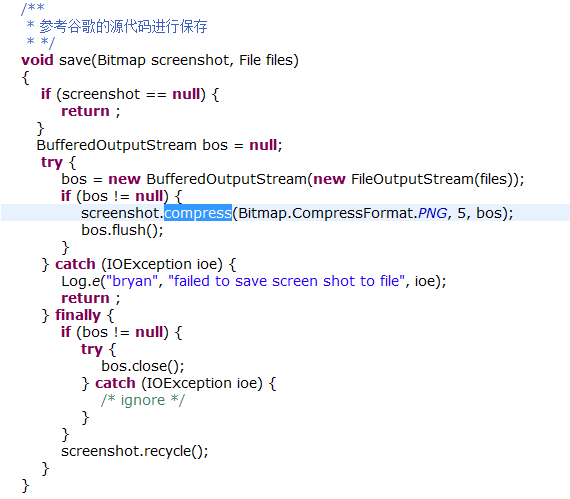
我勾选出的这一句话就是最核心的关键,我们先去查一下这个函数的API用法,不查不知道,一查全明白了:

图中我勾选中的这句话的意思是,对于一些无损的PNG的图片,会忽略quality这个属性的设置。但是我们在源码中却可以看到,谷歌的工程师对于PNG还是使用了压缩,看来得给他提个bug了,哈哈。知道了PNG不能压缩,那么我们把压缩的方式切换成JPEG试试:
screenshot.compress(Bitmap.CompressFormat.PNG, quality, bos);
这句替换为
screenshot.compress(Bitmap.CompressFormat.JPEG, quality, bos);
修改完后,我们运行看看结果:
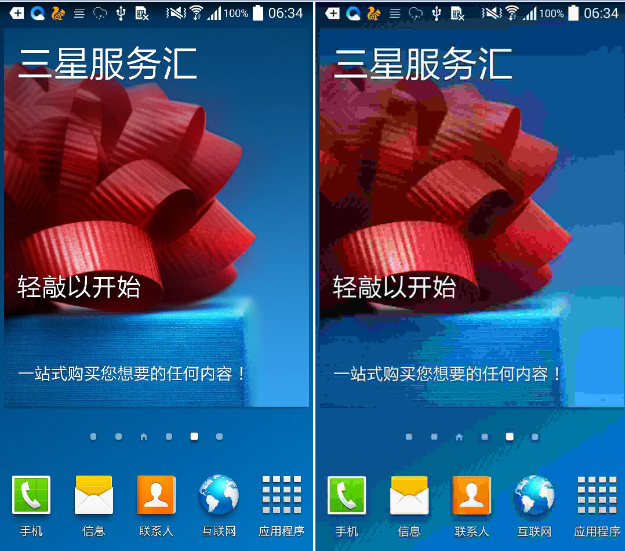
压缩终于生效了,我们看看真实两张图片的效果:
再次优化
这个时候我想,能否满足连续截图的需求呢?如果截一张保存一张,那么保存的过程肯定会很慢,那么能否先记录在内存中,最终结束的时候再写文件呢?于是我讲Bitmap对象压入一个List中,结果保存了大概几十张之后手机就卡死了。
后来在深入了解了Bitmap的原理之后才知道,Bitmap对象在内存中的占用非常的高,原因是图片按照长*宽存储,并且每个像素点上可能还有多个位元素,因此加在一起就多了。我们可以看看占内存的情况:
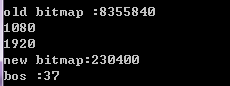
一张1920*1080的图,原始的Bitmap占用为 7.9MB,经过压缩后为225KB保存成为文件后,大小只剩下了5.6KB。所以对于读取来的图片只能压缩完之后,再保存了。最终实现的代码为:
  1 package QQ;
  2
  3 import java.io.BufferedOutputStream;
  4 import java.io.File;
  5 import java.io.FileOutputStream;
  6 import java.io.IOException;
  7 import java.lang.reflect.Field;
  8 import java.lang.reflect.InvocationTargetException;
  9 import java.lang.reflect.Method;
 10 import java.util.Calendar;
 11
 12 import android.R.integer;
 13 import android.app.UiAutomation;
 14 import android.graphics.Bitmap;
 15 import android.util.Log;
 16
 17 import com.android.uiautomator.core.UiDevice;
 18 import com.android.uiautomator.core.UiObjectNotFoundException;
 19 import com.android.uiautomator.testrunner.UiAutomatorTestCase;
 20
 21 public class Test_jietu extends UiAutomatorTestCase
 22 {
 23
 24     public void testDemo() throws IOException, UiObjectNotFoundException {
 25
 26         int i = 0;
 27         while (true)
 28         {
 29             System.out.println(++i);
 30             takeScreenShot();
 31         }
 32
 33     }
 34
 35     void takeScreenShot() {
 36         // File files1 = new File("/mnt/sdcard/xiaobo/pic1.png");
 37         // getUiDevice().takeScreenshot(files1);
 38
 39         File files2 = new File("/mnt/sdcard/xiaobo/" + getTimeString() + ".jpeg");
 40
 41         try
 42         {
 43             reflectTakeScreenshot(files2);
 44
 45         } catch (NoSuchMethodException e)
 46         {
 47             e.printStackTrace();
 48         } catch (SecurityException e)
 49         {
 50             e.printStackTrace();
 51         } catch (IllegalAccessException e)
 52         {
 53             e.printStackTrace();
 54         } catch (IllegalArgumentException e)
 55         {
 56             e.printStackTrace();
 57         } catch (InvocationTargetException e)
 58         {
 59             e.printStackTrace();
 60         } catch (ClassNotFoundException e)
 61         {
 62             e.printStackTrace();
 63         } catch (NoSuchFieldException e)
 64         {
 65             e.printStackTrace();
 66         }
 67     }
 68
 69     /**
 70      * 反射方式拿到Bitmap截图
 71      * */
 72     void reflectTakeScreenshot(File files) throws NoSuchMethodException, SecurityException, IllegalAccessException, IllegalArgumentException, InvocationTargetException, ClassNotFoundException,
 73             NoSuchFieldException {
 74         // 得到UiDevice 对象
 75         UiDevice mdevice = getUiDevice();
 76
 77         // 反射getAutomatorBridge()得到InstrumentationUiAutomatorBridge对象
 78         Method method = mdevice.getClass().getDeclaredMethod("getAutomatorBridge", new Class[] {});
 79         method.setAccessible(true);
 80         Object bridge = method.invoke(mdevice, new Object[] {});
 81
 82         // 反射得到UiAutomation对象
 83         Class tmp = Class.forName("com.android.uiautomator.core.UiAutomatorBridge");
 84         Field fields = tmp.getDeclaredField("mUiAutomation");
 85         fields.setAccessible(true);
 86         UiAutomation mUiAutomation = (UiAutomation) fields.get(bridge);
 87
 88         // 显式调用
 89         Bitmap screenshot = mUiAutomation.takeScreenshot();
 90
 91         // 压缩
 92         screenshot = compress(screenshot);
 93
 94         save(screenshot, files);
 95     }
 96
 97     /**
 98      * 参考谷歌的源代码进行保存
 99      * */
100     void save(Bitmap screenshot, File files) {
101         if (screenshot == null)
102         {
103             return;
104         }
105
106         BufferedOutputStream bos = null;
107         try
108         {
109             bos = new BufferedOutputStream(new FileOutputStream(files));
110             if (bos != null)
111             {
112                 screenshot.compress(Bitmap.CompressFormat.JPEG, 50, bos);
113                 bos.flush();
114             }
115         } catch (IOException ioe)
116         {
117             Log.e("bryan", "failed to save screen shot to file", ioe);
118             return;
119         } finally
120         {
121             if (bos != null)
122             {
123                 try
124                 {
125                     bos.close();
126                 } catch (IOException ioe)
127                 { /* ignore */}
128             }
129
130             // 释放Bitmap在c层的内存
131             screenshot.recycle();
132         }
133     }
134
135     /**
136      * 简单压缩一下图片
137      * */
138     Bitmap compress(Bitmap bitmap) {
139         System.out.println("source bitmap :" + bitmap.getByteCount());
140         if (bitmap != null)
141         {
142             bitmap = Bitmap.createScaledBitmap(bitmap, bitmap.getWidth() / 6, bitmap.getHeight() / 6, true);
143             System.out.println("compress bitmap :" + bitmap.getByteCount());
144             return bitmap;
145         }
146         return bitmap;
147     }
148
149     /*
150      * 得到当前时间
151      */
152     public String getTimeString() {
153         // 取得当前时间
154         Calendar calendar = Calendar.getInstance();
155         calendar.setTimeInMillis(System.currentTimeMillis());
156         return calendar.get(Calendar.HOUR_OF_DAY) + "_" + calendar.get(Calendar.MINUTE) + "_" + calendar.get(Calendar.SECOND) + "_" + calendar.get(Calendar.MILLISECOND);
157     }
158
159 }
这里提供了完整的工程供大家下载。当然如果有愿意使用这个截图的工具的小伙伴,可以下载这个jar包,然后使用下面两条命令,就可以使用了。
命令1:adb push Screenshot.jar /data/local/tmp/
命令2:adb shell uiautomator runtest Screenshot.jar -c QQ.Test_jietu