这两天从同学那里接手了一个可视化的项目 只剩下少量问题未解决。其中,甲方要求实现一个图片放大镜的功能,同学一开始已经做了。但是后期甲方提出放大镜放的比例有问题,要修改。现在落在我手里了
修改一下吧。按照惯例,先搜索引擎一波。找到一篇文章,链接如下http://www.cnblogs.com/liu-wang/p/6125314.html#anchor1。
本文章修改了引用文章中的代码实现了自己想要的功能,现在将过程展现出来
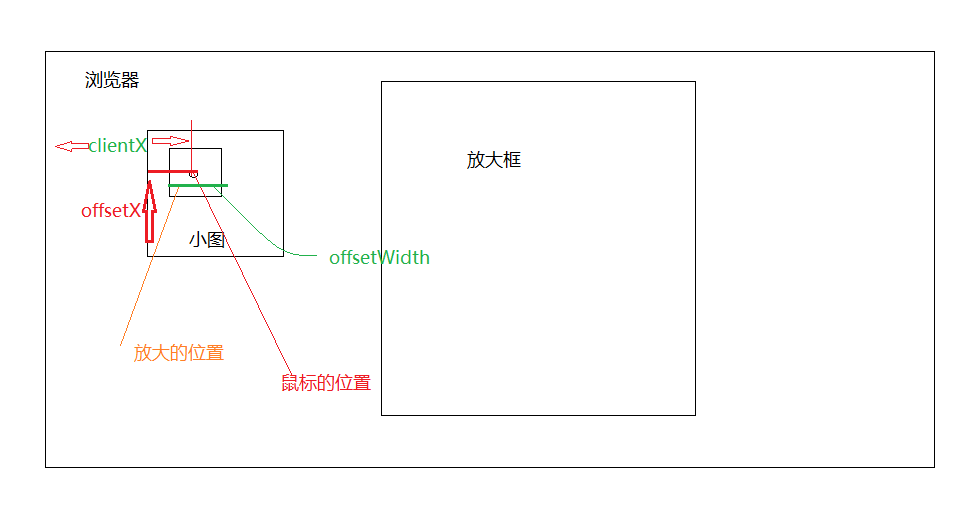
先理解几个概念:关于事件的几个属性:
event.clientX:响应事件时,鼠标相对于浏览器横向的距离(及从鼠标到浏览器左边的距离)(这里说的是浏览器的有效区域)
event.clientY:响应事件时:鼠标相对于浏览器纵向的距离(及从鼠标到浏览器顶端边的距离)(这里说的是浏览器的有效区域)
event.offsetX: 鼠标响应事件时,鼠标相对于事件源的位置(左上角的坐标)
event.offsetXY 鼠标响应事件时,鼠标相对于事件源的位置(左上角的坐标)
元素的属性:
element.offsetWidth元素的宽度
element.offsetHeight元素的高度
下面开始定义css:
<style type="text/css">
        .div1 {
            position: absolute;
            left: 1%;
            width: 11%;
            border: 1px solid #ccc;
        }

        .small_pic img {
            width: 95%;
            height: 95%;
        }

        .div1 .small_pic {/*小图*/
            width: 100%;
            height: 160px;
            background: #eee;
            position: relative;
        }

        .div1 .float_layer {/*浮动层*/
            width: 50px;
            height: 50px;
            border: 1px solid #000;
            background: #fff;
            filter: alpha(opacity:30);
            opacity: 0.3;
            position: absolute;
            top: 0px;
            left: 0px;
            display: none;
        }

        .div1 .mark {
            width: 100%;
            height: 100%;
            position: absolute;
            z-index: 2;
            left: 0px;
            top: 0px;
            background: red;
            filter: alpha(opacity:0);
            opacity: 0;
        }

        .div1 .big_pic {/*大图*/
            position: fixed;/*只有设置为fixed时 设置z-index的值才有效果*/
            top: -1px;
            left: 215px;
            width: 500px;
            height: 500px;
            overflow: hidden;
            border: 2px solid #ccc;
            display: none;
            z-index: 100;
        }

            .div1 .big_pic img {
                position: absolute;
                top: 0px;
                left: 0px;
            }

    </style>
定义脚本元素
<script type="text/javascript">
        function getByClass(oParent, sClass) {//通过类名获取class
            var aEle = oParent.getElementsByTagName('*');
            var aTmp = [];
            var i = 0;

            for (i = 0; i < aEle.length; i++) {
                if (aEle[i].className == sClass) {
                    aTmp.push(aEle[i]);
                }
            }

            return aTmp;
        }

        window.onload = function () {
            var oDiv = document.getElementsByClassName('div1');
            var x;
            for (var i = 0; i < oDiv.length; i++) {

                var eve = function(x) {
                    var oMark = getByClass(oDiv[x], 'mark')[0];
                    var oFloat = getByClass(oDiv[x], 'float_layer')[0];
                    var oBig = getByClass(oDiv[x], 'big_pic')[0];
                    var oSmall = getByClass(oDiv[x], 'small_pic')[0];
                    var oImg = oBig.getElementsByTagName('img')[0];
                    oMark.onmouseover = function () {
                        oFloat.style.display = 'block';
                        oBig.style.display = 'block';


                    };
                    oMark.onmouseout = function () {
                        oFloat.style.display = 'none';
                        oBig.style.display = 'none';
                    };
                    oMark.onmousemove = function (ev) {
                        var oEvent = ev || event;


                        var l = oEvent.offsetX -oFloat.offsetWidth/2;
                        var t = oEvent.offsetY -oFloat.offsetHeight/2 ;
                        var imgWidth = oSmall.offsetWidth;
                        var imgHeight = oSmall.offsetHeight;
                        //判断浮动框是否超过图片边界
                        if (imgWidth - l < oFloat.offsetWidth) {
                            l = imgWidth - oFloat.offsetWidth;
                        }
                        if (l < 0) {
                            l = 0;
                        }
                        if (imgHeight - t < oFloat.offsetHeight) {
                            t = imgHeight - oFloat.offsetHeight;
                        }
                        if (t < 0) {
                            t = 0;
                        }
                        var bigImgHeight = oEvent.clientY - oEvent.offsetY -150;
                        oBig.style.top = bigImgHeight + "px";


                        oFloat.style.left = l + 'px';
                        oFloat.style.top = t + 'px';
                        var tempX = l / (oMark.offsetWidth - oFloat.offsetWidth);
                        var tempY = t / (oMark.offsetHeight - oFloat.offsetHeight);

                        document.title = tempX;
                        oImg.style.left = -tempX * (oImg.offsetWidth - oBig.offsetWidth) + 'px';
                        oImg.style.top = -tempY * (oImg.offsetHeight - oBig.offsetHeight) + 'px';


                    }
                }(i);//使用函数的闭包来为页面中的多个图片批量添加事件响应函数


            }
        };

    </script>
多个元素,这里只展示一个,因为在项目中我是使用Razor视图引擎循环加载多个图片的
<div class="div1">
    <div class="small_pic">
      <span class="mark"></span>
      <span class="float_layer"></span>
         <img src="@dbll.GetModel(item1.module_id).str_value" alt="放大图片1">
    </div>
    <div class="big_pic">
      <img src="~/image/@dbll.GetModel(item1.module_id).str_value" alt="放大图片2">
     </div>
</div>
完成!!