现在越来越多涉及到图片展示的应用都会加入标签功能,标签功能也越来越流行。想起以前做过的一个项目用到过这个功能,所以趁有时间,整理一下,仅供参考,不足之处还请多多指教。
1、标记界面
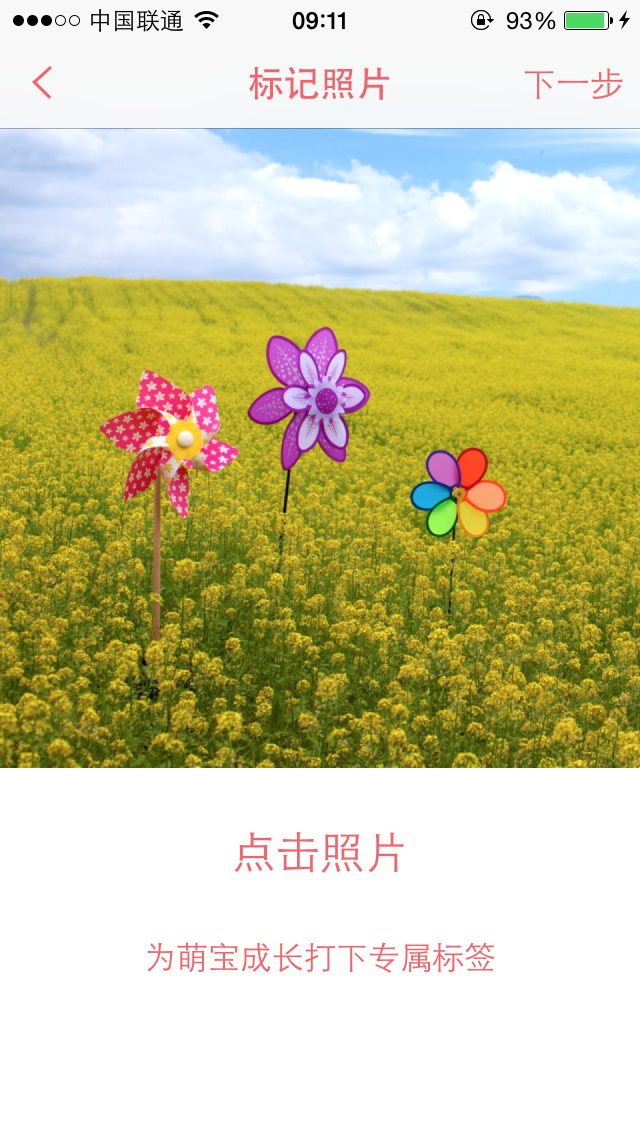
这个界面放一个UIImageView,宽高比例1:1。进入这个界面之前,图片建议是裁剪成1:1,这个比例有利于标签的展示。这个界面代码就不用展示了。
还有给这个UIImageView加入一个点击事件,记得设置userInteractionEnabled = YES。
2、加标签按钮
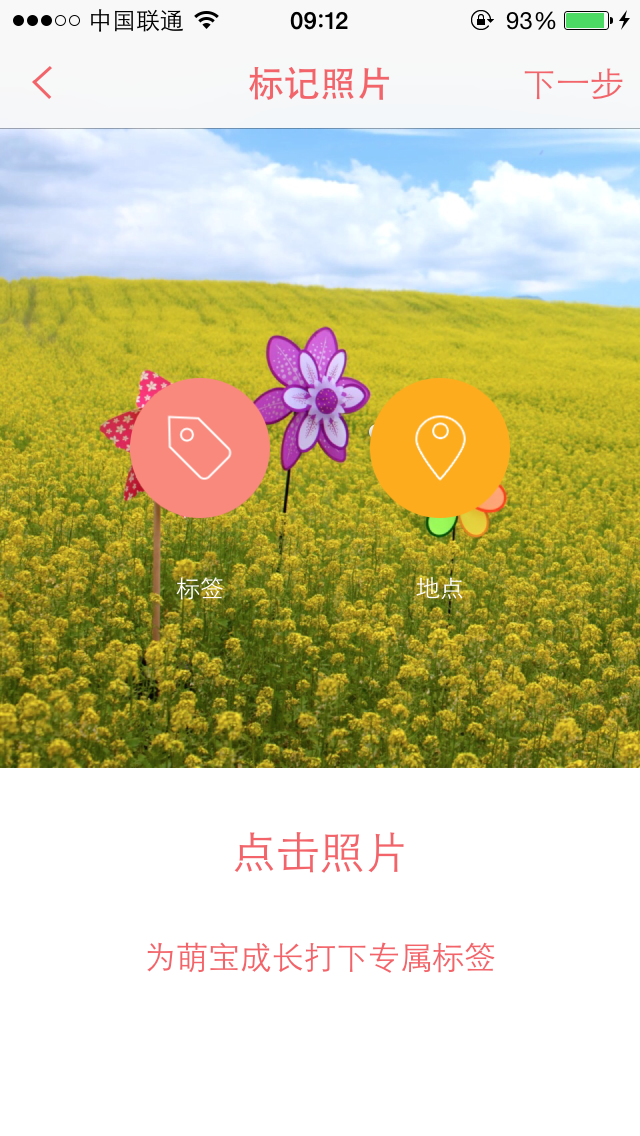
我们项目中是将标签分为两类,文字标签和地理位置标签,基本上是相同的。按钮的布局可以参考我的,也可以自定义。
- (void)setupButton
{
   CGFloat  btnWH = 70
   CGFloat  btnMargin = 50
    UIButton *textBtn = [[UIButton alloc] initWithFrame:CGRectMake((screenW - btnWH * 2 - btnMargin) * 0.5, -btnWH, btnWH, btnWH)];
    [textBtn setImage:[UIImage imageNamed:@"addtag"] forState:UIControlStateNormal];
    [textBtn setImage:[UIImage imageNamed:@"addtag_selected"] forState:UIControlStateSelected];
    [textBtn addTarget:self action:@selector(clickText) forControlEvents:UIControlEventTouchUpInside];
    [self.view addSubview:textBtn];
    self.textBtn = textBtn;

    UILabel *textLabel = [[UILabel alloc] init];
    textLabel.frame = (CGRect){{textBtn.frame.origin.x, CGRectGetMaxY(textBtn.frame)}, textBtn.frame.size};
    textLabel.text = @"标签";
    textLabel.textAlignment = NSTextAlignmentCenter;
    textLabel.textColor = [UIColor whiteColor];
    textLabel.font = [UIFont systemFontOfSize:12];
    [self .view addSubview:textLabel];
    self.textLabel = textLabel;

    UIButton *locationBtn = [[UIButton alloc] initWithFrame:CGRectMake(textBtn.frame.origin.x + btnWH + btnMargin, -btnWH, btnWH, btnWH)];
    [locationBtn setImage:[UIImage imageNamed:@"addtaglocation"] forState:UIControlStateNormal];
    [locationBtn setImage:[UIImage imageNamed:@"addtaglocation_selected"] forState:UIControlStateSelected];
    [locationBtn addTarget:self action:@selector(clickLocation) forControlEvents:UIControlEventTouchUpInside];
    [self.view addSubview:locationBtn];
    self.locationBtn = locationBtn;

    UILabel *locationLabel = [[UILabel alloc] init];
    locationLabel.frame = (CGRect){{locationBtn.frame.origin.x, CGRectGetMaxY(locationBtn.frame)}, locationBtn.frame.size};
    locationLabel.text = @"地点";
    locationLabel.textAlignment = NSTextAlignmentCenter;
    locationLabel.textColor = [UIColor whiteColor];
    locationLabel.font = [UIFont systemFontOfSize:12];
    [self .view addSubview:locationLabel];
    self.locationLabel = locationLabel;
}
好了,定义好这两个按钮,其实是看不见的。因为我们做了一个效果,当点击图片,按钮会蹦出来,当再点击图片,按钮会蹦回去。在这个过程,我只是做了简单的平移动画,从上到下出现。有兴趣的可以自己定义动画(比如弹簧效果)。
点击图片的响应方法
- (void)clickimage:(UITapGestureRecognizer *)sender
{
    //记得定义成员变量isClick用来判断是否点击图片,初始化为NO
    if (self.isClick) {
        //如果有点击图片,让按钮消失
        self.isClick = NO;

        //按钮消失动画
        [UIView animateWithDuration:1.0 animations:^{
            self.textBtn.frame = CGRectMake((screenW - btnWH * 2 - btnMargin) * 0.5, -btnWH, btnWH, btnWH);
            self.locationBtn.frame = CGRectMake(self.textBtn.frame.origin.x + btnWH + btnMargin, -btnWH, btnWH, btnWH);
            self.textLabel.frame = (CGRect){{self.textBtn.frame.origin.x, CGRectGetMaxY(self.textBtn.frame) + 5}, self.textBtn.frame.size};
            self.locationLabel.frame = (CGRect){{self.locationBtn.frame.origin.x, CGRectGetMaxY(self.locationBtn.frame) + 5}, self.locationBtn.frame.size};
        }];
    } else {
        //如果没有点击图片,让按钮出现。此时就是用户开始进行添加标签过程
        self.isClick = YES;

        //记录下用户点击的位置,点击的位置就是所添加标签的位置。
        CGPoint point = [sender locationInView:self.imageview];
        //用成员变量保存点击的位置
        self.clickpoint = point;
        //用小圆圈图片做一个标记,让用户知道自己点了哪里。
        UIImageView *pointView = [[UIImageView alloc] initWithFrame:CGRectMake(point.x, point.y, 15, 15)];
        pointView.image = [UIImage imageNamed:@"tagpoint"];
        pointView.tag = 1001;
        [self.imageview addSubview:pointView];
        //按钮出现动画
        [UIView animateWithDuration:1.0 animations:^{
                self.textBtn.frame = CGRectMake((screenW - btnWH * 2 - btnMargin) * 0.5, (screenW - btnWH) * 0.5 + 64, btnWH, btnWH);
                self.locationBtn.frame = CGRectMake(self.textBtn.frame.origin.x + btnWH + btnMargin, (screenW - btnWH) * 0.5 + 64, btnWH, btnWH);
                self.textLabel.frame = (CGRect){{self.textBtn.frame.origin.x, CGRectGetMaxY(self.textBtn.frame)}, self.textBtn.frame.size};
                self.locationLabel.frame = (CGRect){{self.locationBtn.frame.origin.x, CGRectGetMaxY(self.locationBtn.frame)}, self.locationBtn.frame.size};
        }];
    }
}
3、响应按钮点击
- (void)clickText
{
//将状态变成未点击
    self.isClick = NO;

    [UIView animateWithDuration:0.3 animations:^{
        self.textBtn.frame = CGRectMake((screenW - btnWH * 2 - btnMargin) * 0.5, -btnWH, btnWH, btnWH);
        self.locationBtn.frame = CGRectMake(self.textBtn.frame.origin.x + btnWH + btnMargin, -btnWH, btnWH, btnWH);
        self.textLabel.frame = (CGRect){{self.textBtn.frame.origin.x, CGRectGetMaxY(self.textBtn.frame) + 5}, self.textBtn.frame.size};
        self.locationLabel.frame = (CGRect){{self.locationBtn.frame.origin.x, CGRectGetMaxY(self.locationBtn.frame) + 5}, self.locationBtn.frame.size};
    }];
//自定义一个添加文字的View,如下图所示。
    UIWindow *windows = [UIApplication sharedApplication].keyWindow;
    LMAddTextTagView *addtext = [[LMAddTextTagView alloc] init];
    addtext.delegate = self;
    addtext.frame = [UIScreen mainScreen].bounds;
    addtext.tagListArray = self.taglistArray;
    [windows addSubview:addtext];
}
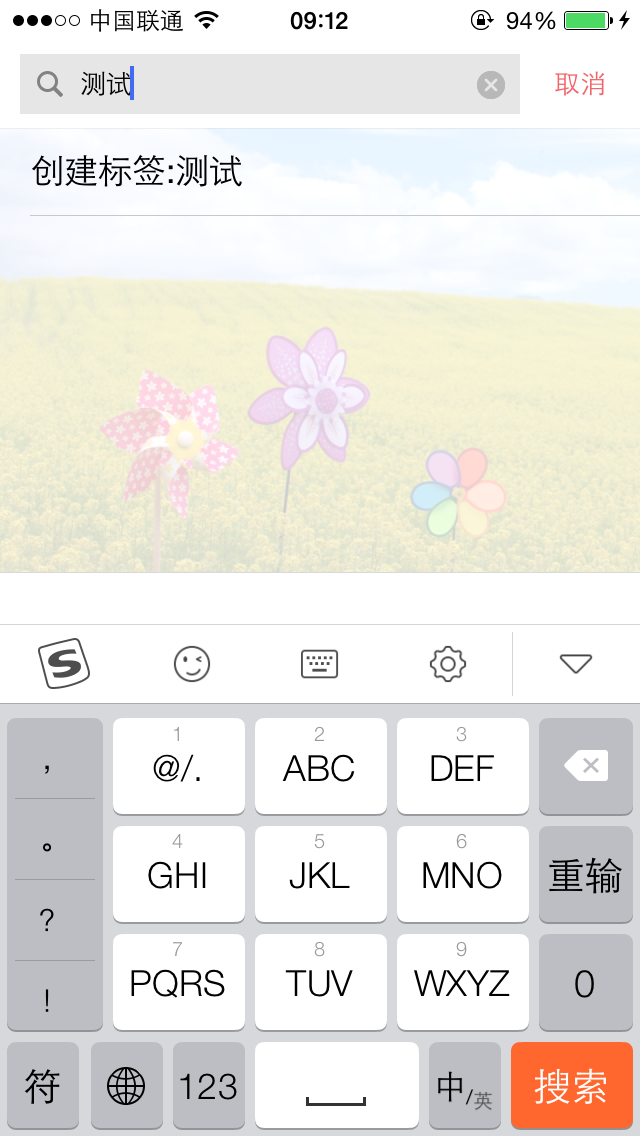
在这个界面,用户可以自己创建标签文字。这个界面并不难,添加好后,将文字传到添加标签界面,通过代理就可以实现,不贴代码了。
4、封装标签信息并显示标签
这里我们定义了两个实体类,LMTagInfo和LMTagFrameInfo。前一个封装了标签信息,后一个封装了标签子控件的frame信息。
//
//  LMTagInfo.h
//  辣妈萌宝
#import <Foundation/Foundation.h>

@interface LMTagInfo : NSObject

@property(nonatomic, assign)CGFloat tagX;
@property(nonatomic, assign)CGFloat tagY;
/**
 0表示文字标签
 1表示位置标签
 **/
@property(nonatomic, assign)int tagType;
@property(nonatomic, copy)NSString *tagText;

@end
//
//  LMTagFrameInfo.h
//  辣妈萌宝
#import <Foundation/Foundation.h>

@class LMTagInfo;
@interface LMTagFrameInfo : NSObject
@property(nonatomic, strong)LMTagInfo *tagInfo;

/**
 整个View
 **/
@property(nonatomic, assign)CGRect viewF;
/**
 logoView
 **/
@property(nonatomic, assign)CGRect logoViewF;
/**
 文字按钮
 **/
@property(nonatomic, assign)CGRect textButtonF;
/**
 文字
 **/
@property(nonatomic, assign)CGRect textLabelF;
/**
 左右判断
 **/
@property(nonatomic, assign)int isRight;
根据标签信息算好标签的Frame
//
//  LMTagFrameInfo.m
//  辣妈萌宝

#import "LMTagFrameInfo.h"
#import "LMTagInfo.h"

#define pointWH 15
#define textBGW 22
#define textBGH  27

@implementation LMTagFrameInfo

- (void)setTagInfo:(LMTagInfo *)tagInfo
{
    _tagInfo = tagInfo;

    CGSize textSize = [tagInfo.tagText sizeWithAttributes:@{NSFontAttributeName:[UIFont systemFontOfSize:12]}];

    CGFloat viewX;
    CGFloat viewY = tagInfo.tagY - textBGH * 0.5;
    CGFloat viewW = textBGW + textSize.width + pointWH;
    CGFloat viewH = textBGH;

    CGFloat logoViewX;
    CGFloat logoViewWH = pointWH;
    CGFloat logoViewY = (viewH - logoViewWH) * 0.5;

    CGFloat textButtonX;
    CGFloat textButtonY = 0;
    CGFloat textButtonW = textBGW + textSize.width;
    CGFloat textButtonH = textBGH;

    CGFloat textLabelX;
    CGFloat textLabelY = (textButtonH - textSize.height) * 0.5;
    CGFloat textLabelW = textSize.width;
    CGFloat textLabelH = textSize.height;

    if (textSize.width + textBGW + pointWH + tagInfo.tagX >= screenW) {
        //文字朝左
        _isRight = 0;
        viewX = tagInfo.tagX - textSize.width - textBGW - pointWH * 0.5;
        logoViewX = textButtonW;
        textButtonX = 0;
        textLabelX = 0.3 * textBGW;
    } else {
        //文字朝右
        _isRight = 1;
        viewX = tagInfo.tagX - pointWH * 0.5;
        logoViewX = 0;
        textButtonX = logoViewWH;
        textLabelX = textButtonX + 0.7 *textBGW;
    }
    _viewF = CGRectMake(viewX, viewY, viewW, viewH);
    _logoViewF = CGRectMake(logoViewX, logoViewY, logoViewWH, logoViewWH);
    _textButtonF = CGRectMake(textButtonX, textButtonY, textButtonW, textButtonH);
    _textLabelF = CGRectMake(textLabelX, textLabelY, textLabelW, textLabelH);
}

@end
然后就是自定义标签View
//
//  LMTagView.h
//  辣妈萌宝

#import <UIKit/UIKit.h>

@class LMTagFrameInfo;
@interface LMTagView : UIImageView
@property(nonatomic, strong)LMTagFrameInfo *tagFrameInfo;
//用来判断这个标签是否可以移动改变其位置
@property(nonatomic, assign)BOOL isTouch;
@end
//
//  LMTagView.m
//  辣妈萌宝

#import "LMTagView.h"
#import "LMTagFrameInfo.h"
#import "LMTagInfo.h"
#import "UIImage+MJ.h"
@interface LMTagView ()

@property(nonatomic, weak)UIImageView *logoView;
@property(nonatomic, weak)UIImageView *textButton;
@property(nonatomic, weak)UILabel *textLabel;
@property(nonatomic, weak)UIImageView *animationView;
@property(nonatomic, assign)CGPoint beginPoint;
@property(nonatomic, assign)CGPoint beginCenter;
@end

@implementation LMTagView

- (id)initWithFrame:(CGRect)frame
{
    self = [super initWithFrame:frame];
    if (self) {
        self.userInteractionEnabled = YES;
        self.backgroundColor = [UIColor clearColor];

        UIImageView *logoView = [[UIImageView alloc] init];
        [self addSubview:logoView];
        self.logoView = logoView;

        UIImageView *textButton = [[UIImageView alloc] init];
        textButton.userInteractionEnabled = YES;
        [self addSubview:textButton];
        self.textButton = textButton;

        UILabel *textLabel = [[UILabel alloc] init];
        textLabel.textColor = [UIColor whiteColor];
        textLabel.textAlignment = NSTextAlignmentCenter;
        textLabel.font = [UIFont systemFontOfSize:12];
        [self addSubview:textLabel];
        self.textLabel = textLabel;
    }
    return self;
}

- (void)setTagFrameInfo:(LMTagFrameInfo *)tagFrameInfo
{
    _tagFrameInfo = tagFrameInfo;

    LMTagInfo *tagInfo  = tagFrameInfo.tagInfo;

    self.logoView.frame = tagFrameInfo.logoViewF;
    if (tagInfo.tagType == 0) {
        self.logoView.image = [UIImage imageNamed:@"tagpoint"];
    } else {
        self.logoView.image = [UIImage imageNamed:@"taglocation"];
    }

    self.textButton.frame = tagFrameInfo.textButtonF;
    if (tagFrameInfo.isRight == 1) {
        self.textButton.image = [UIImage resizedImageWithName:@"tag_text_bg_left" left:0.7 top:0.5];
    } else {
        self.textButton.image = [UIImage resizedImageWithName:@"tag_text_bg_right" left:0.3 top:0.5];
    }

    self.textLabel.frame = tagFrameInfo.textLabelF;
    self.textLabel.text = tagInfo.tagText;

}


- (void)touchesBegan:(NSSet *)touches withEvent:(UIEvent *)event
{
    if (!self.isTouch) {
        return;
    }
    UITouch *touch = [touches anyObject];
    self.beginPoint = [touch locationInView:self];
    self.beginCenter = self.center;
}

- (void)touchesMoved:(NSSet *)touches withEvent:(UIEvent *)event
{
    if (!self.isTouch) {
        return;
    }
    UITouch *touch = [touches anyObject];

    CGPoint nowPoint = [touch locationInView:self];

    float offsetX = nowPoint.x - self.beginPoint.x;
    float offsetY = nowPoint.y - self.beginPoint.y;

    CGPoint newcenter = CGPointMake(self.center.x + offsetX, self.center.y + offsetY);

    float halfx = CGRectGetMidX(self.bounds);

    newcenter.x = MAX(halfx, newcenter.x);
    newcenter.x = MIN(self.superview.bounds.size.width - halfx, newcenter.x);

    float halfy = CGRectGetMidY(self.bounds);
    newcenter.y = MAX(halfy, newcenter.y);
    newcenter.y = MIN(self.superview.bounds.size.height - halfy, newcenter.y);

    self.center = newcenter;


}

- (void)touchesEnded:(NSSet *)touches withEvent:(UIEvent *)event
{
    if (!self.isTouch) {
        return;
    }
    self.tagFrameInfo.tagInfo.tagX += self.center.x - self.beginCenter.x;
    self.tagFrameInfo.tagInfo.tagY += self.center.y - self.beginCenter.y;
}
@end
好了,我们需要的信息和view都定义好了,其中这个标签添加好后,是可以拖拽它,更改它的位置。然后用到的图片素材我会放到最后。
接着在控制器中响应添加标签方法
- (void)addTextTagWith:(NSString *)tagtext
{
    LMTagInfo *tagInfo = [[LMTagInfo alloc] init];
    tagInfo.tagX = self.clickpoint.x;
    tagInfo.tagY = self.clickpoint.y;
    tagInfo.tagText = tagtext;

    tagInfo.tagType = 0;
    //addtagArray用于存放标签信息,因为标签可能不止一个。
    [self.addtagArray addObject:tagInfo];

    LMTagFrameInfo *tagFrameInfo = [[LMTagFrameInfo alloc] init];
    tagFrameInfo.tagInfo = tagInfo;

    LMTagView *tagView = [[LMTagView alloc] init];
    tagView.userInteractionEnabled = YES;
    //同时点击标签可以提示是否删除此标签,删除方法中将tagInfo从addtagArray数组中删除然后再将tagView从superview删除即可。
    UITapGestureRecognizer *tagtap = [[UITapGestureRecognizer alloc] initWithTarget:self action:@selector(clickDelete:)];
    [tagView addGestureRecognizer:tagtap];
    tagView.isTouch = YES;
    tagView.frame = tagFrameInfo.viewF;
    tagView.tagFrameInfo = tagFrameInfo;
    [self.imageview addSubview:tagView];
}
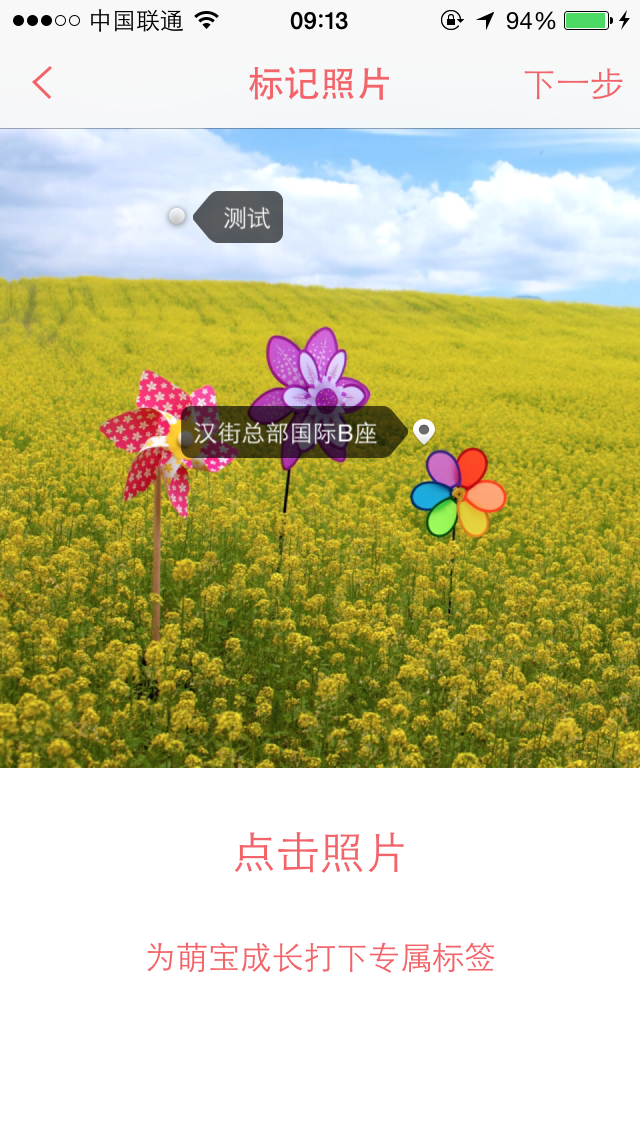
效果如图所示
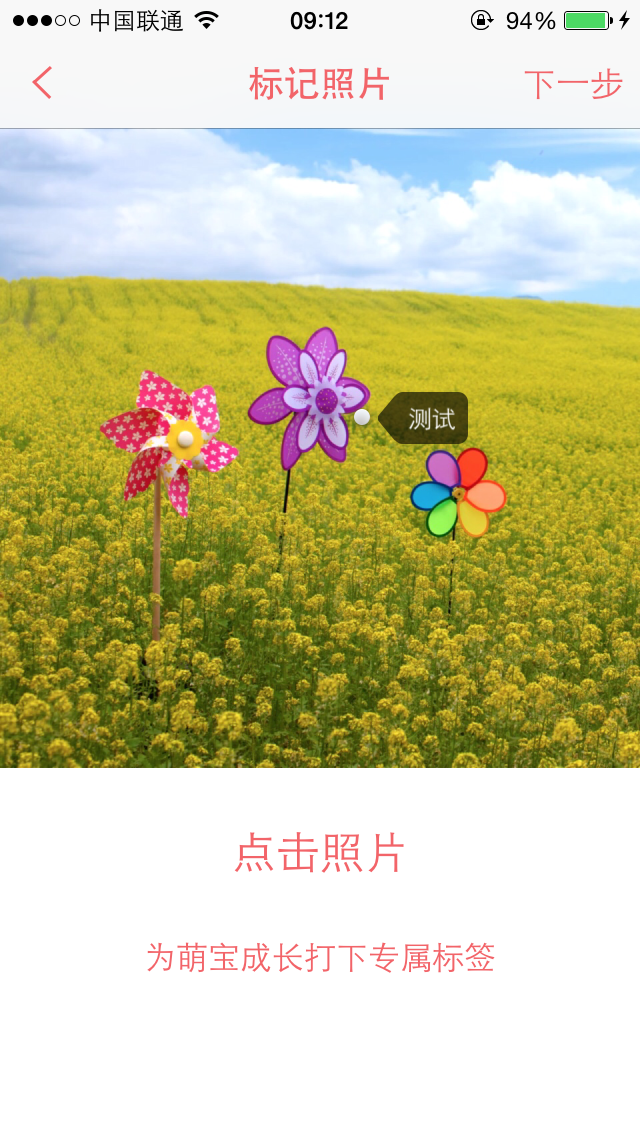
可以拖拽标签改变其位置哦,嘿嘿。另外地理标签同位置标签一样,将tagType设置为1就行了。
文字信息建议使用高德地图,可以获取到用户附近建筑物地址,用户选择好,传回地址文字信息就行了。
5、提交信息到服务器。
需要服务器端配合,我们做的标签图片,标签信息和图片信息是分开的,但需要一一对应。
6、用到的资源


![]()
![]()
![]()
![]()
#import "UIImage+MJ.h"

@implementation UIImage (MJ)
//用于拉伸图片的分类
+ (UIImage *)resizedImageWithName:(NSString *)name
{
    return [self resizedImageWithName:name left:0.5 top:0.5];
}

+ (UIImage *)resizedImageWithName:(NSString *)name left:(CGFloat)left top:(CGFloat)top
{
    UIImage *image = [self imageNamed:name];
    return [image stretchableImageWithLeftCapWidth:image.size.width * left topCapHeight:image.size.height * top];
}
@end