Author: 楚格
2018-11-28
IDE: Pycharm2018.03 Anaconda 3.5.1 Python 3.7
KeyWord :
Explain: 第二次更新
1. 线程基础
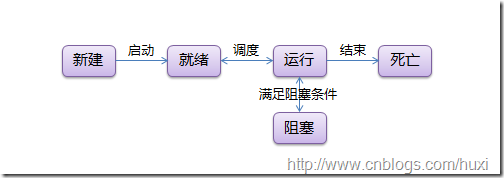
1.1. 线程状态
线程有5种状态,状态转换的过程如下图所示:
1.2. 线程同步(锁)
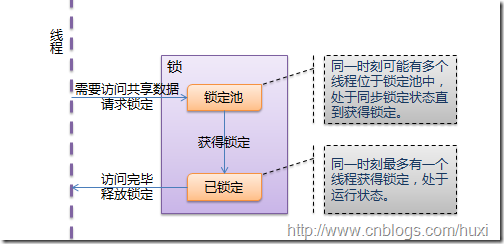
多线程的优势在于可以同时运行多个任务(至少感觉起来是这样)。但是当线程需要共享数据时,可能存在数据不同步的问题。考虑这样一种情况:一个列表里所有元素都是0,线程"set"从后向前把所有元素改成1,而线程"print"负责从前往后读取列表并打印。那么,可能线程"set"开始改的时候,线程"print"便来打印列表了,输出就成了一半0一半1,这就是数据的不同步。为了避免这种情况,引入了锁的概念。
锁有两种状态——锁定和未锁定。每当一个线程比如"set"要访问共享数据时,必须先获得锁定;如果已经有别的线程比如"print"获得锁定了,那么就让线程"set"暂停,也就是同步阻塞;等到线程"print"访问完毕,释放锁以后,再让线程"set"继续。经过这样的处理,打印列表时要么全部输出0,要么全部输出1,不会再出现一半0一半1的尴尬场面。
线程与锁的交互如下图所示:
1.3. 线程通信(条件变量)
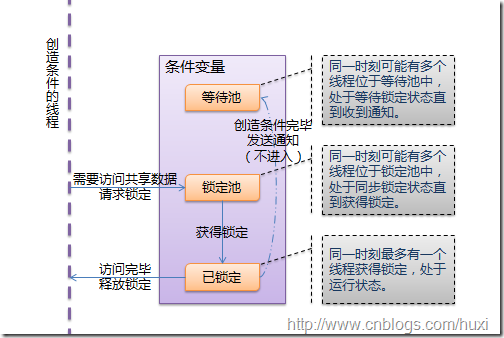
然而还有另外一种尴尬的情况:列表并不是一开始就有的;而是通过线程"create"创建的。如果"set"或者"print" 在"create"还没有运行的时候就访问列表,将会出现一个异常。使用锁可以解决这个问题,但是"set"和"print"将需要一个无限循环——他们不知道"create"什么时候会运行,让"create"在运行后通知"set"和"print"显然是一个更好的解决方案。于是,引入了条件变量。
条件变量允许线程比如"set"和"print"在条件不满足的时候(列表为None时)等待,等到条件满足的时候(列表已经创建)发出一个通知,告诉"set" 和"print"条件已经有了,你们该起床干活了;然后"set"和"print"才继续运行。
线程与条件变量的交互如下图所示:

1.4. 线程运行和阻塞的状态转换
最后看看线程运行和阻塞状态的转换。
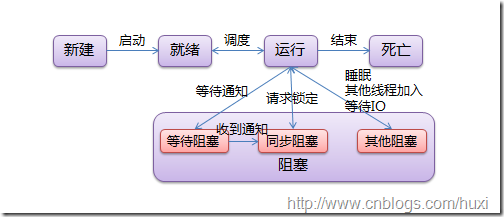
阻塞有三种情况:
同步阻塞是指处于竞争锁定的状态,线程请求锁定时将进入这个状态,一旦成功获得锁定又恢复到运行状态;
等待阻塞是指等待其他线程通知的状态,线程获得条件锁定后,调用“等待”将进入这个状态,一旦其他线程发出通知,线程将进入同步阻塞状态,再次竞争条件锁定;
而其他阻塞是指调用time.sleep()、anotherthread.join()或等待IO时的阻塞,这个状态下线程不会释放已获得的锁定。
tips: 如果能理解这些内容,接下来的主题将是非常轻松的;并且,这些内容在大部分流行的编程语言里都是一样的。(意思就是非看懂不可 >_< 嫌作者水平低找别人的教程也要看懂)
2. thread
Python通过两个标准库thread和threading提供对线程的支持。thread提供了低级别的、原始的线程以及一个简单的锁。
|
1 2 3 4 5 6 7 8 9 10 11 12 13 14 15 16 17 18 19 20 21 22 23 24 25 26 27 28 29 30 31 32 33 34 35 36 37 38 39 40 |
# encoding: UTF-8 import thread import time
# 一个用于在线程中执行的函数 def func(): for i in range(5): print 'func' time.sleep(1)
# 结束当前线程 # 这个方法与thread.exit_thread()等价 thread.exit() # 当func返回时,线程同样会结束
# 启动一个线程,线程立即开始运行 # 这个方法与thread.start_new_thread()等价 # 第一个参数是方法,第二个参数是方法的参数 thread.start_new(func, ()) # 方法没有参数时需要传入空tuple
# 创建一个锁(LockType,不能直接实例化) # 这个方法与thread.allocate_lock()等价 lock = thread.allocate()
# 判断锁是锁定状态还是释放状态 print lock.locked()
# 锁通常用于控制对共享资源的访问 count = 0
# 获得锁,成功获得锁定后返回True # 可选的timeout参数不填时将一直阻塞直到获得锁定 # 否则超时后将返回False if lock.acquire(): count += 1
# 释放锁 lock.release()
# thread模块提供的线程都将在主线程结束后同时结束 time.sleep(6) |
thread 模块提供的其他方法:
thread.interrupt_main(): 在其他线程中终止主线程。
thread.get_ident(): 获得一个代表当前线程的魔法数字,常用于从一个字典中获得线程相关的数据。这个数字本身没有任何含义,并且当线程结束后会被新线程复用。
thread还提供了一个ThreadLocal类用于管理线程相关的数据,名为 thread._local,threading中引用了这个类。
由于thread提供的线程功能不多,无法在主线程结束后继续运行,不提供条件变量等等原因,一般不使用thread模块,这里就不多介绍了。
3. threading
threading基于Java的线程模型设计。锁(Lock)和条件变量(Condition)在Java中是对象的基本行为(每一个对象都自带了锁和条件变量),而在Python中则是独立的对象。Python Thread提供了Java Thread的行为的子集;没有优先级、线程组,线程也不能被停止、暂停、恢复、中断。Java Thread中的部分被Python实现了的静态方法在threading中以模块方法的形式提供。
threading 模块提供的常用方法:
threading.currentThread(): 返回当前的线程变量。
threading.enumerate(): 返回一个包含正在运行的线程的list。正在运行指线程启动后、结束前,不包括启动前和终止后的线程。
threading.activeCount(): 返回正在运行的线程数量,与len(threading.enumerate())有相同的结果。
threading模块提供的类:
Thread, Lock, Rlock, Condition, [Bounded]Semaphore, Event, Timer, local.
3.1. Thread
Thread是线程类,与Java类似,有两种使用方法,直接传入要运行的方法或从Thread继承并覆盖run():
|
1 2 3 4 5 6 7 8 9 10 11 12 13 14 15 16 17 |
# encoding: UTF-8 import threading
# 方法1:将要执行的方法作为参数传给Thread的构造方法 def func(): print 'func() passed to Thread'
t = threading.Thread(target=func) t.start()
# 方法2:从Thread继承,并重写run() class MyThread(threading.Thread): def run(self): print 'MyThread extended from Thread'
t = MyThread() t.start() |
构造方法:
Thread(group=None, target=None, name=None, args=(), kwargs={})
group: 线程组,目前还没有实现,库引用中提示必须是None;
target: 要执行的方法;
name: 线程名;
args/kwargs: 要传入方法的参数。
实例方法:
isAlive(): 返回线程是否在运行。正在运行指启动后、终止前。
get/setName(name): 获取/设置线程名。
is/setDaemon(bool): 获取/设置是否守护线程。初始值从创建该线程的线程继承。当没有非守护线程仍在运行时,程序将终止。
start(): 启动线程。
join([timeout]): 阻塞当前上下文环境的线程,直到调用此方法的线程终止或到达指定的timeout(可选参数)。
一个使用join()的例子:
|
1 2 3 4 5 6 7 8 9 10 11 12 13 14 15 16 17 18 19 20 21 22 23 |
# encoding: UTF-8 import threading import time
def context(tJoin): print 'in threadContext.' tJoin.start()
# 将阻塞tContext直到threadJoin终止。 tJoin.join()
# tJoin终止后继续执行。 print 'out threadContext.'
def join(): print 'in threadJoin.' time.sleep(1) print 'out threadJoin.'
tJoin = threading.Thread(target=join) tContext = threading.Thread(target=context, args=(tJoin,))
tContext.start() |
运行结果:
in
threadContext.
in threadJoin.
out threadJoin.
out threadContext.
3.2. Lock
Lock(指令锁)是可用的最低级的同步指令。Lock处于锁定状态时,不被特定的线程拥有。Lock包含两种状态——锁定和非锁定,以及两个基本的方法。
可以认为Lock有一个锁定池,当线程请求锁定时,将线程至于池中,直到获得锁定后出池。池中的线程处于状态图中的同步阻塞状态。
构造方法:
Lock()
实例方法:
acquire([timeout]): 使线程进入同步阻塞状态,尝试获得锁定。
release(): 释放锁。使用前线程必须已获得锁定,否则将抛出异常。
|
1 2 3 4 5 6 7 8 9 10 11 12 13 14 15 16 17 18 19 20 21 22 23 24 25 26 27 28 29 |
# encoding: UTF-8 import threading import time
data = 0 lock = threading.Lock()
def func(): global data print '%s acquire lock...' % threading.currentThread().getName()
# 调用acquire([timeout])时,线程将一直阻塞, # 直到获得锁定或者直到timeout秒后(timeout参数可选)。 # 返回是否获得锁。 if lock.acquire(): print '%s get the lock.' % threading.currentThread().getName() data += 1 time.sleep(2) print '%s release lock...' % threading.currentThread().getName()
# 调用release()将释放锁。 lock.release()
t1 = threading.Thread(target=func) t2 = threading.Thread(target=func) t3 = threading.Thread(target=func) t1.start() t2.start() t3.start() |
3.3. RLock
RLock(可重入锁)是一个可以被同一个线程请求多次的同步指令。RLock使用了“拥有的线程”和“递归等级”的概念,处于锁定状态时,RLock被某个线程拥有。拥有RLock的线程可以再次调用acquire(),释放锁时需要调用release()相同次数。
可以认为RLock包含一个锁定池和一个初始值为0的计数器,每次成功调用 acquire()/release(),计数器将+1/-1,为0时锁处于未锁定状态。
构造方法:
RLock()
实例方法:
acquire([timeout])/release(): 跟Lock差不多。
|
1 2 3 4 5 6 7 8 9 10 11 12 13 14 15 16 17 18 19 20 21 22 23 24 25 26 27 28 29 30 31 32 33 34 |
# encoding: UTF-8 import threading import time
rlock = threading.RLock()
def func(): # 第一次请求锁定 print '%s acquire lock...' % threading.currentThread().getName() if rlock.acquire(): print '%s get the lock.' % threading.currentThread().getName() time.sleep(2)
# 第二次请求锁定 print '%s acquire lock again...' % threading.currentThread().getName() if rlock.acquire(): print '%s get the lock.' % threading.currentThread().getName() time.sleep(2)
# 第一次释放锁 print '%s release lock...' % threading.currentThread().getName() rlock.release() time.sleep(2)
# 第二次释放锁 print '%s release lock...' % threading.currentThread().getName() rlock.release()
t1 = threading.Thread(target=func) t2 = threading.Thread(target=func) t3 = threading.Thread(target=func) t1.start() t2.start() t3.start() |
3.4. Condition
Condition(条件变量)通常与一个锁关联。需要在多个Contidion中共享一个锁时,可以传递一个Lock/RLock实例给构造方法,否则它将自己生成一个RLock实例。
可以认为,除了Lock带有的锁定池外,Condition还包含一个等待池,池中的线程处于状态图中的等待阻塞状态,直到另一个线程调用notify()/notifyAll()通知;得到通知后线程进入锁定池等待锁定。
构造方法:
Condition([lock/rlock])
实例方法:
acquire([timeout])/release(): 调用关联的锁的相应方法。
wait([timeout]): 调用这个方法将使线程进入Condition的等待池等待通知,并释放锁。使用前线程必须已获得锁定,否则将抛出异常。
notify(): 调用这个方法将从等待池挑选一个线程并通知,收到通知的线程将自动调用acquire()尝试获得锁定(进入锁定池);其他线程仍然在等待池中。调用这个方法不会释放锁定。使用前线程必须已获得锁定,否则将抛出异常。
notifyAll(): 调用这个方法将通知等待池中所有的线程,这些线程都将进入锁定池尝试获得锁定。调用这个方法不会释放锁定。使用前线程必须已获得锁定,否则将抛出异常。
例子是很常见的生产者/消费者模式:
|
1 2 3 4 5 6 7 8 9 10 11 12 13 14 15 16 17 18 19 20 21 22 23 24 25 26 27 28 29 30 31 32 33 34 35 36 37 38 39 40 41 42 43 44 45 46 47 |
# encoding: UTF-8 import threading import time
# 商品 product = None # 条件变量 con = threading.Condition()
# 生产者方法 def produce(): global product
if con.acquire(): while True: if product is None: print 'produce...' product = 'anything'
# 通知消费者,商品已经生产 con.notify()
# 等待通知 con.wait() time.sleep(2)
# 消费者方法 def consume(): global product
if con.acquire(): while True: if product is not None: print 'consume...' product = None
# 通知生产者,商品已经没了 con.notify()
# 等待通知 con.wait() time.sleep(2)
t1 = threading.Thread(target=produce) t2 = threading.Thread(target=consume) t2.start() t1.start() |
3.5. Semaphore/BoundedSemaphore
Semaphore(信号量)是计算机科学史上最古老的同步指令之一。Semaphore管理一个内置的计数器,每当调用acquire()时-1,调用release() 时+1。计数器不能小于0;当计数器为0时,acquire()将阻塞线程至同步锁定状态,直到其他线程调用release()。
基于这个特点,Semaphore经常用来同步一些有“访客上限”的对象,比如连接池。
BoundedSemaphore 与Semaphore的唯一区别在于前者将在调用release()时检查计数器的值是否超过了计数器的初始值,如果超过了将抛出一个异常。
构造方法:
Semaphore(value=1): value是计数器的初始值。
实例方法:
acquire([timeout]): 请求Semaphore。如果计数器为0,将阻塞线程至同步阻塞状态;否则将计数器-1并立即返回。
release(): 释放Semaphore,将计数器+1,如果使用BoundedSemaphore,还将进行释放次数检查。release()方法不检查线程是否已获得 Semaphore。
|
1 2 3 4 5 6 7 8 9 10 11 12 13 14 15 16 17 18 19 20 21 22 23 24 25 26 27 28 29 30 31 32 33 34 35 |
# encoding: UTF-8 import threading import time
# 计数器初值为2 semaphore = threading.Semaphore(2)
def func():
# 请求Semaphore,成功后计数器-1;计数器为0时阻塞 print '%s acquire semaphore...' % threading.currentThread().getName() if semaphore.acquire():
print '%s get semaphore' % threading.currentThread().getName() time.sleep(4)
# 释放Semaphore,计数器+1 print '%s release semaphore' % threading.currentThread().getName() semaphore.release()
t1 = threading.Thread(target=func) t2 = threading.Thread(target=func) t3 = threading.Thread(target=func) t4 = threading.Thread(target=func) t1.start() t2.start() t3.start() t4.start()
time.sleep(2)
# 没有获得semaphore的主线程也可以调用release # 若使用BoundedSemaphore,t4释放semaphore时将抛出异常 print 'MainThread release semaphore without acquire' semaphore.release() |
3.6. Event
Event(事件)是最简单的线程通信机制之一:一个线程通知事件,其他线程等待事件。Event内置了一个初始为False的标志,当调用set()时设为True,调用clear()时重置为 False。wait()将阻塞线程至等待阻塞状态。
Event其实就是一个简化版的 Condition。Event没有锁,无法使线程进入同步阻塞状态。
构造方法:
Event()
实例方法:
isSet(): 当内置标志为True时返回True。
set(): 将标志设为True,并通知所有处于等待阻塞状态的线程恢复运行状态。
clear(): 将标志设为False。
wait([timeout]): 如果标志为True将立即返回,否则阻塞线程至等待阻塞状态,等待其他线程调用set()。
|
1 2 3 4 5 6 7 8 9 10 11 12 13 14 15 16 17 18 19 20 21 22 23 24 |
# encoding: UTF-8 import threading import time
event = threading.Event()
def func(): # 等待事件,进入等待阻塞状态 print '%s wait for event...' % threading.currentThread().getName() event.wait()
# 收到事件后进入运行状态 print '%s recv event.' % threading.currentThread().getName()
t1 = threading.Thread(target=func) t2 = threading.Thread(target=func) t1.start() t2.start()
time.sleep(2)
# 发送事件通知 print 'MainThread set event.' event.set() |
3.7. Timer
Timer(定时器)是Thread的派生类,用于在指定时间后调用一个方法。
构造方法:
Timer(interval, function, args=[], kwargs={})
interval: 指定的时间
function: 要执行的方法
args/kwargs: 方法的参数
实例方法:
Timer从Thread派生,没有增加实例方法。
|
1 2 3 4 5 6 7 8 |
# encoding: UTF-8 import threading
def func(): print 'hello timer!'
timer = threading.Timer(5, func) timer.start() |
3.8. local
local是一个小写字母开头的类,用于管理 thread-local(线程局部的)数据。对于同一个local,线程无法访问其他线程设置的属性;线程设置的属性不会被其他线程设置的同名属性替换。
可以把local看成是一个“线程-属性字典”的字典,local封装了从自身使用线程作为 key检索对应的属性字典、再使用属性名作为key检索属性值的细节。
|
1 2 3 4 5 6 7 8 9 10 11 12 13 14 15 |
# encoding: UTF-8 import threading
local = threading.local() local.tname = 'main'
def func(): local.tname = 'notmain' print local.tname
t1 = threading.Thread(target=func) t1.start() t1.join()
print local.tname |
熟练掌握Thread、Lock、Condition就可以应对绝大多数需要使用线程的场合,某些情况下local也是非常有用的东西。本文的最后使用这几个类展示线程基础中提到的场景:
|
1 2 3 4 5 6 7 8 9 10 11 12 13 14 15 16 17 18 19 20 21 22 23 24 25 26 27 28 29 30 31 32 33 34 35 36 37 |
# encoding: UTF-8 import threading
alist = None condition = threading.Condition()
def doSet(): if condition.acquire(): while alist is None: condition.wait() for i in range(len(alist))[::-1]: alist[i] = 1 condition.release()
def doPrint(): if condition.acquire(): while alist is None: condition.wait() for i in alist: print i, condition.release()
def doCreate(): global alist if condition.acquire(): if alist is None: alist = [0 for i in range(10)] condition.notifyAll() condition.release()
tset = threading.Thread(target=doSet,name='tset') tprint = threading.Thread(target=doPrint,name='tprint') tcreate = threading.Thread(target=doCreate,name='tcreate') tset.start() tprint.start() tcreate.start() |
努力学习英语!!!