今天学习了js的基础知识,自我归纳如下:
第一部分:js变量的声明和引入
js声明1-直接声明js代码块,使用<script></script> 2-引入外部声明,即创建一个js文件,然后利用代码<script src="..." type="text/javascript" charset="utf-8"></script>
第二部分:js的变量学习
js中所有变量的声明只有var关键字
例如: var a=123;
var A=1234;
var a1=3.1415926;
var a2="js";
var a3='k';
var a4=true;
var a5=new Date();
我们需要注意:1-js的变量名是严格区分大小写
2-js中的字符串可以使用双引号也可以使用单引号
3-js中可以声明同名变量,系统不会报错,但是执行时候,后面的会将前面的声明覆盖
js中有几种数据类型:number、String、Boolean、Object
利用关键字typeof可以得出相关变量的数据类型
第三部分:js的变量强转
使用Number和Boolean会将相关的字符串强转为我们运算的相关数据类型的变量,容易理解
第四部分:js的运算符
运算符,一般无非我们常见的+、-、*、/、%,在此之外还有++,--,+=,-=,我们的逻辑运算符: ! & && | || (与java中的一致)。
注意:字符串的加法将会发生字符串的拼接
还有我们重要的==和===运算符
等值运算符:==
先判断类型,类型一致则直接比较。类型不一致,则先使用Number()进行强转后再进行比较。
等同运算符:===
先判断类型,类型一致则再比较内容,内容一致则返回true,内容不一致则返回false。 类型不一致则直接false
第五部分:js的逻辑结构
js的逻辑结构类似于java,有:
if,if-else,switch-case, for(){}, whiel(), do{}-while();
用法几乎相同就是我们常用的是int i 但在此处我们要使用var i。
第六部分:js的数组
数组的声明:
var arr=new Array();//声明一个空数组对象
var arr=new Array(length)//声明一个指定长度的数组
var arr=[元素]//声明数组(最常用)
注意:js中的数组声明不用指定长度,js的数组长度是不固定的,会随着元素的数量改变而改变。
数组的赋值和取值,同java中的数组取值和赋值,不过java中会发生数组越界,在js中不会发生。
数组的length属性,用来返回我们数组长度,可以对长度进行赋值,动态的改变长度
如果赋的值大于length,则多出的用空填充;若小于,则进行数据的截断
数组的遍历:
第一种是利用普通for循环
第二种是类似于java中的高级for循环,不过在java中是for-each,但是在js中是for-in
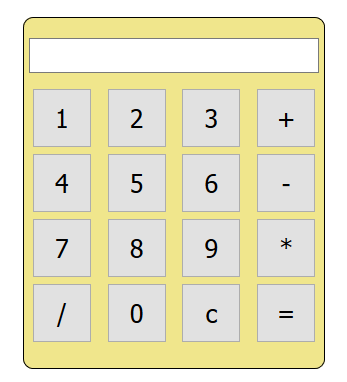
今天学习的内容就是这么多,最后是做了一个简易版本的计算器。
最后的效果如下图:

代码附上:
 1 <html>
 2     <head>
 3         <title>模拟计算器</title>
 4         <meta charset="UTF-8"/>
 5         <style type="text/css">
 6             #showdiv{
 7                 border: solid 1px;
 8                 border-radius: 10px;
 9                 width: 300px;
10                 height:350px;
11                 margin: auto;
12                 margin-top: 60px;
13                 text-align: center;
14                 background-color: khaki;
15             }
16
17             input[type=text]{
18                 width:290px ;
19                 height: 35px;
20                 margin-left: 5px;
21                 margin-right: 5px;
22                 margin-top: 20px;
23                 margin-bottom: 10px;
24                 font-size: 20px;
25             }
26             input[type=button]{
27                 width: 60px;
28                 height: 60px;
29                 margin-left: 5px;
30                 margin-right: 5px;
31                 margin-top: 5px;
32                 font-size: 25px;
33             }
34         </style>
35
36         <script type="text/javascript">
37             function test(btn){
38                 var num = btn.value;
39                 switch (num){
40                     case "=":
41                         document.getElementById("inp").value = eval(document.getElementById("inp").value);
42                         break;
43                     case "c":
44                         document.getElementById("inp").value="";
45                         break;
46                     default:
47                     /*直接使用字符串的拼接*/
48                         document.getElementById("inp").value=document.getElementById("inp").value+num;
49                         break;
50                 }
51             }
52         </script>
53     </head>
54     <body>
55         <div id="showdiv">
56             <input type="text" name="" id="inp" value="" /><br />
57             <!--//onclick 点击即可触发动作-->
58             <input type="button" name="" id="btn" value="1" onclick="test(this)"/>
59             <input type="button" name="" id="" value="2" onclick="test(this)"/>
60             <input type="button" name="" id="" value="3" onclick="test(this)"/>
61             <input type="button" name="" id="" value="+" onclick="test(this)"/><br />
62             <input type="button" name="" id="" value="4" onclick="test(this)"/>
63             <input type="button" name="" id="" value="5" onclick="test(this)"/>
64             <input type="button" name="" id="" value="6" onclick="test(this)"/>
65             <input type="button" name="" id="" value="-" onclick="test(this)"/><br />
66             <input type="button" name="" id="" value="7" onclick="test(this)"/>
67             <input type="button" name="" id="" value="8" onclick="test(this)"/>
68             <input type="button" name="" id="" value="9" onclick="test(this)"/>
69             <input type="button" name="" id="" value="*" onclick="test(this)"/><br />
70             <input type="button" name="" id="" value="/" onclick="test(this)"/>
71             <input type="button" name="" id="" value="0" onclick="test(this)"/>
72             <input type="button" name="" id="" value="c" onclick="test(this)"/>
73             <input type="button" name="" id="" value="=" onclick="test(this)"/>
74         </div>
75     </body>
76 </html>
自勉,继续加油!