0. 风一更 雪一更
有几天没有更新了,因为不知道小白喵的学习情况。小黑喵学习深度学习主要还是更偏NLP一点。在文本数据使用word2vec处理为向量矩阵这部分是视觉方向接触不到的,之前想更这部分内容,不过既然是个方法与工具,就觉得意义不是很大,本质上要处理文本还是将其转换为适合神经网络的矩阵向量输入。
前面的章节介绍了LeNet-5和CNN的基本网络构成,代码给出的是这两种网络解决MNIST手写识别问题。如果能对CNN类卷积神经网络有大致印象(它有哪些层,大体上是如何完成conv-relu-pool,层与层参数个数如何计算,全连接层如何工作,原始输入是如何被一层一层的网络层操作、矩阵的大小怎么一步步变化的),我觉得就已经非常好了。更细节的问题需要对照博客内容和代码一步一步的细致看看。比如代码这一步在构建网络的conv层,那么查一下该函数的参数说明,对照论文或博客中的原理,可能认识会更清晰一点。把代码跑起来,会更有成就感一些。
这一个博客要实现的是,利用CNN网络,完成对某一名画A的作画风格的学习后,将这种风格应用于另外一幅画B。即使用A的作画风格,保留B的骨架,将两者融合。本次仿真就没什么数据集了,只需要两幅画。原理其实比较简单,利用CNN网络,将名画A的作画特征进行存取,然后保留这些训练好的过程矩阵(参数),输入画B后将这些参数矩阵与B的矩阵融合(参数矩阵相当于滤镜,用滤镜去看画B)。
代码还在调试中,之后再继续更了。
(Continue...小黑喵施工现场...)
1. 聒碎乡心梦不成
施工基本完毕了。因为上午去值班的时候那里有人了,所以换成下午去了。这篇博客代码参考2015年的著名文章《A Neural Algorithm of Artistic Style》(https://arxiv.org/abs/1508.06576),首先需要手动下载预训练的网络,并保存为.mat格式(matlab格式的一种)至代码同一文件下,下载链接为 http://www.vlfeat.org/matconvent/models/beta16/imagenet-vgg-verydeep-19.mat,文件有549MB。
1.1 代码
# https://arxiv.org/abs/1508.06576
#
# 需要下载预训练模型 'imagenet-vgg-verydee-19.mat' 链接如下:
# http://www.vlfeat.org/matconvnet/models/beta16/imagenet-vgg-verydeep-19.mat
import scipy.io
import scipy.misc
import numpy as np
import tensorflow as tf
from tensorflow.python.framework import ops
ops.reset_default_graph()
# 创建计算图会话
sess = tf.Session()
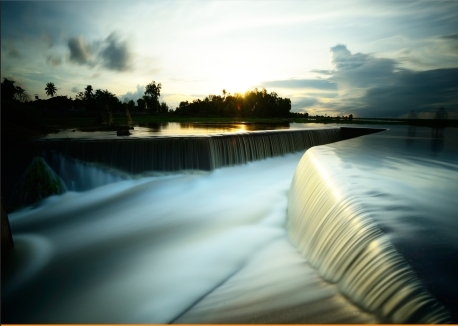
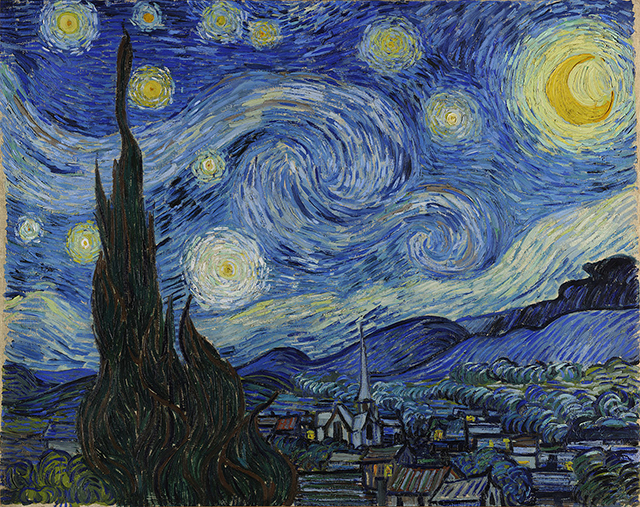
# 图片文件,原始图像为杂志封面图,风格图像为梵高的星空
original_image_file = '../images/book_cover.jpg'
style_image_file = '../images/starry_night.jpg'
# 导入刚刚下载的预训练模型
vgg_path = 'imagenet-vgg-verydeep-19.mat'
# 设置模型参数 网络权重、学习率、迭代次数等
original_image_weight = 5.0
style_image_weight = 500.0
regularization_weight = 100
learning_rate = 0.001
generations = 5000
output_generations = 250
beta1 = 0.9
beta2 = 0.999
# 读入两个图片文件
original_image = scipy.misc.imread(original_image_file)
style_image = scipy.misc.imread(style_image_file)
# 将原图像与风格图像整理为大小相同的矩阵
target_shape = original_image.shape
style_image = scipy.misc.imresize(style_image, target_shape[1] / style_image.shape[1])
# 按照paper定义相关layer
vgg_layers = ['conv1_1', 'relu1_1',
'conv1_2', 'relu1_2', 'pool1',
'conv2_1', 'relu2_1',
'conv2_2', 'relu2_2', 'pool2',
'conv3_1', 'relu3_1',
'conv3_2', 'relu3_2',
'conv3_3', 'relu3_3',
'conv3_4', 'relu3_4', 'pool3',
'conv4_1', 'relu4_1',
'conv4_2', 'relu4_2',
'conv4_3', 'relu4_3',
'conv4_4', 'relu4_4', 'pool4',
'conv5_1', 'relu5_1',
'conv5_2', 'relu5_2',
'conv5_3', 'relu5_3',
'conv5_4', 'relu5_4']
# 定义函数,用来抽取预训练模型.mat文件中的参数
def extract_net_info(path_to_params):
vgg_data = scipy.io.loadmat(path_to_params)
normalization_matrix = vgg_data['normalization'][0][0][0]
mat_mean = np.mean(normalization_matrix, axis=(0,1))
network_weights = vgg_data['layers'][0]
return(mat_mean, network_weights)
# 根据预训练模型加载权重和网络层定义,通过tensorflow创建网
# 迭代训练每层,并分配合适的权重和偏置
def vgg_network(network_weights, init_image):
network = {}
image = init_image
for i, layer in enumerate(vgg_layers):
if layer[0] == 'c':
weights, bias = network_weights[i][0][0][0][0]
weights = np.transpose(weights, (1, 0, 2, 3))
bias = bias.reshape(-1)
conv_layer = tf.nn.conv2d(image, tf.constant(weights), (1, 1, 1, 1), 'SAME')
image = tf.nn.bias_add(conv_layer, bias)
elif layer[0] == 'r':
image = tf.nn.relu(image)
else:
image = tf.nn.max_pool(image, (1, 2, 2, 1), (1, 2, 2, 1), 'SAME')
network[layer] = image
return(network)
# 参考paper的 原始图片和风格图片分配中间层的策略
# 原始图片采用relu4_2层,风格图片采用reluX_1层组合
original_layer = 'relu4_2'
style_layers = ['relu1_1', 'relu2_1', 'relu3_1', 'relu4_1', 'relu5_1']
# 通过extract_net_info函数获取网络权重和平均值
# tensorflow的图像处理针对4维,所以增加一个无关紧要的维度满足输入
normalization_mean, network_weights = extract_net_info(vgg_path)
shape = (1,) + original_image.shape
style_shape = (1,) + style_image.shape
original_features = {}
style_features = {}
# 声明image占位符,创建该占位符的网络
image = tf.placeholder('float', shape=shape)
vgg_net = vgg_network(network_weights, image)
# 归一化原始图片矩阵,并运行网络
original_minus_mean = original_image - normalization_mean
original_norm = np.array([original_minus_mean])
original_features[original_layer] = sess.run(vgg_net[original_layer],
feed_dict={image: original_norm})
# 参考中间层策略,重复原始图片relu4_2层、风格图片reluX_1层
image = tf.placeholder('float', shape=style_shape)
vgg_net = vgg_network(network_weights, image)
style_minus_mean = style_image - normalization_mean
style_norm = np.array([style_minus_mean])
for layer in style_layers:
layer_output = sess.run(vgg_net[layer], feed_dict={image: style_norm})
layer_output = np.reshape(layer_output, (-1, layer_output.shape[3]))
style_gram_matrix = np.matmul(layer_output.T, layer_output) / layer_output.size
style_features[layer] = style_gram_matrix
# 使用“滤镜”融合原始图片,并引入随机噪声
initial = tf.random_normal(shape) * 0.256
image = tf.Variable(initial)
vgg_net = vgg_network(network_weights, image)
# 第一个损失函数 针对原图片
# 定义为原始图片relu4_2层与归一化后的原始图片矩阵差值的L_2范数
original_loss = original_image_weight * (2 * tf.nn.l2_loss(vgg_net[original_layer] - original_features[original_layer]) /
original_features[original_layer].size)
# 第二个损失函数 针对风格图片
# 为风格图片的每个层(前面提到的reluX_1,X=1~5)计算损失函数
style_loss = 0
style_losses = []
for style_layer in style_layers:
layer = vgg_net[style_layer]
feats, height, width, channels = [x.value for x in layer.get_shape()]
size = height * width * channels
features = tf.reshape(layer, (-1, channels))
style_gram_matrix = tf.matmul(tf.transpose(features), features) / size
style_expected = style_features[style_layer]
style_losses.append(2 * tf.nn.l2_loss(style_gram_matrix - style_expected) / style_expected.size)
style_loss += style_image_weight * tf.reduce_sum(style_losses)
# 第三个损失函数 (...不是很明白)
total_var_x = sess.run(tf.reduce_prod(image[:,1:,:,:].get_shape()))
total_var_y = sess.run(tf.reduce_prod(image[:,:,1:,:].get_shape()))
first_term = regularization_weight * 2
second_term_numerator = tf.nn.l2_loss(image[:,1:,:,:] - image[:,:shape[1]-1,:,:])
second_term = second_term_numerator / total_var_y
third_term = (tf.nn.l2_loss(image[:,:,1:,:] - image[:,:,:shape[2]-1,:]) / total_var_x)
total_variation_loss = first_term * (second_term + third_term)
# 将前面三个损失函数加和
loss = original_loss + style_loss + total_variation_loss
# 声明优化器函数
optimizer = tf.train.AdamOptimizer(learning_rate,beta1,beta2)
train_step = optimizer.minimize(loss)
# 初始化变量,开始训练
sess.run(tf.global_variables_initializer())
for i in range(generations):
sess.run(train_step)
# 不断打印融合的图片,效果可以时即可停止
if (i+1) % output_generations == 0:
print('Generation {} out of {}, loss: {}'.format(i + 1, generations,sess.run(loss)))
image_eval = sess.run(image)
best_image_add_mean = image_eval.reshape(shape[1:]) + normalization_mean
output_file = 'temp_output_{}.jpg'.format(i)
scipy.misc.imsave(output_file, best_image_add_mean)
# 最优结果保存为final_output.jpg
image_eval = sess.run(image)
best_image_add_mean = image_eval.reshape(shape[1:]) + normalization_mean
output_file = 'final_output.jpg'
scipy.misc.imsave(output_file, best_image_add_mean)
1.2 运行效果
首先是两副初始的图片。作为原始图片的杂志封面book_cover.jpg,作为风格图片的星空starry_night.jpg。另存为可以不用再自己下载啦:
运行代码进行风格融合后(训练时间可能较长,当看到文件夹下打印的临时照片效果较好时即可停止):

2. 故园无此声
小黑喵的第五个教程就先到这里了。这次这个实战项目挺有意思的。它利用卷积神经网络对图像特征的抽取进行图片风格融合,本质上就是前面提到的“制作滤镜”。短发非常好看。