HTML文档树

Doctype
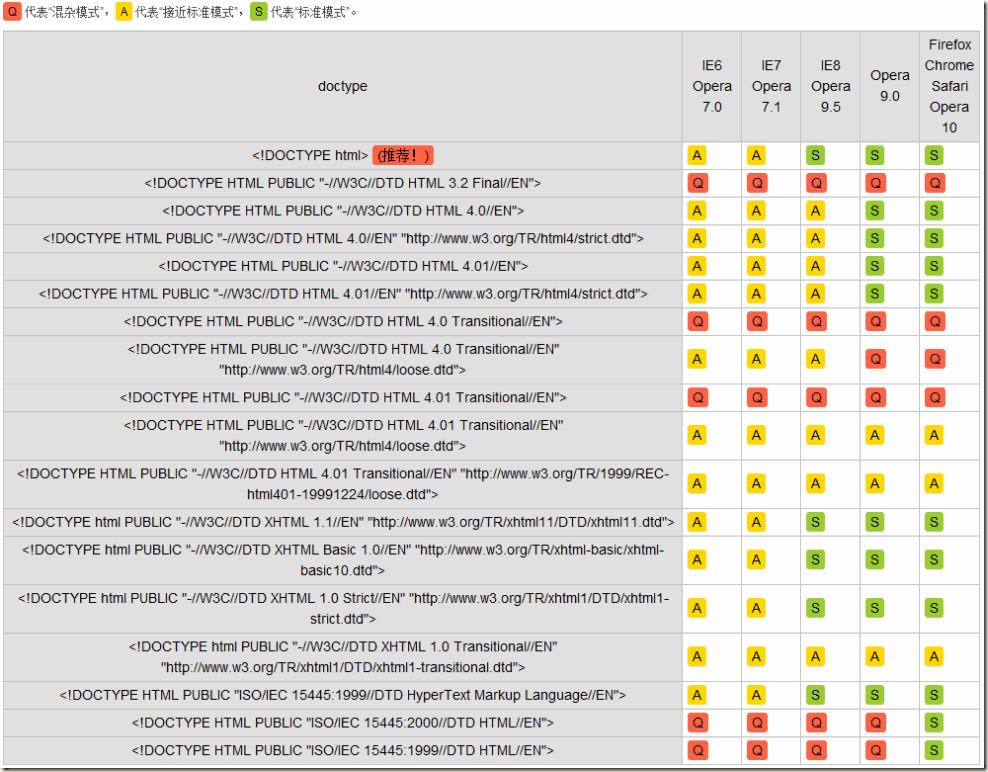
Doctype告诉浏览器使用什么样的html或xhtml规范来解析html文档.有和无的区别:
- BackCompat:标准兼容模式未开启(或叫怪异模式[Quirks mode]、混杂模式)
- CSS1Compat:标准兼容模式已开启(或叫严格模式[Standards mode/Strict mode])
这个属性会被浏览器识别并使用,但是如果你的页面没有DOCTYPE的声明,那么compatMode默认就是BackCompat,这也就是恶魔的开始 -- 浏览器按照自己的方式解析渲染页面,那么,在不同的浏览器就会显示不同的样式。如果你的页面添加了那么,那么就等同于开启了标准模式,那么浏览器就得老老实实的按照W3C的标准解析渲染页面.
Doctype告诉浏览器使用什么样的html或xhtml规范来解析html文档, dtd文件则包含了标记、attributes 、properties、约束规则。
Meta(metadata information)
提供有关页面的元信息,例:页面编码、刷新、跳转、针对搜索引擎和更新频度的描述和关键词
页面编码(告诉浏览器是什么编码
<meta http-equiv=“content-type” content=“text/html;charset=utf-8”>
<meta charset="UTF-8">
刷新和跳转
<meta http-equiv=“Refresh” Content=“30″>
<meta http-equiv=”Refresh“ Content=”5; Url=http://www.autohome.com.cn“ />
关键词
有助于协助搜索或者爬虫之类的工具搜索到
< meta name="keywords" content="星际2,星际老男孩,专访,F91,小色,JOY" >
描述
例如:cnblog
X-UA-Compatible
微软的IE6是通过XP、Win2003等操作系统发布出来,作为占统治地位的桌面操作系统,也使得IE占据了通知地位,许多的网站开发的时候,就按照IE6的标准去开发,而IE6自身的标准也是微软公司内部定义的。到了IE7出来的时候,采用了微软公司内部标准以及部分W3C的标准,这个时候许多网站升级到IE7的时候,就比较痛苦,很多代码必须调整后,才能够正常的运行。而到了微软的IE8这个版本,基本上把微软内部自己定义的标准抛弃了,而全面的支持W3C的标准,由于基于对标准彻底的变化了,使得原先在早期IE8版本上能够访问的网站,在IE8中无法正常的访问,会出现一些排版错乱、文字重叠,显示不全等各种兼容性错误。
与任何早期浏览器版本相比,Internet Explorer 8 对行业标准提供了更加紧密的支持。 因此,针对旧版本的浏览器设计的站点可能不会按预期显示。 为了帮助减轻任何问题,Internet Explorer 8 引入了文档兼容性的概念,从而允许您指定站点所支持的 Internet Explorer 版本。 文档兼容性在 Internet Explorer 8 中添加了新的模式;这些模式将告诉浏览器如何解释和呈现网站。 如果您的站点在 Internet Explorer 8 中无法正确显示,则可以更新该站点以支持最新的 Web 标准(首选方式),也可以强制 Internet Explorer 8 按照在旧版本的浏览器中查看站点的方式来显示内容。 通过使用 meta 元素将 X-UA-Compatible 标头添加到网页中,可以实现这一点。
当 Internet Explorer 8 遇到未包含 X-UA-Compatible 标头的网页时,它将使用 指令来确定如何显示该网页。 如果该指令丢失或未指定基于标准的文档类型,则 Internet Explorer 8 将以 IE5 模式(Quirks 模式)显示该网页
<meta http-equiv="X-UA-Compatible" content="IE=EmulateIE7" />
<meta http-equiv="X-UA-Compatible" content="IE=edge" />
Title
网页头部信息
Link
css
< link rel="stylesheet" type="text/css" href="css/common.css" >
icon
< link rel="shortcut icon" href="image/favicon.ico">
Style
在页面中写样式
< style type="text/css" >
.bb{
      background-color: red;
   }
< /style>
css在页面中的优先级:
- 标签中的属性
- 页面头部style的属性
- 页面头部type中的指定页面设置
Script
引进文件:
<script type="text/javascript" src="http://www.googletagservices.com/tag/js/gpt.js"> </script >
写入js代码:
<script type="text/javascript" > ... </script >
常用标签
一般分为两种:块级标签和行内标签(也叫内联标签)
- a、span、select 等(行内标签)
- div、h1、p 等(块级标签)
各种符号
HTML特殊字符编码大全:往网页中输入特殊字符,需在html代码中加入以&开头的字母组合或以&#开头的数字。下面就是以字母或数字表示的特殊符号大全。
|
|
|||||||||
| ´ | ´ | © | © | > | > | µ | µ | ® | ® |
| & | & | ° | ° | ¡ | ¡ | | » | » | |
| ¦ | ¦ | ÷ | ÷ | ¿ | ¿ | ¬ | ¬ | § | § |
| • | • | ½ | ½ | « | « | ¶ | ¶ | ¨ | ¨ |
| ¸ | ¸ | ¼ | ¼ | < | < | ± | ± | × | × |
| ¢ | ¢ | ¾ | ¾ | ¯ | ¯ | “ | " | ™ | ™ |
|
|
|||||||||
| € | € | £ | £ | ¥ | ¥ | ||||
|
|
|||||||||
| „ | „ | … | … | · | · | › | › | ª | ª |
| ˆ | ˆ | “ | “ | — | — | ’ | ’ | º | º |
| † | † | ‹ | ‹ | – | – | ‚ | ‚ | ” | ” |
| ‡ | ‡ | ‘ | ‘ | ‰ | ‰ | | ­ | ˜ | ˜ |
|
|
|||||||||
| ≈ | ≈ | ⁄ | ⁄ | ← | ← | ∂ | ∂ | ♠ | ♠ |
| ∩ | ∩ | ≥ | ≥ | ≤ | ≤ | ″ | ″ | ∑ | ∑ |
| ♣ | ♣ | ↔ | ↔ | ◊ | ◊ | ′ | ′ | ↑ | ↑ |
| ↓ | ↓ | ♥ | ♥ | − | − | ∏ | ∏ | | ‍ |
| ♦ | ♦ | ∞ | ∞ | ≠ | ≠ | √ | √ | | ‌ |
| ≡ | ≡ | ∫ | ∫ | ‾ | ‾ | → | → | ||
|
|
|||||||||
| α | α | η | η | μ | μ | π | π | θ | θ |
| β | β | γ | γ | ν | ν | ψ | ψ | υ | υ |
| χ | χ | ι | ι | ω | ω | ρ | ρ | ξ | ξ |
| δ | δ | κ | κ | ο | ο | σ | σ | ζ | ζ |
| ε | ε | λ | λ | φ | φ | τ | τ | ||
|
|
|||||||||
| Α | Α | Η | Η | Μ | Μ | Π | Π | Θ | Θ |
| Β | Β | Γ | Γ | Ν | Ν | Ψ | Ψ | Υ | Υ |
| Χ | Χ | Ι | Ι | Ω | Ω | Ρ | Ρ | Ξ | Ξ |
| Δ | Δ | Κ | Κ | Ο | Ο | Σ | Σ | Ζ | Ζ |
| Ε | Ε | Λ | Λ | Φ | Φ | Τ | Τ | ς | ς |
|
|
|||||||||
HTML常用特殊字符:只要你认识了 HTML 标记,你便会知道特殊字符的用处。
| HTML 原代码 | 显示结果 | 描述 |
| < | < | 小于号或显示标记 |
| > | > | 大于号或显示标记 |
| & | & | 可用于显示其它特殊字符 |
| " | “ | 引号 |
| ® | ® | 已注册 |
| © | © | 版权 |
| ™ | ™ | 商标 |
|   | 半个空白位 | |
|   | 一个空白位 | |
| | 不断行的空白 |
p br hr
- p表示段落,默认段落之间是有间隔的
- br表示换行
- hr表示页面中的一条线
a标签
< a href="http://www.autohome.com.cn"> </a>
- target属性,_black表示在新的页面打开
- 锚
看下例子吧:
<!DOCTYPE html>
<html lang="en">
    <head>
        <meta charset="UTF-8">
        <title>臭傻逼</title>
        <!--<meta http-equiv="Refresh" content="2; Url=http://www.baidu.com"/>-->
    </head>
    <body>
        hello,world!
        <div style="background: red">red</div>
        <span style="background: red">red</span>
        <h1>asdf<br />asdfa<br />sdfasd</h1>
        <h2>aa</h2>
        <h3>aa</h3>
        <h4>aa</h4>
        <h5>aa</h5>
        <h6 style="font-size: 70px">aa</h6>
        <a href="http://www.baidu.com">跳转1</a>
        <a href="http://www.baidu.com" target="_blank">跳转1</a>

        <a href="#p1" style="font-size: 45px;background-color: mediumvioletred">page1</a>
        <a href="#p2">page1</a>
        <a href="#p3">page1</a>
        <div id="p1" style="height: 500px;">P1内容</div>
        <div id="p2" style="height: 500px;">P2内容</div>
        <div id="p3" style="height: 500px;">P3内容</div>
    </body>
</html>
h标签
h标签比较简单,定义字体大小,一共6个
					<h1>H1</h1>
					<h2>H2</h2>
					<h3>H3</h3>
					<h4>H4</h4>
					<h5>H5</h5>
					<h6>H6</h6>
form标签
form标签(即表格)一般用来提交数据的,大多数时候与select input textarea等等,一起使用
需要注意的是,属性中需要这么写:
<form action="http://192.168.11.88:8000/index/" method="post" enctype="multipart/form-data">
其中method有两种方式,一种post,一种是get.
select标签
看下源码:
<p>
<select>
<option>北京</option>
<option>上海</option>
<option>广州</option>
</select>
<select name="city">
<optgroup label="北京">
    <option value="1">西城</option>
    <option value="2">海淀</option>
    <option value="3">朝阳</option>
</optgroup>
<optgroup label="上海">
    <option value="4">嘉定</option>
    <option value="5">虹桥</option>
    <option value="6">徐汇</option>
</optgroup>
</select>
</p>
input系列
checkbox
选择框,为了提交时数据的统一,方便服务端协调数据,我们需要给定义一个统一的name和不同的value值
爱好(多选):
女1
女2
女3
女4
女5
女6
看下源码:
<div>
<p>爱好(多选):
    <br />女1<input type="checkbox" name="faver" value="1"/>
    <br />女2<input type="checkbox" name="faver" value="2"/>
    <br />女3<input type="checkbox" name="faver" value="3"/>
    <br />女4<input type="checkbox" name="faver" value="4"/>
    <br />女5<input type="checkbox" name="faver" value="5"/>
    <br />女6<input type="checkbox" name="faver" value="6"/>
</p>
</div>
radio
圆形选择框
性别(单选):
男
女
<div>
<p>性别(单选):
    <br />男<input type="radio" name="gender" value="1"/>
    <br />女<input type="radio" name="gender" value="2"/>
</p>
</div>
password text
两个可能经常在一起使用,text模式是明文的,password模式是密文
用户名:
密码:
源码:
<div style="border: 1px solid red">
<p>用户名: <input type="text" name="ccorz_name"/></p>
<p>密码: <input type="password" name="ccorz_pwd"/></p>
</div>
button
按钮,一共有3种
- 无任何功能的按钮button
- 重置表单中的数据reset
- 提交表单中的数据submit
file
上传文件
文件:
代码:<p>文件: <input type="file" name="uploadfile"/></p>
需要注意的一个是,需要在form定义enctype='multipart/form-data' method='POST',看代码:
<form action="http://192.168.11.88:8000/index/" enctype="multipart/form-data">
textarea
比如备注,需要多行输入时候可以用这种模式:
备注:
代码:
<p>备注: <textarea name="extra"></textarea></p>
label
for属性:表示Label标签要绑定的HTML元素,你点击这个标签的时候,所绑定的元素将获取焦点。
ACCESSKEY属性:表示访问Label标签所绑定的元素的热键,当您按下热键,所绑定的元素将获取焦点
源码:
<div>
	姓名:<input id="name1" type="text">
	婚否:<input id="marriy1" type="checkbox">
	<br>
	<label for="name2">姓名:<input id="name2" type="text"></label>
	<label for="marriy2">婚否:<input id="marriy2" type="checkbox"></label>
</div>
ul ol dl
与li标签共用
ul,实心圆点:
- ul1
- ul1
- ul1
code:
<ul>
<li>ul1</li>
<li>ul1</li>
<li>ul1</li>
</ul>
ol,数字排序:
- ul1
- ul1
- ul1
code:
<ol>
<li>ul1</li>
<li>ul1</li>
<li>ul1</li>
</ol>
dl,与dt dd 配合使用,分层:
- 山西省
- 太原市
- 太原市
- 太原市
- 山西省
- 太原市
- 太原市
- 太原市
code:
<dl>
<dt>山西省</dt>
	<dd>太原市</dd>
	<dd>太原市</dd>
	<dd>太原市</dd>
<dt>山西省</dt>
	<dd>太原市</dd>
	<dd>太原市</dd>
	<dd>太原市</dd>
</dl>
table
表格,border属性表示线条的粗细度,thead 表头;tbody td 表内容;tr表示一行表格.
| 姓名 | 年龄 | 性别 |
|---|---|---|
| cc | 18 | male |
| cd | 19 | male |
| dd | 20 | male |
code:
<table border="1">
        <thead>
            <tr><th>姓名</th>
            <th>年龄</th>
            <th>性别</th>
        </tr></thead>
        <tbody>
            <tr><td>cc</td>
            <td>18</td>
            <td>male</td>
        </tr></tbody>
        <tbody>
            <tr><td>cd</td>
            <td>19</td>
            <td>male</td>
        </tr></tbody>
        <tbody>
            <tr><td>dd</td>
            <td>20</td>
            <td>male</td>
        </tr></tbody>
        </table>
合并单元格,要注意,行和列设置后,后面内容的注释:
| 姓名 | 性别 | |
|---|---|---|
| cc | 18 | male |
| 18 | male | |
| cc | 18 | male |
| cc | 18 | male |
code:
<table border="1">
        <thead>
            <tr><th colspan="2">姓名</th>
            <!--<th>年龄</th>-->
            <th>性别</th>
        </tr></thead>
        <tbody>
            <tr>
                <td rowspan="2">cc</td>
                <td>18</td>
                <td>male</td>
            </tr>
            <tr>
                <!--<td >cc</td>-->
                <td>18</td>
                <td>male</td>
            </tr>
            <tr>
                <td>cc</td>
                <td>18</td>
                <td>male</td>
            </tr>
            <tr>
                <td>cc</td>
                <td>18</td>
                <td>male</td>
            </tr>
    </tbody>
</table>
fieldset
用的比较少,先记录下吧,legend将内容放置于线条中
code:
<div>
<fieldset>
<legend>login</legend>
<p>用户名<input type="text"/></p>
<p>密码<input type="password"/></p>
</fieldset>
</div>
iframe
比较有意思的东西,可以直接内嵌网页
code:
<iframe style=" 100%;height: 250px;" src="http://www.autohome.com"></iframe>