转载:https://blog.csdn.net/yue530tomtom/article/details/82113558
| 环境 | 版本 |
|---|---|
| ngrinder | 3.4.1 |
| OS | centos7 |
ngrinder是一个开源工具,网上也有很多教程,刚开始接触使用ngrinder的时候也拜读过不少前辈们的文章,实施过程还是会有大大小小的坑,github上的部分文档也没有更新,总体来说还是以官网文档为主要依据。
部署方式有多种
1、单Controller多agent是最常用的方式,但这种方式在规模大的压测时Controller会成为瓶颈
2、分布式Controller和多agent:1)单机部署Controller集群 .2) 多机部署Controller集群
3、使用docker安装以上3种形式,做平台的话可以考虑使用这种方式,agent可以用docker自动弹,方便管理
#安装前提
- nGrinder是Web应用程序(Controller)和Java应用程序(Agent,Monitor)的组合,要安装nGrinder控制器和代理,需要jdk
- nGrinder使用许多端口与代理和代理进行通信。如果某些端口被防火墙阻止,则应要求网络管理员在防火墙中打开以下端口。可以通过配置配置这些端口
#运行Controller方式
- 直接使用jar执行
- 放入tomcat容器执行
#演示环境
| ip | OS config |
|---|---|
| 10.255.254.25 | centOS7、jdk7 |
| 10.255.254.55 | centOS7、jdk8 |
| 10.255.254.56 | centOS7、jdk8 |
#下载最新的releases
[root@localhost ~]#mkdir yueling ;cd yueling
[root@localhost yueling]#wget https://github.com/naver/ngrinder/releases/download/ngrinder-3.4.1-20170131/ngrinder-controller-3.4.1.war
- 1
- 2
#单Controller多Agent
| ip | soft | confPath |
|---|---|---|
| 10.255.254.25 | Controller | ~/.ngrinder |
| 10.255.254.55 | agent | ~/.ngrinder_agent |
| 10.255.254.56 | agent | ~/.ngrinder_agent |
- 使用直接启动的方式,jdk7需要显式声明-XX:MaxPermSize(jdk8已经废弃了该参数),其他参数可以先不指定。nGrinder需要非常大的PermGen内存,因为它包含很多库,如SVNKit,maven,Jetty webserver,groovy和python。使用PermGen设置重新运行ngrinder。nGrinder需要相当大的perm-gen内存
[root@localhost yueling]#java -XX:MaxPermSize=200m -jar ngrinder-controller-3.4.1.war
- 1
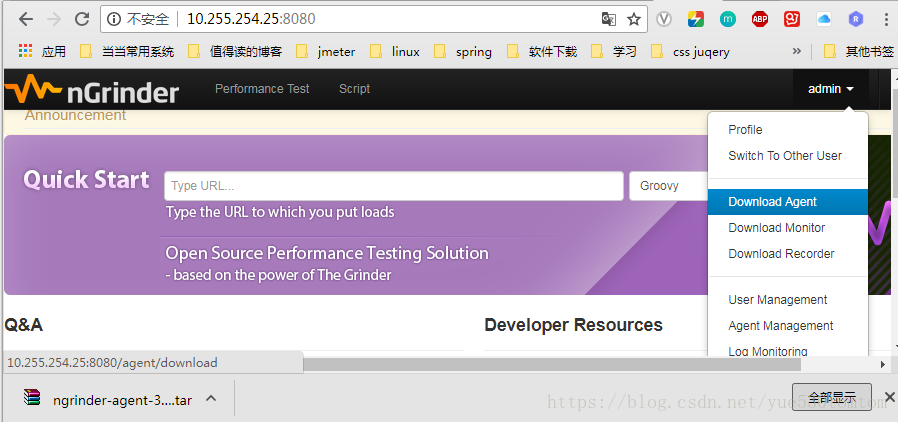
- 启动web,并使用默认用户admin/admin登录,下载agent(另外还可以下载monitor、recorder)
- 上传至10.255.254.55、10.255.254.56两台服务器
[root@localhost yueling]# tar -xvf ngrinder-agent-3.4.1-10.255.254.25.tar
[root@localhost yueling]# cd ngrinder-agent/
[root@localhost ngrinder-agent]# ./run_agent.sh
……
- 1
- 2
- 3
- 4
因为从界面上下载的agent,配置已经完成,所以不需要修改,直接即可运行,第一次运行会自动创建NGRINDER_AGENT的配置文件目录(默认是在~/.ngrinder_agent,可以显式指定),配置文件从agent的根目录的__agent.conf中复制
配置如下
common.start_mode=agent
agent.controller_host=10.255.254.25
agent.controller_port=16001
agent.region=NONE
#agent.host_id=
#agent.server_mode=true

# provide more agent java execution option if necessary.
#agent.java_opt=
# set following false if you want to use more than 1G Xmx memory per a agent process.
#agent.limit_xmx=true
# please uncomment the following option if you want to send all logs to the controller.
#agent.all_logs=true
# some jvm is not compatible with DNSJava. If so, set this false.
#agent.enable_local_dns=false
- 1
- 2
- 3
- 4
- 5
- 6
- 7
- 8
- 9
- 10
- 11
- 12
- 13
- 14
- 15
最简单的方式已经搭建完成
敲黑板
在单台机器上可以部署多个agent
同一台机上运行多个agent需要满足:可执行文件位置不同,配置文件路径不同,host-id不同。
- 将agent复制多份
[root@localhost yueling]# ls -l
total 104632
drwxr-xr-x 3 root root     4096 Aug 28 09:59 ngrinder-agent
drwxr-xr-x 3 root root     4096 Aug 28 10:23 ngrinder-agent2
-rw-r--r-- 1 root root 36167680 Aug 27 11:50 ngrinder-agent-3.4.1-10.255.254.25.tar
-rw-r--r-- 1 root root 70963742 Aug 27 16:31 ngrinder-controller-3.4.1.war
[root@localhost ngrinder-agent]#
- 1
- 2
- 3
- 4
- 5
- 6
- 7
- 分别执行
[root@localhost yueling]# cd ngrinder-agent
[root@localhost ngrinder-agent]# ./run_agent.sh -o -ah ~/.ngrinder_agent --host-id first-agent
- 1
- 2
[root@localhost yueling]# cd ngrinder-agent
[root@localhost ngrinder-agent2]# ./run_agent.sh -o -ah ~/.ngrinder_agent2 --host-id second-agent
- 1
- 2
这里使用了一些参数,-o每次都覆盖配置__agent.conf覆盖到agenthome目录的agent.conf -ah agenthome目录 host-id指定agent标识等等
运行起来后,可以创建脚本、创建测试场景、运行等
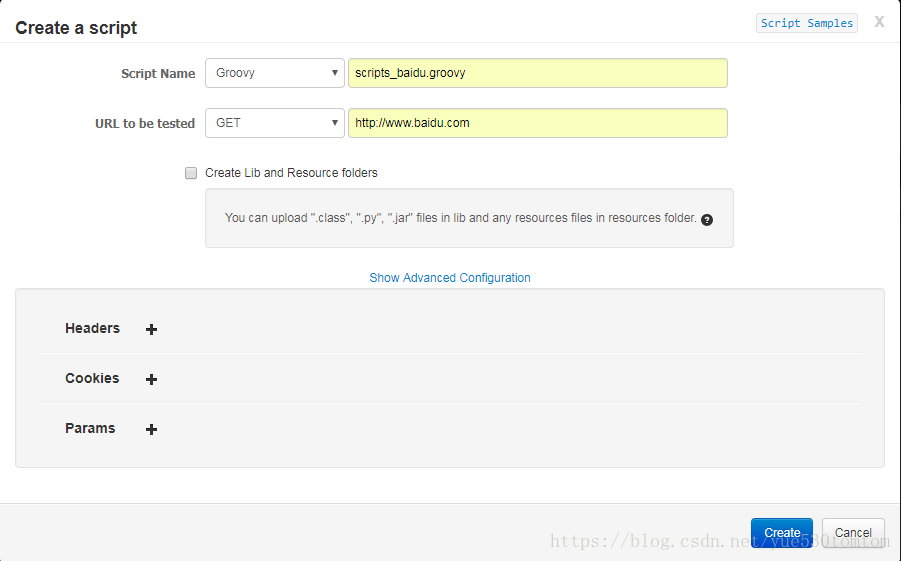
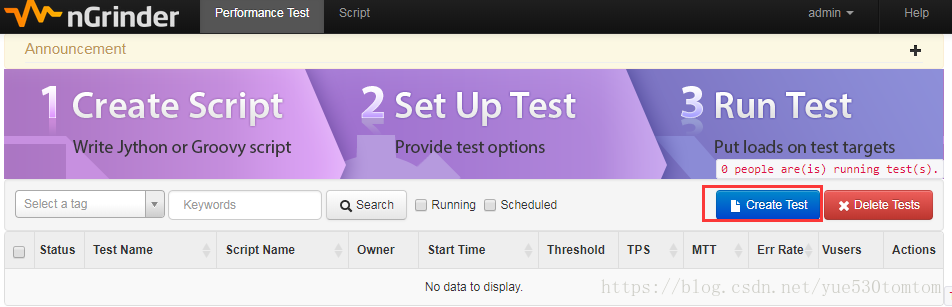
至此,最简单的搭建方式完成,可以运行试试
#单机Controller集群
以10.255.254.25机器为例
| ip | soft | confPath |
|---|---|---|
| 10.255.254.25 | Controller集群、H2 | ~/.ngrinder |
| 10.255.254.55 | agent | ~/.ngrinder_agent |
| 10.255.254.56 | agent | ~/.ngrinder_agent |
- 销毁之前所有的ngrinder实例
- 下载H2
[root@test25 yueling]# wget http://www.h2database.com/h2-2018-03-18.zip
- 1
或者去官网找最新的releases包
- 配置H2
[root@test25 yueling]# unzip h2-2018-03-18.zip
[root@test25 yueling]# cd h2/bin
[root@test25 bin]# cp h2.sh h2server.sh
[root@test25 bin]# vim h2server.sh

#!/bin/sh
dir=$(dirname "$0")
java -cp "$dir/h2-1.4.197.jar:$H2DRIVERS:$CLASSPATH" org.h2.tools.Server -tcpAllowOthers -webAllowOthers -baseDir /db -webPort 9092 -tcpPort 9083 "$@"
- 1
- 2
- 3
- 4
- 5
- 6
- 7
- 8
- 9
其中tcpPort比较重要启动时要用,在这里特意改了一下,没有使用默认值,改为9083(这个值任意,只要没有被占用)
在该案例中使用的时候显式指定H2的host和port,可以在ngrinder_home目录中的database.conf中配置相关信息,具体参见下个示例
[root@test25 yueling]# java -jar -XX:MaxPermSize=500m -jar ngrinder-controller-3.4.1.war -p 8080  -cm easy -clp 10010 -r region1 -cp 9001 -dh 10.255.254.25 -dp 9083
[root@test25 yueling]# java -jar -XX:MaxPermSize=500m -jar ngrinder-controller-3.4.1.war -p 8081 -cm easy -clp 10011 -r region2 -cp 9002 -dh 10.255.254.25 -dp 9083
[root@test25 yueling]# java -jar -XX:MaxPermSize=200m -jar ngrinder-controller-3.4.1.war -p 8082 -cm easy -clp 10012 -r region3 -cp 9003 -dh 10.255.254.25 -dp 9083
- 1
- 2
- 3
为了实时查看日志,在此我开了3个终端,当然可以后台运行(正式环境中肯定是后台运行的……)
如果顺利的话,登录任意一端口即可
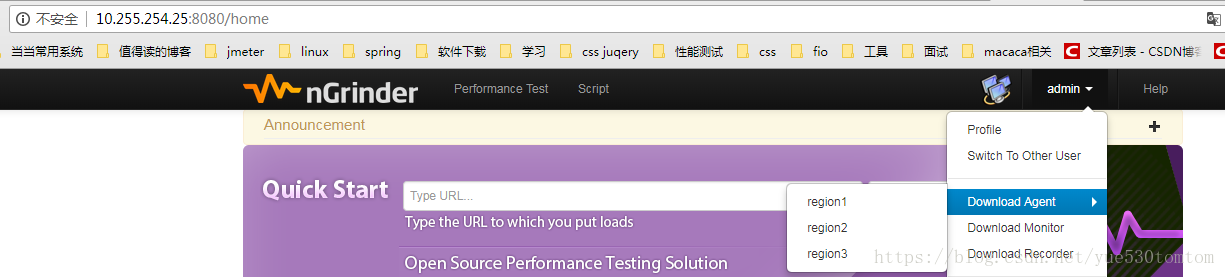
下载agent 比如region1的agent
[root@localhost yueling]# wget http://10.255.254.25:8080/agent/download?region=region1
[root@localhost yueling]# tar -vxf ngrinder-agent-3.4.1-region1-10.255.254.25.tar
[root@localhost yueling]# cd ngrinder-agent/
[root@localhost ngrinder-agent]# ./run_agent.sh -o
- 1
- 2
- 3
- 4
-o 覆盖 即从__agent.conf覆盖AGENT_HOME中的agent.conf。具体agent启动的选项在单独的章节中介绍

在agent管理中也能看到相应的分类
#多机集群Controller
| ip | soft | confPath |
|---|---|---|
| 10.255.254.25 | Controller、H2、NFS server | /data/nfs/、~/.ngrinder_ex |
| 10.255.254.55 | Controller、agent | /data/nfs/、/.ngrinder_ex、/.ngrinder_agentX |
| 10.255.254.56 | Controller | /data/nfs/、~/.ngrinder_ex |
建立NFS(这里假设你已经搭建好了环境),把配置文件放入10.255.254.25:/data/nfs目录下
并分别在10.255.254.55、10.255.254.56上执行命令
NFS搭建可以问问度娘和gooooole很多相关资料,比如 Linux下NFS服务器的搭建与配置、linux之NFS服务
[root@localhost ~]# mount -t nfs 10.255.254.25:/data/nfs /data/nfs
[root@localhost ~]# mount
……
10.255.254.25:/data/nfs on /data/nfs type nfs4 (rw,relatime,vers=4.1,rsize=1048576,wsize=1048576,namlen=255,hard,proto=tcp,port=0,timeo=600,retrans=2,sec=sys,clientaddr=10.255.254.55,local_lock=none,addr=10.255.254.25)
[root@localhost ngrinder-agent]#
- 1
- 2
- 3
- 4
- 5
启动H2
[root@test25 bin]# ./h2server.sh
- 1
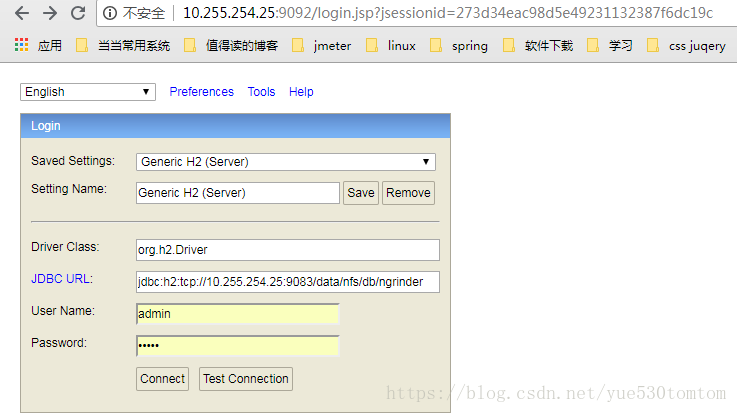
修改/data/nfs/database.conf,路径根据自己的喜好配置,会在H2的baseDir下创建子目录(/db/data/nfs/db/ngrinder.mv.db)
# H2 / cubrid can be set
database.type=H2
#database.type=cubrid
# for cubrid. You should configure the following.
# database.url=localhost:33000:ngrinder
# for H2 remote connection, You should configure like followings.
# You can see how to run the H2 DB server by yourself in http://www.h2database.com/html/tutorial.html#using_server
# If this is not set, ngrinder will create the embedded DB.
#database.url=tcp://h2_server_ip:h2_server_port:ngrinder
#database.url=tcp://10.255.254.25:9083:ngrinder
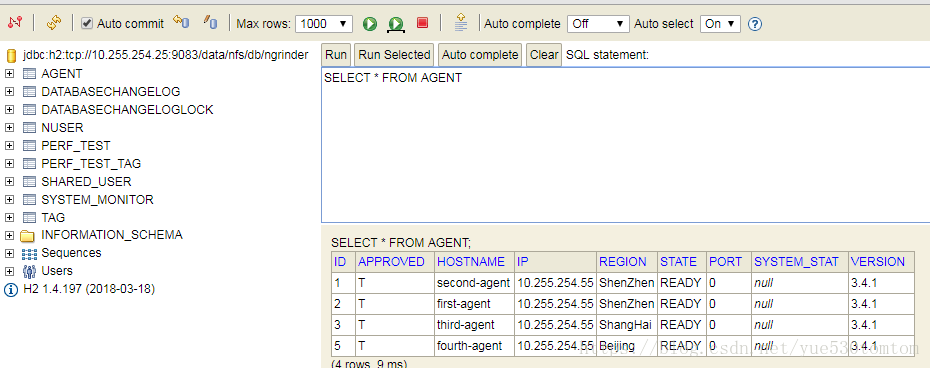
database.url=tcp://10.255.254.25:9083/data/nfs/db/ngrinder
# if you want to use HA mode in cubrid, you should enable following
# database.url_option=&althosts=secondary_ip:port
# you should provide id / password who has a enough permission to create tables in the given db.
database.username=admin
database.password=admin
- 1
- 2
- 3
- 4
- 5
- 6
- 7
- 8
- 9
- 10
- 11
- 12
- 13
- 14
- 15
- 16
- 17
- 18
- 19
- 20
配置共享的system.conf
……
# if you want to enable controller clustering. please enable below.
cluster.enabled=true

# comma separated IP list of all clustered controller servers.
cluster.members=10.255.254.25,10.255.254.55,10.255.254.56

# cluster communication port. This port should be same across the controllers if advanced cluster mode is enabled.
cluster.port=40003
……
- 1
- 2
- 3
- 4
- 5
- 6
- 7
- 8
- 9
- 10
在25、55、56三台机器上分别创建NGRINDER_EX_HOME(默认是在~/.ngrinder_ex),为方便起见我们就在当前home目录下创建相应的文件夹
[root@localhost ~]# mkdir .ngrinder_ex
[root@localhost ~]# vim .ngrinder_ex/system-ex.conf
# Followings are options which should be set in ${NGRINDER_EX_HOME}!!
#
# Region setting for the current controller.
# When running cluster mode, the ${NGRINDER_HOME} should be shared via NFS by multiple controllers.
# Which means the controllers share same system.conf file and have same properties.
# However each controllers should looks different region info. To make it possible
# The following options should be defined in ${NGRINDER_EX_HOME}(by default it's .ngrinder_ex/system-ex.conf
# which is not shared via NFS, so that each node cluster looks different value.

#Console binding IP of this region. If not set, console will be bound to all available IPs.
#cluster.host=

# cluster communication port. This port should be different across the controllers if easy cluster mode is enabled.
#cluster.port=40003

cluster.region=ShangHai
……
- 1
- 2
- 3
- 4
- 5
- 6
- 7
- 8
- 9
- 10
- 11
- 12
- 13
- 14
- 15
- 16
- 17
- 18
- 19
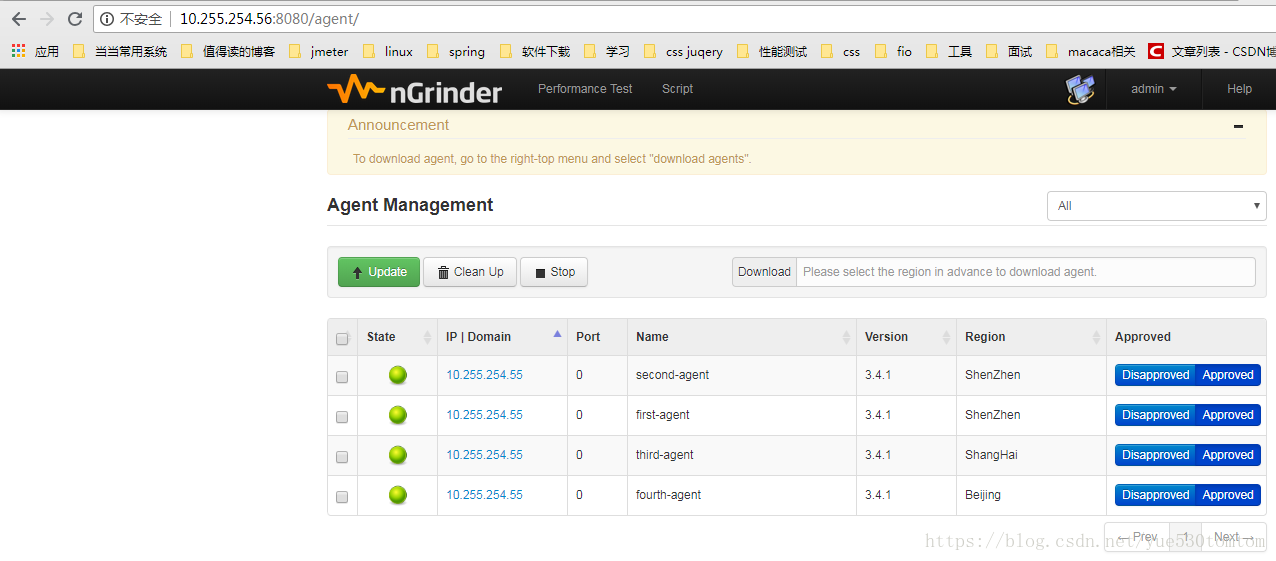
这里三台的system-ex.conf分别配置
55:cluster.region=ShangHai
56:cluster.region=Beijing
25:ShenZhen
接下来在三台机器上分别启动
[root@localhost yueling]# java -XX:MaxPermSize=500m -jar ngrinder-controller-3.4.1.war -p 8080 -nh /data/nfs/
- 1
在55上启动4个agent实例,同一台机器如何启动多个实例看上面的 “敲黑板” 章节
agent复制4份,分别修改__agent.conf中的配置,使用命令启动
[root@localhost ~]# ls -la |grep .ngrinder_agent
drwxr-xr-x   5 root root      4096 Aug 28 17:43 .ngrinder_agent
drwxr-xr-x   5 root root      4096 Aug 28 11:36 .ngrinder_agent2
drwxr-xr-x   5 root root      4096 Aug 28 16:42 .ngrinder_agent3
drwxr-xr-x   4 root root      4096 Aug 28 17:42 .ngrinder_agent4
[root@localhost ~]#
为方便看日志开多个终端分别执行
[root@localhost ngrinder-agent]# ./run_agent.sh -o -ah ~/.ngrinder_agent --host-id first-agent
[root@localhost ngrinder-agent2]# ./run_agent.sh -o -ah ~/.ngrinder_agent2 --host-id second-agent
[root@localhost ngrinder-agent3]# ./run_agent.sh -o -ah ~/.ngrinder_agent3 --host-id third-agent
[root@localhost ngrinder-agent4]# ./run_agent.sh -o -ah ~/.ngrinder_agent4 --host-id fourth-agent
- 1
- 2
- 3
- 4
- 5
- 6
- 7
- 8
- 9
- 10
- 11
至此,手工安装已经介绍完毕,下面写docker,有上面的理解,剩下的就是写dockerfile
#Docker安装
今天先下班,得空写(最迟本周补上)
update@20180831
先写一个简单的吧:比如在同一台机器上装Controller和agent(在不同的机器上装只需要将配置文件分开)
以25为例,使用docker-compose服务编排装一个Controller和两个agent(docker和docker-compose基础知识先自行查阅)
注意指定了containername 就不能使用
[root@test25 ngrinder]# vim docker-compose.yml

ngrinder-controller-1:
  image: ngrinder/controller
  container_name: ngrinder-controller-1
  hostname: ngrinder-controller-1
  ports:
    - 8087:80
    - 16001:16001
    - 12000-12009:12000-12009
  volumes:
    - /data/ngrinder/controller-1:/opt/ngrinder-controller
ngrinder-agent-1:
  image: ngrinder/agent
  container_name: ngrinder-agent-1
  hostname: ngrinder-agent-1
  volumes:
    - /data/ngrinder/agent-1:/opt/ngrinder-agent
  command:
    - 10.255.254.25:8087
ngrinder-agent-2:
  image: ngrinder/agent
  container_name: ngrinder-agent-2
  hostname: ngrinder-agent-2
  volumes:
    - /data/ngrinder/agent-2:/opt/ngrinder-agent
  command:
    - 10.255.254.25:8087
- 1
- 2
- 3
- 4
- 5
- 6
- 7
- 8
- 9
- 10
- 11
- 12
- 13
- 14
- 15
- 16
- 17
- 18
- 19
- 20
- 21
- 22
- 23
- 24
- 25
- 26
- 27
- 28
[root@test25 ngrinder]# docker-compose -f docker-compose.yml -d up
- 1
再挖个坑:复杂的例子还得往后推没时间写