首先生成一个决策树,然后画出决策树,再将决策树条件转化成hiveSQL语句进行部署,并非所有公司有部署决策树的环境,这时候可以使用SQL去部署
首先创建一个dt_main.py,主要是决策树方面的,代码如下:


#!/usr/bin/env python
# coding: utf-8

# In[ ]:

#导入模块
from sklearn import tree
import pandas as pd
import numpy as np
import os
import toad
from pydotplus import graph_from_dot_data
from sklearn.tree import export_graphviz
from six import StringIO
#卡方分箱决策树
class auto_DecisionTreeRegressor(object):

    def __init__(self,datasets,ex_lis,dep='bad_ind',min_samples=0.05,min_samples_leaf=200,min_samples_split=20,max_depth=4,is_bin=True):

        '''
        datasets:数据集 dataframe格式
        ex_lis:不参与建模的特征,如id,时间切片等。 list格式
        min_samples:分箱时最小箱的样本占总比 numeric格式
        max_depth:决策树最大深度 numeric格式
        min_samples_leaf:决策树子节点最小样本个数 numeric格式
        min_samples_split:决策树划分前,父节点最小样本个数 numeric格式
        is_bin:是否进行卡方分箱 bool格式(True/False)
        '''
        self.datasets = datasets
        self.ex_lis = ex_lis
        self.dep = dep
        self.max_depth = max_depth
        self.min_samples = min_samples
        self.min_samples_leaf = min_samples_leaf
        self.min_samples_split = min_samples_split
        self.is_bin = is_bin

        self.bins = 0

    def fit_plot(self):
        os.environ["PATH"] += os.pathsep + 'D:/Program Files'
        dtree = tree.DecisionTreeRegressor(max_depth=self.max_depth,
                                           min_samples_leaf=self.min_samples_leaf,
                                           min_samples_split=self.min_samples_split)

        x = self.datasets.drop(self.ex_lis,axis=1)
        y = self.datasets[self.dep]

        combiner = 0

        if self.is_bin:
            #分箱
            combiner = toad.transform.Combiner()
            combiner.fit(x,y,method='chi',min_samples = self.min_samples)

            x_bin= combiner.transform(x)
            self.bins = combiner.export()
        else:
            x_bin = x.copy()

        dtree = dtree.fit(x_bin,y)

        df_bin = x_bin.copy()

        df_bin[self.dep] = y

        dot_data = StringIO()
        tree.export_graphviz(dtree, out_file=dot_data,
                                 feature_names=x_bin.columns,
                                 class_names=[self.dep],
                                 filled=True, rounded=True,
                                 special_characters=True)

        graph = graph_from_dot_data(dot_data.getvalue())
        png = graph.create_png()

        #返回字典
        dct = {
                'df_bin': df_bin,
                'bins':self.bins,
                'combiner':combiner,
                'graph':png,
                'dtree':dtree,
                'feature_names':x_bin.columns
              }

        return dct
再创建一个Decision_utils.py,找到决策树的叶子节点并抽取决策路径到SQL中。因为是一个重新写的demo,如果公司实际生产环境,还需要在脚本中使用cast(features as flaot) 之类的函数,就自己添加
代码如下:
#!/usr/bin/env python
# coding: utf-8


import toad
import pandas as pd
import numpy as np
import pydotplus
from IPython.display import Image
from six import StringIO
import os
from sklearn import tree

def DTR_TO_SQL(tree, feature_names, when_else=-1):
    import numpy as np

    left = tree.tree_.children_left
    right = tree.tree_.children_right
    threshold = tree.tree_.threshold
    features = [feature_names[i] for i in tree.tree_.feature]

    le='<='
    g ='>'

    idx = np.argwhere(left == -1)[:,0]

    def find_value(tree):
        value_lis=[]
        tree_ = tree.tree_
        def recurse(node, depth):
            from sklearn.tree import _tree
            if tree_.feature[node] != _tree.TREE_UNDEFINED:
                recurse(tree_.children_left[node], depth + 1)
                recurse(tree_.children_right[node], depth + 1)
            else:
                value_lis.append(tree_.value[node][0][0])
        recurse(0, 1)
        return value_lis

    value_lis = find_value(tree)


    def recurse(left, right, child, lineage=None):
        if lineage is None:
            lineage = [child]

        if child in left:
            parent = np.where(left == child)[0].item()
            split = 'l'
        else:
            parent = np.where(right == child)[0].item()
            split = 'r'

        lineage.append((parent, split, threshold[parent], features[parent]))

        if parent == 0:
            lineage.reverse()
            return lineage
        else:
            return recurse(left, right, parent, lineage)

    print('case ')
    for j,child in enumerate(idx):
        clause=' when '
        for node in recurse(left, right, child):
            if len(str(node))<3:
                continue
            i=node
            if i[1]=='l':
                sign=le
            else:
                sign=g
            clause=clause+i[3]+sign+str(i[2])+' and '
        clause=clause[:-4]+' then '+ str(value_lis[j])
        print(clause)
    print('else %s end as clusters'%(when_else))
将这二者放在同一文件夹里面,然后再在此文件夹打开一个notebook,运行下面代码
import pandas as pd
import sys
sys.path.append('/函数/automl/')

from sklearn.datasets import make_classification
from dt_main import auto_DecisionTreeRegressor
from Decision_utils import DTR_TO_SQL
from IPython.display import Image

X, y = make_classification(n_samples=1000,n_features=30,n_classes=2,random_state=328)
data = pd.DataFrame(X)
data['bad_ind'] = y
data['imei'] = [i for i in range(len(data))]
data.columns = ['f0_radius','f0_texture','f0_perimeter','f0_area','f0_smoothness',
                'f0_compactness','f0_concavity','f0_concave_points','f0_symmetry',
                'f0_fractal_dimension','f1_radius_error','f1_texture_error','f1_perimeter_error',
                'f2_area_error','f2_smoothness_error','f2_compactness_error','f2_concavity_error',
                'f2_concave_points_error','f2_symmetry_error','f2_fractal_dimension_error',
                'f3_radius','f3_texture','f3_perimeter','f3_area','f3_smoothness',
                'f3_compactness','f3_concavity','f3_concave_points','f3_symmetry',
                'f3_fractal_dimension','bad_ind','imei']


uid, dep = "imei", "bad_ind"
var_names = list(data.columns)
var_names.remove(dep)
var_names.remove(uid)

#指定不参与建模的变量,包含标签bad_ind。
ex_lis = [uid, dep]

#调用决策树函数
dct = auto_DecisionTreeRegressor(datasets = data,ex_lis = ex_lis,is_bin=False,
                                 dep = dep,min_samples=0.01,max_depth=4,
                                 min_samples_leaf=50,min_samples_split=50).fit_plot()
#展示图像
Image(dct['graph'])
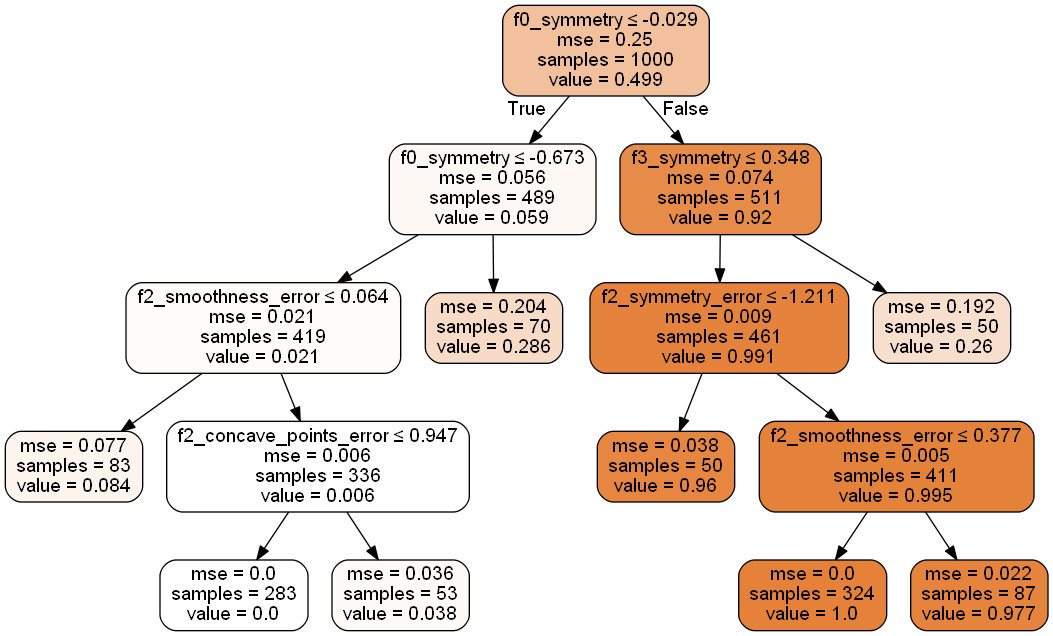
如果需要查看SQL:
#查看SQL代码
DTR_TO_SQL(dct['dtree'],dct['feature_names'],when_else=0)
case
 when f0_symmetry<=-0.028780914843082428 and f0_symmetry<=-0.6725731492042542 and f2_smoothness_error<=0.06367828324437141  then 0.08433734939759036
 when f0_symmetry<=-0.028780914843082428 and f0_symmetry<=-0.6725731492042542 and f2_smoothness_error>0.06367828324437141 and f2_concave_points_error<=0.9470688104629517  then 0.0
 when f0_symmetry<=-0.028780914843082428 and f0_symmetry<=-0.6725731492042542 and f2_smoothness_error>0.06367828324437141 and f2_concave_points_error>0.9470688104629517  then 0.03773584905660377
 when f0_symmetry<=-0.028780914843082428 and f0_symmetry>-0.6725731492042542  then 0.2857142857142857
 when f0_symmetry>-0.028780914843082428 and f3_symmetry<=0.34790952503681183 and f2_symmetry_error<=-1.2111823558807373  then 0.96
 when f0_symmetry>-0.028780914843082428 and f3_symmetry<=0.34790952503681183 and f2_symmetry_error>-1.2111823558807373 and f2_smoothness_error<=0.37725594639778137  then 1.0
 when f0_symmetry>-0.028780914843082428 and f3_symmetry<=0.34790952503681183 and f2_symmetry_error>-1.2111823558807373 and f2_smoothness_error>0.37725594639778137  then 0.9770114942528736
 when f0_symmetry>-0.028780914843082428 and f3_symmetry>0.34790952503681183  then 0.26
else 0 end as clusters
文章参考:https://zhuanlan.zhihu.com/p/188759754
修改了一些错误,使得整个程序得以顺利运行