一.Struts
一.struts的流程
(1)首先,用户在地址栏中输入你的项目访问路径,然后这个请求会发送到服务器,服务器先找到要web.xml的,给web.xml中配置了一个filter过滤器,过滤所有的
访问进行过滤,在搭建struts,先要配置一个过滤,所以我们可以把这个struts看成是一个过滤器,用户的所有请求都需要经过struts进行分配。服务器接受到用
户请求之后就吧这个请求传给struts,具体的处理是依靠org.apache.struts2.dispatcher.ng.filter.StrutsPrepareAndExecuteFilter这个web.xml中配置的类,
具体怎么处理我们不要明白。之后接受到用户的请求,struts.xml进行处理,action标签中name属性为用户访问你的项目时候输入的指定名字,然class属性是定
义这个name请求需要进行处理的类,也就是action类,然method是指定使用这个类中的某一个方法。之后调用完这个方法。之后返回一个值,然后在struts.xml
指定根据所返回的字符串进行跳转页面。
流程图:

二.struts的搭建
(1)导入相关的jra包
①:在官方的网下载struts2,在这个网址http://struts.apache.org/download.cgi#struts252,选择相适合的版本即可
②从struts2,解压出struts2-rest-showcasw.war

③从struts2-blank.war解压拿到ilb文件,把ilb导入项目中


二.web.xml的文件配置
(1)配置struts
  <welcome-file-list>
    <welcome-file>default.jsp</welcome-file>
  </welcome-file-list>
  <filter>
    <filter-name>struts2</filter-name>
    <filter-class>org.apache.struts2.dispatcher.ng.filter.StrutsPrepareAndExecuteFilter</filter-class>
  </filter>
  <filter-mapping>
    <filter-name>struts2</filter-name>
    <url-pattern>/*</url-pattern>
  </filter-mapping>
1.设置你的项目路径(红色字样)
 <welcome-file-list>
    <welcome-file>default.jsp</welcome-file>
  </welcome-file-list>
2设置struts具体设置的类型(红色字样)
  <filter>
    <filter-name>struts2</filter-name>
    <filter-class>org.apache.struts2.dispatcher.ng.filter.StrutsPrepareAndExecuteFilter</filter-class>
  </filter>
3.设置接收所有的请求
<filter-mapping>
    <filter-name>struts2</filter-name>
    <url-pattern>/*</url-pattern>
  </filter-mapping>
三.struts
(1)首先在src目录下新建一个xml文件,即struts.xml配置文件。
(2)建好struts.xml然后把配置文件头文声明dtd规范,即文档类型定义
<!DOCTYPE struts PUBLIC
	"-//Apache Software Foundation//DTD Struts Configuration 2.3//EN"
	"http://struts.apache.org/dtds/struts-2.3.dtd">
(3)配置Struts的环境
①在文件头文声明下,先写一对Struts标签。
②在Struts标签里中,定义一package标签,设置它的name和extends属性,extend的值为struts-default
③在package标签中,定义一个action标签,一样设置它的属性,不过是设置的是name和class,method,
name属性设置的是在URL中访问项目的路径名字,class设置的是业务逻辑处理的类(包名.类名);
method属性设置的是需要进行访问的这个类中的指定的方法(写上方法名即可),如果没有设置method属性的值,那默认调用execute()。
④在action标签中,定义一个result标签,设置name属性,属性action标签中method属性中的方法的返回值(这些方法的返回值均为String);
result标签之间为需要跳转的页面。
<struts>
	<package name="mycpk" extends="struts-default">
		<action name="Index" class="myIndexAction" method="execute1">
			<result name="success">/WEB-INF/jsp/success.jsp</result>
			<result name="error">/WEB-INF/jsp/error.jsp</result>
		</action>
	</package>
</struts>
四.处理类action
(1)定一个类,并且 继承ActionSupport(extends ActionSupport)类,在这个方法定义成员和变量。
public class IndexAction  extends ActionSupport {


	private static final long serialVersionUID = 1L;

	public String execute1(){
		IndexService is = new IndexServiceImpl();
		List<BookCard> myBookCardList = is.getAllBookCard();
		myBookCardList = is.getAllBookCard();

		System.out.println("struts调用action");
		return "success";
	}
    public String formatDouble(double s){

		DecimalFormat fmat=new DecimalFormat("u00A4##.0");

		return fmat.format(s);
	}
(1)成员一般是用来保存数据,等待注入的实例属性注入的实例的方法(spring+Struts,一起用的)
成员变量保存的数据可以是用户请求传过来的参数还可以是从数据库中
curd获取到的集合、信息。。
(2)这个类中定义的方法的返回值都是String类型,返回的字符串和struts2.xml中的配置相匹配。
Spring是全面的和模块化的。Spring有分层的体系结构,这意味着你能选择使用它孤立的任何部分,
它的架构仍然是内在稳定的。
二.Spring
一.Spring一个轻量级的Java 开发框架,主要的作用是用来管理实例(解决JAVA类中new对象的问题,节省内存资源。)
和降低代码之间的耦合性,促进代码模块化。
二、spring搭建:
⑴、导入相关的jar包:
①下载好spring后解压出来找到lib目录将其中除了javaDoc和sources的jar包全部导入项目中,并且在struts解压包lib目录中找到struts2-spring-plugin的jar包和 Commons-logging的jar包导入项目中。如下:
一.spring
(1)下载

(2)路径


二.struts
(1)


![]()
(2)


三.头文件
1.在src目录下新建一个applicationContext.xml文件

2 .applicationContext.xml头信息:
<?xml version="1.0" encoding="UTF-8"?>
<beans xmlns="http://www.springframework.org/schema/beans"
        xmlns:xsi="http://www.w3.org/2001/XMLSchema-instance"
        xmlns:p="http://www.springframework.org/schema/p"
        xmlns:aop="http://www.springframework.org/schema/aop"
        xmlns:context="http://www.springframework.org/schema/context"
        xmlns:jee="http://www.springframework.org/schema/jee"
        xmlns:tx="http://www.springframework.org/schema/tx"
        xsi:schemaLocation="
            http://www.springframework.org/schema/aop http://www.springframework.org/schema/aop/spring-aop-4.2.xsd
            http://www.springframework.org/schema/beans http://www.springframework.org/schema/beans/spring-beans-4.2.xsd
            http://www.springframework.org/schema/context http://www.springframework.org/schema/context/spring-context-4.2.xsd
            http://www.springframework.org/schema/jee http://www.springframework.org/schema/jee/spring-jee-4.2.xsd
            http://www.springframework.org/schema/tx http://www.springframework.org/schema/tx/spring-tx-4.2.xsd">
⑵、其次配置bean实例中进行,下面是示例的配置:
 d
d
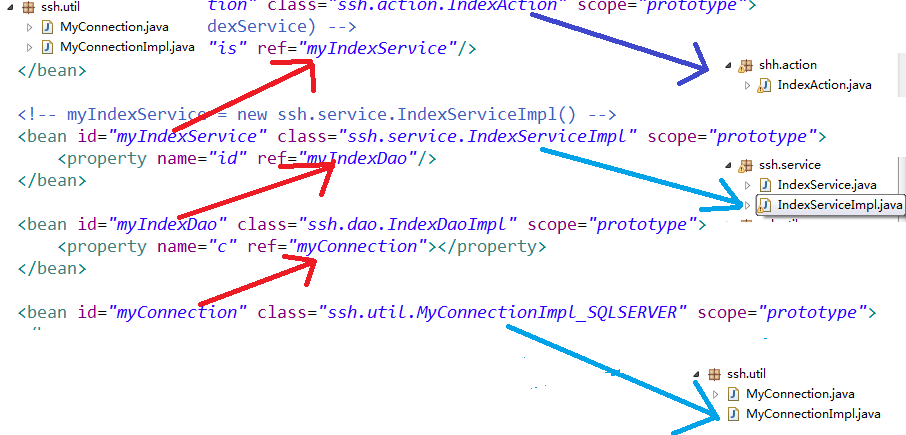
1.bean中的id是bean的名 ,可能实例中需要用到另外实例,就需要引用,这个id就是引用的名字
class属性是指向的这个类,也就是会对这个类进行new实例,但是不是自己作,而是bean帮我们解决。。
scope实例的创建形式
scope="prototype"每次对这个bean的请求都会创建一个实例。
singleton:单实例,在bean无状态使用。
<property name="is" ref="myIndexService"/>
<property name="is" ref="myIndexService"/>:IndexAction中需要有一个成员属性为is,
定义了这个属性的set方法(spring会帮忙注入这个实例),
并且类型是一个services.MyServiceImp的类型或者是这个类的接口类型
private IndexService is = null;

	public void setIs(IndexService is) {
		System.out.println("有人帮我们注入了service的实例:"+is);
		this.is = is;
	}
三、Hibernate的搭建:
相关描述
Ⅰ.服务器与数据库之间的交互
Ⅱ. Hibernate是一个开放源代码的对象关系映射框架,它对JDBC进行了非常轻量级的对象封装,它将POJO与数据库表建立映射关系,是一个全自动的orm框架,hibernate可以自动生成SQL语句,自动执行,使得Java程序员可以随心所欲的使用对象编程思维来操纵数据库。
实现流程
1. 首先在Struts2-spring搭建基础上,再把下载好的Hibernate5.2.2解压后,找到hibernate-release-5.2.2.Finallib equired的jar包,复制到项目的WebContentWEB-INFlib目录下(注意:本例使用是MySQL,记得导入对应的数据库驱动包)
1.下载

2解压

3,复制到项目的WebContentWEB-INFlib目录下(里面的)

2.编写applicationContext.xml文件,添加以下代码,用作描述具体的数据库信息(定义1个sessionFactory,用作于注入)

 1 <bean id="sessionFactory" class="org.springframework.orm.hibernate5.LocalSessionFactoryBean">
 2         <!-- 注入连接池,包含了数据库用户名,密码等等信息 -->
 3         <property name="dataSource" ref="myDataSource"></property>
 4         <property name="hibernateProperties">
 5             <props>
 6                 <!-- 数据库的方言 -->
 7                 <prop key="hibernate.dialect">org.hibernate.dialect.MySQL5Dialect</prop>
 8                 <!-- 是否显示打印sql语句-->
 9                 <prop key="hibernate.show_sql">true</prop>
10                 <!-- 是否格式化显示sql语句-->
11                 <prop key="hibernate.format_sql">true</prop>
12                 <!-- 是否自动提交-->
13                 <prop key="hibernate.connection.autocommit">false</prop>
14                 <!-- 没表帮你创建表,有表就更新表信息 -->
15                 <prop key="hibernate.hbm2ddl">update</prop>
16             </props>
17         </property>
18         <property name="mappingResources">
19             <list>
20                 <!-- 映射文件路径(实体类) -->
21                 <value>ssh/entity/BookCard.hbm.xml</value>
22             </list>
23         </property>
24     </bean>
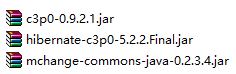
3.为c3p0数据池导入相应的jar包,在Hibernate5.2.2压缩包hibernate-release-5.2.2.Finalliboptionalc3p0的3个jar包, 复制到项目的WebContentWEB-INFlib目录下(提议:也可以使用..optionaldbcp的数据池)(区别:c3p0:稳定性、dbcp:速度比较快)
4. 继续编写applicationContext.xml文件,添加以下代码(为sessionFactory注入一个c3p0数据库)
5.第4步也可以替换成,以下写法,先在src目录下创建一个jdbc.properties的文件(用于记录保存数据库相关的信息)
 1 <!-- 定义c3p0数据池 -->
 2     <bean id="myDataSource" class="com.mchange.v2.c3p0.ComboPooledDataSource">
 3         <!-- 数据库的驱动 -->
 4         <property name="driverClass" value="com.mysql.jdbc.Driver"/>
 5         <!-- 数据库的路径 -->
 6         <property name="jdbcUrl" value="jdbc:mysql://localhost:3306/CardDB"/>
 7         <!-- 数据库的用户名 -->
 8         <property name="user" value="root"/>
 9         <!-- 数据库的密码 -->
10         <property name="password" value="123456"/>
11         <!-- 每300秒检查所有连接池中的空闲连接 -->
12         <property name="idleConnectionTestPeriod" value="300"></property>
13         <!-- 最大空闲时间,900秒内未使用则连接被丢弃。若为0则永不丢弃 -->
14         <property name="maxIdleTime" value="900"></property>
15         <!-- 最大连接数 -->
16         <property name="maxPoolSize" value="2"></property>
17     </bean>

1 jdbc.driver=com.mysql.jdbc.Driver
2 jdbc.url=jdbc:mysql://localhost:3306/CardDB
3 jdbc.user=root
4 jdbc.password=123456
然后applicationContext.xml文件就可以引用该文件内的参数
1 <property name="driverClass" value="${jdbc.driver}"/>
2 <property name="jdbcUrl" value="${jdbc.url}"/>
3 <property name="user" value="${jdbc.user}"/>
4 <property name="password" value="${jdbc.password}"/>
(注意:引用前提必须要在applicationContext.xml文件里添加以下代码,声明一下引用的文件路径)
1 <context:property-placeholder location="classpath:jdbc.properties.txt" />
6.实体类的目录下新建一个实体类.hbm.xml的文件,进行以下编辑
1 <?xml version="1.0" encoding="UTF-8"?>
 2 <hibernate-mapping xmlns="http://www.hibernate.org/xsd/hibernate-mapping">
 3       <!-- name是实体类的具体路径,table是定义创建表的名字 -->
 4     <class name="ssh.entity.BookCard" table="BookCard">
 5         <!-- 定义主键的名称 -->
 6         <id name="cid" column="cid">
 7             <!-- 定义主键为自动增长 -->
 8             <generator class="native"></generator>
 9         </id>
10         <!-- 定义数据库的其他的字段 的具体描述-->
11         <property name="name" type="string" length="50" column="name" not-null="true"></property>
12         <property name="sex" type="string" length="2" column="sex"></property>
13         <property name="cardDate" type="date" column="cardDate"></property>
14         <property name="deposit" type="double" column="deposit"></property>
15     </class>
16 </hibernate-mapping>