创建ReactNative项目
需要在命令行中创建
react-native init HelloWorld
HelloWorld是项目名,该命令会创建一个名为HelloWorld的文件夹,其中是一些依赖包,文件等
创建完成之后的目录
直接在iOS模拟器中运行:
在命令行中,cd到项目文件夹,然后运行:react-native run-ios
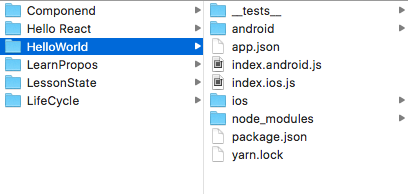
node_modules文件夹里是依赖包
ios,android文件夹中是各自的工程文件
index.android.js和index.ios.js是入口文件
然后在Atom中打开项目,在index.ios.js文件中有一些模板代码,下面是代码和他们的意思
/*
  第一部分
  导入ReactNative包,导入ReactNative组件
  AppRegistry:JS运行所有ReactNative应用的入口
  StyleSheet:ReactNative中使用的样式表,类似css样式表
  各种开发中需要使用的组件

  模板中使用的是ES6语法,ES5语法如下
  let React = require("react-native");
  let {
    AppRegistry,
    StyleSheet,
    Text,
    View
  } = React

  require函数,搜索目录加载文件
*/

import React, { Component } from 'react';
import {
  AppRegistry,
  StyleSheet,
  Text,
  View
} from 'react-native';

/*
  第二部分

  创建ReactNative组件

  模板中使用的是ES6语法,
  render(){}是ES6的函数简写
  ES5语法如下:
  var HelloWorld = React.createClass({
    render:function{
      return {};
    }
  });
*/

export default class HelloWorld extends Component {
  render() {
    return (
      <View style={styles.container}>
        <Text style={styles.welcome}>
          Welcome to React Native!
        </Text>
        <Text style={styles.instructions}>
          To get started, edit index.ios.js
        </Text>
        <Text style={styles.instructions}>
          Press Cmd+R to reload,{'
'}
          Cmd+D or shake for dev menu
        </Text>
      </View>
    );
  }
}

/*
  第三部分

  StyleSheet.create创建样式实例
  在应用中只会贝创建一次,不用每次在渲染周期中重新创建

*/

const styles = StyleSheet.create({
  container: {
    flex: 1,
    justifyContent: 'center',
    alignItems: 'center',
    backgroundColor: '#F5FCFF',
  },
  welcome: {
    fontSize: 20,
    textAlign: 'center',
    margin: 10,
  },
  instructions: {
    textAlign: 'center',
    color: '#333333',
    marginBottom: 5,
  },
});
/*
  第四部分
  注册入口组件

  AppRegistry:负责注册运行ReactNative应用程序的JavaScript入口
  registerComponent注册应用程序的入口组件。告知ReactNative哪一个组件
  被注册为应用的根容器

  第二个参数使用了ES6语法,箭头函数:
  {} => HelloWorld
  返回的必须是定义的组件类的名字

  定价于
  function() {return HelloWorld}
*/
AppRegistry.registerComponent('HelloWorld', () => HelloWorld);
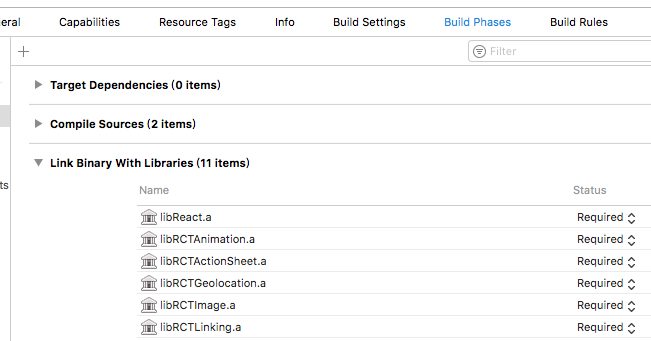
遇到的bug:
#import <React/RCTBundleURLProvider.h>
说这个文件找不到
然后可能是因为依赖的类没有添加进去
然后按照知乎上的回答莫名其妙解决了
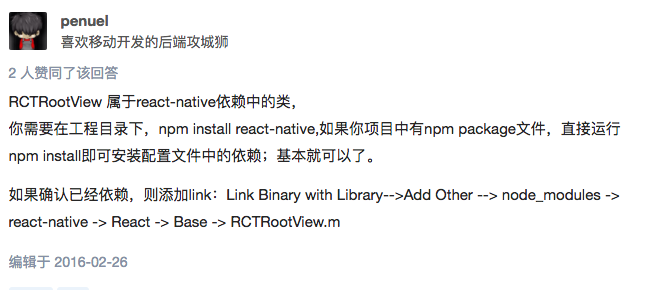
其中,Link Binary with Library的位置是