前言:
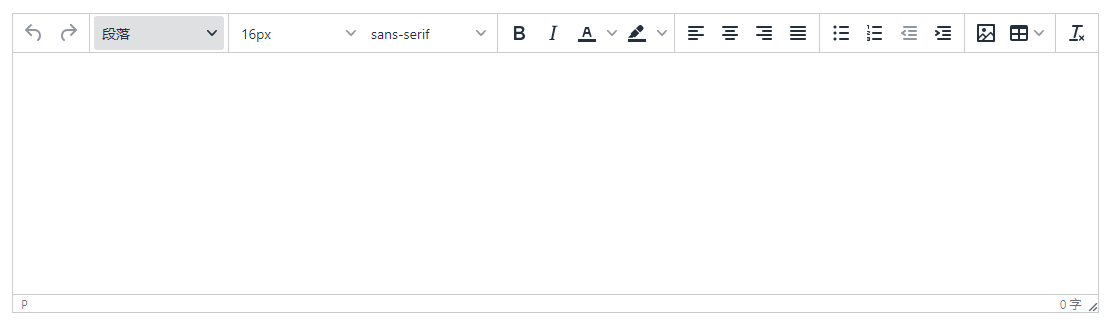
遇到需求,需要在vue项目中引入富文本编辑器,对比了几种编辑器,最终选择了tinymce,基本效果图如下:
TinyMCE的中文文档地址:http://tinymce.ax-z.cn/
安装:
1、下载依赖包
npm i @tinymce/tinymce-vue -S
npm i tinymce -S
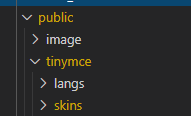
2、下载完成后,在vue项目存放静态资源的文件夹中新建一个文件夹tinymce,到node_modules中找到tinymce/skins目录,将skins文件夹拷贝到新建的tinymce文件夹中
3、中文化:语言包地址,下载语言包,解压将langs文件夹拷贝到vue项目静态资源路径下的tinymce文件夹中
具体如下图:
使用:
将tinymce封装成组件,完整代码如下:
<template>
  <div class="tinymce-box">
    <editor v-model="myValue" :init="init" :disabled="disabled" @onClick="onClick"> </editor>
  </div>
</template>

<script>
import tinymce from 'tinymce/tinymce' //tinymce默认hidden,不引入不显示
import Editor from '@tinymce/tinymce-vue'
import 'tinymce/icons/default/icons'
import 'tinymce/themes/silver'
// 编辑器插件plugins
// 更多插件参考:https://www.tiny.cloud/docs/plugins/
import 'tinymce/plugins/image' // 插入上传图片插件
import 'tinymce/plugins/media' // 插入视频插件
import 'tinymce/plugins/table' // 插入表格插件
import 'tinymce/plugins/lists' // 列表插件
import 'tinymce/plugins/wordcount' // 字数统计插件
export default {
  components: {
    Editor
  },
  name: 'tinymce',
  props: {
    value: {
      type: String,
      default: ''
    },
    disabled: {
      type: Boolean,
      default: false
    },
    plugins: {
      type: [String, Array],
      default: 'lists image media table wordcount'
    },
    toolbar: {
      type: [String, Array],
      default:
        'undo redo |  formatselect | fontsizeselect  fontselect | bold italic forecolor backcolor | alignleft aligncenter alignright alignjustify | bullist numlist outdent indent | lists image table | removeformat'
    }
  },
  data() {
    return {
      init: {
        language_url: '/tinymce/langs/zh_CN.js',
        language: 'zh_CN',
        skin_url: '/tinymce/skins/ui/oxide',
        // skin_url: 'tinymce/skins/ui/oxide-dark',//暗色系
        font_formats: '微软雅黑=Microsoft YaHei,Helvetica Neue,PingFang SC,sans-serif;苹果苹方=PingFang SC,Microsoft YaHei,sans-serif;宋体=simsun,serif',
        fontsize_formats: '11px 12px 14px 16px 18px 24px 36px 48px',
        height: 300,
        plugins: this.plugins,
        toolbar: this.toolbar,
        branding: false,
        menubar: false,
        convert_urls: false,
        // images_upload_base_path: process.env.BASE_URL + '/test/',
        // relative_urls : false,
        // remove_script_host : true,
        // document_base_url: location.protocol + '//' + location.hostname,
        // 此处为图片上传处理函数,这个直接用了base64的图片形式上传图片,
        // 如需ajax上传可参考https://www.tiny.cloud/docs/configure/file-image-upload/#images_upload_handler
        images_upload_handler: (blobInfo, success, failure) => {
          const img = 'data:image/jpeg;base64,' + blobInfo.base64()
          success(img)
        },
        urlconverter_callback: function(url, node, on_save, name) {
          return url
        },
        setup: editor => {
          editor.on('blur', () => {
            this.$emit('onBlur', this.myValue)
          })
        }
      },
      myValue: this.value
    }
  },
  mounted() {
    tinymce.init({})
  },
  methods: {
    // 添加相关的事件,可用的事件参照文档=> https://github.com/tinymce/tinymce-vue => All available events
    // 需要什么事件可以自己增加
    onClick(e) {
      this.$emit('onClick', e, tinymce)
    },
    // 可以添加一些自己的自定义事件,如清空内容
    clear() {
      this.myValue = ''
    },
    getWordcount() {
      return tinymce.activeEditor.plugins.wordcount
    },
    // 自定义方法,判断编辑器内是否有有效内容
    isNoEmpty() {
      let wordcount = this.getWordcount()
      const reg1 = /<table.*?>[sS]*</table>/
      const reg2 = /<ul.*?>[sS]*</ul>/
      const reg3 = /<ol.*?>[sS]*</ol>/
      const reg4 = /<img.*?>/
      let count = wordcount.body.getWordCount()

      return reg1.test(this.myValue) || reg2.test(this.myValue) || reg3.test(this.myValue) || reg4.test(this.myValue) || count > 0
    }
  },
  watch: {
    value(newValue) {
      this.myValue = newValue
    },
    myValue(newValue) {
      this.$emit('input', newValue)
    }
  }
}
</script>
<style scoped></style>
使用封装组件:
<tinymce ref="editor" :key="tinymceFlag" v-model="goodsDescp" />
关于init属性的解释:
1、font_formats:字体格式
2、fontsize_formats:字体大小
3、convert_urls
过程中踩过的坑及解决方法:
1、在keep-alive中使用自定义封装组件时,第一次进入页面编辑器能正常使用,切换页面再次进入时编辑器无法正常使用,解决方法是给组件加动态key值,打破dom复用,参考代码如下:
activated() {
    this.tinymceFlag++
}
2、图片上传默认是以base64的图片形式上传图片,也可以实现通过请求方式将图片上传到服务器中并返回图片地址,在images_upload_handler配置中实现,参考代码如下:
images_upload_handler: (blobInfo, success, failure) => {
  // const img = 'data:image/jpeg;base64,' + blobInfo.base64()
  // success(img)
  var xhr, formData

  xhr = new XMLHttpRequest()
  xhr.withCredentials = false
  xhr.open('POST', '...') // 省略请求地址

  xhr.onload = function() {
    // 可自定义返回数据格式,根据自己需求进行处理
    var json
    if (xhr.status != 200) {
      failure('HTTP Error: ' + xhr.status)
      return
    }
    json = JSON.parse(xhr.responseText)
    if (!json || !json.success) {
      failure((json ? '' : 'Invalid JSON: ') + xhr.responseText)
      return
    }
    success(json.data.url)
  }
  formData = new FormData()
  formData.append('file', blobInfo.blob(), blobInfo.filename())
  xhr.send(formData)
}
3、如果图片上传服务器返回的是相对地址,在编辑器中需要使用绝对地址,可通过urlconverter_callback配置格式化url,参考代码如下:
urlconverter_callback: function(url, node, on_save, name) {
  if (url.indexOf('http://') !== -1) {
    return url
  }
  url = window.location.protocol + '//' + window.location.hostname + (window.location.port ? ':' + window.location.port : '') + url
  // Return new URL
  return url
}
4、自定义图标功能,可在setup配置中实现
5、校验编辑器内容必填,测试要求考虑编辑器内容只有`回车,空字符`时也算无内容,处理思路是,通过编辑器的字数统计插件来获取当前编辑器内字数,作为判断条件