Django
Django版本下载:
https://www.djangoproject.com/download/
安装Django步骤见:
http://www.cnblogs.com/chenchao1990/p/5229257.html
一、创建Django
- 终端命令:django-admin startproject sitename
- IDE创建Django程序时,本质上都是自动执行上述命令
其他常用命令:
python manage.py runserver 0.0.0.0 运行Django项目
python manage.py startapp appname 创建app应用
python manage.py syncdb 刷新数据库
python manage.py makemigrations 1.7 及以上的版本同步数据库命令
python manage.py migrate 1.7 及以上的版本同步数据库命令
python manage.py createsuperuser 创建管理员用户
二、程序目录
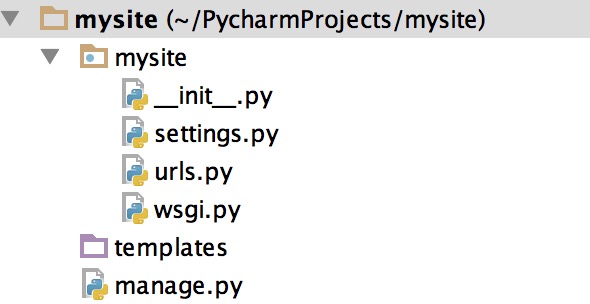
mysit:与创建的django同名的模块
settings:放置有关配置的代码
urls:路由
wsgi:主要规定是用哪一种去运行django程序 wsgi或uwsgi
templates:放置html页面
manage.py:django的启动程序
app的目录结构:
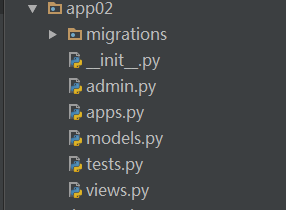
admin:django自带后台管理程序提供的文件
models: 对数据库操作文件
views:逻辑处理函数
test:测试
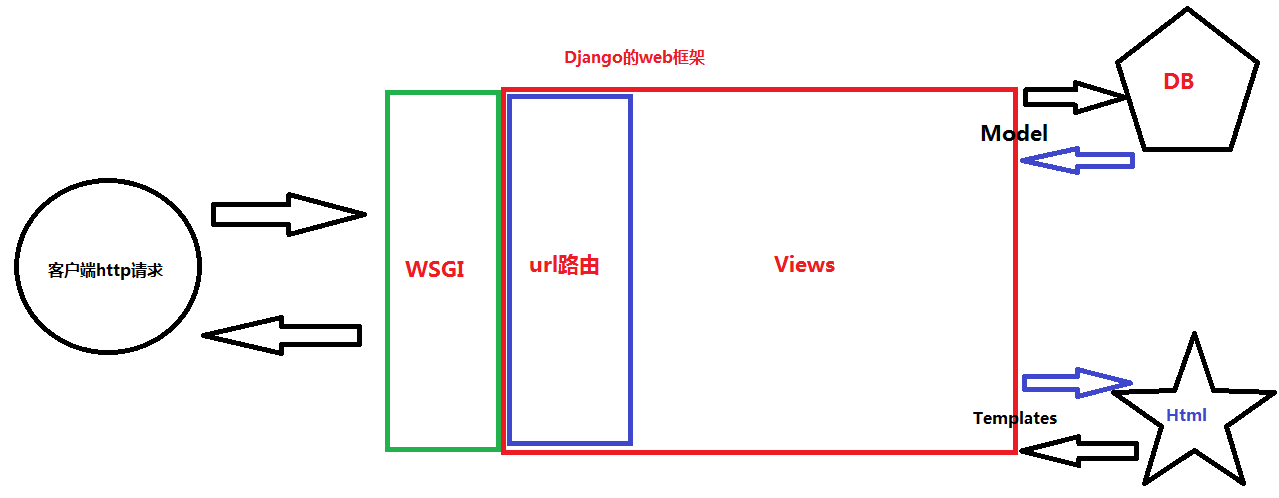
三、Django实现一次http请求基本流程
1、在app下的views文件中写一个处理函数。参数必须至少包含一个request,因为此参数里面包含了有关请求的信息,可以调取使用。
1 def index(request):
2     pass
2、在urls里面定义路由,参数要与在views里定义的函数名一致。
1 from app01 import views
2 urlpatterns = [
3     url(r'^admin/', admin.site.urls),
4     url(r'^home/',views.home),
5     url(r'^index/',views.index),
6 ]
3、返回数据,需要导入一个方法去返回字符串数据
1 from django.shortcuts import HttpResponse
2
3
4 def index(request):
5     return  HttpResponse("OK")
4、运行django程序
1 python manage.py runserver 127.0.0.1:8888

四、模板引擎
Django自带模板引擎,可以将html文件渲染,返回给用户。
 1 <!DOCTYPE html>
 2 <html lang="en">
 3 <head>
 4     <meta charset="UTF-8">
 5     <title></title>
 6 </head>
 7 <body>
 8
 9     <h1>{{ name }}</h1>
10     <h1>{{ age }}</h1>
11     <h1>{{ sex }}</h1>
12
13
14     {% for item in userlist %}
15
16     <ul>
17         <li>{{ item }},{{ forloop.counter }}</li>
18     </ul>
19
20     {% endfor %}
21
22     {% if age > 20%}
23
24         <div style="color: red">OldMEN</div>
25
26
27     {% endif %}
28
29
30 </body>
31 </html>
 1 from django.shortcuts import render
 2
 3
 4 def index(request):
 5
 7     user_list = ['zhangsan','lisi','wangwu']
 8
 9     dic = {
10         'name':'chenchao',
11         'age':25,
12         'sex':'nan',
13         'userlist':user_list,
14     }
15
16     return render(request,'chenchao.html',dic)
forloop.counter 显示当前循环的次数
forloop.first 是否是第一次循环
forloop.last 是否是最后一次循环
帮助方法
{{ item.event_start|date:"Y-m-d H:i:s"}} 时间格式化
{{ bio|truncatewords:"30" }} 打印前三十个字节
{{ my_list|first|upper }} 首字母大写
{{ name|lower }} 名字小写
五、自定义simple_tag
帮助的方法虽然很多,但显然不够。so,也可以自定义帮助方法。
a、在app中创建templatetags模块
b、创建任意 .py 文件,如:new_tag.py
 1 #!/usr/bin/env python
 2 # coding:utf-8
 3 from django import template
 4 from django.utils.safestring import mark_safe
 5
 6 register = template.Library()
 7
 8 @register.simple_tag
 9 def my_simple_time(v1,v2,v3):
10     return  v1 + v2 + v3
11
12 @register.simple_tag
13 def my_input(id,arg):
14     result = "<input type='text' id='%s' class='%s' />" %(id,arg,)
15     return mark_safe(result)
c、在使用自定义simple_tag的html文件最前面导入之前创建的 new_tag.py 文件名
1 {% load new_tag %}
d、使用simple_tag
1 {% my_simple_time 1 2 3%}
2 {% my_input 'id_username' 'hide'%}
e、在settings中配置当前app,不然django无法找到自定义的simple_tag
1 INSTALLED_APPS = (
2     'django.contrib.admin',
3     'django.contrib.auth',
4     'django.contrib.contenttypes',
5     'django.contrib.sessions',
6     'django.contrib.messages',
7     'django.contrib.staticfiles',
8     'app01',
9 )
六、母板、子板
母板:{% block title %}{% endblock %}
子板:{% extends "base.html" %}
{% block title %}{% endblock %}
include:{% include "include/include_2.html"%} (当一个内容或者功能在多个页面都存在时,会用到include)
a、在templates下创建一个任意文件夹 如:master
b、在master下创建母板的html文件,如m1.并填写子板的格式语言


 1 <!DOCTYPE html>
 2 <html lang="en">
 3 <head>
 4     <meta charset="UTF-8">
 5     <title>
 6         {% block title %}{% endblock %}
 7     </title>
 8         <style>
 9         .headers{
10             height: 48px;
11             background-color: burlywood;
12         }
13         .body{
14             background-color: darkolivegreen;
15         }
16         .body .menu{
17             background-color: antiquewhite;
18             float: left;
19             width: 20%;
20             height: 500px;
21         }
22         .body .content{
23             background-color: sandybrown;
24             float: left;
25             width: 70%;
26             height: 500px;
27
28         }
29
30     </style>
31 </head>
32
33 <body>
34
35     <div class='headers'>
36         <h1>LOGO</h1>
37     </div>
38     <div class="body">
39         <div class="menu">
40             <h1>左侧菜单</h1>
41         </div>
42         <div class="content">
43             {% block content %}  {% endblock %}
44         </div>
45     </div>
46
47 </body>
48 </html>
c、在templates下创建子板的html文件,并继承母板 如:son1。并将木板留置的内容一一对应填写。
 1 {% extends "master/m1.html" %}
 2
 3
 4 {% block title %}
 5 好好学习,天天向上 6 {% endblock %}
 7
 8
 9 {% block content %}
10     <h1>66666666666666666</h1>
11 {% endblock %}
d、在app的views里添加处理函数
1 def son(request):
2     return  render(request,'son1.html')
e、在urls里添加需要访问的路径
1 url(r'^son/',views.son),
f、可以将多个html文件内容导入到子板中
- 在templates下创建一个任意文件夹 如:include
- 创建带有内容的html文件
- 在子板中用 {% include "include/include_2.html"%} 将html文件内容导入
1 {% block content %}
2     <h1>66666666666666666</h1>
3     {% include "include/include_1.html"%}
4     {% include "include/include_2.html"%}
5 {% endblock %}
七、静态文件配置
一般地静态文件都会单独的放在一个目录下,把各自的静态文件从html文件中分离出来,使程序解耦。
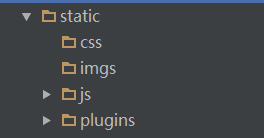
然后再settings里面添加静态文件的目录即可:
1 STATIC_URL = '/static/'
2 STATICFILES_DIRS = (
3     os.path.join(BASE_DIR,'static'),
4 )
一般地,在html文件中title部分也会分离出来
1 <title>
2         {% block title %}{% endblock %}
3  </title>
CSS和JS也会定义一个全局母板,然后再每个子板中单独定义一些特殊的样式,这样不同的子板就可以用各自不同的样式
1     <link rel="stylesheet" href="/static/css/commons.css">
2     {% block css %}{% endblock %}
 1 {% extends "master/m1.html" %}
 2
 3 {% block css %}
 4
 5 <style>
 6     .son2{
 7         font-size: large;
 8     }
 9     .son3{
10         margin: 0 auto;
11     }
12
13 </style>
14 {% endblock %}
15
16
17 {% block secson %}
18     <div class="son2">
19         <ul>
20             <li>This is son2 style</li>
21         </ul>
22         <div >
23             <input class="son3" type="text">
24         </div>
25     </div>
26 {% endblock %}
同理。JS也是一样的