目录
- 综合架构图
- 主机规划 ip
- 基础优化
- m01 搭建yum仓库
- backup- rsync全网备份
- nfs 共享存储项目
- NFS 共享存储数据实时复制到 backup
- SSH、Ansible,批量管理服务项目
- MySQL 数据库环境搭建
- Nginx+PHP 流行动态 Web 环境搭建
- Nginx+Tomcat 流行动态 Web 环境搭建
- 将 PHP 产品和 Tomcat 产品上传目录挂载到 NFS
- 搭建 Nginx+keepalived 七层负载,172.16.1.5/6/lb01/lb02
- 配置 Nginx- tomcat- HTTPS 加密访问项目
- 将 NFS 存储数据实时复制到静态 Web 本地 172.16.1.9/10/web01/02
- Nginx 静态 Web 服务环境搭建 172.16.1.9/10/sweb01/02 +实现动静分离
综合架构图
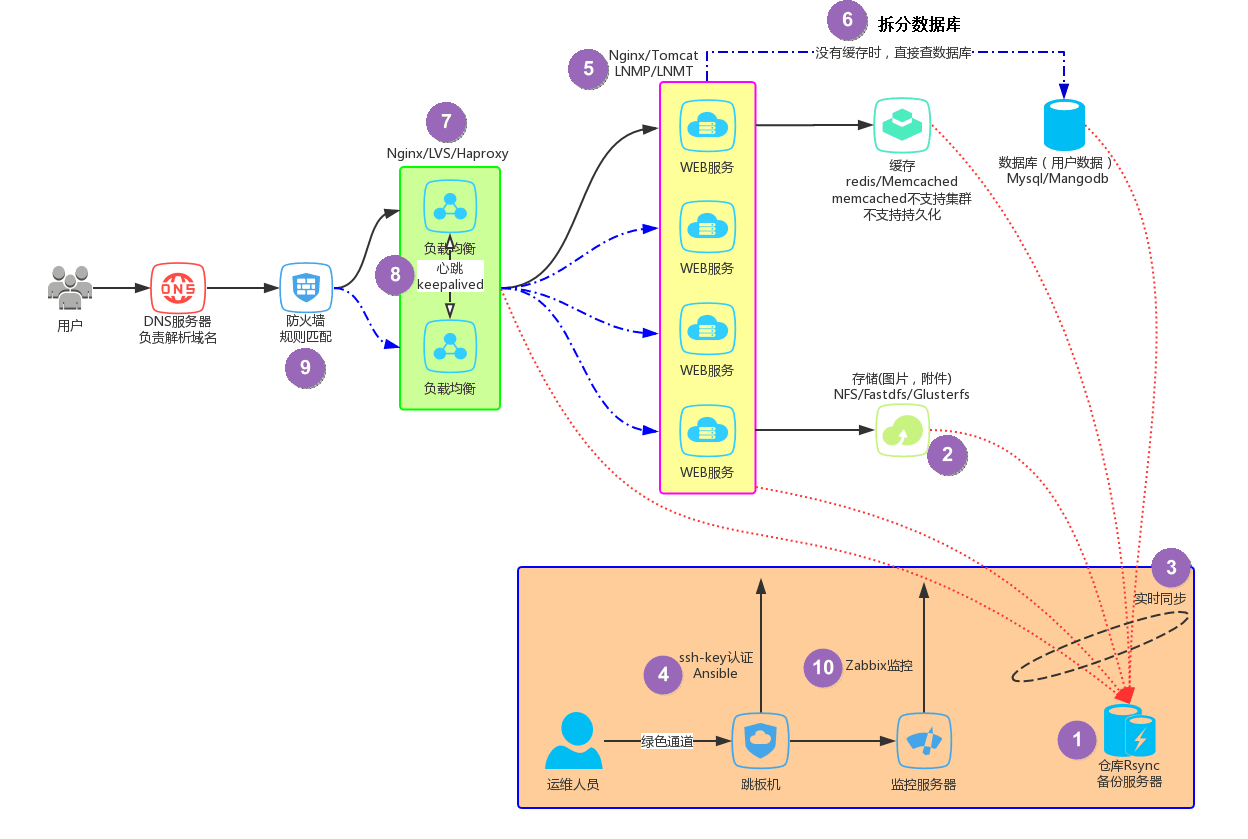
主机规划 ip
服务器主机名和 IP 规划参考模板
| 主机名 | eth0 网卡 | eth1 网卡 | 服务简介 |
|---|---|---|---|
| lb01 | 10.0.0.5/24 | 172.16.1.5/24 | 负载服务 |
| lb02 | 10.0.0.6/24 | 172.16.1.6/24 | 负载服务 |
| web01 | 10.0.0.7/24 | 172.16.1.7/24 | phpwww 服务 |
| web02 | 10.0.0.8/24 | 172.16.1.8/24 | php www 服务 |
| tweb01 | 10.0.0.9/24 | 172.16.1.9/24 | tomcat www 服务 |
| db01 | 10.0.0.51/24 | 172.16.1.51/24 | 数据库服务 |
| nfs01 | 10.0.0.31/24 | 172.16.1.31/24 | 存储服务 |
| backup | 10.0.0.41/24 | 172.16.1.41/24 | 备份服务 |
| m01 | 10.0.0.61/24 | 172.16.1.61/24 | 管理服务 |
基础优化
修改ip地址
sed -i 's#222#61#g' /etc/sysconfig/network-scripts/ifcfg-eth[01]

永久修改主机名
[root@oldboy-c7 ~]# hostnamectl set-hostname oldboyedu-cc7
[root@web01 data]# vim /etc/hosts
127.0.0.1   localhost localhost.localdomain localhost4 localhost4.localdomain4
::1         localhost localhost.localdomain localhost6 localhost6.localdomain6
172.16.1.5  lb01
172.16.1.6  lo02
172.16.1.7  web01
172.16.1.8  web02
172.16.1.9  sweb
172.16.1.31  nfs
172.16.1.41  backup
172.16.1.51  db
#批量推送其他主机
[root@web01 data]# scp -rp /etc/hosts root@172.16.1.31:/etc/

调整yum源
CentOS 7

wget -O /etc/yum.repos.d/CentOS-Base.repo http://mirrors.aliyun.com/repo/Centos-7.repo
wget -O /etc/yum.repos.d/epel.repo http://mirrors.aliyun.com/repo/epel-7.repo

//1.安装基础软件包
yum install net-tools vim tree htop iftop iotop lrzsz sl wget unzip telnet nmap nc psmisc
dos2unix bash-completion iotop iftop sysstat screen  -y

1.自动补全
yum install bash-completion -y
退出一次,然后重新登录

安装net-tools工具,可使用ifconfig命令
yum install net-tools -y

//2.关闭firewalld防火墙
systemctl disable firewalld
systemctl stop firewalld
systemctl status firewalld

//3.关闭selinux
# 方式一
sed -ri 's#(^SELINUX=).*#1disabled#g' /etc/selinux/config
# 方式二
sed -i '/^SELINUX=/c SELINUX=disabled' /etc/selinux/config
# 方式三
vim /etc/selinux/config

# 临时生效
setenforce 0

//4.优化ulimit
echo '* - nofile 65535' >> /etc/security/limits.conf

//5 重启快照
m01 搭建yum仓库
1.基础环境准备
//安装ftp服务,启动并加入开机启动
 yum -y install vsftpd
 systemctl start vsftpd
 systemctl enable vsftpd

//开启yum缓存功能
 vim /etc/yum.conf
[main] cachedir=/var/cache/yum/$basearch/$releasever
keepcache=1

 yum clean all

2.提供基础base源
 mkdir /var/ftp/centos75
 mount /dev/cdrom /mnt
 cp -rp  /mnt/Packages/*.rpm /var/ftp/centos75

3.提供第三方源
mkdir /var/ftp/ops

yum install net-tools vim tree htop iftop
iotop lrzsz sl wget unzip telnet nmap nc psmisc
dos2unix bash-completion iotop iftop sysstat screen  -y


//复制已缓存的 Nginx docker 及依赖包 到自定义 YUM 仓库目录中
[root@yum_server_69_112 ~]# find /var/cache/yum/x86_64/7/
-iname "*.rpm" -exec cp -rf {} /var/ftp/ops ;


4.安装createrepo并创建 reopdata仓库

//安装createrepo
[root@yum_server_69_112 ~]# yum -y install createrepo
//生成仓库信息
createrepo /var/ftp/ops
createrepo /var/ftp/centos75
//注意: 如果此仓库每次新增软件则需要重新生成一次


客户端使用yum源

1.配置并使用base基础源

[root@yum_client_69_113 ~]# gzip /etc/yum.repos.d/*
[root@yum_client_69_113 ~]# vim /etc/yum.repos.d/centos7.repo
[centos75]
name=centos74_base
baseurl=ftp://172.16.1.61/centos75
gpgcheck=0
2.客户端指向本地ops源

[root@yum_client_69_113 ~]# vim /etc/yum.repos.d/ops.repo
[ops]
name=local ftpserver
baseurl=ftp://172.16.1.61/ops
gpgcheck=0


yum clean all
yum makecache


#其他客户端同步推送过去
[root@backup ~]# rsync -avz /etc/yum.repos.d root@172.16.1.6:/etc/ --delete
backup- rsync全网备份
[root@backup ~]# yum install rsync -y   //基础环境已经安装
[root@backup ~]# cat /etc/rsyncd.conf
uid = www
gid = www
port = 873
fake super = yes
use chroot = no
max connections = 200
timeout = 600
ignore errors
read only = false
list = false
auth users = rsync_backup
secrets file = /etc/rsync.password
log file = /var/log/rsyncd.log
#####################################
[backup]
path = /backup
[data]
path = /data


[root@backup ~]# mkdir /backup/
[root@backup ~]# groupadd -g666 www
[root@backup ~]# useradd -u666 -g666 www

[root@backup ~]# chown -R www.www /backup/
[root@backup ~]# chmod 755 /backup

# 创建rsync使用的虚拟连接用户
[root@backup ~]# echo "rsync_backup:1" > /etc/rsync.password
[root@backup ~]# chmod 600 /etc/rsync.password

[root@backup ~]# systemctl enable rsyncd
[root@backup ~]# systemctl start rsyncd


1 客户端定时执行脚本 推送 backup服务器
[root@nfs ~]# mkdir -p /server/scripts/

[root@nfs scripts]# cat /server/scripts/client_rsync_backup.sh
#!/usr/bin/bash
export PATH=/usr/local/sbin:/usr/local/bin:/usr/sbin:/usr/bin:/root/bin
#1.定义变量
Host=$(hostname)
Addr=$(ifconfig eth1|awk 'NR==2{print $2}')
Date=$(date +%F)
Dest=${Host}_${Addr}_${Date}
Path=/backup

#2.创建备份目录
[ -d $Path/$Dest ] || mkdir -p $Path/$Dest

#3.备份对应的文件
cd / &&
[ -f $Path/$Dest/system.tar.gz ] || tar czf $Path/$Dest/system.tar.gz etc/fstab etc/rsyncd.conf &&
[ -f $Path/$Dest/log.tar.gz ] || tar czf $Path/$Dest/log.tar.gz  var/log/messages var/log/secure &&

#4.携带md5验证信息
[ -f $Path/$Dest/flag_$Date ] || md5sum $Path/$Dest/*.tar.gz >$Path/$Dest/flag_${Date}

#4.推送本地数据至备份服务器
export RSYNC_PASSWORD=1
rsync -avz $Path/ rsync_backup@172.16.1.41::backup

#5.本地保留最近7天的数据
find $Path/ -type d -mtime +7|xargs rm -rf


2 服务端backup 校验压缩包 发送给管理员
1.配置邮箱(配发件服务器)
[root@backup ~]# cat /etc/mail.rc
yum install mailx -y
set from=343264992@163.com
set smtp=smtps://smtp.163.com:465
set smtp-auth-user=343264992@163.com
set smtp-auth-password=aa123456
set smtp-auth=login
set ssl-verify=ignore
set nss-config-dir=/etc/pki/nssdb/

[root@backup ~]# mkdir /server/scripts -p
[root@backup scripts]# vim check_backup.sh
#!/usr/bin/bash

#1.定义全局的变量
export PATH=/usr/local/sbin:/usr/local/bin:/usr/sbin:/usr/bin:/root/bin

#2.定义局部变量
Path=/backup
Date=$(date +%F)

#3.查看flag文件,并对该文件进行校验, 然后将校验的结果保存至result_时间
find $Path/*_${Date} -type f -name "flag_$Date"|xargs md5sum -c >$Path/result_${Date}

#4.将校验的结果发送邮件给管理员
mail -s "Rsync Backup $Date" 343264992@qq.com <$Path/result_${Date}

#5.删除超过7天的校验结果文件, 删除超过180天的备份数据文件
find $Path/ -type f -name "result*" -mtime +7|xargs rm -f
find $Path/ -type d -mtime +180|xargs rm -rf

定时任务
	#多台客户端
[root@nfs ~]# crontab -l
00 01 * * * /usr/bin/bash /server/scripts/clinet_rsync_backup.sh >/dev/null 2>&1
测试
[root@web01 ~]# sh /server/scripts/client_rsync_backup.sh

# 多台客户端快速增加
[root@nfs01 yum.repos.d]# scp -rp /var/spool/cron/root root@172.16.1.7:/var/spool/cron/
[root@nfs01 yum.repos.d]# rsync -avz /server root@172.16.1.8:/
	#服务端
[root@backup backup]# crontab -l
00 05 * * * /usr/bin/bash /server/scripts/check_backup.sh >/dev/null 2>&1
nfs 共享存储项目
nfs服务端
[root@nfs ~]# yum install nfs-utils -y  (已安装)
[root@nfs ~]# cat /etc/exports
/data 172.16.1.0/24(rw,sync,all_squash,anonuid=666,anongid=666)

# nfs 依赖环境
[root@nfs ~]# groupadd -g 666 www
[root@nfs ~]# useradd -u 666 -g 666 www
[root@nfs ~]# mkdir /data
[root@nfs ~]# chown -R www.www /data

# 启动nfs
[root@nfs ~]# systemctl enable rpcbind nfs-server
[root@nfs ~]# systemctl start rpcbind nfs-server

nfs 客户端
#安装工具包
[root@web01 ~]# yum install nfs-utils -y  (已安装)
[root@web01 ~]# systemctl start rpcbind    (默认开机自启动)
#创建目录用于挂载
[root@web01 ~]# mkdir /data
# 挂载nfs的data目录
root@web01 ~]# showmount -e 172.16.1.31
Export list for 172.16.1.31:
/data 172.16.1.0/24
[root@web01 ~]# mount -t nfs 172.16.1.31:/data /data
# 加入开机自启动
172.16.1.31:/data  /data nfs defaults   0 0
测试:
   #通过windows上传一个视频或图片至/data
wget http://img.mp.itc.cn/upload/20170511/cad88c2e57f44e93b664a48a98a47108_th.jpg
     # 验证内容是否存在nfs服务器
[root@nfs ~]# ls /data/
1111  cad88c2e57f44e93b664a48a98a47108_th.jpg  tes1  test
NFS 共享存储数据实时复制到 backup
安装inotify-tools
[root@nfs ~]# yum install inotify-tools rsync -y
安装sersync
[root@nfs ~]# wget https://raw.githubusercontent.com/wsgzao/sersync/master/sersync2.5.4_64bit_binary_stable_final.tar.gz
解压重命名
[root@nfs01 ~]# tar xf sersync2.5.4_64bit_binary_stable_final.tar.gz -C /usr/local/
[root@nfs01 local]# mv GNU-Linux-x86/ sersync

#配置sersync
   <fileSystem xfs="true"/>  <!-- 文件系统 -->

     <inotify> <!-- 监控的事件类型 -->
        <delete start="true"/>
        <createFolder start="true"/>
        <createFile start="true"/>
        <closeWrite start="true"/>
         <moveFrom start="true"/>
         <moveTo start="true"/>
         <attrib start="false"/>
          <modify start="false"/>
      </inotify>

<sersync>
         <localpath watch="/data"> <!-- 监控的目录 -->
           <remote ip="172.16.1.41" name="data"/>  <!-- backup的IP以及模块 -->
		 </localpath>


  <rsync> <!-- rsync的选项 -->
            <commonParams params="-az"/>
           <auth start="true" users="rsync_backup" passwordfile="/etc/rsync.pass"/>
            <userDefinedPort start="false" port="874"/><!-- port=874 -->
            <timeout start="true" time="100"/><!-- timeout=100 -->
             <ssh start="false"/>
        </rsync>


#创建密码文件
[root@nfs01 sersync]# echo "1" > /etc/rsync.pass
[root@nfs01 ~]# chmod 600 /etc/rsync.pass
#backup创建目录
[root@backup /]# mkdir /data
[root@backup /]# chowm -R www.www /data
启动sersync
[root@nfs ~]# /usr/local/sersync/sersync2 -dro /usr/local/sersync/confxml.xml
SSH、Ansible,批量管理服务项目
[root@backup ~]# rpm -ql openssh-server
/etc/ssh/sshd_config    --- ssh服务配置文件
/usr/sbin/sshd          --- ssh服务进程启动命令

[root@backup ~]# rpm -ql openssh-clients
/usr/bin/scp            --- 远程拷贝命令
/usr/bin/sftp           --- 远程文件传输命令
/usr/bin/ssh            --- 远程连接登录命令
/usr/bin/ssh-copy-id    --- 远程分发公钥命令


1.创建密钥对
[root@m01 ~]# ssh-keygen -t rsa -C xuliangwei.com   #一路回车即可
[root@m01 ~]# ls ~/.ssh/
id_rsa(钥匙)  id_rsa.pub(锁头)

2#发送密钥给需要登录的用户
[root@m01 ~]# ssh-copy-id -i ~/.ssh/id_rsa.pub root@172.16.1.31

#远程登录对端主机方式
[root@m01 ~]# ssh root@172.16.1.41

# 不登陆主机执行命令
[root@m01 ~]# ssh root@172.16.1.41 "hostname -i"

.ansible借助公钥批量管理
#利用非交换式工具实现批量分发公钥与批量管理服务器
[root@m01 ~]# ssh-copy-id -i ~/.ssh/id_rsa.pub root@172.16.1.41

[root@m01 ~]# yum install ansible -y

//检查ansible版本
[root@m01 ~]# ansible --version
ansible 2.6.1

配置ansible  主机清单
[root@m01 ~]# vim /etc/ansible/hosts
[root@m01 7]# cat /etc/ansible/hosts
[lb]
172.16.1.5
172.16.1.6
[web]
172.16.1.7
172.16.1.8
[sweb]
172.16.1.9
[nfs]
172.16.1.31
[backup]
172.16.1.41
[db]
172.16.1.51

# ansible是通过ssh端口探测通信
[root@m01 ~]# ansible all -m ping

#批量执行命令
[root@m01 ~]# ansible all -m command -a "df -h"
[root@m01 ~]# ansible all -m command -a "hostname"
MySQL 数据库环境搭建
# 1.下载MySQL官方扩展源     (yum仓库已经准备好)
[root@nginx ~]# rpm -ivh http://repo.mysql.com/yum/mysql-5.7-community/el/7/x86_64/mysql57-community-release-el7-10.noarch.rpm

#2.安装mysql5.7, 文件过大可能会导致下载缓慢
[root@nginx ~]# yum install mysql-community-server -y

#3.启动数据库, 并加入开机自启动
[root@nginx ~]# systemctl start mysqld
[root@nginx ~]# systemctl enable mysqld

#4.由于mysql5.7默认配置了默认密码, 需要过滤temporary password关键字查看对应登陆数据库密码
[root@nginx ~]# grep 'temporary password' /var/log/mysqld.log

#5.登陆mysql数据库[password中填写上一步过滤的密码]
[root@web02 ~]# mysql -uroot -p$(awk '/temporary password/{print $NF}' /var/log/mysqld.log)

#6.重新修改数据库密码
mysql> ALTER USER 'root'@'localhost' IDENTIFIED BY 'Ckh123.com';

# 服务器mysql允许远程用户连接 (授权法)
grant all privileges on *.* to 'all'@'%' identified by 'Ckh123.com';
flush privileges;
#7. web客户端安装 mysql (命令 测试用 可以不用装)
[root@web02 ~]# yum provides mysql
[root@web02 ~]# yum install mariadb -y
[root@web02 ~]# mysql -h172.16.1.51 -uall -pCkh123.com
Nginx+PHP 流行动态 Web 环境搭建
#1.使用Nginx官方提供的rpm包  (yum仓库已经准备好)
[root@nginx ~]# cat /etc/yum.repos.d/nginx.repo
[nginx]
name=nginx repo
baseurl=http://nginx.org/packages/centos/7/$basearch/
gpgcheck=0
enabled=1

#2.执行yum安装
[root@nginx ~]# yum install nginx -y
# 修改nginx 运行身份
sed -i '/^user/c user www;' /etc/nginx/nginx.conf
[root@web01 ~]# id www
uid=666(www) gid=666(www) 组=666(www)
[root@web01 ~]# # groupadd -g 666 www
[root@web01 ~]# # useradd -u666 -g666 www
#3.启动并加入开机自启动
[root@web01 ~]# systemctl start nginx
[root@nginx ~]# systemctl enable nginx

#检查 运行进程中式否www 用户运行
[root@web01 ~]# ps aux |grep nginx
www        2396  0.0  0.3  46996  1784 ?        S    08:44   0:00 nginx: worker process
root       2398  0.0  0.2 112720   984 pts/0    R+   08:44   0:00 grep --color=auto nginx


使用第三方扩展epel源安装php7.1

#1.移除旧版php   (没有旧版 )
[root@nginx ~]# yum remove php-mysql-5.4 php php-fpm php-common

#2.安装扩展源 (yum仓库已经准备了)
# 依赖包
[root@nginx ~]# rpm -Uvh https://dl.fedoraproject.org/pub/epel/epel-release-latest-7.noarch.rpm
[root@nginx ~]# rpm -Uvh https://mirror.webtatic.com/yum/el7/webtatic-release.rpm
# 或者用yum自行解决依赖包安装

#3.安装php7.1版本
[root@nginx ~]# yum -y install php71w php71w-cli php71w-common php71w-devel php71w-embedded php71w-gd php71w-mcrypt php71w-mbstring php71w-pdo php71w-xml php71w-fpm php71w-mysqlnd php71w-opcache php71w-pecl-memcached php71w-pecl-redis php71w-pecl-mongodb

#4.替换php-fpm运行的用户和组身份
[root@web02 ~]# sed -i '/^user/c user = www' /etc/php-fpm.d/www.conf
[root@web02 ~]# sed -i '/^group/c group = www' /etc/php-fpm.d/www.conf

#5.启动php-fpm管理进程, 并加入开机自启
[root@nginx ~]# systemctl start php-fpm
[root@nginx ~]# systemctl enable php-fpm


ansible 批量管理
[root@m01 7]# ansible web -m yum -a "name=nginx state=installed"
[root@m01 7]# ansible web -m shell -a "sed -i '/^user/c user www;' /etc/nginx/nginx.conf "
[root@m01 7]# ansible web -m group -a "name=www gid=666"
[root@m01 7]# ansible web -m user -a "name=www uid=666 group=666 "
[root@m01 7]# ansible web -m service -a "name=nginx state=started enabled=yes"
[root@m01 7]# ansible web -m yum -a "name=php71w,php71w-cli,php71w-common,php71w-devel,php71w-embedded,php71w-gd,php71w-mcrypt,php71w-mbstring,php71w-pdo,php71w-xml,php71w-fpm,php71w-mysqlnd,php71w-opcache,php71w-pecl-memcached,php71w-pecl-redis,php71w-pecl-mongodb  state=installed"
[root@m01 7]# ansible web -m shell -a "sed -i '/^user/c user = www' /etc/php-fpm.d/www.conf;sed -i '/^group/c group = www' /etc/php-fpm.d/www.conf"
[root@m01 7]# ansible web -m service -a "name=php-fpm state=started enabled=yes"

调整网站上传文件大小
vim /etc/php.ini
memory_limit=1024M
post_max_size=1024M
upload_max_filesize=1024M
max_execution_time=60
max_input_time=60

vim nginx配置文件 nginx.conf, 找到http{} 段 添加
client_max_body_size 1024M;
# 重启服务生效配置
[root@web01 code]# systemctl restart nginx php-fpm

wordpress 安装 *
[root@web01 conf.d]# cat wordpress.conf
server {
	server_name wordpress.etiantian.org;
	listen 80;
	root /code/wordpress;
	index index.php index.html;

	location ~ .php$ {
	    root /code/wordpress;
            fastcgi_pass   127.0.0.1:9000;
            fastcgi_index  index.php;
            fastcgi_param  SCRIPT_FILENAME  $document_root$fastcgi_script_name;
            include        fastcgi_params;
	}
}

[root@web01 conf.d]# nginx -t
[root@web01 conf.d]# systemctl restart nginx
#1.获取wordpress代码
[root@web01 ~]# wget https://cn.wordpress.org/wordpress-4.9.4-zh_CN.tar.gz

#2.解压网站源码文件,拷贝至对应站点目录,并授权站点目录
[root@web01 ~]# tar xf wordpress-4.9.4-zh_CN.tar.gz -C /code/wordpress/
[root@web01 ~]# chown -R www.www /code/wordpress/

# wordpress 产品需要手动创建数据库
#1.登陆数据库
[root@http-server ~]# mysql -uroot -pCkh123.com
#2.创建wordpress数据库
MariaDB [(none)]> create database wordpress;
MariaDB [(none)]> exit

# windows hosts解析 登录浏览器访问wordpress.etiantian.org 并安装


wecenter 安装 *
[root@web01 conf.d]# cat wecenter.conf
server {
	server_name wecenter.etiantian.org;
	listen 80;
	root /code/wecenter;
	index index.php index.html;

	location ~ .php$ {
	    root /code/wecenter;
            fastcgi_pass   127.0.0.1:9000;
            fastcgi_index  index.php;
            fastcgi_param  SCRIPT_FILENAME  $document_root$fastcgi_script_name;
            include        fastcgi_params;
	}
}
[root@web01 code]# nginx -t
[root@web01 code]# systemctl restart nginx

# 下载wecenter 产品
[root@web01 ~]# wget http://ahdx.down.chinaz.com/201605/WeCenter_v3.2.1.zip
[root@web01 ~]# unzip WeCenter_v3.1.9.zip
[root@web01 code]# mv WeCenter_3-2-1 wecenter
[root@web01 ~]# chown -R www.www /code/wecenter/

#1.登陆数据库
[root@http-server ~]# mysql -uroot -pCkh123.com

#2.创建wecenter数据库
MariaDB [(none)]> create database wecenter;
MariaDB [(none)]> exit

# window hosts解析 通过浏览器访问 wecenter.etiantian.org 并安装
Nginx+Tomcat 流行动态 Web 环境搭建
1.准备Java基础环境
[root@web02 ~]# yum install java jarjar-maven-plugin -y
[root@web03 ~]# mkdir /server && cd /server

2.下载并安装Tomcat服务
wget http://mirrors.shu.edu.cn/apache/tomcat/tomcat-8/v8.5.34/bin/apache-tomcat-8.5.34.tar.gz
[root@web03 server]# tar xf apache-tomcat-8.5.34.tar.gz
[root@web03 server]# ln -s /server/apache-tomcat-8.5.34 /server/tomcat8_1
# 启动 tomcat 服务
[root@lb01 ~]# /server/tomcat8_1/bin/startup.sh
[root@lb01 ~]# netstat -lntp

# 浏览器访问  http://10.0.0.9:8080/

[root@web03 WEB-INF]# pwd
/server/tomcat-8080/webapps/ROOT/WEB-INF

[root@web03 webapps]# jar xf jpress-web-newest.war
# 浏览器访问 http://10.0.0.9:8081/jpress
0.准备数据库[db01]
mysql> create database jpress;

4.启动tomcat
[root@web03 tomcat]# /root/tomcat/bin/startup.sh
	关闭tomcat方式
[root@web03 tomcat]# /root/tomcat/bin/shutdown.sh


5.在proxy上新增java节点
upstream php {
	server 172.16.1.7:80;
	server 172.16.1.8:80;
}

upstream java {
	server 172.16.1.9:8081;
}

server {
	server_name wordpress.etiantian.org;
	listen 80;
	location / {
		proxy_pass http://php;
		include proxy_params;
	}
}
server {
	server_name jpress.etiantian.org;
	listen 80;
	location / {
		proxy_pass http://java;
		include proxy_params;
	}
}

[root@lb01 conf.d]# nginx -t
[root@lb01 conf.d]# systemctl restart nginx


6.给tomcat提供静态存储[nfs操作]
[root@nfs ~]# cat /etc/exports
/data/blog 172.16.1.0/24(rw,sync,all_squash,anonuid=666,anongid=666)
/data/java 172.16.1.0/24(rw,sync,all_squash,anonuid=666,anongid=666)   #新增

[root@nfs ~]# mkdir /data/java
[root@nfs ~]# chown -R www.www /data/java/

[root@nfs ~]# systemctl restart nfs-server

7.在web03上操作
[root@web03 ROOT]# yum install nfs-utils -y
[root@web03 ROOT]# showmount -e 172.16.1.31
Export list for 172.16.1.31:
/data/java 172.16.1.0/24
/data/blog 172.16.1.0/24

8.准备挂载环境
[root@web03 ROOT]# groupadd -g 666 www
[root@web03 ROOT]# useradd -g www -u 666 www

挂载
[root@web03 ROOT]# cp -rp attachment/ attachment_bak
[root@web03 ROOT]# rm -rf attachment/*
[root@web03 ROOT]# mount -t nfs 172.16.1.31:/data/java /root/apache-tomcat-8.5.33/webapps/ROOT/attachment
[root@web03 ROOT]# cp -rp attachment_bak/* attachment/

永久挂载
[root@web03 ROOT]# cat /etc/fstab
172.16.1.31:/data/java /root/apache-tomcat-8.5.33/webapps/ROOT/attachment nfs defaults,_rnetdev 0 0
[root@web03 ROOT]# mount -a
将 PHP 产品和 Tomcat 产品上传目录挂载到 NFS
#1.web先找出图片存储的路径,然后进行挂载

wordpress   wp-content/uploads/
wecenter    uploads
jpress			attachment/


# nfs01 服务器提供静态存储
[root@nfs01 data]# cat /etc/exports
/data/wordpress 172.16.1.0/24(rw,sync,all_squash,anonuid=666,anongid=666)
/data/wecenter 172.16.1.0/24(rw,sync,all_squash,anonuid=666,anongid=666)
/data/jpress 172.16.1.0/24(rw,sync,all_squash,anonuid=666,anongid=666)

[root@nfs01 data]# mkdir /data/{wecenter,jpress,wordpress}
[root@nfs01 data]# chown -R www.www /data
[root@nfs01 data]# systemctl restart nfs-server


 # web01 安装 nfs工具  (已经安装)
[root@web01 code]# yum install nfs-utils
[root@web01 code]# showmount -e 172.16.1.31
Export list for 172.16.1.31:
/data/jpress    172.16.1.0/24
/data/wecenter  172.16.1.0/24
/data/wordpress 172.16.1.0/24

[root@web01 ~]# groupadd -g 666 www   (已经创建了)
[root@web01 ~]# useradd -g www -u 666 www

# 挂载
[root@web01 wecenter]# pwd
/code/wecenter
[root@web01 wecenter]# cp -rp uploads/ uploads_bak
[root@web01 code]# mount -t nfs 172.16.1.31:/data/wecenter /code/wecenter/uploads
[root@web01 code]# cp -rp /code/wecenter/uploads_bak/* /code/wecenter/uploads/
[root@web01 code]# cat /etc/fstab
172.16.1.31:/data/wecenter  /code/wecenter/uploads nfs defaults 0 0

[root@web01 wp-content]# pwd
/code/wordpress/wp-content
[root@web01 wp-content]# cp -rp uploads/ uploads_bak
[root@web01 code]# mount -t nfs 172.16.1.31:/data/wordpress /code/wordpress/wp-content/uploads
[root@web01 code]# cp -rp /code/wordpress/wp-content/uploads_bak/* /code/wordpress/wp-content/uploads/
[root@web01 code]# cat /etc/fstab
172.16.1.31:/data/wordpress /code/wordpress/wp-content/uploads nfs defaults 0 0

#web03 的jpress
[root@web03 jpress]# pwd
/server/tomcat-8080/webapps/jpress
[root@web03 jpress]# cp -rp attachment/ attachment_bak
[root@web03 jpress]# mount -t nfs 172.16.1.31:/data/jpress /server/tomcat-8080/webapps/ROOT/attachment

[root@web03 jpress]# groupadd -g 666 www
[root@web03 jpress]# useradd -g www -u 666 www
[root@web03 jpress]# chown -R www.www /server/tomcat-8080/webapps

[root@web03 jpress]# cp -rp attachment_bak/* attachment/

[root@web03 jpress]# cat /etc/fstab
172.16.1.31:/data/jpress /server/tomcat8_1/webapps/jpress/attachment nfs defaults 0 0
搭建 Nginx+keepalived 七层负载,172.16.1.5/6/lb01/lb02
# web01  和web02 环境保持一模一样
[root@web01 code]# rsync -avz /code root@172.16.1.8:/
[root@web01 code]# rsync -avz /etc/nginx root@172.16.1.8:/etc/ --delete
[root@web01 code]# scp -rp /etc/php.ini root@172.16.1.8:/etc/
[root@web02 ~]# vim /etc/fstab
172.16.1.31:/data/wecenter  /code/wecenter/uploads nfs defaults 0 0
172.16.1.31:/data/wordpress /code/wordpress/wp-content/uploads nfs defaults 0 0
[root@web02 ~]# mount -a
[root@web02 ~]# df -h
[root@web02 code]# systemctl restart nginx php-fpm

# 安装nginx
[root@db01 ~]# yum install nginx
[root@db01 conf.d]# mv default.conf default.conf.off
[root@db01 conf.d]# cat proxy.conf
upstream php {
	server 172.16.1.7:80;
	server 172.16.1.8:80;
}
upstream java {
	server 172.16.1.9:8080;
}
server {
	listen 80;
	server_name wordpress.etiantian.org;
	location / {
		proxy_pass http://php;
		include proxy_params;
	}
}
server {
	listen 80;
	server_name wecenter.etiantian.org;
	location / {
		proxy_pass http://php;
		include proxy_params;
	}
}
server {
    listen 80;
	server_name jpress.etiantian.org;
    location / {
           proxy_pass http://java;
           include proxy_params;
         }
}

[root@db01 conf.d]# cat /etc/nginx/proxy_params
proxy_set_header Host $http_host;
proxy_set_header X-Real-IP $remote_addr;
proxy_set_header X-Forwarded-For $proxy_add_x_forwarded_for;

proxy_connect_timeout 30;
proxy_send_timeout  60;
proxy_read_timeout  60;

proxy_buffering on;
proxy_buffer_size 32k;
proxy_buffers 4 128k;

[root@db01 conf.d]# nginx -t
[root@db01 conf.d]# systemctl restart nginx

##windows hosts 解析  浏览器访问

# +keepalived

#两台lb 一模一样配置 , 快速配置一台lb02-6
[root@lb02 ~]# yum install nginx
[root@lb02 ~]# scp -rp root@172.16.1.5:/etc/yum.repos.d /etc/  (基础环境已经配置好yum仓库)
[root@lb02 conf.d]# rsync -avz root@172.16.1.5:/etc/nginx /etc/ --delete
[root@lb02 ~]# systemctl start nginx
[root@lb02 ~]# systemctl enable nginx

# 安装 keepalived
[root@lb01 ~]# yum install keepalived -y
[root@lb02 ~]# yum install keepalived -y

#配置 keepalived
[root@lb01 conf.d]# cat /etc/keepalived/keepalived.conf
global_defs {
    router_id lb01
}
vrrp_instance VI_1 {
    state BACKUP
    interface eth0
    virtual_router_id 50
    priority 150
    advert_int 1
    authentication {
        auth_type PASS
        auth_pass 1111
    }
    virtual_ipaddress {
        10.0.0.3
    }
}
[root@lb01 conf.d]# systemctl restart keepalived
[root@lb01 conf.d]# systemctl enable keepalived

[root@lb02 conf.d]# cat /etc/keepalived/keepalived.conf
global_defs {
    router_id lb02
}
vrrp_instance VI_1 {
    state MASTER
    interface eth0
    virtual_router_id 50
    priority 100
    advert_int 1
    authentication {
        auth_type PASS
        auth_pass 1111
}
    virtual_ipaddress {
        10.0.0.3
    }
}
[root@lb02 conf.d]# systemctl restart keepalived
[root@lb01 conf.d]# systemctl enable keepalived
配置 Nginx- tomcat- HTTPS 加密访问项目
[root@web01 code]# mkdir /etc/nginx/ssl_key
[root@web01 code]# cd /etc/nginx/ssl_key/
[root@web01 ~]# openssl genrsa -idea -out server.key 2048
这里密码设置1234
[root@web01 ~]# openssl req -days 36500 -x509 -sha256 -nodes -newkey rsa:2048 -keyout server.key -out server.crt
Country Name (2 letter code) [XX]:CN
State or Province Name (full name) []:WH
Locality Name (eg, city) [Default City]:WH
Organization Name (eg, company) [Default Company Ltd]:edu
Organizational Unit Name (eg, section) []:SA
Common Name (eg, your name or your server's hostname) []:bgx
Email Address []:bgx@foxmail.com
[root@web01 ssl_key]# cat /etc/nginx/conf.d/wecenter-https.conf
server {
listen 443;
server_name wecenter.etiantian.org;
ssl on;
ssl_certificate ssl_key/server.crt;
ssl_certificate_key ssl_key/server.key;
location / {
root /code/wecenter;
index index.php index.html;
}
location ~ .php$ {
root /code/wecenter;
fastcgi_pass 127.0.0.1:9000;
fastcgi_index index.php;
fastcgi_param SCRIPT_FILENAME $document_root$fastcgi_script_name;
include fastcgi_params;
}
}
[root@web01 ~]# cat /etc/nginx/conf.d/wordpress-https.conf
server {
server_name wordpress.etiantian.org;
listen 443;
root /code/wordpress;
index index.php index.html;
ssl on;
ssl_certificate ssl_key/server.crt;
ssl_certificate_key ssl_key/server.key;
location ~ .php$ {
root /code/wordpress;
fastcgi_pass 127.0.0.1:9000;
fastcgi_index index.php;
fastcgi_param SCRIPT_FILENAME $document_root$fastcgi_script_name;
include fastcgi_params;
}
}
[root@web01 conf.d]# rsync -avz /etc/nginx root@172.16.1.8:/etc/ --delete
[root@web01 ssl_key]# nginx -t
nginx: the configuration file /etc/nginx/nginx.conf syntax is ok
nginx: configuration file /etc/nginx/nginx.conf test is successful
[root@web01 ssl_key]# systemctl restart nginx
# 负载均衡配置
[root@lb01 code]# mkdir /etc/nginx/ssl_key
[root@lb01 code]# cd /etc/nginx/ssl_key/
[root@lb01 ssl_key]# scp -rp root@172.16.1.7:/etc/nginx/ssl_key/* ./
[root@lb01 nginx]# cat /etc/nginx/conf.d/proxy-https.conf
upstream php {
server 172.16.1.7:443;
server 172.16.1.8:443;
}
upstream java {
server 172.16.1.9:8080;
}
server {
listen 80;
server_name wordpress.etiantian.org;
return 302 https://$server_name$request_uri;
}
server {
listen 80;
server_name wecenter.etiantian.org;
return 302 https://$server_name$request_uri;
}
server {
listen 80;
server_name jpress.etiantian.org;
return 302 https://$server_name$request_uri;
}
server {
listen 443 ssl;
server_name jpress.etiantian.org;
ssl on;
ssl_certificate ssl_key/server.crt;
ssl_certificate_key ssl_key/server.key;
ssl_session_cache shared:SSL:1m;
ssl_session_timeout 5m;
ssl_ciphers HIGH:!aNULL:!MD5;
ssl_prefer_server_ciphers on;
location / {
proxy_set_header X-Forwarded-For $proxy_add_x_forwarded_for;
proxy_set_header Host $http_host;
proxy_set_header X-Forwarded-Proto https;
proxy_redirect off;
proxy_connect_timeout 240;
proxy_send_timeout 240;
proxy_read_timeout 240;
# note, there is not SSL here! plain HTTP is used
proxy_pass http://java;
}
}
server {
listen 443;
server_name wordpress.etiantian.org;
ssl on;
ssl_certificate ssl_key/server.crt;
ssl_certificate_key ssl_key/server.key;
location / {
proxy_pass https://php;
include proxy_params;
}
}
server {
listen 443;
server_name wecenter.etiantian.org;
ssl on;
ssl_certificate ssl_key/server.crt;
ssl_certificate_key ssl_key/server.key;
location / {
proxy_pass https://php;
include proxy_params;
}
}
# lb02 一样的配置
[root@lb01 ssl_key]# rsync -avz /etc/nginx root@172.16.1.6:/etc/ --delete
#其中最为关键的就是 ssl_certificate 和 ssl_certificate_key 这两项配置,其他的按正常配置。不过多了一个 proxy_set_header X-Forwarded-Proto https; 配置。
Tomcat server.xml 完整配置
[root@web03 server]# cat tomcat8_1/conf/server.xml
<?xml version="1.0" encoding="UTF-8"?>
<Server port="8011" shutdown="SHUTDOWN">
<Listener className="org.apache.catalina.startup.VersionLoggerListener" />
<Listener className="org.apache.catalina.security.SecurityListener" />
-->
<!--APR library loader. Documentation at /docs/apr.html -->
<Listener className="org.apache.catalina.core.AprLifecycleListener" SSLEngine="on" />
<!-- Prevent memory leaks due to use of particular java/javax APIs-->
<Listener className="org.apache.catalina.core.JreMemoryLeakPreventionListener" />
<Listener className="org.apache.catalina.mbeans.GlobalResourcesLifecycleListener" />
<Listener className="org.apache.catalina.core.ThreadLocalLeakPreventionListener" />
<Resource name="UserDatabase" auth="Container"
type="org.apache.catalina.UserDatabase"
description="User database that can be updated and saved"
factory="org.apache.catalina.users.MemoryUserDatabaseFactory"
pathname="conf/tomcat-users.xml" />
</GlobalNamingResources>
<Service name="Catalina">
<Connector port="8081" protocol="HTTP/1.1"
connectionTimeout="20000"
redirectPort="443"
proxyPort="443" />
<Connector port="8009" protocol="AJP/1.3" redirectPort="8443" />
<Engine name="Catalina" defaultHost="localhost">
<Realm className="org.apache.catalina.realm.LockOutRealm">
<Realm className="org.apache.catalina.realm.UserDatabaseRealm"
resourceName="UserDatabase"/>
</Realm>
<Host name="localhost" appBase="webapps"
unpackWARs="true" autoDeploy="true">
<Valve className="org.apache.catalina.valves.AccessLogValve" directory="logs"
remoteIpHeader="x-forwarded-for"
remoteIpProxiesHeader="x-forwarded-by"
protocolHeader="x-forwarded-proto"
prefix="localhost_access_log" suffix=".txt"
pattern="%h %l %u %t "%r" %s %b" />
</Host>
</Engine>
</Service>
</Server>
#上述的配置中没有什么特别的,但是特别特别注意的是必须有 proxyPort="443",这是整篇文章的关键,当然 redirectPort 也必须是 443。同时 <Value> 节点的配置也非常重要,否则你在 Tomcat 中的应用在读取 getScheme() 方法以及在 web.xml 中配置的一些安全策略会不起作用。
将 NFS 存储数据实时复制到静态 Web 本地 172.16.1.9/10/web01/02
# web01准备环境

[root@web01 ~]# yum install rsync -y   //基础环境已经安装
[root@web01 ~]# cat /etc/rsyncd.conf
uid = www
gid = www
port = 873
fake super = yes
use chroot = no
max connections = 200
timeout = 600
ignore errors
read only = false
list = false
auth users = rsync_backup
secrets file = /etc/rsync.password
log file = /var/log/rsyncd.log
#####################################

[data]
path = /data


[root@web01 ~]# mkdir /data/
[root@web01 ~]# groupadd -g666 www     (用户已经存在)
[root@web01 ~]# useradd -u666 -g666 www

[root@web01 ~]# chown -R www.www /data/
[root@web01 ~]# chmod 755 /data   (默认755)

# 创建rsync使用的虚拟连接用户
[root@web01 ~]# echo "rsync_backup:1" > /etc/rsync.password
[root@web01 ~]# chmod 600 /etc/rsync.password

[root@web01 ~]# systemctl enable rsyncd
[root@web01 ~]# systemctl restart rsyncd


# 复制之前的sersync 配置文件修改

[root@nfs01 data]# cd /usr/local/sersync/
[root@nfs01 sersync]# cp confxml.xml web01-confxml.xml
[root@nfs01 sersync]# vim web01-confxml.xml  # 修改的地方
    <host hostip="localhost" port="8009"></host>
            <remote ip="172.16.1.7" name="data"/>
#启动服务
[root@nfs01 sersync]# /usr/local/sersync/sersync2 -dro /usr/local/sersync/web01-confxml.xml

web02 操作类似
Nginx 静态 Web 服务环境搭建 172.16.1.9/10/sweb01/02 +实现动静分离
flag-------------------------------
系统	    服务	    地址
CentOS7.5	proxy	    10.0.0.5  lb01
CentOS7.5	Nginx	    10.0.0.7  web01
CentOS7.5	TOmcat	    10.0.0.9  web03

# web01静态资源
[root@web01 data]# wget http://nginx.org/nginx.png
[root@web01 data]# cat /etc/nginx/conf.d/ds.conf
server {
	listen 80;
	server_name ds.etiantian.org;
	root /data;
	index index.php index.html;

	location ~* .*.(png|jpg|gif)$ {
		root /data;
	}
}

# web03 动态资源
[root@web03 webapps]# cat /server/tomcat8_1/webapps/ROOT/java-test.jsp
<%@ page language="java" import="java.util.*" pageEncoding="utf-8"%>
<HTML>
    <HEAD>
        <TITLE>JSP Test Page</TITLE>
    </HEAD>
    <BODY>
      <%
        Random rand = new Random();
        out.println("<h1>Random number:</h1>");
        out.println(rand.nextInt(99)+100);
      %>
          </BODY>
          </HTML>

#lb01 整合静态和动态资源在一个页面
# nginx 配置
[root@lb01 conf.d]# cat /etc/nginx/conf.d/ds.conf
upstream static {
        server 10.0.0.7:80;
}
upstream javaround {
        server 10.0.0.9:8080;
}
server {
        listen 80;
        server_name ds.etiantian.org;
        location / {
                root /soft/code;
                index index.html;
        }
        location ~ .*.(png|jpg|gif)$ {
                proxy_pass http://static;
                include proxy_params;
        }
        location  ~ .*.jsp$ {
                proxy_pass http://javaround;
                include proxy_params;
        }
}

# 代码
[root@lb01 conf.d]# cat /soft/code/index.html
<html lang="en">
<head>
        <meta charset="UTF-8" />
        <title>测试ajax和跨域访问</title>
        <script src="http://libs.baidu.com/jquery/2.1.4/jquery.min.js"></script>
</head>
<script type="text/javascript">
$(document).ready(function(){
        $.ajax({
        type: "GET",
        url: "http://ds.etiantian.org/java-test.jsp",
        success: function(data) {
                $("#get_data").html(data)
        },
        error: function() {
                alert("fail!!,请刷新再试!");
        }
        });
});
</script>
        <body>
                <h1>测试动静分离</h1>
               <img src="http://ds.etiantian.org/nginx.png">
                <div id="get_data"></div>
        </body>
</html>


# windows hosts 解析 10.0.0.5   ds.etiantian.org
# 浏览器访问  http://ds.etiantian.org/  图片和动态随机数同时显示在一个页面上,
# 停掉web01 的nginx  页面的图片不显示,动态资源正常显示 反之一样