配置方案
master:192.168.99.61    service-id:61
slave:192.168.99.62     service-id:62
同步账号:sync         同步密码:sync
主:192.168.99.61步骤
1.配置同步账号
mysql>CREATE USER 'sync'@'%' IDENTIFIED BY 'sync';(但是我是使用navicat建的)
授权
mysql>grant replication slave on *.* to 'sync'@'192.168.99.62' identified by 'sync';
mysql>flush privileges;
mysql>exit
2.修改/etc/my.cnf添加
server-id=61
log-bin=mysql-bin
lower_case_table_names=1(数据表不区分大小写)
3.重启master端
service mysqld restart

mysql>show master status G

备:192.168.99.62步骤
1.修改/etc/my.cnf
server-id=62
lower_case_table_names=1(数据表不区分大小写)
2.重启slave端
service mysqld restart

mysql>CHANGE MASTER TO MASTER_HOST='192.168.99.61',MASTER_USER='sync',MASTER_PASSWORD='sync',MASTER_LOG_FILE='mysql-bin.000019',MASTER_LOG_POS=2020109;

启动slave
mysql>start slave;
检查状态
mysql>show slave status G
提示:Slave_IO_Running和Slave_SQL_Running两个值为YES基本上成功了
检查状态
1.检查master
mysql>show processlistG
*************************** 24. row ***************************
     Id: 157
   User: sync
   Host: 192.168.99.62:44517
     db: NULL
Command: Binlog Dump
   Time: 87
  State: Master has sent all binlog to slave; waiting for binlog to be updated
   Info: NULL
看到上面的Command: Binlog Dump说明配置成功!
2.检查slave
mysql>show slave status G
mysql> show slave status G
*************************** 1. row ***************************
               Slave_IO_State: Waiting for master to send event
                  Master_Host: 192.168.99.61
                  Master_User: sync
                  Master_Port: 3306
                Connect_Retry: 60
              Master_Log_File: mysql-bin.000019
          Read_Master_Log_Pos: 2144195
               Relay_Log_File: mysql3306-relay-bin.000002
                Relay_Log_Pos: 118676
        Relay_Master_Log_File: mysql-bin.000019
             Slave_IO_Running: Yes
            Slave_SQL_Running: Yes
              Replicate_Do_DB:
          Replicate_Ignore_DB:
           Replicate_Do_Table:
       Replicate_Ignore_Table:
      Replicate_Wild_Do_Table:
  Replicate_Wild_Ignore_Table:
                   Last_Errno: 0
                   Last_Error:
                 Skip_Counter: 0
          Exec_Master_Log_Pos: 2144195
              Relay_Log_Space: 118853
              Until_Condition: None
               Until_Log_File:
                Until_Log_Pos: 0
           Master_SSL_Allowed: No
           Master_SSL_CA_File:
           Master_SSL_CA_Path:
              Master_SSL_Cert:
            Master_SSL_Cipher:
               Master_SSL_Key:
        Seconds_Behind_Master: 0
Master_SSL_Verify_Server_Cert: No
                Last_IO_Errno: 0
                Last_IO_Error:
               Last_SQL_Errno: 0
               Last_SQL_Error:
  Replicate_Ignore_Server_Ids:
             Master_Server_Id: 61
                  Master_UUID: 63a4da2b-2938-11e5-89c1-00505689cba6
             Master_Info_File: /usr/local/mysql/data/master.info
                    SQL_Delay: 0
          SQL_Remaining_Delay: NULL
      Slave_SQL_Running_State: Slave has read all relay log; waiting for the slave I/O thread to update it
           Master_Retry_Count: 86400
                  Master_Bind:
      Last_IO_Error_Timestamp:
     Last_SQL_Error_Timestamp:
               Master_SSL_Crl:
           Master_SSL_Crlpath:
           Retrieved_Gtid_Set:
            Executed_Gtid_Set:
                Auto_Position: 0
1 row in set (0.00 sec)
看到上面的Slave_IO_Running: Yes Slave_SQL_Running: Yes说明配置成功!
排错艰难过程
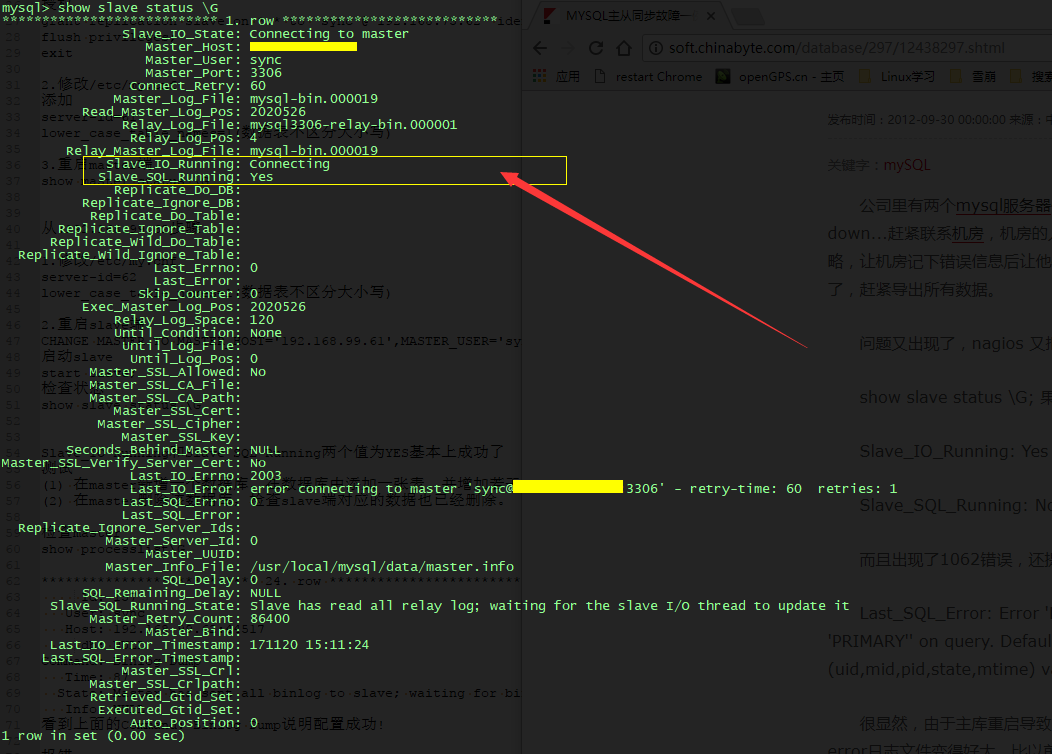
1.Slave_IO_Running: connecting Slave_SQL_Running: Yes

问题排查:pos不对,密码不对,网络问题(我重点放在pos, 我就是出错在pos)
重新手动同步
1.进入主库锁表
mysql> FLUSH TABLES WITH READ LOCK;
mysql> show master status;
2.进入从库
mysql>stop slave;
mysql>CHANGE MASTER TO MASTER_HOST='192.168.99.61',MASTER_USER='sync',MASTER_PASSWORD='sync',MASTER_LOG_FILE='xxx',MASTER_LOG_POS=xxx;
mysql>start slave;
3.回到主库解锁
mysql>unlock tables;
4.回到从库查看
mysql>show slave status G
原图:

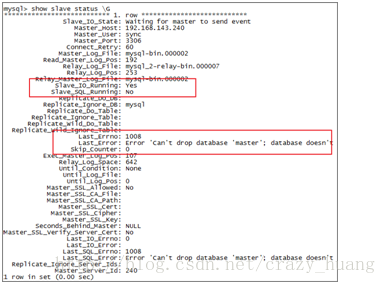
2.事件回滚不一致导致,错误形态

解决方法,手动跳过这个错误
mysql>stop slave;
mysql>set global sql_slave_skip_counter =1; (这个是偏移量,可以是1,也可以是n,原理参考主从同步原理)
mysql>start slave;