微信测试平台:
https://open.weixin.qq.com/connect/qrconnect?appid=wx39c379788eb1286a&scope=snsapi_login&redirect_uri=http%3A%2F%2Fmp.weixin.qq.com%2Fdebug%2Fcgi-bin%2Fsandbox%3Ft%3Dsandbox%2Flogin
开发前的准备:
1、需要有一个公众号(我这里用的测试号),拿到AppID和AppSecret;
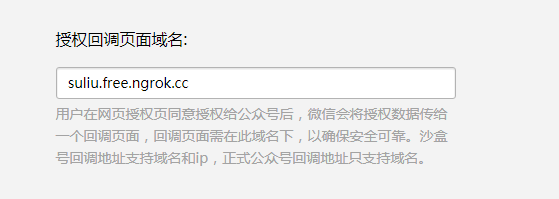
2、进入公众号开发者中心页配置授权回调域名。具体位置:接口权限-网页服务-网页账号-网页授权获取用户基本信息-修改
注意,这里仅需填写全域名(如www.qq.com、www.baidu.com),勿加 http:// 等协议头及具体的地址字段;
我们可以通过使用Ngrok来虚拟一个域名映射到本地开发环境,网址https://www.ngrok.cc/,大家自己去下载学习怎么使用
同时还需要扫一下这个二维码

授权步骤:
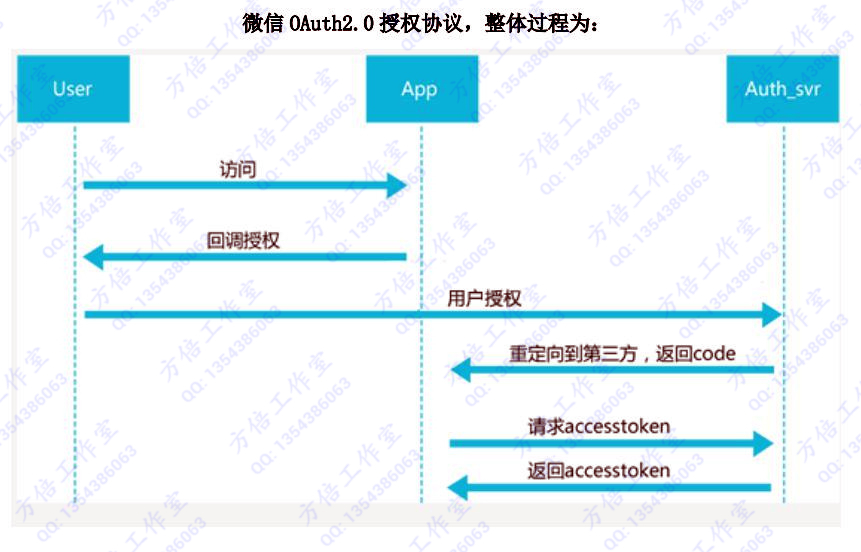
1、引导用户进入授权页面同意授权,获取code
2、通过code换取网页授权access_token(与基础支持中的access_token不同)
3、通过网页授权access_token和openid获取用户基本信息
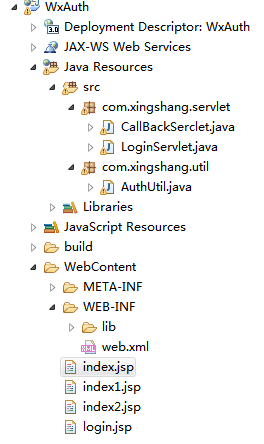
先看一下我的项目结构:
web.xml相关代码:

<?xml version="1.0" encoding="UTF-8"?>
<web-app xmlns:xsi="http://www.w3.org/2001/XMLSchema-instance" xmlns="http://java.sun.com/xml/ns/javaee" xsi:schemaLocation="http://java.sun.com/xml/ns/javaee http://java.sun.com/xml/ns/javaee/web-app_3_0.xsd" id="WebApp_ID" version="3.0">
  <display-name>WxAuth</display-name>
  <welcome-file-list>
    <welcome-file>index.html</welcome-file>
    <welcome-file>index.htm</welcome-file>
    <welcome-file>index.jsp</welcome-file>
    <welcome-file>default.html</welcome-file>
    <welcome-file>default.htm</welcome-file>
    <welcome-file>default.jsp</welcome-file>
  </welcome-file-list>


  <servlet>
      <servlet-name>wxCallBack</servlet-name>
      <servlet-class>com.xingshang.servlet.CallBackSerclet</servlet-class>
      <init-param>
          <param-name>dbUrl</param-name>
          <param-value>jdbc:mysql://127.0.0.1:3306/wxauth</param-value>
      </init-param>
      <init-param>
          <param-name>driverClassName</param-name>
          <param-value>com.mysql.jdbc.Driver</param-value>
      </init-param>
      <init-param>
          <param-name>userName</param-name>
          <param-value>root</param-value>
      </init-param>
      <init-param>
          <param-name>passWord</param-name>
          <param-value>123456</param-value>
      </init-param>
      <load-on-startup>1</load-on-startup>
  </servlet>

  <servlet-mapping>
      <servlet-name>wxCallBack</servlet-name>
      <url-pattern>/wxCallBack</url-pattern>
  </servlet-mapping>


</web-app>
AuthUtil工具类:
package com.xingshang.util;

import java.io.IOException;

import org.apache.http.HttpEntity;
import org.apache.http.HttpResponse;
import org.apache.http.client.ClientProtocolException;
import org.apache.http.client.methods.HttpGet;
import org.apache.http.impl.client.DefaultHttpClient;
import org.apache.http.util.EntityUtils;

import net.sf.json.JSONObject;

public class AuthUtil {

    public static final String APPID = "wx45c1428e5584fcdb";
    public static final String APPSECRET = "98174450eb706ada330f37e646be85d5";

    public static JSONObject doGetJson(String url) throws ClientProtocolException, IOException{
        JSONObject jsonObject = null;
        //首先初始化HttpClient对象
        DefaultHttpClient client = new DefaultHttpClient();
        //通过get方式进行提交
        HttpGet httpGet = new HttpGet(url);
        //通过HTTPclient的execute方法进行发送请求
        HttpResponse response = client.execute(httpGet);
        //从response里面拿自己想要的结果
        HttpEntity entity = response.getEntity();
        if(entity != null){
            String result = EntityUtils.toString(entity,"UTF-8");
            jsonObject = jsonObject.fromObject(result);
        }
        //把链接释放掉
        httpGet.releaseConnection();
        return jsonObject;
    }
}
Java实现:
1、引导用户进入授权页面同意授权,获取code
这一步其实就是将需要授权的页面url拼接到微信的认证请求接口里面,比如需要用户在访问页面 时进行授权认证
其中的scope参数有两个值:
snsapi_base:只能获取到用户openid。好处是静默认证,无需用户手动点击认证按钮,感觉上像是直接进入网站一样。
snsapi_userinfo:可以获取到openid、昵称、头像、所在地等信息。需要用户手动点击认证按钮。
相关代码
package com.xingshang.servlet;

import java.io.IOException;
import java.net.URLEncoder;

import javax.servlet.ServletException;
import javax.servlet.annotation.WebServlet;
import javax.servlet.http.HttpServlet;
import javax.servlet.http.HttpServletRequest;
import javax.servlet.http.HttpServletResponse;

import com.xingshang.util.AuthUtil;

/**
 * 入口地址
 * @author Administrator
 *
 */
@WebServlet("/wxLogin")
public class LoginServlet extends HttpServlet {

    /**
     *
     */
    private static final long serialVersionUID = 1L;

    @Override
    protected void doGet(HttpServletRequest request, HttpServletResponse response) throws ServletException, IOException {

        //第一步:引导用户进入授权页面同意授权,获取code

        //回调地址
//        String backUrl = "http://suliu.free.ngrok.cc/WxAuth/callBack";    //第1种情况使用
        String backUrl = "http://suliu.free.ngrok.cc/WxAuth/wxCallBack";//第2种情况使用,这里是web.xml中的路径

        //授权页面地址
        String url = "https://open.weixin.qq.com/connect/oauth2/authorize?appid="+AuthUtil.APPID
                + "&redirect_uri="+URLEncoder.encode(backUrl)
                + "&response_type=code"
                + "&scope=snsapi_userinfo"
                + "&state=STATE#wechat_redirect";

        //重定向到授权页面
        response.sendRedirect(url);
    }
}
2、通过第一步获取的code换取网页授权access_token(与基础支持中的access_token不同)
这一步需要在控制器中获取微信回传给我们的code,通过这个code来请求access_token,通过access_token和openid获取用户基本信息:
相关代码:
package com.xingshang.servlet;

import java.io.IOException;
import java.sql.Connection;
import java.sql.DriverManager;
import java.sql.PreparedStatement;
import java.sql.ResultSet;
import java.sql.SQLException;

import javax.servlet.ServletConfig;
import javax.servlet.ServletException;
import javax.servlet.annotation.WebServlet;
import javax.servlet.http.HttpServlet;
import javax.servlet.http.HttpServletRequest;
import javax.servlet.http.HttpServletResponse;

import com.xingshang.util.AuthUtil;

import net.sf.json.JSONObject;

/**
 * 回调地址
 * @author Administrator
 *
 */
//@WebServlet("/callBack")
public class CallBackSerclet extends HttpServlet {

    /**
     *
     */
    private static final long serialVersionUID = 1L;

    private String dbUrl;
    private String driverClassName;
    private String userName;
    private String passWord;

    private Connection conn =null;
    private PreparedStatement ps =null;
    private ResultSet rs = null;

    //初始化数据库
    @Override
    public void init(ServletConfig config) throws ServletException {

        //加载驱动
        try {
            this.dbUrl = config.getInitParameter("dbUrl");
            this.driverClassName = config.getInitParameter("driverClassName");
            this.userName = config.getInitParameter("userName");
            this.passWord = config.getInitParameter("passWord");
            Class.forName(driverClassName);
        } catch (ClassNotFoundException e) {
            // TODO Auto-generated catch block
            e.printStackTrace();
        }
    }


    @Override
    protected void doGet(HttpServletRequest request, HttpServletResponse response) throws ServletException, IOException {

        //第二步:通过code换取网页授权access_token

        //从request里面获取code参数(当微信服务器访问回调地址的时候,会把code参数传递过来)
        String code = request.getParameter("code");

        System.out.println("code:"+code);

        //获取code后,请求以下链接获取access_token
        String url = "https://api.weixin.qq.com/sns/oauth2/access_token?appid=" + AuthUtil.APPID
                + "&secret=" + AuthUtil.APPSECRET
                + "&code=" + code
                + "&grant_type=authorization_code";

        //通过网络请求方法来请求上面这个接口
        JSONObject jsonObject = AuthUtil.doGetJson(url);

        System.out.println("==========================jsonObject"+jsonObject);

        //从返回的JSON数据中取出access_token和openid,拉取用户信息时用
        String token =  jsonObject.getString("access_token");
        String openid = jsonObject.getString("openid");

        // 第三步:刷新access_token(如果需要)

        // 第四步:拉取用户信息(需scope为 snsapi_userinfo)
        String infoUrl ="https://api.weixin.qq.com/sns/userinfo?access_token=" + token
                + "&openid=" + openid
                + "&lang=zh_CN";
        //通过网络请求方法来请求上面这个接口
        JSONObject userInfo = AuthUtil.doGetJson(infoUrl);

        System.out.println(userInfo);


        //第1种情况:使用微信用户信息直接登录,无需注册和绑定
//        request.setAttribute("info", userInfo);
        //直接跳转
//        request.getRequestDispatcher("/index1.jsp").forward(request, response);


        //第2种情况: 将微信与当前系统的账号进行绑定(需将第1种情况和@WebServlet("/callBack")注释掉)
        //第一步,根据当前openid查询数据库,看是否该账号已经进行绑定
        try {
            String nickname = getNickName(openid);
            if(!"".equals(nickname)){
                //已绑定
                request.setAttribute("nickname", nickname);
                request.getRequestDispatcher("/index2.jsp").forward(request, response);
            }else{
                //未绑定
                request.setAttribute("openid", openid);
                request.getRequestDispatcher("/login.jsp").forward(request, response);
            }
        } catch (SQLException e) {
            // TODO Auto-generated catch block
            e.printStackTrace();
        }

    }

    //数据库的查询
    public String getNickName(String openid) throws SQLException{
        String nickName = "";
        //创建数据库链接
        conn = DriverManager.getConnection(dbUrl, userName, passWord);
        String sql = "select nickname from user where openid = ?";
        ps = conn.prepareStatement(sql);
        ps.setString(1, openid);
        rs = ps.executeQuery();
        while (rs.next()) {
            nickName = rs.getString("nickname");
        }

        //关闭链接
        rs.close();
        ps.close();
        conn.close();

        return nickName;
    }

    //数据库的修改(openid的綁定)
    public int updateUser(String account,String password,String openid) throws SQLException{

        //创建数据库链接
        conn = DriverManager.getConnection(dbUrl, userName, passWord);
        String sql = "update user set openid = ? where account = ? and password = ?";
        ps = conn.prepareStatement(sql);
        ps.setString(1, openid);
        ps.setString(2, account);
        ps.setString(3, password);
        int temp = ps.executeUpdate();

        //关闭链接
        rs.close();
        ps.close();
        conn.close();

        return temp;
    }

    //post方法,用来接受登录请求
    @Override
    protected void doPost(HttpServletRequest request, HttpServletResponse response) throws ServletException, IOException {

        String account = request.getParameter("account");
        String password = request.getParameter("password");
        String openid = request.getParameter("openid");

        try {
            int temp = updateUser(account, password, openid);

            if(temp > 0){
                String nickname = getNickName(openid);
                request.setAttribute("nickname", nickname);
                request.getRequestDispatcher("/index2.jsp").forward(request, response);
                System.out.println("账号绑定成功");
            }else{
                System.out.println("账号绑定失败");
            }

        } catch (SQLException e) {
            // TODO Auto-generated catch block
            e.printStackTrace();
        }

    }

}
login.jsp
<%@ page language="java" contentType="text/html; charset=UTF-8"
    pageEncoding="UTF-8"%>
<!DOCTYPE html PUBLIC "-//W3C//DTD HTML 4.01 Transitional//EN" "http://www.w3.org/TR/html4/loose.dtd">
<html>
<head>
<meta http-equiv="Content-Type" content="text/html; charset=UTF-8">
<meta name="viewport" content="width=device-width,initial-scale=1.0">
<title>Insert title here</title>
</head>
<body>
    <form action="/WxAuth/wxCallBack" method="post">
        <input type="text" name="account" />
        <input type="password" name="password" />
        <input type="hidden" name="openid" value="${openid }" />
        <input type="submit" value="提交并绑定" />
    </form>
</body>
</html>
index.jsp
<%@ page language="java" contentType="text/html; charset=UTF-8"
    pageEncoding="UTF-8"%>
<!DOCTYPE html PUBLIC "-//W3C//DTD HTML 4.01 Transitional//EN" "http://www.w3.org/TR/html4/loose.dtd">
<html>
<head>
<meta http-equiv="Content-Type" content="text/html; charset=UTF-8">
<meta name="viewport" content="width=device-width,initial-scale=1.0">
<title>Insert title here</title>
</head>
<body style="font-size: 40px; text-align: center;">
    <a href="/WxAuth/wxLogin">微信公众授权登录</a>
</body>
</html>
index1.jsp
<%@ page language="java" contentType="text/html; charset=UTF-8"
    pageEncoding="UTF-8"%>
<!DOCTYPE html PUBLIC "-//W3C//DTD HTML 4.01 Transitional//EN" "http://www.w3.org/TR/html4/loose.dtd">
<html>
<head>
<meta http-equiv="Content-Type" content="text/html; charset=UTF-8">
<meta name="viewport" content="width=device-width,initial-scale=1.0">
<title>Insert title here</title>
</head>
<body>
    <div>登陆成功!</div>
    <div>用户昵称:${info.nickname}</div>
    <div>用户头像:<img style="text-align: top;" width="100" src="${info.headimgurl }"></div>
</body>
</html>
index2.jsp
<%@ page language="java" contentType="text/html; charset=UTF-8"
    pageEncoding="UTF-8"%>
<!DOCTYPE html PUBLIC "-//W3C//DTD HTML 4.01 Transitional//EN" "http://www.w3.org/TR/html4/loose.dtd">
<html>
<head>
<meta http-equiv="Content-Type" content="text/html; charset=UTF-8">
<meta name="viewport" content="width=device-width,initial-scale=1.0">
<title>Insert title here</title>
</head>
<body>
    <div>登陆成功!</div>
    <div>用户昵称:${nickname}</div>
</body>
</html>
最后附上需要的jar包
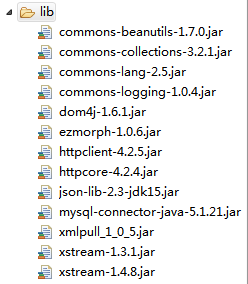
jar包下载链接:
链接:https://pan.baidu.com/s/1tLJ8Z-ZFrDOv9-YduUj9Nw 密码:rmr6
到此,微信授权登录成功,如果有运行问题请自行调试,我这边能正常运行的