写在前面
taobao-pamirs-proxycache 是一款开源缓存代理框架, 它将 缓存代码 与 业务代码 解耦。让开发专注coding业务, 缓存通过xml配置即可实现。本文先从此工具如何使用讲起,给大家带来点感知~再从源码剖析它的实现原理。
一、proxycache工具的感知
1.1 使用场景
假设我有这样的一个场景,在访问UserWhiteReadService.getUserWhiteByAppAndWhiteCode时,希望先从缓存获取,结果为空,则走原生方法,再把原生方法返回的结果put到缓存。传统的做法,会写一堆取缓存再判空等代码。方法多了的话,每个要缓存的方法需要重复上述coding。结合这种场景,使用taobao-pamirs-proxycache 能给我们带来什么好处。从下面的代码来看,业务代码中去除了缓存的相关代码。只需要配置下xml即可达到传统做法的目的。管理更加集中了。
public ResultSupport<List<UserWhiteEventDTO>> getUserWhiteByAppAndWhiteCode(String appName, String userWhiteCode) throws Exception {

		ResultSupport<List<UserWhiteEventDTO>> res = new ResultSupport<List<UserWhiteEventDTO>>();
		try {
			List<UserWhiteEventDO> r = userWhiteEventDAO.selectUserWhitesByAppAndWhiteCode(appName, userWhiteCode);
			res.setModule(TransferUtils.convert2UserWhiteEventDTOList(r));
			res.setSuccess(Boolean.TRUE);
		} catch (Exception e) {
			res.setMessage("异常 : " + e);
			throw new Exception("UserWhiteReadServiceImpl.getUserWhiteByAppAndWhiteCode error : " + e);
		}

		return res;
	}
缓存、清理方法配置 biz-cache.xml
<?xml version="1.0" encoding="gb2312"?>
<cacheModule>
 <!-- 缓存bean list -->
	<cacheBeans>
		<cacheBean>
			<beanName>userWhiteReadService</beanName>
			<cacheMethods>
				<methodConfig>
					<methodName>getUserWhiteByAppAndWhiteCode</methodName>
					<expiredTime>2592000</expiredTime><!-- 指定缓存生命周期 -->
				</methodConfig>
				<methodConfig>
					<methodName>getUserWhitesByUserId</methodName>
					<expiredTime>2592000</expiredTime><!-- 指定缓存生命周期 -->
				</methodConfig>
			</cacheMethods>
		</cacheBean>
	</cacheBeans>

<!-- 清缓存bean list -->
	<cacheCleanBeans>
		<cacheCleanBean>
			<beanName>userWhiteReadService</beanName>
			<methods>
				<cacheCleanMethod>
					<methodName>cleanByAppAndCode</methodName>
					<cleanMethods>
						<methodConfig>
						<methodName>getUserWhiteByAppAndWhiteCode</methodName>
						</methodConfig>
					</cleanMethods>
				</cacheCleanMethod>
				<cacheCleanMethod>
					<methodName>cleanByUserId</methodName>
					<cleanMethods>
						<methodConfig>
							<methodName>getUserWhitesByUserId</methodName>
						</methodConfig>
					</cleanMethods>
				</cacheCleanMethod>
			</methods>
		</cacheCleanBean>
	</cacheCleanBeans>
</cacheModule>
cache配置 base-cache.xml
<?xml version="1.0" encoding="gb2312"?>
<beans xmlns="http://www.springframework.org/schema/beans"
   xmlns:xsi="http://www.w3.org/2001/XMLSchema-instance"
   xsi:schemaLocation="http://www.springframework.org/schema/beans
   http://www.springframework.org/schema/beans/spring-beans.xsd"
   default-autowire="byName">

   <bean id="tairManager" class="com.taobao.tair.impl.mc.MultiClusterTairManager"
      init-method="init">
      <property name="configID">
         <value>${tair.configID}</value>
      </property>
      <property name="dynamicConfig">
         <value type="java.lang.Boolean">true</value>
      </property>
   </bean>

   <bean id="cacheManager" class="com.taobao.pamirs.cache.load.impl.LocalConfigCacheManager"
          init-method="init" depends-on="tairManager">
      <property name="storeType" value="tair" />
      <property name="tairNameSpace" value="${tair.namespace}" /><!-- 缓存tair空间 -->
      <property name="storeRegion" value="${tair.store.region}" /> <!-- 缓存环境隔离  -->
      <property name="configFilePaths">
         <list>
            <value>spring/cache/biz-cache.xml</value>
         </list>
      </property>
      <property name="tairManager" ref="tairManager" />
   </bean>

   <bean class="com.taobao.pamirs.cache.framework.aop.handle.CacheManagerHandle">
      <property name="cacheManager" ref="cacheManager" />
   </bean>
</beans>
二、proxy-cache 框架模块
-
缓存配置信息加载模块
-
beanProxy(bean代理对象)生成模块
-
CacheProxy(缓存代理对象)生成模块
-
日志监控模块(本文不讲)
三、实现原理
3.1 缓存配置信息加载架构图

从上图及结合源码, CacheManager 是缓存框架的加载入口。CacheManager 有两个关键实现细节 :
1、定义了初始化方法init( ), 由子类LocalConfigCacheManager实现loadConfig( )。这是加载缓存配置信息,组装成缓存组件的入口。
2、实现了ApplicationListener 接口,重写了监听事件方法。
/**
 * Handle an application event.
 * @param event the event to respond to
 */
void onApplicationEvent(ApplicationEvent event) {

 if (event instanceof ContextRefreshedEvent) {
   // 2. 自动填充默认的配置
   autoFillCacheConfig(cacheConfig);

   // 3. 缓存配置合法性校验
   verifyCacheConfig(cacheConfig);

   // 4. 初始化缓存
   initCache();
}}
initCache()方法, 主要是对缓存适配key的构造、生成所有需缓存的方法对应的"缓存代理" -- CacheProxy, 及缓存的定时清理任务。下面对上述各个细节点一一讲解。
3.1.1缓存适配器key的构造
缓存适配器的key格式 : region@beanName#methodName#{String|Long}
public static String getCacheAdapterKey(String region, String beanName,
      MethodConfig methodConfig) {
   Assert.notNull(methodConfig);

   // 最终的key
   StringBuilder key = new StringBuilder();

   // 1. region
   if (StringUtils.isNotBlank(region))
      key.append(region).append(REGION_SPLITE_SIGN); // "@"

   // 2. bean + method + parameter
   String methodName = methodConfig.getMethodName();
   List<Class<?>> parameterTypes = methodConfig.getParameterTypes();

   key.append(beanName).append(KEY_SPLITE_SIGN);   // "#"
   key.append(methodName).append(KEY_SPLITE_SIGN); // "#"
   key.append(parameterTypesToString(parameterTypes));

   return key.toString();

}
3.1.2 缓存处理适配CacheProxy的组装
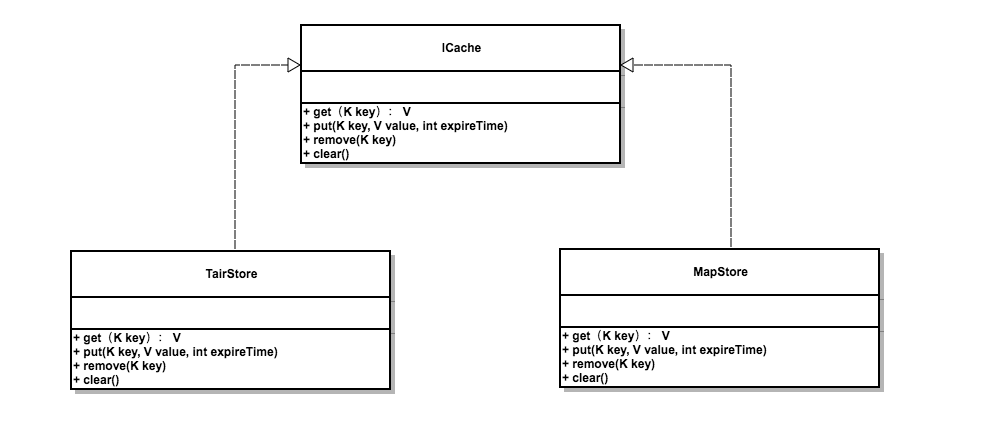
CacheProxy :包含了适配器Key、缓存类型(如 tair缓存 or Map本地缓存)、 缓存对应的对象bean及method、缓存空间(tair要用到)等。
ICache : 则是缓存基础接口。提供了get 、 put、clean等通用方法。目前支持tair 、 Map本地 两种缓存类型
3.2 beanProxy 代理对象生成结构图

CacheManagerHandle : 这个缓存处理类很关键,它实现了AbstractAutoProxyCreator接口,重写了getAdvicesAndAdvisorsForBean方法,实现了自己的AOP切面CacheManagerAdvisor。CacheManagerAdvisor,依赖了CacheManagerRoundAdvice拦截器, CacheManagerRoundAdvice 通过实现 MethodInterceptor接口的invoke 方法,实现了在访问目标方法时植入缓存访问、清缓存切面 。具体可以看下下面这一小段源码 :
protected Object[] getAdvicesAndAdvisorsForBean(Class beanClass,
      String beanName, TargetSource targetSource) throws BeansException {

   log.debug("CacheManagerHandle in:" + beanName);

   if (ConfigUtil.isBeanHaveCache(cacheManager.getCacheConfig(), beanName)) {

      log.warn("CacheManager start... ProxyBean:" + beanName);

      return new CacheManagerAdvisor[] { new CacheManagerAdvisor(
            cacheManager, beanName) };
   }

   return DO_NOT_PROXY;
}
CacheManagerRoundAdvice 重写的invoke方法 : 访问目标方法前进行拦截,如果是访问缓存的操作, 则植入缓存代理切面,优先从缓存结果中取,取不到再从原生方法取数据,并且put 到 缓存。 如果是清理缓存的操作, 则在原生方法访问后,清理原生方法历史缓存数据。
public Object invoke(MethodInvocation invocation) throws Throwable {
		MethodConfig cacheMethod = null;
		List<MethodConfig> cacheCleanMethods = null;
		String storeRegion = "";
		Method method = invocation.getMethod();
		String methodName = method.getName();
		try {
			CacheConfig cacheConfig = cacheManager.getCacheConfig();
			storeRegion = cacheConfig.getStoreRegion();
			List<Class<?>> parameterTypes = Arrays.asList(method
					.getParameterTypes());
			cacheMethod = ConfigUtil.getCacheMethod(cacheConfig, beanName,

					methodName, parameterTypes);
			cacheCleanMethods = ConfigUtil.getCacheCleanMethods(cacheConfig,
					beanName, methodName, parameterTypes);

		} catch (Exception e) {
			log.error("CacheManager:切面解析配置出错:" + beanName + "#"
					+ invocation.getMethod().getName(), e);
			return invocation.proceed();
		}
		String fromHsfIp = "";// hsf consumer ip
		try {
			fromHsfIp = (String) invocation.getThis().getClass()
					.getMethod("getCustomIp").invoke(invocation.getThis());
		} catch (NoSuchMethodException e) {
			log.debug("接口没有实现HSF的getCustomIp方法,取不到Consumer IP, beanName="
					+ beanName);
		}
		try {
			// 1. 走缓存
			if (cacheManager.isUseCache() && cacheMethod != null) {
				String adapterKey = CacheCodeUtil.getCacheAdapterKey(
						storeRegion, beanName, cacheMethod);
				CacheProxy<Serializable, Serializable> cacheAdapter = cacheManager
						.getCacheProxy(adapterKey);
				String cacheCode = CacheCodeUtil.getCacheCode(storeRegion,
						beanName, cacheMethod, invocation.getArguments());
				return useCache(cacheAdapter, cacheCode,
						cacheMethod.getExpiredTime(), invocation, fromHsfIp);
			}
			// 2. 清理缓存
			if (cacheCleanMethods != null) {
				try {
					return invocation.proceed();
				} finally {
					cleanCache(beanName, cacheCleanMethods, invocation,
							storeRegion, fromHsfIp);
				}
			}
			// 3. 走原生方法
			return invocation.proceed();
		} catch (Exception e) {
			// log.error("CacheManager:出错:" + beanName + "#"
			// + invocation.getMethod().getName(), e);
			throw e;
		}
	}
四、那些踩过的坑
原生方法,不要随意捕获异常;或者在捕获异常后,要手动throw异常出来。因为使用了该缓存工具,只要调用此方法不抛出异常,原生方法的结果(不排除异常结果)会被框架缓存住。记得有一次在断网演练的时候,由于断网导致连接DB出问题,异常信息还是被我catch掉了,结果就悲剧了,异常信息结果被缓存住了。导致应用恢复时,再次调用此方法,返回的结果一直都是exception~
写在最后
我的新博客
CSDN博客经常打不开, 老博客继续维护一段时间吧~~