C++11 并发编程
C++11 新标准中引入了几个头文件来支持多线程编程,他们分别是:
- <atomic>:该头文主要声明了两个类, std::atomic 和 std::atomic_flag,另外还声明了一套 C 风格的原子类型和与 C 兼容的原子操作的函数。
- <thread>:该头文件主要声明了 std::thread 类,另外 std::this_thread 命名空间也在该头文件中。
- <mutex>:该头文件主要声明了与互斥量(mutex)相关的类,包括 std::mutex 系列类,std::lock_guard, std::unique_lock, 以及其他的类型和函数。
- <condition_variable>:该头文件主要声明了与条件变量相关的类,包括 std::condition_variable 和 std::condition_variable_any。
- <future>:该头文件主要声明了 std::promise, std::package_task 两个 Provider 类,以及 std::future 和 std::shared_future 两个 Future 类,另外还有一些与之相关的类型和函数,std::async() 函数就声明在此头文件中。
std::thread
构造函数
| default (1) |
thread() noexcept; |
|---|---|
| initialization (2) |
template <class Fn, class... Args> explicit thread (Fn&& fn, Args&&... args); |
| copy [deleted] (3) |
thread (const thread&) = delete; |
| move (4) |
thread (thread&& x) noexcept; |
- (1). 默认构造函数,创建一个空的 thread 执行对象。
- (2). 初始化构造函数,创建一个 thread对象,该 thread对象可被 joinable,新产生的线程会调用 fn 函数,该函数的参数由 args 给出。
- (3). 拷贝构造函数(被禁用),意味着 thread 不可被拷贝构造。
- (4). move 构造函数,move 构造函数,调用成功之后 x 不代表任何 thread 执行对象。
- 注意:可被 joinable 的 thread 对象必须在他们销毁之前被主线程 join 或者将其设置为 detached.
thread使用例子


 1 #include <iostream>
 2 #include <utility>
 3 #include <thread>
 4 #include <chrono>
 5 #include <functional>
 6 #include <atomic>
 7
 8 void f1(int n)
 9 {
10     for (int i = 0; i < 5; ++i) {
11         std::cout << "Thread " << n << " executing
";
12         std::this_thread::sleep_for(std::chrono::milliseconds(10));
13     }
14 }
15
16 void f2(int& n)
17 {
18     for (int i = 0; i < 5; ++i) {
19         std::cout << "Thread 2 executing
";
20         ++n;
21         std::this_thread::sleep_for(std::chrono::milliseconds(10));
22     }
23 }
24
25 int main()
26 {
27     int n = 0;
28     std::thread t1; // t1 is not a thread
29     std::thread t2(f1, n + 1); // pass by value
30     std::thread t3(f2, std::ref(n)); // pass by reference
31     std::thread t4(std::move(t3)); // t4 is now running f2(). t3 is no longer a thread
32     t2.join();
33     t4.join();
34     std::cout << "Final value of n is " << n << '
';
35 }
std::mutex
Mutex 类
- std::mutex,最基本的 Mutex 类,如果当前线程对同一个mutex多次加锁,会产生死锁(dead lock);
- std::recursive_mutex,递归锁,允许同一个线程对互斥量多次上锁(即递归上锁),来获得对互斥量对象的多层所有权,recursive_mutex 释放互斥量时需要调用与该锁层次深度相同次数的 unlock(),可理解为 lock() 次数和 unlock() 次数相同,。
- std::time_mutex,定时 Mutex 类。
- std::recursive_timed_mutex,定时递归 Mutex 类。
Lock 类
- std::lock_guard,与 Mutex RAII 相关,方便线程对互斥量上锁。
- std::unique_lock,与 Mutex RAII 相关,方便线程对互斥量上锁,但提供了更好的上锁和解锁控制。
其他类型
- std::once_flag,配合std:call_once使用;
- std::adopt_lock_t,通常作为参数传入给 unique_lock 或 lock_guard 的构造函数;
- std::defer_lock_t,通常作为参数传入给 unique_lock 的构造函数;
- std::try_to_lock_t,通常作为参数传入给 unique_lock 的构造函数;
函数
- std::try_lock,调用时没有获得锁,则直接返回 false
- std::lock,调用线程将阻塞等待该互斥量。
- std::try_lock_for,对定时锁可用,接受一个时间范围,表示在这一段时间范围之内线程如果没有获得锁则被阻塞住,如果在此期间其他线程释放了锁,则该线程可以获得对互斥量的锁,如果超时则返回 false;
- std::try_lock_util,对定时锁可用,接受一个时间点作为参数,在指定时间点未到来之前线程如果没有获得锁则被阻塞住,如果在此期间其他线程释放了锁,则该线程可以获得对互斥量的锁,如果超时则返回 false;
- std::call_once,如果多个线程需要同时调用某个函数,call_once 可以保证多个线程对该函数只调用一次。
定时锁例子
 1 #include <iostream>       // std::cout
 2 #include <chrono>         // std::chrono::milliseconds
 3 #include <thread>         // std::thread
 4 #include <mutex>          // std::timed_mutex
 5
 6 std::timed_mutex mtx;
 7
 8 void fireworks() {
 9   // waiting to get a lock: each thread prints "-" every 200ms:
10   while (!mtx.try_lock_for(std::chrono::milliseconds(200))) {
11     std::cout << "-";
12   }
13   // got a lock! - wait for 1s, then this thread prints "*"
14   std::this_thread::sleep_for(std::chrono::milliseconds(1000));
15   std::cout << "*
";
16   mtx.unlock();
17 }
18
19 int main ()
20 {
21   std::thread threads[10];
22   // spawn 10 threads:
23   for (int i=0; i<10; ++i)
24     threads[i] = std::thread(fireworks);
25
26   for (auto& th : threads) th.join();
27
28   return 0;
29 }
lock_guard例子
在 lock_guard 对象构造时,传入的 Mutex 对象会被当前线程锁住。在lock_guard 对象被析构时,它所管理的 Mutex 对象会自动解锁,由于不需要程序员手动调用 lock 和 unlock 对 Mutex 进行上锁和解锁操作,因此这也是最简单安全的上锁和解锁方式,尤其是在程序抛出异常后先前已被上锁的 Mutex 对象可以正确进行解锁操作,极大地简化了程序员编写与 Mutex 相关的异常处理代码。
值得注意的是,lock_guard 对象并不负责管理 Mutex 对象的生命周期,lock_guard 对象只是简化了 Mutex 对象的上锁和解锁操作,方便线程对互斥量上锁,即在某个 lock_guard 对象的声明周期内,它所管理的锁对象会一直保持上锁状态;而 lock_guard 的生命周期结束之后,它所管理的锁对象会被解锁。
一个简单例子
 1 #include <iostream>       // std::cout
 2 #include <thread>         // std::thread
 3 #include <mutex>          // std::mutex, std::lock_guard
 4 #include <stdexcept>      // std::logic_error
 5
 6 std::mutex mtx;
 7
 8 void print_even (int x) {
 9     if (x%2==0) std::cout << x << " is even
";
10     else throw (std::logic_error("not even"));
11 }
12
13 void print_thread_id (int id) {
14     try {
15         // using a local lock_guard to lock mtx guarantees unlocking on destruction / exception:
16         std::lock_guard<std::mutex> lck (mtx);
17         print_even(id);
18     }
19     catch (std::logic_error&) {
20         std::cout << "[exception caught]
";
21     }
22 }
23
24 int main ()
25 {
26     std::thread threads[10];
27     // spawn 10 threads:
28     for (int i=0; i<10; ++i)
29         threads[i] = std::thread(print_thread_id,i+1);
30
31     for (auto& th : threads) th.join();
32
33     return 0;
34 }
adopting初始化,对一个已经加锁的mutex使用lock_guard,由其负责解锁
 1 #include <iostream>       // std::cout
 2 #include <thread>         // std::thread
 3 #include <mutex>          // std::mutex, std::lock_guard, std::adopt_lock
 4
 5 std::mutex mtx;           // mutex for critical section
 6
 7 void print_thread_id (int id) {
 8   mtx.lock();
 9   std::lock_guard<std::mutex> lck(mtx, std::adopt_lock);
10   std::cout << "thread #" << id << '
';
11 }
12
13 int main ()
14 {
15   std::thread threads[10];
16   // spawn 10 threads:
17   for (int i=0; i<10; ++i)
18     threads[i] = std::thread(print_thread_id,i+1);
19
20   for (auto& th : threads) th.join();
21
22   return 0;
23 }
lock_guard只能保证在析构的时候执行解锁操作,本身并没有提供加锁和解锁的接口,看下面的例子
 1 class LogFile {
 2     std::mutex _mu;
 3     ofstream f;
 4 public:
 5     LogFile() {
 6         f.open("log.txt");
 7     }
 8     ~LogFile() {
 9         f.close();
10     }
11     void shared_print(string msg, int id) {
12         {
13             std::lock_guard<std::mutex> guard(_mu);
14             //do something 1
15         }
16         //do something 2
17         {
18             std::lock_guard<std::mutex> guard(_mu);
19             // do something 3
20             f << msg << id << endl;
21             cout << msg << id << endl;
22         }
23     }
24
25 };
lock_guard就需要创建两个局部对象来管理同一个互斥锁(其实也可以只创建一个,但是锁的力度太大,效率不行),修改方法是使用unique_lock。unique_lock例子
它提供了lock()和unlock()接口,能记录现在处于上锁还是没上锁状态,在析构的时候,会根据当前状态来决定是否要进行解锁(lock_guard就一定会解锁)。
 1 class LogFile {
 2     std::mutex _mu;
 3     ofstream f;
 4 public:
 5     LogFile() {
 6         f.open("log.txt");
 7     }
 8     ~LogFile() {
 9         f.close();
10     }
11     void shared_print(string msg, int id) {
12
13         std::unique_lock<std::mutex> guard(_mu);
14         //do something 1
15         guard.unlock(); //临时解锁
16
17         //do something 2
18
19         guard.lock(); //继续上锁
20         // do something 3
21         f << msg << id << endl;
22         cout << msg << id << endl;
23         // 结束时析构guard会临时解锁
24         // 这句话可要可不要,不写,析构的时候也会自动执行
25         // guard.ulock();
26     }
27
28 };
lock_guard对象,还能减少锁的区域。try-locking 初始化,新创建的 unique_lock 对象管理 Mutex 对象 m,并尝试调用 m.try_lock() 对 Mutex 对象进行上锁,但如果上锁不成功,并不会阻塞当前线程
 1 #include <iostream>       // std::cout
 2 #include <thread>         // std::thread
 3 #include <mutex>          // std::mutex, std::lock, std::unique_lock
 4                           // std::adopt_lock, std::defer_lock
 5 std::mutex foo,bar;
 6
 7 void task_a () {
 8   std::lock (foo,bar);         // simultaneous lock (prevents deadlock)
 9   std::unique_lock<std::mutex> lck1 (foo,std::adopt_lock);
10   std::unique_lock<std::mutex> lck2 (bar,std::adopt_lock);
11   std::cout << "task a
";
12   // (unlocked automatically on destruction of lck1 and lck2)
13 }
14
15 void task_b () {
16   // foo.lock(); bar.lock(); // replaced by:
17   std::unique_lock<std::mutex> lck1, lck2;
18   lck1 = std::unique_lock<std::mutex>(bar,std::defer_lock);
19   lck2 = std::unique_lock<std::mutex>(foo,std::defer_lock);
20   std::lock (lck1,lck2);       // simultaneous lock (prevents deadlock)
21   std::cout << "task b
";
22   // (unlocked automatically on destruction of lck1 and lck2)
23 }
24
25
26 int main ()
27 {
28   std::thread th1 (task_a);
29   std::thread th2 (task_b);
30
31   th1.join();
32   th2.join();
33
34   return 0;
35 }
后面在学习条件变量的时候,还会有unique_lock的用武之地。
call_once例子
若调用发生异常,不会翻转flag,以令其它调用得到尝试
 1 #include <iostream>
 2 #include <thread>
 3 #include <mutex>
 4
 5 std::once_flag flag1, flag2;
 6
 7 void simple_do_once()
 8 {
 9     std::call_once(flag1, [](){ std::cout << "Simple example: called once
"; });
10 }
11
12 void may_throw_function(bool do_throw)
13 {
14   if (do_throw) {
15     std::cout << "throw: call_once will retry
"; // 这会出现多于一次
16     throw std::exception();
17   }
18   std::cout << "Didn't throw, call_once will not attempt again
"; // 保证一次
19 }
20
21 void do_once(bool do_throw)
22 {
23   try {
24     std::call_once(flag2, may_throw_function, do_throw);
25   }
26   catch (...) {
27   }
28 }
29
30 int main()
31 {
32     std::thread st1(simple_do_once);
33     std::thread st2(simple_do_once);
34     std::thread st3(simple_do_once);
35     std::thread st4(simple_do_once);
36     st1.join();
37     st2.join();
38     st3.join();
39     st4.join();
40
41     std::thread t1(do_once, true);
42     std::thread t2(do_once, true);
43     std::thread t3(do_once, false);
44     std::thread t4(do_once, true);
45     t1.join();
46     t2.join();
47     t3.join();
48     t4.join();
49 }
std::future
<future> 头文件中包含了以下几个类和函数:
- Providers 类:std::promise, std::package_task
- Futures 类:std::future, shared_future
- Providers 函数:std::async()
- 其他类型:std::future_error, std::future_errc, std::future_status, std::launch
future和promise的作用是在不同线程之间传递数据,大概流程如下
流程:
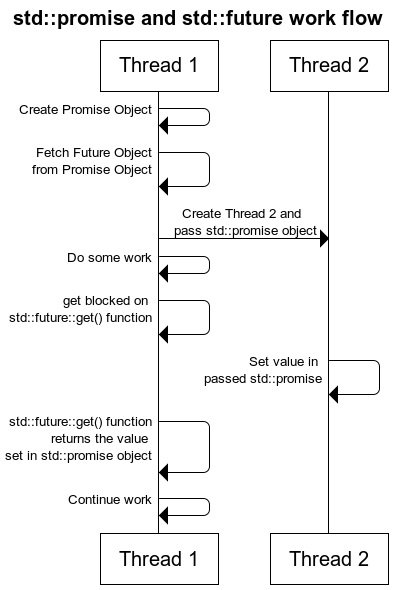
- 线程1初始化一个promise对象和一个future对象,并将promise传递给线程2,相当于线程2对线程1的一个承诺;future相当于一个接受一个承诺,用来获取未来线程2传递的值;
- 线程2获取到promise后,需要对这个promise传递有关的数据,之后线程1的future就可以获取数据了;
- 如果线程1想要获取数据,而线程2未给出数据,则线程1阻塞,直到线程2的数据到达
一个例子:
 1 #include <iostream>
 2 #include <functional>
 3 #include <future>
 4 #include <thread>
 5 #include <chrono>
 6 #include <cstdlib>
 7
 8 void thread_set_promise(std::promise<int>& promiseObj) {
 9     std::cout << "In a thread, making data...
";
10     std::this_thread::sleep_for(std::chrono::milliseconds(1000));
11     promiseObj.set_value(35);
12     std::cout << "Finished
";
13 }
14
15 int main() {
16     std::promise<int> promiseObj;
17     std::future<int> futureObj = promiseObj.get_future();
18     std::thread t(&thread_set_promise, std::ref(promiseObj));
19     std::cout << futureObj.get() << std::endl;
20     t.join();
21
22     return 0;
23 }
promise例子
在 promise 对象构造时可以和一个共享状态(通常是std::future)相关联,并可以在相关联的共享状态(std::future)上保存一个类型为 T 的值。
future对象的成员函数:
- std::promise::get_future,返回一个与 promise 共享状态相关联的 future ,返回的 future 对象可以访问由 promise 对象设置在共享状态上的值或者某个异常对象,如果不设置值或者异常,promise 对象在析构时会自动地设置一个 future_error 异常;
- std::promise::set_value,设置共享状态的值,此后 promise 的共享状态标志变为 ready;
- std::promise::set_exception,为 promise 设置异常,此后 promise 的共享状态变标志变为 ready;
- std::promise::set_value_at_thread_exit,设置共享状态的值,但是不将共享状态的标志设置为 ready,当线程退出时该 promise 对象会自动设置为 ready;
设置异常的例子:
 1 #include <iostream>       // std::cin, std::cout, std::ios
 2 #include <functional>     // std::ref
 3 #include <thread>         // std::thread
 4 #include <future>         // std::promise, std::future
 5 #include <exception>      // std::exception, std::current_exception
 6
 7 void get_int(std::promise<int>& prom) {
 8     int x;
 9     std::cout << "Please, enter an integer value: ";
10     std::cin.exceptions (std::ios::failbit);   // throw on failbit
11     try {
12         std::cin >> x;                         // sets failbit if input is not int
13         prom.set_value(x);
14     } catch (std::exception&) {
15         prom.set_exception(std::current_exception());
16     }
17 }
18
19 void print_int(std::future<int>& fut) {
20     try {
21         int x = fut.get();
22         std::cout << "value: " << x << '
';
23     } catch (std::exception& e) {
24         std::cout << "[exception caught: " << e.what() << "]
";
25     }
26 }
27
28 int main ()
29 {
30     std::promise<int> prom;
31     std::future<int> fut = prom.get_future();
32
33     std::thread th1(get_int, std::ref(prom));
34     std::thread th2(print_int, std::ref(fut));
35
36     th1.join();
37     th2.join();
38     return 0;
39 }
package_task例子
std::packaged_task 包装一个可调用的对象,并且允许异步获取该可调用对象产生的结果,
std::packaged_task 对象内部包含了两个最基本元素,一、被包装的任务(stored task),任务(task)是一个可调用的对象,如函数指针、成员函数指针或者函数对象,二、共享状态(shared state),用于保存任务的返回值,可以通过 std::future 对象来达到异步访问共享状态的效果。
packaged_task对象的成员函数:
- std::packaged_task::valid,检查当前 packaged_task 是否和一个有效的共享状态相关联;
- std::packaged_task::get_future,来获取与共享状态相关联的 std::future 对象;
- std::packaged_task::make_ready_at_thread_exit,
- std::packaged_task::reset(),重置 packaged_task 的共享状态,但是保留之前的被包装的任务
package_task使用例子
 1 #include <iostream>     // std::cout
 2 #include <future>       // std::packaged_task, std::future
 3 #include <chrono>       // std::chrono::seconds
 4 #include <thread>       // std::thread, std::this_thread::sleep_for
 5
 6 // count down taking a second for each value:
 7 int countdown (int from, int to) {
 8     for (int i=from; i!=to; --i) {
 9         std::cout << i << '
';
10         std::this_thread::sleep_for(std::chrono::seconds(1));
11     }
12     std::cout << "Finished!
";
13     return from - to;
14 }
15
16 int main ()
17 {
18     std::packaged_task<int(int,int)> task(countdown); // 设置 packaged_task
19     std::future<int> ret = task.get_future(); // 获得与 packaged_task 共享状态相关联的 future 对象.
20
21     std::thread(std::move(task), 10, 0).detach();   //创建一个新线程完成计数任务.
22
23     int value = ret.get();                    // 等待任务完成并获取结果.
24
25     std::cout << "The countdown lasted for " << value << " seconds.
";
26
27     return 0;
28 }
reset 的例子
 1 #include <iostream>     // std::cout
 2 #include <utility>      // std::move
 3 #include <future>       // std::packaged_task, std::future
 4 #include <thread>       // std::thread
 5
 6 // a simple task:
 7 int triple (int x) { return x*3; }
 8
 9 int main ()
10 {
11     std::packaged_task<int(int)> tsk (triple); // package task
12
13
14     std::future<int> fut = tsk.get_future();
15     std::thread (std::move(tsk), 100).detach();
16     std::cout << "The triple of 100 is " << fut.get() << ".
";
17
18
19     // re-use same task object:
20     tsk.reset();
21     fut = tsk.get_future();
22     std::thread(std::move(tsk), 200).detach();
23     std::cout << "Thre triple of 200 is " << fut.get() << ".
";
24
25     return 0;
26 }
future例子
std::future 可以用来获取异步任务的结果。
std::future 通常由某个 Provider 创建,你可以把 Provider 想象成一个异步任务的提供者,Provider 在某个线程中设置共享状态的值,与该共享状态相关联的 std::future 对象调用 get(通常在另外一个线程中) 获取该值,如果共享状态的标志不为 ready,则调用 std::future::get 会阻塞当前的调用者,直到 Provider 设置了共享状态的值(此时共享状态的标志变为 ready),std::future::get 返回异步任务的值或异常(如果发生了异常)。
一个有效(valid)的 std::future 对象通常由以下三种 Provider 创建,并和某个共享状态相关联。Provider 可以是函数或者类,其实我们前面都已经提到了,他们分别是:
- std::async 函数;
- std::promise::get_future,get_future 为 promise 类的成员函数;
- std::packaged_task::get_future,此时 get_future为 packaged_task 的成员函数;
async 函数使用例子
 1 // future example
 2 #include <iostream>             // std::cout
 3 #include <future>               // std::async, std::future
 4 #include <chrono>               // std::chrono::milliseconds
 5
 6 // a non-optimized way of checking for prime numbers:
 7 bool
 8 is_prime(int x)
 9 {
10     for (int i = 2; i < x; ++i)
11         if (x % i == 0)
12             return false;
13     return true;
14 }
15
16 int
17 main()
18 {
19     // call function asynchronously:
20     std::future < bool > fut = std::async(is_prime, 444444443);
21
22     // do something while waiting for function to set future:
23     std::cout << "checking, please wait";
24     std::chrono::milliseconds span(100);
25     while (fut.wait_for(span) == std::future_status::timeout)
26         std::cout << '.';
27
28     bool x = fut.get();         // retrieve return value
29
30     std::cout << "
444444443 " << (x ? "is" : "is not") << " prime.
";
31
32     return 0;
33 }
std::async() 返回一个 std::future 对象,通过该对象可以获取异步任务的值或异常(如果异步任务抛出了异常)
另外,async 函数可以指定启动策略 std::launch ,该枚举参数可以是launch::async,launch::deferred,以及两者的按位或( | );
 1 #include <stdio.h>
 2 #include <stdlib.h>
 3
 4 #include <cmath>
 5 #include <chrono>
 6 #include <future>
 7 #include <iostream>
 8
 9 double ThreadTask(int n) {
10     std::cout << std::this_thread::get_id()
11         << " start computing..." << std::endl;
12
13     double ret = 0;
14     for (int i = 0; i <= n; i++) {
15         ret += std::sin(i);
16     }
17
18     std::cout << std::this_thread::get_id()
19         << " finished computing..." << std::endl;
20     return ret;
21 }
22
23 int main(int argc, const char *argv[])
24 {
25     std::future<double> f(std::async(std::launch::async, ThreadTask, 100000000));
26
27 #if 0
28     while(f.wait_until(std::chrono::system_clock::now() + std::chrono::seconds(1))
29             != std::future_status::ready) {
30         std::cout << "task is running...
";
31     }
32 #else
33     while(f.wait_for(std::chrono::seconds(1))
34             != std::future_status::ready) {
35         std::cout << "task is running...
";
36     }
37 #endif
38
39     std::cout << f.get() << std::endl;
40
41     return EXIT_SUCCESS;
42 }
std::launch枚举类型主要是在调用 std::async 设置异步任务的启动策略的。
| 类型 | 描述 |
|---|---|
| launch::async | Asynchronous: 异步任务会在另外一个线程中调用,并通过共享状态返回异步任务的结果(一般是调用 std::future::get() 获取异步任务的结果)。 |
| launch::deferred | Deferred: 异步任务将会在共享状态被访问时调用,相当与按需调用(即延迟(deferred)调用)。 |
future对象的成员函数:
- std::future::valid(),检查当前的 std::future 对象是否有效;
- std::future::get(),调用该函数会阻塞当前的调用者,而此后一旦共享状态的标志变为 ready,get 返回 Provider 所设置的共享状态的值或者异常(如果抛出了异常);
- std::future::share(),返回一个 std::shared_future 对象,调用该函数之后,该 std::future 对象本身已经不和任何共享状态相关联,因此该 std::future 的状态不再是 valid 的了;
- std::future::wait(),等待与该 std::future 对象相关联的共享状态的标志变为 ready,但是 wait() 并不读取共享状态的值或者异常;
- std::future::wait_for(),可以设置一个时间段 rel_time,如果共享状态的标志在该时间段结束之前没有被 Provider 设置为 ready,则调用 wait_for 的线程被阻塞,在等待了 rel_time 的时间长度后 wait_until() 返回;
- std::future::wait_until(),可以设置一个系统绝对时间点 abs_time,如果共享状态的标志在该时间点到来之前没有被 Provider 设置为 ready,则调用 wait_until 的线程被阻塞,在 abs_time 这一时刻到来之后 wait_for() 返回;
valid 使用例子
 1 #include <iostream>       // std::cout
 2 #include <future>         // std::async, std::future
 3 #include <utility>        // std::move
 4
 5 int do_get_value() { return 11; }
 6
 7 int main ()
 8 {
 9     // 由默认构造函数创建的 std::future 对象,
10     // 初始化时该 std::future 对象处于为 invalid 状态.
11     std::future<int> foo, bar;
12     foo = std::async(do_get_value); // move 赋值, foo 变为 valid.
13     bar = std::move(foo); // move 赋值, bar 变为 valid, 而 move 赋值以后 foo 变为 invalid.
14
15     if (foo.valid())
16         std::cout << "foo's value: " << foo.get() << '
';
17     else
18         std::cout << "foo is not valid
";
19
20     if (bar.valid())
21         std::cout << "bar's value: " << bar.get() << '
';
22     else
23         std::cout << "bar is not valid
";
24
25     return 0;
26 }
wait_for 使用例子
 1 #include <iostream>                // std::cout
 2 #include <future>                // std::async, std::future
 3 #include <chrono>                // std::chrono::milliseconds
 4
 5 // a non-optimized way of checking for prime numbers:
 6 bool do_check_prime(int x) // 为了体现效果, 该函数故意没有优化.
 7 {
 8     for (int i = 2; i < x; ++i)
 9         if (x % i == 0)
10             return false;
11     return true;
12 }
13
14 int main()
15 {
16     // call function asynchronously:
17     std::future < bool > fut = std::async(do_check_prime, 194232491);
18
19     std::cout << "Checking...
";
20     std::chrono::milliseconds span(1000); // 设置超时间隔.
21
22     // 如果超时,则输出".",继续等待
23     while (fut.wait_for(span) == std::future_status::timeout)
24         std::cout << '.';
25
26     std::cout << "
194232491 ";
27     if (fut.get()) // guaranteed to be ready (and not block) after wait returns
28         std::cout << "is prime.
";
29     else
30         std::cout << "is not prime.
";
31
32     return 0;
33 }
shared_future例子
shared_future支持拷贝,多个 std::shared_future 可以共享某个共享状态的最终结果(即共享状态的某个值或者异常)。;
std::condition_variable
先看一个例子
 1 #include <iostream>                // std::cout
 2 #include <thread>                // std::thread
 3 #include <mutex>                // std::mutex, std::unique_lock
 4 #include <condition_variable>    // std::condition_variable
 5
 6 std::mutex mtx; // 全局互斥锁.
 7 std::condition_variable cv; // 全局条件变量.
 8 bool ready = false; // 全局标志位.
 9
10 void do_print_id(int id)
11 {
12     std::unique_lock <std::mutex> lck(mtx);
13     while (!ready) // 如果标志位不为 true, 则等待...
14         cv.wait(lck); // 当前线程被阻塞, 当全局标志位变为 true 之后,
15     // 线程被唤醒, 继续往下执行打印线程编号id.
16     std::cout << "thread " << id << '
';
17 }
18
19 void go()
20 {
21     std::unique_lock <std::mutex> lck(mtx);
22     ready = true; // 设置全局标志位为 true.
23     cv.notify_all(); // 唤醒所有线程.
24 }
25
26 int main()
27 {
28     std::thread threads[10];
29     // spawn 10 threads:
30     for (int i = 0; i < 10; ++i)
31         threads[i] = std::thread(do_print_id, i);
32
33     std::cout << "10 threads ready to race...
";
34     go(); // go!
35
36   for (auto & th:threads)
37         th.join();
38
39     return 0;
40 }
wait函数执行的步骤:
- unlock mutex,wait调用要和mutex配合,调用wait前要先获取mutex的锁,调用wait时会先自动解锁,使得其他被阻塞在锁竞争上的线程得以继续执行。
- waiting for notify,阻塞等待唤醒;
- waked by notify,被唤醒;
- lock mutex,自动重新加锁,使得mutex状态和wait被调用时相同;
另外,上面的代码中,
while (!ready) // 如果标志位不为 true, 则等待...
        cv.wait(lck); // 当前线程被阻塞, 当全局标志位变为 true 之后,  线程被唤醒, 继续往下执行打印线程编号id.
可以用下面的语句替换:
cv.wait(lck, isReady);


// isReady的实现
bool isReady() {
    return ready;
}
更多wait函数
// wait
void wait (unique_lock<mutex>& lck);
template <class Predicate>
  void wait (unique_lock<mutex>& lck, Predicate pred);

// wait_for
template <class Rep, class Period>
  cv_status wait_for (unique_lock<mutex>& lck,
                      const chrono::duration<Rep,Period>& rel_time);
template <class Rep, class Period, class Predicate>
       bool wait_for (unique_lock<mutex>& lck,
                      const chrono::duration<Rep,Period>& rel_time, Predicate pred);

// wait_until
template <class Clock, class Duration>
  cv_status wait_until (unique_lock<mutex>& lck,
                        const chrono::time_point<Clock,Duration>& abs_time);
template <class Clock, class Duration, class Predicate>
       bool wait_until (unique_lock<mutex>& lck,
                        const chrono::time_point<Clock,Duration>& abs_time,
                        Predicate pred);
wait_for 可以指定一个时间段,在当前线程收到通知或者指定的时间 rel_time 超时之前,该线程都会处于阻塞状态;
wait_until 可以指定一个时间点,在当前线程收到通知或者指定的时间点 abs_time 超时之前,该线程都会处于阻塞状态;
wait_for 例子
 1 #include <iostream>           // std::cout
 2 #include <thread>             // std::thread
 3 #include <chrono>             // std::chrono::seconds
 4 #include <mutex>              // std::mutex, std::unique_lock
 5 #include <condition_variable> // std::condition_variable, std::cv_status
 6
 7 std::condition_variable cv;
 8
 9 int value;
10
11 void do_read_value()
12 {
13     std::cin >> value;
14     cv.notify_one();
15 }
16
17 int main ()
18 {
19     std::cout << "Please, enter an integer (I'll be printing dots):
";
20     std::thread th(do_read_value);
21
22     std::mutex mtx;
23     std::unique_lock<std::mutex> lck(mtx);
24     while (cv.wait_for(lck,std::chrono::seconds(1)) == std::cv_status::timeout) {
25         std::cout << '.';
26         std::cout.flush();
27     }
28
29     std::cout << "You entered: " << value << '
';
30
31     th.join();
32     return 0;
33 }
上面的例子使用了std::cv_status枚举类型:
| cv_status::no_timeout | wait_for 或者 wait_until 没有超时,即在规定的时间段内线程收到了通知。 |
| cv_status::timeout | wait_for 或者 wait_until 超时。 |
notify函数
- notify_one,唤醒某个等待(wait)线程。如果当前没有等待线程,则该函数什么也不做,如果同时存在多个等待线程,则唤醒某个线程是不确定的(unspecified)
- notify_all,唤醒所有的等待(wait)线程。如果当前没有等待线程,则该函数什么也不做。
notify_all_at_thread_exit
当调用该函数的线程退出时,所有在 cond 条件变量上等待的线程都会收到通知。
例子:
 1 #include <iostream>           // std::cout
 2 #include <thread>             // std::thread
 3 #include <mutex>              // std::mutex, std::unique_lock
 4 #include <condition_variable> // std::condition_variable
 5
 6 std::mutex mtx;
 7 std::condition_variable cv;
 8 bool ready = false;
 9
10 void print_id (int id) {
11   std::unique_lock<std::mutex> lck(mtx);
12   while (!ready) cv.wait(lck);
13   // ...
14   std::cout << "thread " << id << '
';
15 }
16
17 void go() {
18   std::unique_lock<std::mutex> lck(mtx);
19   std::notify_all_at_thread_exit(cv,std::move(lck));
20   ready = true;
21 }
22
23 int main ()
24 {
25   std::thread threads[10];
26   // spawn 10 threads:
27   for (int i=0; i<10; ++i)
28     threads[i] = std::thread(print_id,i);
29   std::cout << "10 threads ready to race...
";
30
31   std::thread(go).detach();   // go!
32
33   for (auto& th : threads) th.join();
34
35   return 0;
36 }
condition_variable_any
与 std::condition_variable 类似,只不过 std::condition_variable_any 的 wait 函数可以接受任何 lockable 参数,而 std::condition_variable 只能接受 std::unique_lock<std::mutex> 类型的参数,除此以外,和 std::condition_variable 几乎完全一样。
std::atomic
原子操作是可以lock-free的算法和数据结构。
std::atomic_flag
 1 #include <iostream>              // std::cout
 2 #include <atomic>                // std::atomic, std::atomic_flag, ATOMIC_FLAG_INIT
 3 #include <thread>                // std::thread, std::this_thread::yield
 4 #include <vector>                // std::vector
 5
 6 std::atomic<bool> ready(false);    // can be checked without being set
 7 std::atomic_flag winner = ATOMIC_FLAG_INIT;    // always set when checked
 8
 9 void count1m(int id)
10 {
11     while (!ready) {
12         std::this_thread::yield();
13     } // 等待主线程中设置 ready 为 true.
14
15     for (int i = 0; i < 1000000; ++i) {
16     } // 计数.
17
18     // 如果某个线程率先执行完上面的计数过程,则输出自己的 ID.
19     // 此后其他线程执行 test_and_set 是 if 语句判断为 false,
20     // 因此不会输出自身 ID.
21     if (!winner.test_and_set()) {
22         std::cout << "thread #" << id << " won!
";
23     }
24 };
25
26 int main()
27 {
28     std::vector<std::thread> threads;
29     std::cout << "spawning 10 threads that count to 1 million...
";
30     for (int i = 1; i <= 10; ++i)
31         threads.push_back(std::thread(count1m, i));
32     ready = true;
33
34     for (auto & th:threads)
35         th.join();
36
37     return 0;
38 }
std::atomic_flag 的 test_and_set 函数是原子的:
test_and_set() 函数检查 std::atomic_flag 标志,如果 std::atomic_flag 之前没有被设置过,则设置 std::atomic_flag 的标志,并返回先前该 std::atomic_flag 对象是否被设置过,如果之前 std::atomic_flag 对象已被设置,则返回 true,否则返回 false。
std::atomic_flag 的 clear 函数,清除 std::atomic_flag 标志使得下一次调用 std::atomic_flag::test_and_set 返回 false。
参考文档: