前言
本文将学习如何利用Spring boot快速创建SOAP webservice服务;
虽然目前REST和微服务越来越流行,但是SOAP在某些情况下,仍然有它的用武之地;
在本篇 spring boot SOAP教程中,我们会专注于和Spring boot相关的配置,感受下在Spring Boot中,创建SOAP webservice是如何的简便、快速;
本文将以一个"学生搜索"这个小功能作为示例,演示Spring Boot中SOAP webservice的创建过程;
技术栈
JDK 1.8, Eclipse, Maven– 开发环境Spring-boot– 基础开发框架wsdl4j– 发布WSDLSOAP-UI– 测试服务JAXB maven plugin- 代码生成
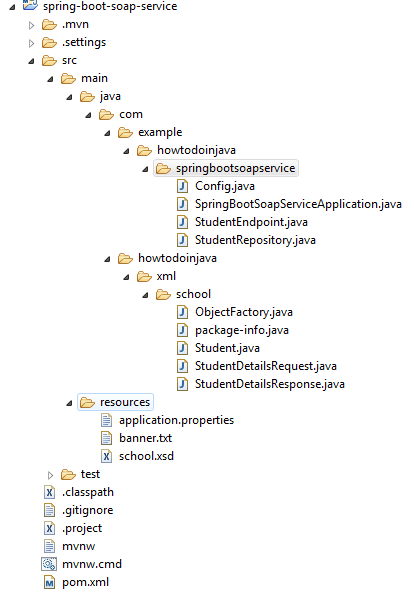
工程结构
本工程的代码及文件目录结构如下
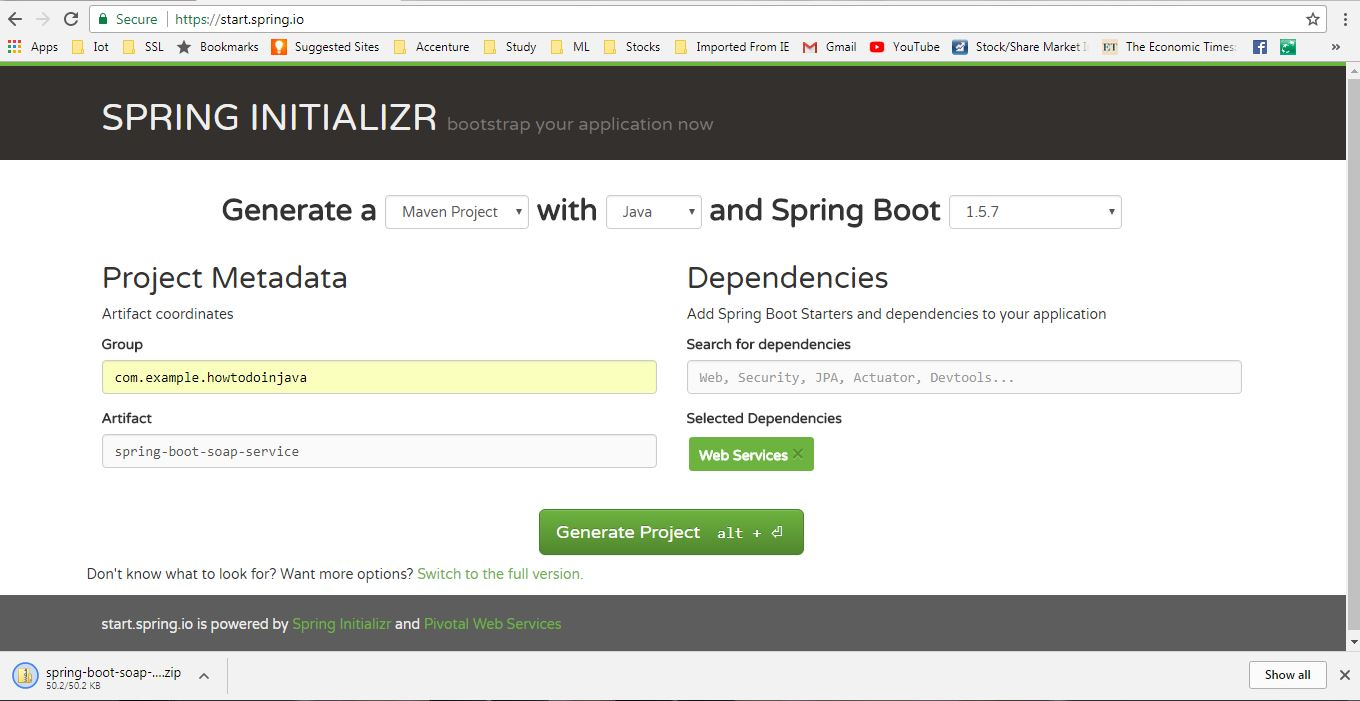
创建Spring Boot工程
访问 SPRING INITIALIZR网站,添加Web Services依赖,输入maven的GAV 坐标,点击下载工程,下载完成后解压导入IDE即可;
修改pom.xml文件,添加Wsdl4j依赖:
<dependency>
    <groupId>wsdl4j</groupId>
    <artifactId>wsdl4j</artifactId>
</dependency>
创建SOAP Domain模型并生成Java代码
首先,我们需要给我们的服务创建domain(方法和参数),出于简便考虑,我将请求和响应放在了同一个XSD文件里,不过在实际应用开发的时候,通常需要放到多个XSD文件里;
创建student.xsd文件,并放到我们工程的resources 目录下
student.xsd
<xs:schema xmlns:xs="http://www.w3.org/2001/XMLSchema" xmlns:tns="http://www.howtodoinjava.com/xml/school"
targetNamespace="http://www.howtodoinjava.com/xml/school" elementFormDefault="qualified">

    <xs:element name="StudentDetailsRequest">
        <xs:complexType>
            <xs:sequence>
                <xs:element name="name" type="xs:string"/>
            </xs:sequence>
        </xs:complexType>
    </xs:element>

    <xs:element name="StudentDetailsResponse">
        <xs:complexType>
            <xs:sequence>
                <xs:element name="Student" type="tns:Student"/>
            </xs:sequence>
        </xs:complexType>
    </xs:element>

    <xs:complexType name="Student">
        <xs:sequence>
            <xs:element name="name" type="xs:string"/>
            <xs:element name="standard" type="xs:int"/>
            <xs:element name="address" type="xs:string"/>
        </xs:sequence>
    </xs:complexType>

</xs:schema>
添加JAXB maven插件用于生成代码
我们将使用jaxb2-maven-plugin来高效的生成domain代码,首先需要在pom.xml文件添加以下插件配置代码:
<plugin>
    <groupId>org.codehaus.mojo</groupId>
    <artifactId>jaxb2-maven-plugin</artifactId>
    <version>1.6</version>
    <executions>
        <execution>
            <id>xjc</id>
            <goals>
                <goal>xjc</goal>
            </goals>
        </execution>
    </executions>
    <configuration>
        <schemaDirectory>${project.basedir}/src/main/resources/</schemaDirectory>
        <outputDirectory>${project.basedir}/src/main/java</outputDirectory>
        <clearOutputDir>false</clearOutputDir>
    </configuration>
</plugin>
该插件将使用 XJC工具作为代码生成引擎,XJC能将XML schema 文件转成带注解的代码;
现在,我们就可以执行以上插件生成代码了;
创建SOAP Webservice Endpoint
StudentEndpoint类会处理所有访问该服务的请求,并委派给StudentRepository去处理,具体代码如下:
package com.example.howtodoinjava.springbootsoapservice;

import org.springframework.beans.factory.annotation.Autowired;
import org.springframework.ws.server.endpoint.annotation.Endpoint;
import org.springframework.ws.server.endpoint.annotation.PayloadRoot;
import org.springframework.ws.server.endpoint.annotation.RequestPayload;
import org.springframework.ws.server.endpoint.annotation.ResponsePayload;
import com.howtodoinjava.xml.school.StudentDetailsRequest;
import com.howtodoinjava.xml.school.StudentDetailsResponse;

@Endpoint
public class StudentEndpoint
{
    private static final String NAMESPACE_URI = "http://www.howtodoinjava.com/xml/school";

    private StudentRepository StudentRepository;

    @Autowired
    public StudentEndpoint(StudentRepository StudentRepository) {
        this.StudentRepository = StudentRepository;
    }

    @PayloadRoot(namespace = NAMESPACE_URI, localPart = "StudentDetailsRequest")
    @ResponsePayload
    public StudentDetailsResponse getStudent(@RequestPayload StudentDetailsRequest request) {
        StudentDetailsResponse response = new StudentDetailsResponse();
        response.setStudent(StudentRepository.findStudent(request.getName()));

        return response;
    }
}
对上面的几个注解做个简单说明(可以和Spring MVC的Controller做个类比,有点相似):
@Endpoint声明用于处理SOAP消息@PayloadRoot根据namespace和localPart映射对应的处理方法@RequestPayload声明进来的消息将会与该方法的参数映射@ResponsePayload方法返回值的映射
创建Data Repository
出于简便考虑,我们将直接在代码里初始化相关数据,代码如下:
创建StudentRepository.java,加上@Repository注解,添加findStudent()方法:
package com.example.howtodoinjava.springbootsoapservice;

import java.util.HashMap;
import java.util.Map;
import javax.annotation.PostConstruct;
import org.springframework.stereotype.Component;
import org.springframework.util.Assert;
import com.howtodoinjava.xml.school.Student;

@Component
public class StudentRepository {
    private static final Map<String, Student> students = new HashMap<>();

    @PostConstruct
    public void initData() {

        Student student = new Student();
        student.setName("Sajal");
        student.setStandard(5);
        student.setAddress("Pune");
        students.put(student.getName(), student);

        student = new Student();
        student.setName("Kajal");
        student.setStandard(5);
        student.setAddress("Chicago");
        students.put(student.getName(), student);

        student = new Student();
        student.setName("Lokesh");
        student.setStandard(6);
        student.setAddress("Delhi");
        students.put(student.getName(), student);

        student = new Student();
        student.setName("Sukesh");
        student.setStandard(7);
        student.setAddress("Noida");
        students.put(student.getName(), student);
    }

    public Student findStudent(String name) {
        Assert.notNull(name, "The Student's name must not be null");
        return students.get(name);
    }
}
添加SOAP Webservice 配置
添加一个带 @Configuration注解的配置类:
package com.example.howtodoinjava.springbootsoapservice;

import org.springframework.boot.web.servlet.ServletRegistrationBean;
import org.springframework.context.ApplicationContext;
import org.springframework.context.annotation.Bean;
import org.springframework.context.annotation.Configuration;
import org.springframework.core.io.ClassPathResource;
import org.springframework.ws.config.annotation.EnableWs;
import org.springframework.ws.config.annotation.WsConfigurerAdapter;
import org.springframework.ws.transport.http.MessageDispatcherServlet;
import org.springframework.ws.wsdl.wsdl11.DefaultWsdl11Definition;
import org.springframework.xml.xsd.SimpleXsdSchema;
import org.springframework.xml.xsd.XsdSchema;

@EnableWs
@Configuration
public class Config extends WsConfigurerAdapter
{
    @Bean
    public ServletRegistrationBean messageDispatcherServlet(ApplicationContext applicationContext)
    {
        MessageDispatcherServlet servlet = new MessageDispatcherServlet();
        servlet.setApplicationContext(applicationContext);
        servlet.setTransformWsdlLocations(true);
        return new ServletRegistrationBean(servlet, "/service/*");
    }

    @Bean(name = "studentDetailsWsdl")
    public DefaultWsdl11Definition defaultWsdl11Definition(XsdSchema countriesSchema)
    {
        DefaultWsdl11Definition wsdl11Definition = new DefaultWsdl11Definition();
        wsdl11Definition.setPortTypeName("StudentDetailsPort");
        wsdl11Definition.setLocationUri("/service/student-details");
        wsdl11Definition.setTargetNamespace("http://www.howtodoinjava.com/xml/school");
        wsdl11Definition.setSchema(countriesSchema);
        return wsdl11Definition;
    }

    @Bean
    public XsdSchema countriesSchema()
    {
        return new SimpleXsdSchema(new ClassPathResource("school.xsd"));
    }
}
- 该类继承了
WsConfigurerAdapter类配置了注解驱动的 Spring-WS编程模式; MessageDispatcherServlet- Spring-WS使用该类处理SOAP 请求,我们需要把该Servlet注入ApplicationContext ,以便Spring-WS能找到其它Bean;DefaultWsdl11Definition使用XsdSchema暴露了一个标准的的WSDL 1.1,bean的名字studentDetailsWsdl 将会作为wsdl 暴露出去的名称,我们可以通过http://localhost:8080/service/studentDetailsWsdl.wsdl路径访问;
Spring boot SOAP webservice例子演示
使用mvn clean install maven命名构建工程,并使用java -jar targetspring-boot-soap-service-0.0.1-SNAPSHOT.jar命令启动应用;
执行完以上操作后,将会以默认的8080端口启动一个tomcat服务,本应用将部署在该服务里;
现在我们可以访问http://localhost:8080/service/studentDetailsWsdl.wsdl路径,确认wsdl是否是正确的:
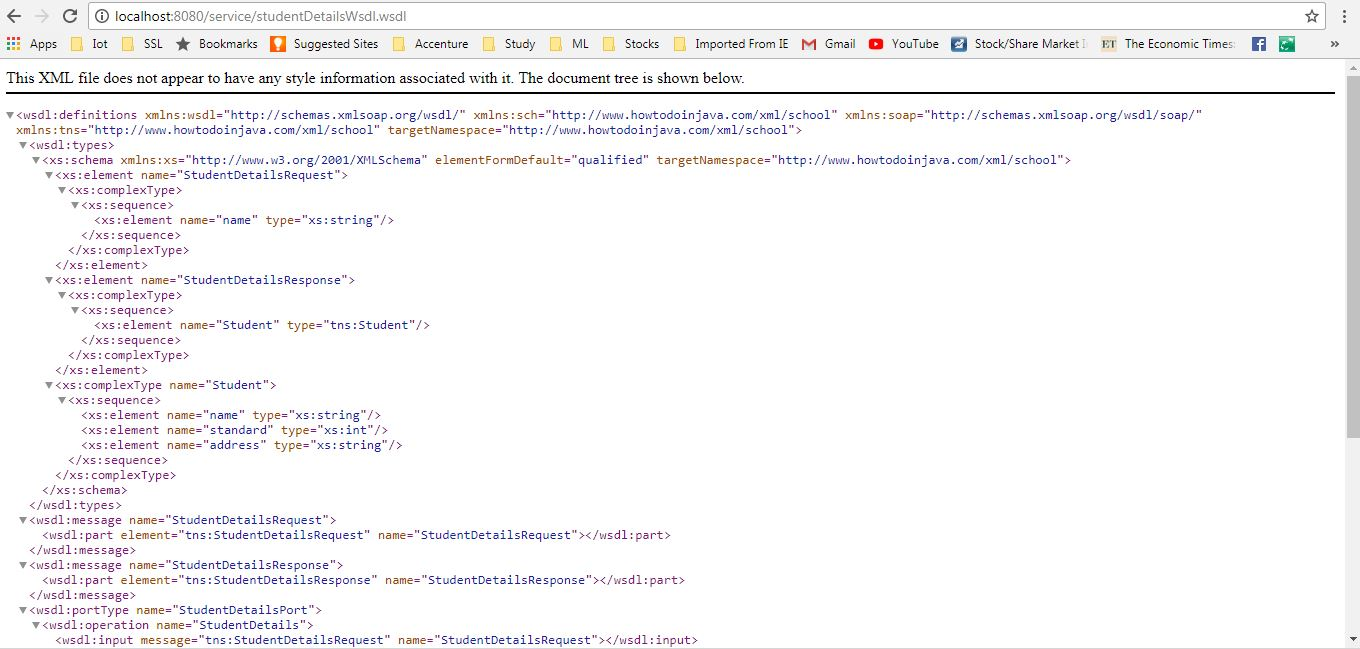
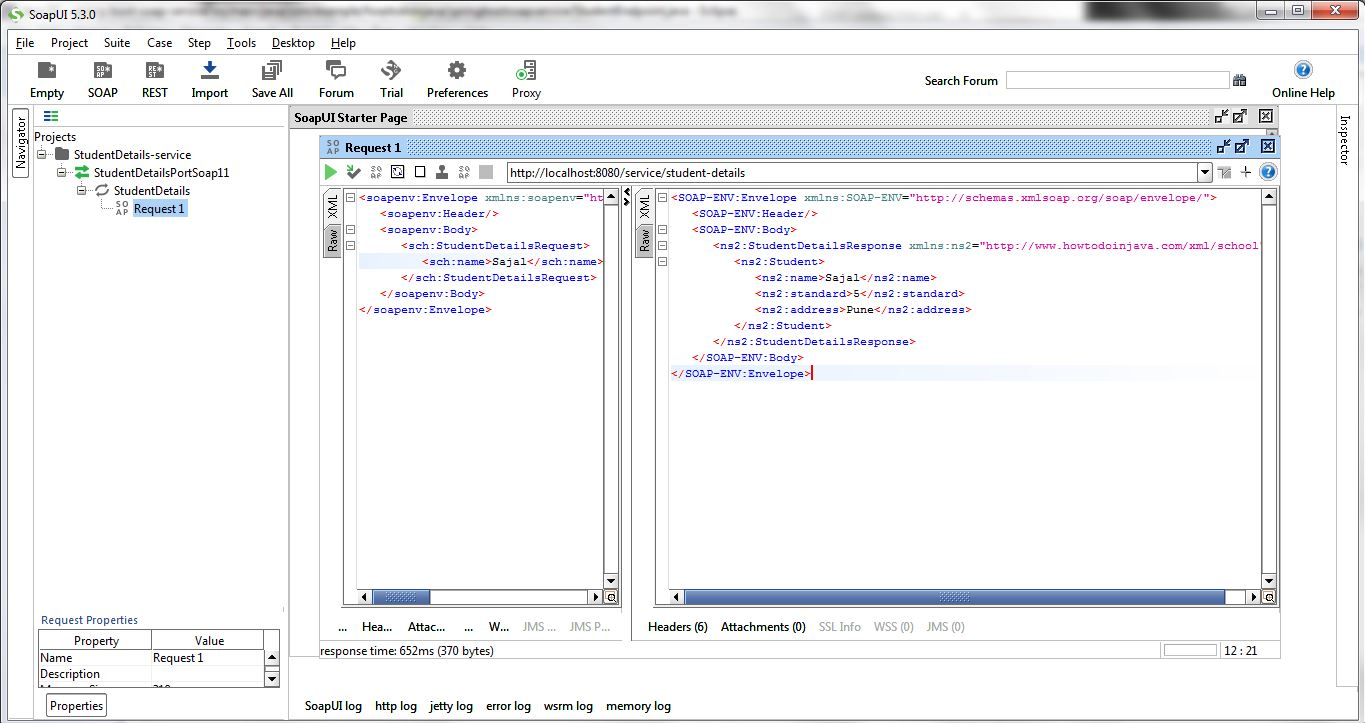
如果我们的wsdl没问题的话,我们可以使用该WSDL 在SOAP ui 里创建一个工程,并测试该应用,请求和响应示例如下:
请求:
<soapenv:Envelope xmlns:soapenv="http://schemas.xmlsoap.org/soap/envelope/" xmlns:sch="http://www.howtodoinjava.com/xml/school">
   <soapenv:Header/>
   <soapenv:Body>
      <sch:StudentDetailsRequest>
         <sch:name>Sajal</sch:name>
      </sch:StudentDetailsRequest>
   </soapenv:Body>
</soapenv:Envelope>
响应
<SOAP-ENV:Envelope xmlns:SOAP-ENV="http://schemas.xmlsoap.org/soap/envelope/">
   <SOAP-ENV:Header/>
   <SOAP-ENV:Body>
      <ns2:StudentDetailsResponse xmlns:ns2="http://www.howtodoinjava.com/xml/school">
         <ns2:Student>
            <ns2:name>Sajal</ns2:name>
            <ns2:standard>5</ns2:standard>
            <ns2:address>Pune</ns2:address>
         </ns2:Student>
      </ns2:StudentDetailsResponse>
   </SOAP-ENV:Body>
</SOAP-ENV:Envelope>
总结
本文学习了如何使用Spring Boot创建SOAP webservice,同时也学习了如何利用wsdl生成代码,以及Spring-WS如何处理SOAP 请求