一、URL
URL配置(URLconf)就像Django 所支撑网站的目录。它的本质是URL模式以及要为该URL模式调用的视图函数之间的映射表;你就是以这种方式告诉Django,对于这个URL调用这段代码,对于那个URL调用那段代码。
urlpatterns = [
    url(正则表达式, views视图函数,参数,别名),
]
别名 name="reg" ,跟 标签 {% url "reg" %} 配合使用,意味着中国url 指向 别名代表的那个 url匹配。
    这个 url 标签 有好几种情况用法,在 2.1 版本,【加参数,{% url 'bieming' {{ canshu }} %}】
      【url.py 别名重名 https://docs.djangoproject.com/zh-hans/2.1/intro/tutorial03/】
参数说明:
- 一个正则表达式字符串
- 一个可调用对象,通常为一个视图函数或一个指定视图函数路径的字符串
- 可选的要传递给视图函数的默认参数(字典形式)
- 一个可选的name参数
二、例子
url(r'^index.html/(d+)/(w+)', views.index),

def index(request,a,b):
    print(request.GET)
    print(a)
    print(b)
    return HttpResponse(a+"  "+b)

URL里有 无名分组匹配时候,会给 views 函数 位置传参

[15/Sep/2019 14:56:21] "GET /index.html/123/qwe HTTP/1.1" 200 8
<QueryDict: {}>
123
qwe

===========================

url(r'^index1.html/(?P<year>d{4})/(?P<month>d{2})', views.index1 ),

def index1(request,month,year):
    print(request.GET)
    print("year",year)
    print("month",month)
    return HttpResponse("year:{} month:{}".format(year,month))

URL里的有名分组,匹配到后给views函数 关键字传参,相当于在URL()的参数位置写上匹配到的字典。比如下面的例子
<QueryDict: {}>
[15/Sep/2019 14:59:01] "GET /index1.html/2020/03 HTTP/1.1" 200 18
year 2020
month 03

==========================

url(r'^index3.html/(?P<year>d+)', views.index3 ,{"name":"qweqwe","age":12}),

def index3(request,year,age,name):
    print(request.GET)
    print("year",year)
    print("name",name)
    print("age",age)
    return HttpResponse(year)

当匹配到这个URL时候,会将有名分组 year +到后面的字典里,

[15/Sep/2019 15:02:16] "GET /index3.html/2020 HTTP/1.1" 200 4
year 2020
name qweqwe
age 12

==============================

url(r'^index2.html$', views.index2),

def index2(request):
    print(request.GET)
    aa = request.GET.get("aa")
    print(aa)
    return HttpResponse(aa)

【http://127.0.0.1:8888/index2.html?aa=213】
请求的URL是带有传参的,这种传参是赋值给 get方法

<QueryDict: {'aa': ['213']}>
[15/Sep/2019 15:11:53] "GET /index2.html?aa=213 HTTP/1.1" 200 3
213
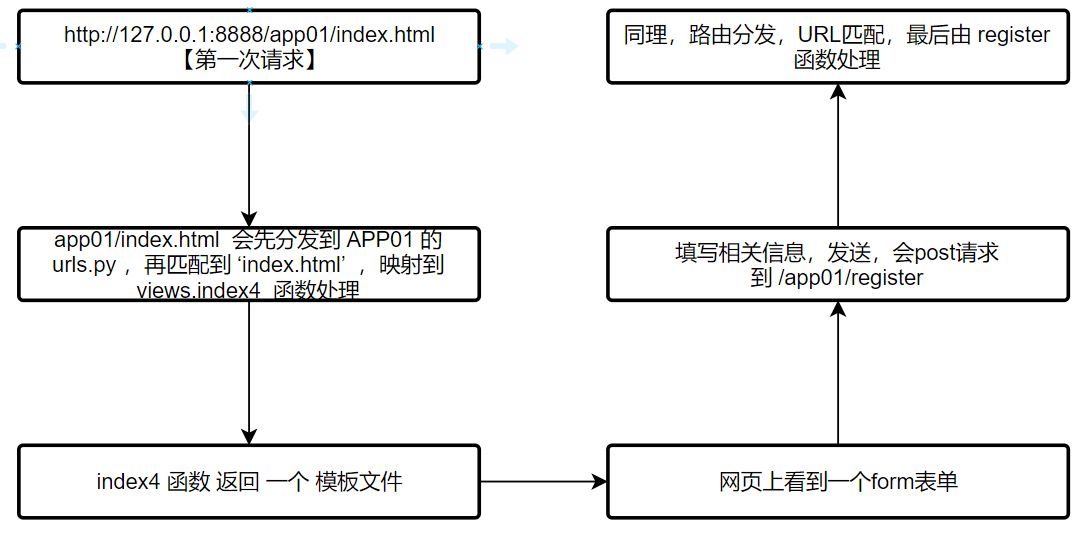
三、路由分发
存在将不同URL分类到不同的APP中再处理,采取路由分发
在  项目的 urls.py 文件
导入 include
from django.conf.urls import url,include

    url(r'^app01', include("app01.urls")),

在 APP01 下创建 urls.py  文件
所有app01 的请求就转到 APP01  下的 urls.py  文件 做URL处理。
APP01 下的 urls.py 文件
from django.conf.urls import url,include
from app01 import views
urlpatterns = [
    url(r'/index.html', views.index4),
    url(r'/register', views.register),
]
views.py 的函数
def index4(request):

    return render(request,"index.html")

def register(request):
    print("post ",request.POST)

    return HttpResponse("ok111")
模板文件【HTML】的 form表单 , post 请求
<h1>学生注册</h1>
<form action="/app01/register" method="post">
    {% csrf_token %} {# post 请求 加这个 #}
    <p>姓名 <input type="text" name="user"></input></p>
    <p>年龄 <input type="text" name="age"></input></p>
    <p>爱好
        <input type="checkbox" name="hobby" value="1">足球</input>
        <input type="checkbox" name="hobby" value="2">篮球</input>
        <input type="checkbox" name="hobby" value="3">乒乓球</input>
    </p>
    <p><input type="submit" >提交</p>
</form>
最后 在 后台打印
post  <QueryDict:
{
  'csrfmiddlewaretoken': ['qzqavNxXMQtYzbNdUUa1mfZp6GpqU3tCCYlvJQUWLhd0mJ3gxpsTYDKR0P3biwrr'],
  'user': ['qwe'],
  'age': ['2'],
  'hobby': ['1']
}
>
如果改成 get 请求, 那么 会在URL地址栏 看到提交后的 URL是把 提交的参数显示出来了,
chome 开发者模式 也能看到
Request URL: http://127.0.0.1:8888/app01/register?user=qwe&age=2222222222&hobby=3
Request Method: GET
Status Code: 200 OK
Remote Address: 127.0.0.1:8888
Referrer Policy: no-referrer-when-downgrade
后台打印
<QueryDict:
 {
'user': ['qwe'],
'age': ['2222222222'],
'hobby': ['3']}
>
这个 就没有 token 了
四、视图函数 views
http请求中产生两个核心对象:
http请求:HttpRequest对象
http响应:HttpResponse对象
所在位置:django.http
之前我们用到的参数request就是HttpRequest 检测方法:isinstance(request,HttpRequest)
HttpRequest对象的属性和方法:
# path:       请求页面的全路径,不包括域名
#
# method:     请求中使用的HTTP方法的字符串表示。全大写表示。例如
#
#                    if  req.method=="GET":
#
#                              do_something()
#
#                    elseif req.method=="POST":
#
#                              do_something_else()
#
# GET:         包含所有HTTP GET参数的类字典对象
#
# POST:       包含所有HTTP POST参数的类字典对象
#
#              服务器收到空的POST请求的情况也是可能发生的,也就是说,表单form通过
#              HTTP POST方法提交请求,但是表单中可能没有数据,因此不能使用
#              if req.POST来判断是否使用了HTTP POST 方法;应该使用  if req.method=="POST"
#
#
#
# COOKIES:     包含所有cookies的标准Python字典对象;keys和values都是字符串。
#
# FILES:      包含所有上传文件的类字典对象;FILES中的每一个Key都是<input type="file" name="" />标签中name属性的值,FILES中的每一个value同时也是一个标准的python字典对象,包含下面三个Keys:
#
#             filename:      上传文件名,用字符串表示
#             content_type:   上传文件的Content Type
#             content:       上传文件的原始内容
#
#
# user:       是一个django.contrib.auth.models.User对象,代表当前登陆的用户。如果访问用户当前
#              没有登陆,user将被初始化为django.contrib.auth.models.AnonymousUser的实例。你
#              可以通过user的is_authenticated()方法来辨别用户是否登陆:
#              if req.user.is_authenticated();只有激活Django中的AuthenticationMiddleware
#              时该属性才可用
#
# session:    唯一可读写的属性,代表当前会话的字典对象;自己有激活Django中的session支持时该属性才可用。

#方法
get_full_path(),   比如:http://127.0.0.1:8000/index33/?name=123 ,req.get_full_path()得到的结果就是/index33/?name=123
req.path:/index33
注意一个常用方法:request.POST.getlist('')
HttpResponse对象:
对于HttpRequest对象来说,是由django自动创建的,但是,HttpResponse对象就必须我们自己创建。每个view请求处理方法必须返回一个HttpResponse对象。
HttpResponse类在django.http.HttpResponse
在HttpResponse对象上扩展的常用方法:
页面渲染:         render()(推荐)
页面跳转:         redirect("路径")
locals():    可以直接将函数中所有的变量传给模板