![]()
十年河东,十年河西,莫欺少年穷
学无止境,精益求精
首先,本篇教程为基础教程,大牛请翻过,小白值得一看
如下:
1、准备数据
create database StudentDB
go
use StudentDB
go
create table Student
(
StudentId varchar(50) primary key,
StudentSex nvarchar(2),
StudentName nvarchar(50),
StudentAge int,
CreateDate datetime
)

insert into Student
values(newid(),'女','王娜',18,getdate())

insert into Student
values(newid(),'女','李丽',19,getdate())

insert into Student
values(newid(),'女','阿卜杜拉',17,getdate())

insert into Student
values(newid(),'女','高骏花',20,getdate())

insert into Student
values(newid(),'女','陈雪好',18,getdate())

insert into Student
values(newid(),'男','刘邦',18,getdate())

insert into Student
values(newid(),'男','陈世美',16,getdate())

insert into Student
values(newid(),'男','陈学德',20,getdate())

insert into Student
values(newid(),'男','陈夏明',18,getdate())

insert into Student
values(newid(),'男','龙德海',19,getdate())
创建一个数据库,一张数据表,十条数据,这~没什么好说的
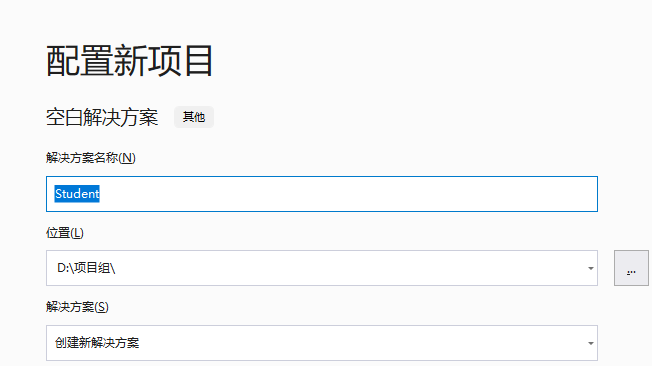
2、打开VS2019、创建一个空白解决方案 Student,如下:
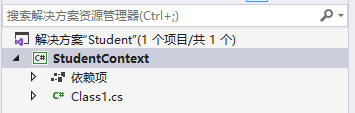
3、在项目中创建一个NetCore类库,并命名为:StudentContext
3.1、打开程序包管理器控制台(工具->NuGet包管理器->程序包管理器控制台),执行如下命令:
   Install-Package Microsoft.EntityFrameworkCore
   Install-Package Microsoft.EntityFrameworkCore.SqlServer
   Install-Package Microsoft.EntityFrameworkCore.Tools
   Install-Package Microsoft.VisualStudio.Web.CodeGeneration.Design
待四个安装包依次安装成功后,我们执行生成数据库上下文的命令,如下:
Scaffold-DbContext "Data Source=DESKTOP-VD79APRSQLEXPRESS;Initial Catalog=StudentDB;User ID=sa;Password=chen1234" Microsoft.EntityFrameworkCore.SqlServer -OutputDir Models -Forc
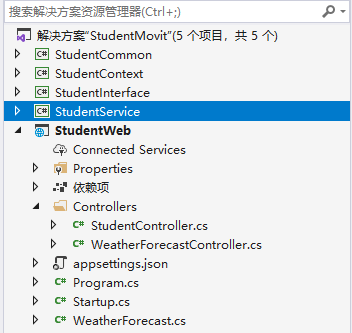
这样,该项目下,就会生成用于数据库访问的上下文类及各个数据表对应的实体,如下:

4、添加NetCore Web项目,并命名为:StudentWeb
在StartUp.cs中注册数据库服务,如下:
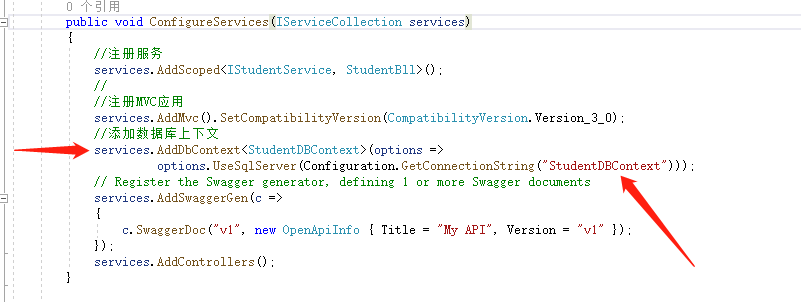
整个Startup.cs代码如下(后续不在贴出该类的代码):


using System;
using System.Collections.Generic;
using System.Linq;
using System.Threading.Tasks;
using Microsoft.AspNetCore.Builder;
using Microsoft.AspNetCore.Hosting;
using Microsoft.AspNetCore.HttpsPolicy;
using Microsoft.AspNetCore.Mvc;
using Microsoft.EntityFrameworkCore;
using Microsoft.Extensions.Configuration;
using Microsoft.Extensions.DependencyInjection;
using Microsoft.Extensions.Hosting;
using Microsoft.Extensions.Logging;
using StudentContext.Models;
using StudentInterface;
using StudentService;
//
using System.IO;
using System.Reflection;
using Swashbuckle.AspNetCore.Swagger;
using Microsoft.OpenApi.Models;

namespace StudentWeb
{
    public class Startup
    {
        public Startup(IConfiguration configuration)
        {
            Configuration = configuration;
        }

        public IConfiguration Configuration { get; }

        // This method gets called by the runtime. Use this method to add services to the container.
        public void ConfigureServices(IServiceCollection services)
        {
            //注册服务
            services.AddScoped<IStudentService, StudentBll>();
            //
            //注册MVC应用
            services.AddMvc().SetCompatibilityVersion(CompatibilityVersion.Version_3_0);
            //添加数据库上下文
            services.AddDbContext<StudentDBContext>(options =>
                     options.UseSqlServer(Configuration.GetConnectionString("StudentDBContext")));
            // Register the Swagger generator, defining 1 or more Swagger documents
            services.AddSwaggerGen(c =>
            {
                c.SwaggerDoc("v1", new OpenApiInfo { Title = "My API", Version = "v1" });
            });
            services.AddControllers();
        }

        // This method gets called by the runtime. Use this method to configure the HTTP request pipeline.
        public void Configure(IApplicationBuilder app, IWebHostEnvironment env)
        {
            if (env.IsDevelopment())
            {
                app.UseDeveloperExceptionPage();
            }

            // Enable middleware to serve generated Swagger as a JSON endpoint.
            app.UseSwagger();

            // Enable middleware to serve swagger-ui (HTML, JS, CSS, etc.),
            // specifying the Swagger JSON endpoint.
            app.UseSwaggerUI(c =>
            {
                c.SwaggerEndpoint("/swagger/v1/swagger.json", "My API V1");
            });

            app.UseHttpsRedirection();

            app.UseRouting();

            app.UseAuthorization();

            app.UseEndpoints(endpoints =>
            {
                endpoints.MapControllers();
            });
        }
    }
}
在 appsettings.json 文件中添加数据库连接字符串,如下:
{
  "Logging": {
    "LogLevel": {
      "Default": "Information",
      "Microsoft": "Warning",
      "Microsoft.Hosting.Lifetime": "Information"
    }
  },
  "AllowedHosts": "*",
  "ConnectionStrings": {
    "StudentDBContext": "Data Source=DESKTOP-VD79APR\SQLEXPRESS;Initial Catalog=StudentDB;User ID=sa;Password=chen1234;"
  }
}
这样,数据库这块的应用就搭建完毕了,下面我们写两个方法,一个用于根据姓名获取同名学生列表,一个用于创建一个新的学生,如下:
5、在项目中添加接口项目:StudentInterface 及 实现接口的基类项目:StudentService,如下:

关于接口层 及 实现层的代码,我贴出来,这没什么好说的,都是些数据库操作的代码,如下:
接口层:
using StudentCommon;
using StudentContext.Models;
using System;
using System.Collections.Generic;

namespace StudentInterface
{
    public interface IStudentService
    {
        List<Student> GetStudent(string StudentName);
        BaseResponse CreateStudent(Student model);
    }
}
实现层:
using StudentCommon;
using StudentContext.Models;
using StudentInterface;
using System;
using System.Collections.Generic;
using System.Data;
using System.Linq;

namespace StudentService
{
    public class StudentBll : IStudentService
    {
        private readonly StudentDBContext _context;

        public StudentBll(StudentDBContext context)
        {
            _context = context;
        }
        public List<Student> GetStudent(string StudentName)
        {
            var result = _context.Student.Where(A => A.StudentName == StudentName).ToList();
            return result;
        }

        public BaseResponse CreateStudent(Student model)
        {
            if (model != null)
            {
                _context.Student.Add(model);
                _context.SaveChanges();
                return CommonBaseResponse.SetResponse(true);
            }
            return CommonBaseResponse.SetResponse(false);
        }
    }
}
然后在启动类中注册 接口及具体实现:
            //注册服务
            services.AddScoped<IStudentService, StudentBll>();
6、在NEtCore web项目中添加一个Api控制器,并命名为:StudentController,代码如下:
using System;
using System.Collections.Generic;
using System.Linq;
using System.Threading.Tasks;
using Microsoft.AspNetCore.Http;
using Microsoft.AspNetCore.Mvc;
using StudentContext.Models;
using StudentInterface;

namespace StudentWeb.Controllers
{
    [Route("api/[controller]/[action]")]
    [ApiController]
    public class StudentController : ControllerBase
    {
        private IStudentService _studentService;
        public StudentController(IStudentService studentService)
        {
            _studentService = studentService;
        }

        /// <summary>
        /// 根据学生姓名 获取学生列表
        /// </summary>
        /// <param name="name">姓名</param>
        /// <returns>同名学生列表</returns>
        [HttpGet]
        public IActionResult GetStudentsByName(string name)
        {
            return Ok(_studentService.GetStudent(name));
        }


        /// <summary>
        /// 获取一个Student Json字符串
        /// </summary>
        /// <param name="name">姓名</param>
        /// <param name="sex">性别</param>
        /// <returns>学生对象Json串</returns>
        [HttpGet]
        public IActionResult GetStudent(string name,string sex)
        {
            Student model = new Student()
            {
                StudentName = name,
                StudentId = Guid.NewGuid().ToString(),
                StudentSex = "女",
                StudentAge = 30,
                CreateDate = DateTime.Now
            };
            return Ok(model);
        }

        /// <summary>
        /// 创建一个新学生 并保存数据库
        /// </summary>
        /// <param name="model">学生对象</param>
        /// <returns>基础返回值 BaseResponse</returns>
        [HttpPost]
        public IActionResult CreateStudent(Student model)
        {
            var result = _studentService.CreateStudent(model);
            return Ok(result);
        }
    }
}
到此为止,我们的webApi就书写完成了,现在我们搭建 Swagger,并用Swagger来测试我们的服务,如下:
7、如何搭建 Swagger UI ?
打开打开程序包管理器控制台,执行如下命令,用于安装5.0.0版本的Swagger ,如下:
Install-Package Swashbuckle.AspNetCore -Version 5.0.0
然后在启动类中注册Swagger,如下:
引入命名空间:
//
using System.IO;
using System.Reflection;
using Swashbuckle.AspNetCore.Swagger;
using Microsoft.OpenApi.Models;
注册代码如下:
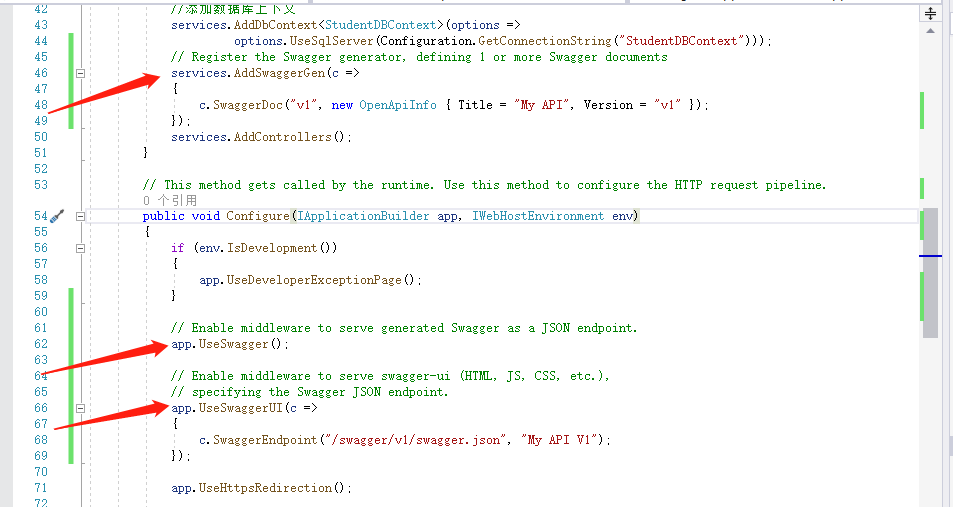
具体使用方法,详见微软教程:https://docs.microsoft.com/zh-cn/aspnet/core/tutorials/getting-started-with-swashbuckle?view=aspnetcore-3.1&tabs=visual-studio
启动应用,并导航到 http://localhost:<port>/swagger/v1/swagger.json。 生成的描述终结点的文档显示在 Swagger 规范 (swagger.json) 中。
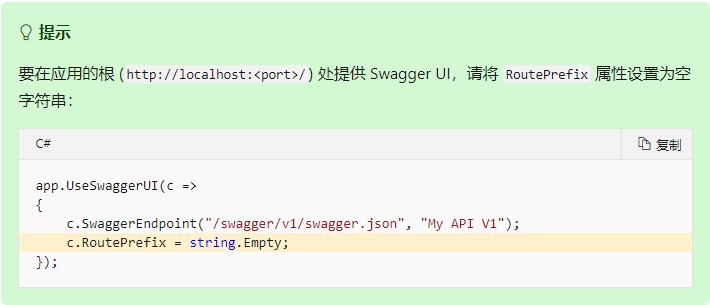
可在 http://localhost:<port>/swagger 找到 Swagger UI。 通过 Swagger UI 浏览 API,并将其合并其他计划中。
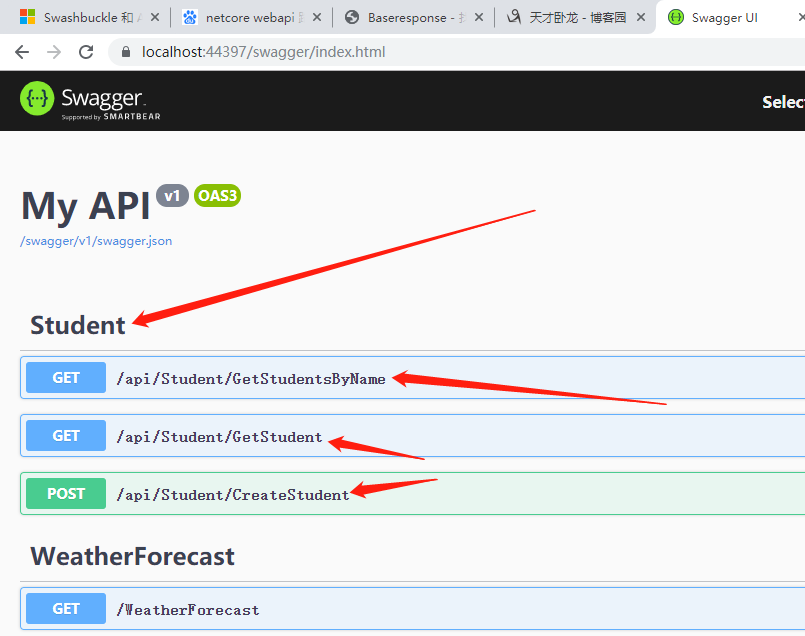
运行 Swagger,如下:
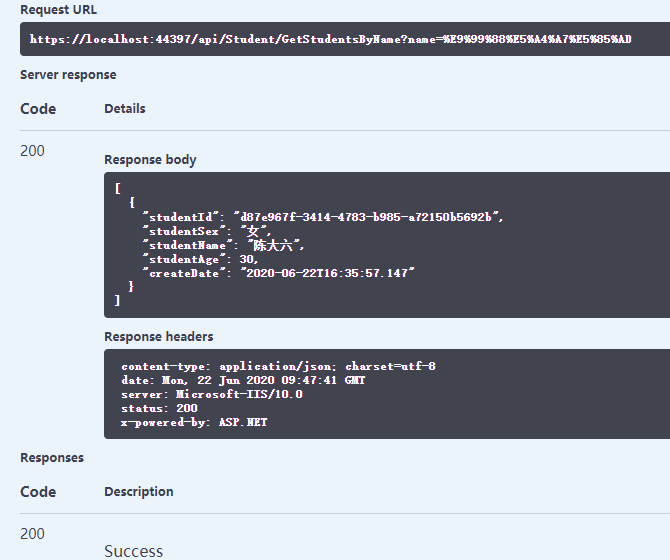
点击 Try it Out 即可调用写好的webApi ,执行结果如下:
顺便说下NetCore webApi路由,默认是:
[Route("api/[controller]")]
当然,我们可以修改为:

这样就可以精确到具体的Action方法了。
OK,就这么多吧,呵呵呵。
@陈卧龙的博客