关键字:JNDI,J2EE,Java,命名和目录接口,Java Naming and Directory Interface
摘要:
本文详细介绍了JNDI的架构与实现,JNDI的工作原理,并给出了具体代码,帮助读者更理解J2EE主要常用技术---JNDI.本文为系列文章的第一篇,其它相关文章会在近期推出。
名词解释
jndi是Java 命名和目录接口(Java Naming and Directory Interface,JNDI)的简称.从一开始就一直是 Java 2 平台企业版(JEE)的核心技术之一。在JMS,JMail,JDBC,EJB等技术中,就大量应用的这种技术。
为什么会有jndi
jndi诞生的理由似乎很简单。随着分布式应用的发展,远程访问对象访问成为常用的方法。虽然说通过 Socket等编程手段仍然可实现远程通信,但按照模式的理论来说,仍是有其局限性的。RMI技术,RMI-IIOP技术的产生,使远程对象的查找成为了技术焦点。JNDI技术就应运而生。JNDI技术产生后,就可方便的查找远程或是本地对象。
JNDI的架构与实现
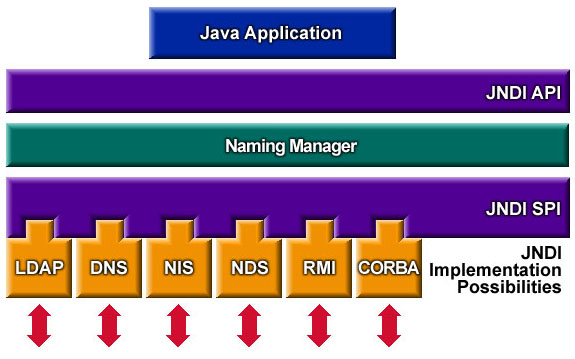
JNDI的架构与JDBC的架构非常类似.JNDI架构提供了一组标准命名系统的API,这些API在JDK1.3之前是作为一个单独的扩展包jndi.jar(通过这个地址下载),这个基础API构建在与SPI之上。这个API提供如下五个包
在应用程序中,我们实际上只使到用以上几个包的中类.具体调用类及通信过程对用户来说是透明的.
JNDI API提供了访问不同JNDI服务的一个标准的统一的实现,其具体实现可由不同的 Service Provider来完成。前面讲的为第一层JNDI API层.
最下层为JNDI SPI API及其具体实现。
图中所列的一些SPI可从http://java.sun.com/products/jndi/downloads/index.html下载.
 它包括了几个增强和下面的命名/目录服务提供者:
- LDAP(Lightweight Directory Access Protocol)服务提供者
- CORBA COS(Common Object Request Broker Architecture Common Object Services)命名服务提供者
- RMI(Java Remote Method Invocation)注册服务提供者
- DNS(Domain Name System)服务提供者.
- FSSP(File System Service Provider)文件系统服务提供者
- 其它服务提供者
中间层为命名管理层。其功能应该由JNDI SPI来完成。上层为JNDI API,这个API包在Java 2 SDK 1.3及以上的版本中已经包括。
前面讲解的只是作为应用程序客户端的架构实现,其服务端是由SPI对应的公司/厂商来实现的,我们只需将服务端的相关参数传给JNDI API就可以了,具体调用过程由SPI来完成.
JNDI工作原理
下面通过一个示例程序来说明JNDI工作原理(代码为自解释).
/*
    * Created on 2005-3-4
    *
    * To change the template for this generated file go to
    * Window>Preferences>Java>Code Generation>Code and Comments
    */
    package com.sily.jndi;
    import java.io.FileInputStream;
    import java.util.Properties;
    import javax.naming.Context;
    import javax.naming.InitialContext;
    /**
    * @author shizy
    *
    * To change the template for this generated type comment go to
    * Window>Preferences>Java>Code Generation>Code and Comments
    */
    public class TestJbossJNDI {
    /**
    *
    */
    public TestJbossJNDI() {
    super();
    // TODO Auto-generated constructor stub
    }
    public static void main(String[] args) { try {
    Properties env = new Properties();
    //载入jboss的SPI相关参数,包括初始上下文工厂,服务URL,等等
    env.load(new FileInputStream("jbossJndi.properties"));
    env.list(System.out);
    //通过JNDI api 初始化上下文
    InitialContext ctx = new javax.naming.InitialContext(env);
    System.out.println("Got context");
    //create a subContext
    ctx.createSubcontext("/sylilzy");
    ctx.createSubcontext("sylilzy/sily");
    //rebind a object
    ctx.rebind("sylilzy/sily/a", "I am sily a!");
    ctx.rebind("sylilzy/sily/b", "I am sily b!");
    //lookup context
    Context ctx1=(Context)ctx.lookup("sylilzy");
    Context ctx2=(Context)ctx1.lookup("/sylilzy/sily");
    ctx2.bind("/sylilzy/g", "this is g");
    //lookup binded object
    Object o;
    o=ctx1.lookup("sily/a");
    System.out.println("get object from jndi:"+o);
    //rename the object
    ctx2.rename("/sylilzy/g", "g1");
    o=ctx2.lookup("g1");
    System.out.println("get object from jndi:"+o);
    } catch (Exception e) {
    e.printStackTrace();
    }
    }
    }
结果输出如下:
-- listing properties --
java.naming.factory.initial=org.jnp.interfaces.NamingContextFactory
java.naming.provider.url=jnp://localhost:1099
java.naming.factory.url.pkgs=org.jboss.naming:org.jnp.interfaces
Got context
get object from jndi:I am sily a!
get object from jndi:this is g
java.naming.factory.initial=org.jnp.interfaces.NamingContextFactory
java.naming.provider.url=jnp://localhost:1099
java.naming.factory.url.pkgs=org.jboss.naming:org.jnp.interfaces
Got context
get object from jndi:I am sily a!
get object from jndi:this is g
程序中jbossJndi.properties文件的内容为:
java.naming.factory.initial=org.jnp.interfaces.NamingContextFactory
java.naming.factory.url.pkgs=org.jboss.naming:org.jnp.interfaces
java.naming.provider.url=jnp://localhost:1099
java.naming.factory.url.pkgs=org.jboss.naming:org.jnp.interfaces
java.naming.provider.url=jnp://localhost:1099
注意:要正确运行示例程序,请启动jboss,并将jboss的jbossall-client.jar文件放入classpath中。
上述示例程序在jboss服务器的jndi树上建立了几个上下文,并bind了几对象,大家可通过附录中的代码或其它工具查看
查看结果为:
-----------------------------
/sylilzy/sily
-----------------------------
/sylilzy/sily/b:I am sily b!
/sylilzy/sily/a:I am sily a!
/sylilzy/sily/g1:this is g
-----------------------------
-----------------------------
/sylilzy/sily
-----------------------------
/sylilzy/sily/b:I am sily b!
/sylilzy/sily/a:I am sily a!
/sylilzy/sily/g1:this is g
-----------------------------
-----------------------------
上述程序中,我们的代码只涉及到了jndi API,其它细节如初始化jboss jndi的初始上下文,建立网络连接,与服务器通信,对我们来说都是透明的,另外,我们将jboss jndi的spi包中的类名作为参数传入了程序中,要访问一个远程对象,我们所做的就这么多。
下面,再提供一个例子,与上例不同,我们不需要 jboss,我们使用sun的FSSP(File System Service Provider)文件系统服务提供者.注意在这个例子中要使用到前面所说的File System Service Provider for the Java Naming and Directory InterfaceTM (JNDI)相关类(下载)。
/*
    * Created on 2005-3-1
    *
    * To change the template for this generated file go to
    * Window>Preferences>Java>Code Generation>Code and Comments
    */
    package com.sily.jndi;
    import java.io.FileInputStream;
    import java.util.Properties;
    import javax.naming.*;
    import javax.naming.Context;
    import javax.naming.InitialContext;
    /**
    * @author shizy
    *
    * To change the template for this generated type comment go to
    * Window>Preferences>Java>Code Generation>Code and Comments
    */
    public class JndiTest1 {
    /**
    *
    */
    public JndiTest1() {
      super();
      // TODO Auto-generated constructor stub
     }
     public static void main(String[] args) {
      try {
       Properties env = new Properties();
       env.load(new FileInputStream("fileSystemService.properties"));
       env.put(Context.PROVIDER_URL, "file:///c:/");
       Context ctx = new InitialContext(env);
       ctx.createSubcontext("sylilzy");

    NamingEnumeration list = ctx.list("/");
       while (list.hasMore()) {
        NameClassPair nc = (NameClassPair) list.next();
        System.out.println(nc);
       }

    }
      catch (Exception e) {
       e.printStackTrace();
      }
     }
    }
上例中fileSystemService.properties文件的内容为:java.naming.factory.initial=com.sun.jndi.fscontext.RefFSContextFactory
这个例子较简单,运行后,它会列出C:\下所有的文件和目录,另外你会发现有一个新目录被创建了.本例不同于上例,它并不需要服务端,因为它访问的是文件系统.有关帮助可查阅包内的相关文档。
通过对比这两个例子,应该JNDI的工作原理有了一个大致的了解。
总结:
jndi技术体现了分布式应用的优点,同进它的 产生也为分布式对象提供了统一的访问接口。由于篇幅所限,对目录的操作本文未作介绍,其它内容将在接下来的系列中讨论。要对JNDI技术作全面的了解,请 参阅参考资料.要对于JNDI技术深入学习,仍有许多地方值得进一步了解,例如EJB容器所使用的JNDI所提供的对象就有 Local和Remote之分,对于Local Object,对于不同的JVM是不可访问的;对于远程对象的访问,还涉及到Java安全机制。
附录:
查看jboss jndi内容的代码:
//----------------------------------------
/*
    * Created on 2005-3-4
    *
    * To change the template for this generated file go to
    * Window>Preferences>Java>Code Generation>Code and Comments
    */
    package com.sily.jndi;
    import java.io.FileInputStream;
    import java.util.Properties;
    import javax.naming.*;
    import javax.naming.Context;
    import javax.naming.InitialContext;
    /**
    * @author shizy
    *
    * To change the template for this generated type comment go to
    * Window>Preferences>Java>Code Generation>Code and Comments
    */
    public class ListJbossJndi {
    /**
    *
    */
    public ListJbossJndi() {
      super();
      // TODO Auto-generated constructor stub
     }
     public static void main(String[] args) {
      try {
       Properties env = new Properties();
       env.load(new FileInputStream("jbossJndi.properties"));
       //env.list(System.out);
       Context ctx = new InitialContext(env);
       listCtx(ctx.lookup("sylilzy"));
      }
      catch (Exception e) {
       e.printStackTrace();
      }
     }
     static void listCtx(Object o){
      if(!(o instanceof Context))log(":"+o);
      else {
       log("\n-----------------------------");
      try {
       Context ctx=(Context)o;
       //log(ctx.getNameInNamespace()+"/:");
       NamingEnumeration list=ctx.listBindings("");
       while(list.hasMore()){
        Binding bind=(Binding)list.next();
        log("\n/"+ctx.getNameInNamespace()+"/"+bind.getName());
        listCtx(bind.getObject());
       }
       log("\n-----------------------------");
      }
      catch (NamingException e) {
       // TODO Auto-generated catch block
       e.printStackTrace();
      }
     }
     }
     static void log(Object o){
      System.out.print(o);
     }
    }