1.pip安装源
介绍
"""
1、采用国内源,加速下载模块的速度
2、常用pip源:
	-- 豆瓣:https://pypi.douban.com/simple
	-- 阿里:https://mirrors.aliyun.com/pypi/simple
3、加速安装的命令:
	-- >: pip install -i https://pypi.douban.com/simple 模块名
"""
永久配置安装源
Windows
"""
1、文件管理器文件路径地址栏敲:%APPDATA% 回车,快速进入 C:Users电脑用户AppDataRoaming 文件夹中
2、新建 pip 文件夹并在文件夹中新建 pip.ini 配置文件
3、新增 pip.ini 配置文件内容
"""
MacOS、Linux
"""
1、在用户根目录下 ~ 下创建 .pip 隐藏文件夹,如果已经有了可以跳过
	-- mkdir ~/.pip
2、进入 .pip 隐藏文件夹并创建 pip.conf 配置文件
	-- cd ~/.pip && touch pip.conf
3、启动 Finder(访达) 按 cmd+shift+g 来的进入,输入 ~/.pip 回车进入
4、新增 pip.conf 配置文件内容
"""
配置文件内容
"""
[global]
index-url = http://pypi.douban.com/simple
[install]
use-mirrors =true
mirrors =http://pypi.douban.com/simple/
trusted-host =pypi.douban.com
"""
2.虚拟环境的搭建
优点
1、使不同应用开发环境相互独立
2、环境升级不影响其他应用,也不会影响全局的python环境
3、防止出现包管理混乱及包版本冲突
windows
安装
# 建议使用pip3安装到python3环境下
pip3 install virtualenv
pip3 install virtualenvwrapper-win
配置虚拟环境管理器工作目录
# 配置环境变量:
# 控制面板 => 系统和安全 => 系统 => 高级系统设置 => 环境变量 => 系统变量 => 点击新建 => 填入变量名与值
变量名:WORKON_HOME  变量值:自定义存放虚拟环境的绝对路径
eg: WORKON_HOME: D:Virtualenvs

# 同步配置信息:
# 去向Python3的安装目录 => Scripts文件夹 => virtualenvwrapper.bat => 双击
MacOS、Linux
安装
# 建议使用pip3安装到python3环境下
pip3 install -i https://pypi.douban.com/simple virtualenv
pip3 install -i https://pypi.douban.com/simple virtualenvwrapper
工作文件
# 先找到virtualenvwrapper的工作文件 virtualenvwrapper.sh,该文件可以刷新自定义配置,但需要找到它
# MacOS可能存在的位置 /Library/Frameworks/Python.framework/Versions/版本号文件夹/bin
# Linux可能所在的位置 /usr/local/bin  |  ~/.local/bin  |  /usr/bin
# 建议不管virtualenvwrapper.sh在哪个目录,保证在 /usr/local/bin 目录下有一份
# 如果不在 /usr/local/bin 目录,如在 ~/.local/bin 目录,则复制一份到 /usr/local/bin 目录
	-- sudo cp -rf ~/.local/bin/virtualenvwrapper.sh /usr/local/bin
配置
# 在 ~/.bash_profile 完成配置,virtualenvwrapper的默认默认存放虚拟环境路径是 ~/.virtualenvs
# WORKON_HOME=自定义存放虚拟环境的绝对路径,需要自定义就解注
VIRTUALENVWRAPPER_PYTHON=/usr/local/bin/python3
source /usr/local/bin/virtualenvwrapper.sh

# 在终端让配置生效:
	-- source ~/.bash_profile
使用
# 在终端工作的命令

# 1、创建虚拟环境到配置的WORKON_HOME路径下
# 选取默认Python环境创建虚拟环境:
	-- mkvirtualenv 虚拟环境名称
# 基于某Python环境创建虚拟环境:
	-- mkvirtualenv -p python2.7 虚拟环境名称
	-- mkvirtualenv -p python3.6 虚拟环境名称

# 2、查看已有的虚拟环境
	-- workon

# 3、使用某个虚拟环境
	-- workon 虚拟环境名称

# 4、进入|退出 该虚拟环境的Python环境
	-- python | exit()

# 5、为虚拟环境安装模块
	-- pip或pip3 install 模块名

# 6、退出当前虚拟环境
	-- deactivate

# 7、删除虚拟环境(删除当前虚拟环境要先退出)
	-- rmvirtualenv 虚拟环境名称
pycharm使用
新建项目

添加环境
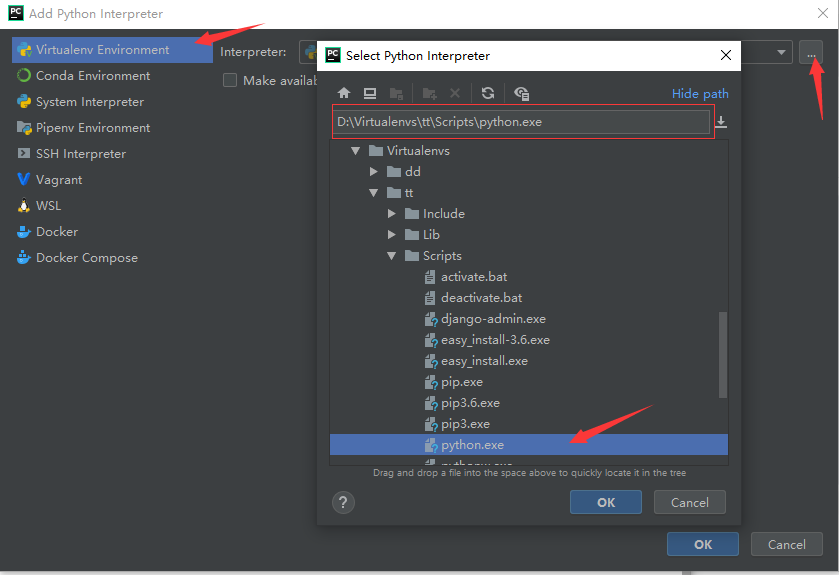
使用环境
3.luffy后台:Django项目创建
环境
"""
为luffy项目创建一个虚拟环境
>: mkvirtualenv luffy
"""

"""
按照基础环境依赖
>: pip install django==2.0.7
>: pip install djangorestframework
>: pip install pymysql
"""
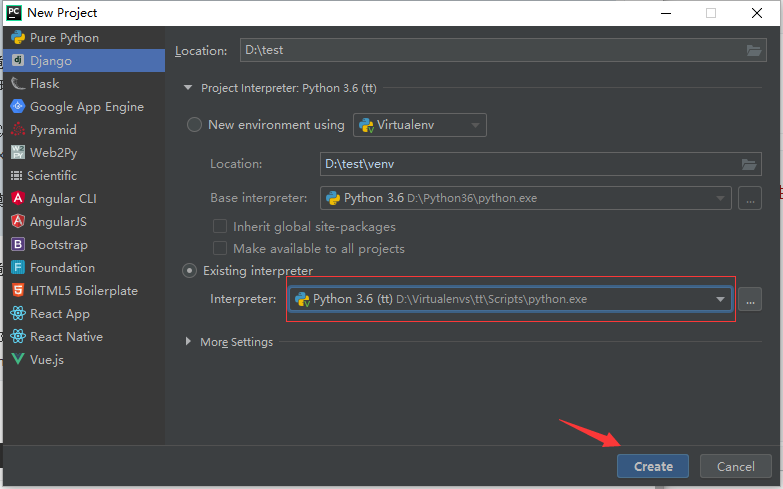
创建项目
"""
前提:在目标目录新建luffy文件夹
>: cd 建立的luffy文件夹
>: django-admin startproject luffyapi

开发:用pycharm打开项目,并选择提前备好的虚拟环境
"""
重构项目目录
"""
├── luffyapi
	├── logs/				# 项目运行时/开发时日志目录 - 包
    ├── manage.py			# 脚本文件
    ├── luffyapi/      		# 项目主应用,开发时的代码保存 - 包
     	├── apps/      		# 开发者的代码保存目录,以模块[子应用]为目录保存 - 包
        ├── libs/      		# 第三方类库的保存目录[第三方组件、模块] - 包
    	├── settings/  		# 配置目录 - 包
			├── dev.py   	# 项目开发时的本地配置
			└── prod.py  	# 项目上线时的运行配置
		├── urls.py    		# 总路由
		└── utils/     		# 多个模块[子应用]的公共函数类库[自己开发的组件]
    └── scripts/       		# 保存项目运营时的脚本文件 - 文件夹
"""
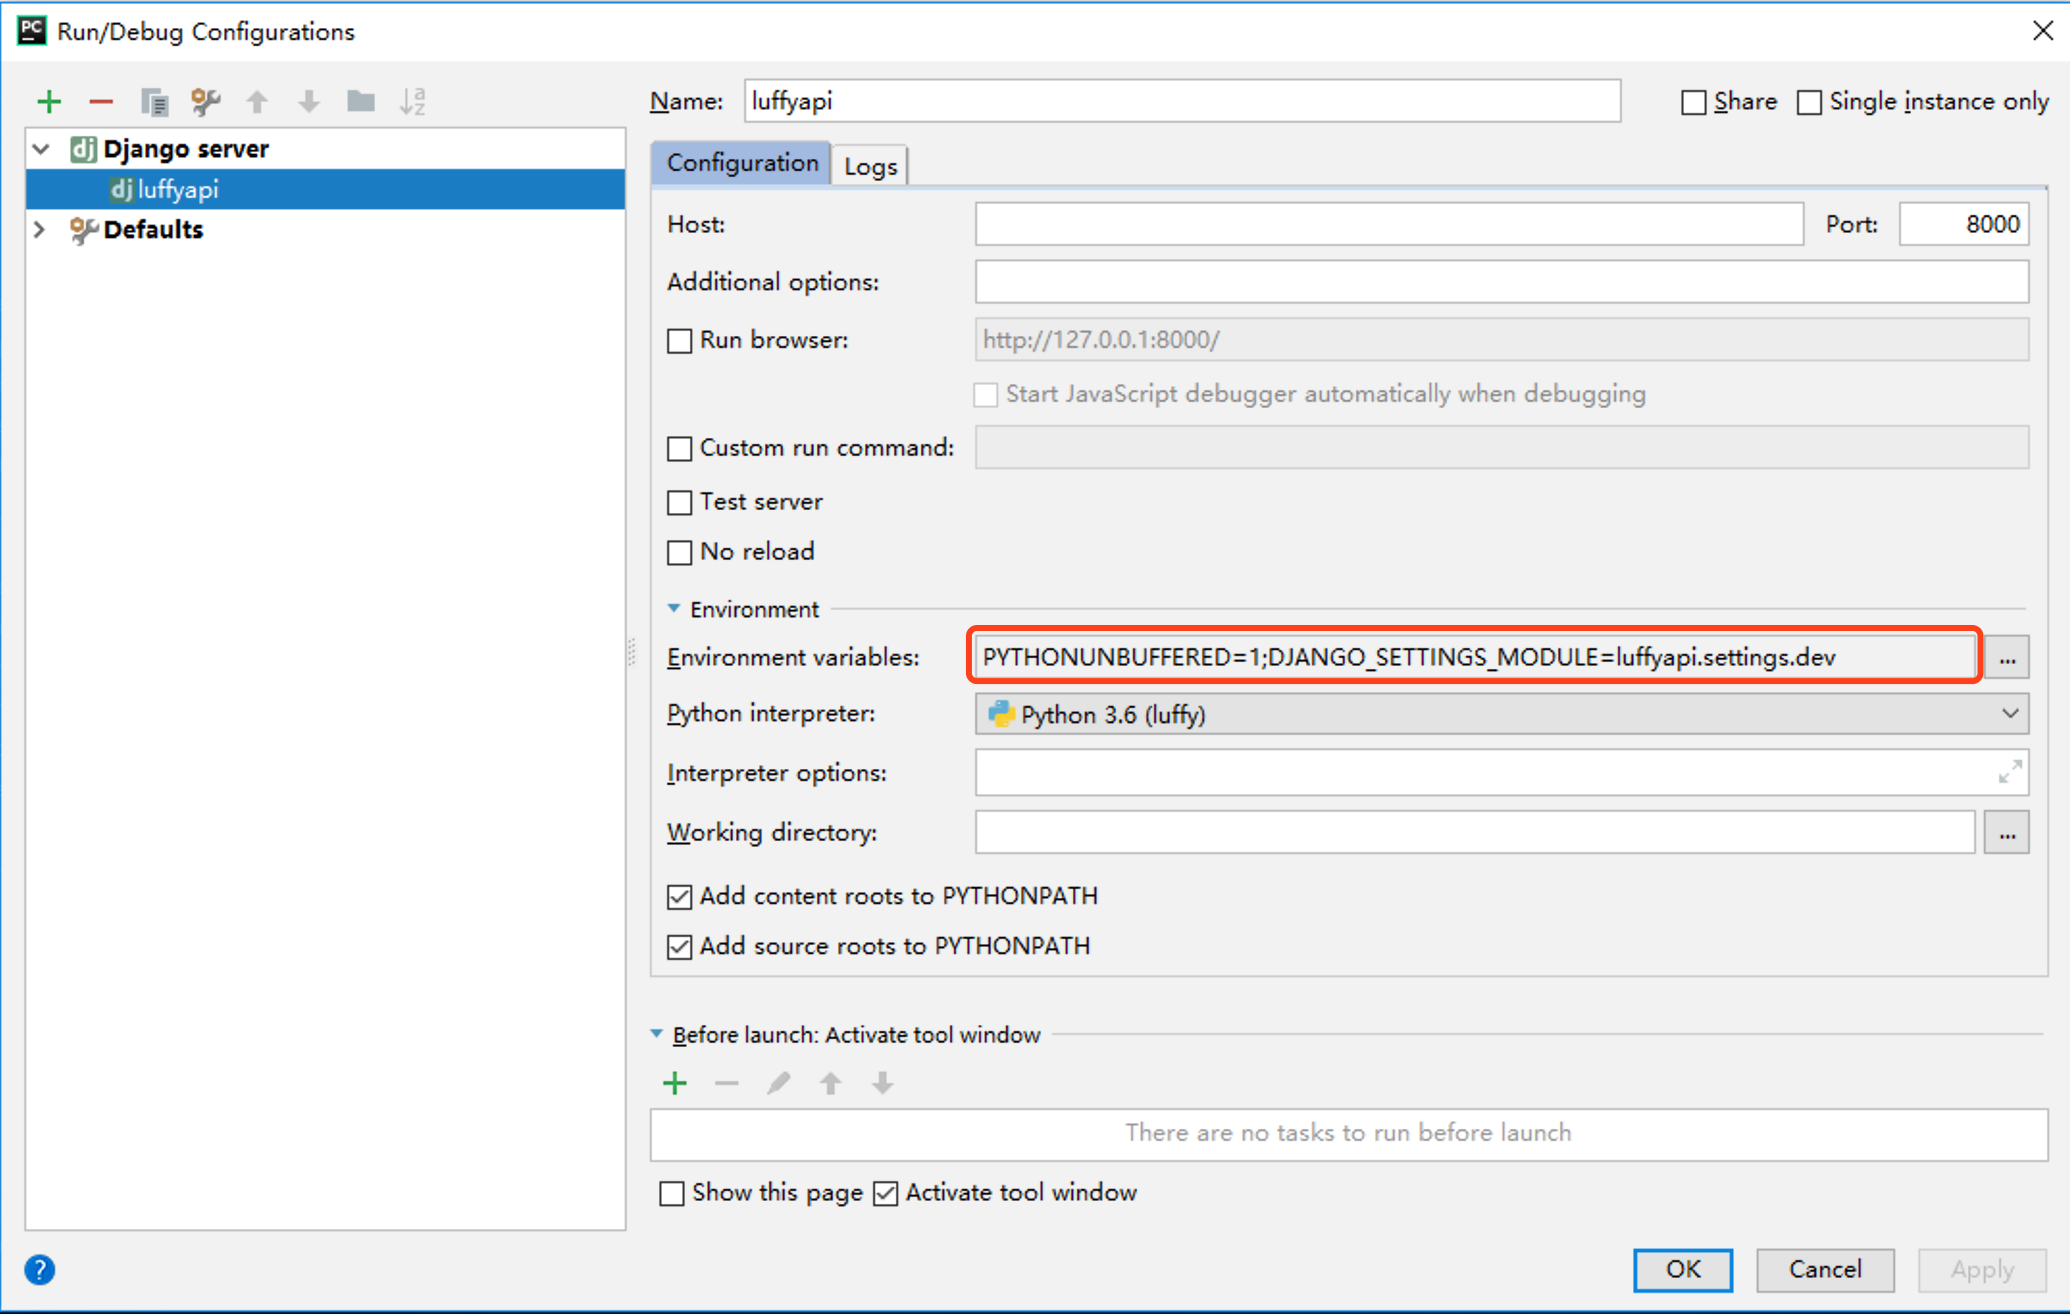
配置开发环境
"""
1.修改 wsgi.py 与 manage.py 两个文件:
os.environ.setdefault('DJANGO_SETTINGS_MODULE', 'luffyapi.settings.dev')

2.将settings.py删除或改名,内容拷贝到settings/dev.py中

3.修改dev.py文件内容
LANGUAGE_CODE = 'zh-hans'
TIME_ZONE = 'Asia/Shanghai'
USE_TZ = False

4.修改启动配置:见插图

5.在任何一个__init__.py文件中测试默认配置文件是否是dev.py文件
from django.conf import settings
print(settings)
"""
配置日志
LOGGING = {
    'version': 1,
    'disable_existing_loggers': False,
    'formatters': {
        'verbose': {
            'format': '%(levelname)s %(asctime)s %(module)s %(lineno)d %(message)s'
        },
        'simple': {
            'format': '%(levelname)s %(module)s %(lineno)d %(message)s'
        },
    },
    'filters': {
        'require_debug_true': {
            '()': 'django.utils.log.RequireDebugTrue',
        },
    },
    'handlers': {
        'console': {
            'level': 'DEBUG',
            'filters': ['require_debug_true'],
            'class': 'logging.StreamHandler',
            'formatter': 'simple'
        },
        'file': {
            # 实际开发建议使用WARNING
            'level': 'INFO',
            'class': 'logging.handlers.RotatingFileHandler',
            # 日志位置,日志文件名,日志保存目录必须手动创建,注:这里的文件路径要注意BASE_DIR代表的是小luffyapi
            'filename': os.path.join(os.path.dirname(BASE_DIR), "logs", "luffy.log"),
            # 日志文件的最大值,这里我们设置300M
            'maxBytes': 300 * 1024 * 1024,
            # 日志文件的数量,设置最大日志数量为10
            'backupCount': 10,
            # 日志格式:详细格式
            'formatter': 'verbose',
            # 文件内容编码
            'encoding': 'utf-8'
        },
    },
    # 日志对象
    'loggers': {
        'django': {
            'handlers': ['console', 'file'],
            'propagate': True, # 是否让日志信息继续冒泡给其他的日志处理系统
        },
    }
}
4.luffy后台配置
环境变量
dev.py
# 环境变量操作:小luffyapiBASE_DIR与apps文件夹都要添加到环境变量
import sys
sys.path.insert(0, BASE_DIR)
APPS_DIR = os.path.join(BASE_DIR, 'apps')
sys.path.insert(1, APPS_DIR)
在写项目直接导入utils文件夹也不''错误提示''

封装logger
dev.py
# 真实项目上线后,日志文件打印级别不能过低,因为一次日志记录就是一次文件io操作
LOGGING = {
    'version': 1,
    'disable_existing_loggers': False,
    'formatters': {
        'verbose': {
            'format': '%(levelname)s %(asctime)s %(module)s %(lineno)d %(message)s'
        },
        'simple': {
            'format': '%(levelname)s %(module)s %(lineno)d %(message)s'
        },
    },
    'filters': {
        'require_debug_true': {
            '()': 'django.utils.log.RequireDebugTrue',
        },
    },
    'handlers': {
        'console': {
            # 实际开发建议使用WARNING
            'level': 'DEBUG',
            'filters': ['require_debug_true'],
            'class': 'logging.StreamHandler',
            'formatter': 'simple'
        },
        'file': {
            # 实际开发建议使用ERROR
            'level': 'INFO',
            'class': 'logging.handlers.RotatingFileHandler',
            # 日志位置,日志文件名,日志保存目录必须手动创建,注:这里的文件路径要注意BASE_DIR代表的是小luffyapi
            'filename': os.path.join(os.path.dirname(BASE_DIR), "logs", "luffy.log"),
            # 日志文件的最大值,这里我们设置300M
            'maxBytes': 300 * 1024 * 1024,
            # 日志文件的数量,设置最大日志数量为10
            'backupCount': 10,
            # 日志格式:详细格式
            'formatter': 'verbose',
            # 文件内容编码
            'encoding': 'utf-8'
        },
    },
    # 日志对象
    'loggers': {
        'django': {
            'handlers': ['console', 'file'],
            'propagate': True, # 是否让日志信息继续冒泡给其他的日志处理系统
        },
    }
}
utils/logging.py
import logging
logger = logging.getLogger('django')
封装项目异常处理
utils/exception.py
from rest_framework.views import exception_handler as drf_exception_handler
from rest_framework.views import Response
from rest_framework import status
from utils.logging import logger
def exception_handler(exc, context):
    response = drf_exception_handler(exc, context)
    # 异常模块就是记录项目的错误日志
    logger.error('%s - %s - %s' % (context['view'], context['request'].method, exc))
    if response is None:
        return Response({
            'detail': '%s' % exc
        }, status=status.HTTP_500_INTERNAL_SERVER_ERROR, exception=True)
    return response
settings.py
REST_FRAMEWORK = {
    'EXCEPTION_HANDLER': 'utils.exception.exception_handler',
}
二次封装Response模块
utils/response.py
from rest_framework.response import Response

class APIResponse(Response):
    def __init__(self, data_status=0, data_msg='ok', results=None, http_status=None, headers=None, exception=False, **kwargs):
        data = {
            'status': data_status,
            'msg': data_msg,
        }
        if results is not None:
            data['results'] = results
        data.update(kwargs)

        super().__init__(data=data, status=http_status, headers=headers, exception=exception)
5.luffy数据库——数据库配置
创建数据库
"""
1.管理员连接数据库
>: mysql -uroot -proot

2.创建数据库
>: create database luffy default charset=utf8;

3.查看用户
>: select user,host,password from mysql.user;
"""
为指定数据库配置指定账户
"""
设置权限账号密码
# 授权账号命令:grant 权限(create, update) on 库.表 to '账号'@'host' identified by '密码'

1.配置任意ip都可以连入数据库的账户
>: grant all privileges on luffy.* to 'luffy'@'%' identified by 'Luffy123?';

2.由于数据库版本的问题,可能本地还连接不上,就给本地用户单独配置
>: grant all privileges on luffy.* to 'luffy'@'localhost' identified by 'Luffy123?';

3.刷新一下权限
>: flush privileges;

只能操作luffy数据库的账户
账号:luffy
密码:Luffy123?
"""
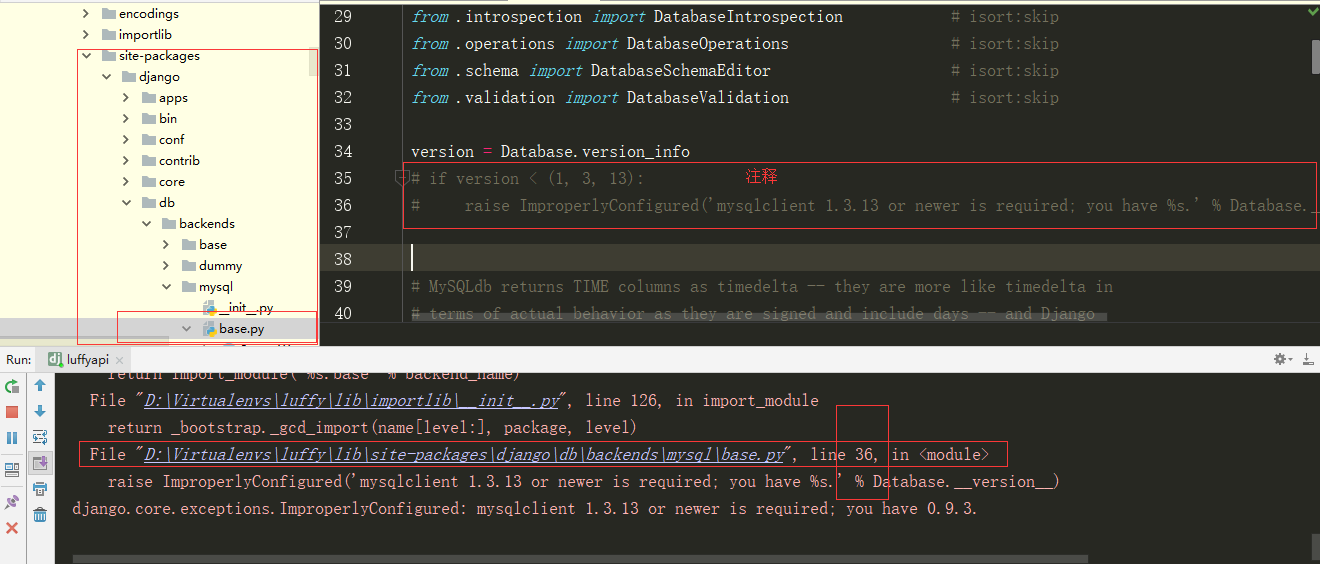
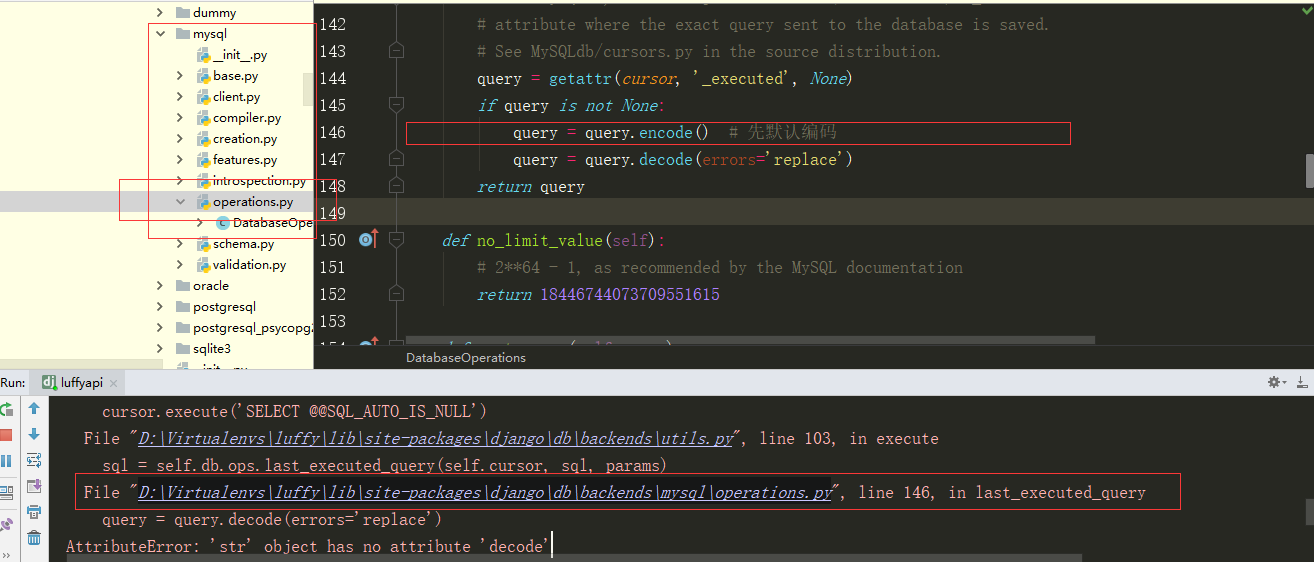
Django 2.x 一些版本pymysql兼容问题
Django不采用2.0.7版本很可能出现以下问题,需要修改源代码
6.user模块User表
创建user模块
前提:在 luffy 虚拟环境下

1.终端从项目根目录进入apps目录
>: cd luffyapi & cd apps

2.创建app
>: python ../../manage.py startapp user
创建User表对应的model:user/models.py
from django.db import models
from django.contrib.auth.models import AbstractUser
class User(AbstractUser):
    mobile = models.CharField(max_length=11, unique=True)
    icon = models.ImageField(upload_to='icon', default='icon/default.png')

    class Meta:
        db_table = 'luffy_user'
        verbose_name = '用户表'
        verbose_name_plural = verbose_name

    def __str__(self):
        return self.username
注册user模块,配置User表:dev.py
INSTALLED_APPS = [
    # ...
    'user',
]

# 自定义User表
AUTH_USER_MODEL = 'user.User'
配置media
media配置:dev.py
MEDIA_URL = '/media/'
MEDIA_ROOT = os.path.join(BASE_DIR, 'media')
media目录配置
"""
├── luffyapi
    └──	luffyapi/
       	└──	media/
			└──	icon
				└── default.png
"""
主路由:luffyapi/urls.py
from django.contrib import admin
from django.urls import path, re_path, include
from django.views.static import serve
from django.conf import settings
urlpatterns = [
    path('admin/', admin.site.urls),

    path('user/', include('user.urls')),

    re_path('^media/(?P<path>.*)', serve, {'document_root': settings.MEDIA_ROOT})
]
子路由:user/urls.py
from django.urls import path, re_path
urlpatterns = [

]
7.luffy前台
前台
vue环境
1.傻瓜式安装node:
官网下载:https://nodejs.org/zh-cn/

2.安装cnpm:
>: npm install -g cnpm --registry=https://registry.npm.taobao.org

3.安装vue最新脚手架:
>: cnpm install -g @vue/cli

注:如果2、3步报错,清除缓存后重新走2、3步
>: npm cache clean --force
创建项目
"""
前提:在目标目录新建luffy文件夹
>: cd 建立的luffy文件夹
>: vue create luffycity
"""


重构项目目录
"""
├── luffycity
	├── public/          			# 项目共有资源
		├── favicon.ico				# 站点图标
		└── index.html				# 主页
    ├── src/      					# 项目主应用,开发时的代码保存
    	├── assets/      			# 前台静态资源总目录
    		├── css/				# 自定义css样式
    			└── global.css		# 自定义全局样式
    		├── js/					# 自定义js样式
				└── settings.js		# 自定义配置文件
			└── img/				# 前台图片资源
		├── components/    			# 小组件目录
		├── views/  				# 页面组件目录
		├── App.vue	    			# 根路由
		├── main.js	    			# 入口脚本文件
		├── router
			└── index.js			# 路由脚本文件
		store
			└── index.js			# 仓库脚本文件
    ├── vue.config.js	    		# 项目配置文件
    └── *.*							# 其他配置文件
"""
文件修订:目录中非配置文件的多余文件可以移除
App.vue
<template>
    <div id="app">
        <router-view/>
    </div>
</template>
router/index.js
import Vue from 'vue'
import VueRouter from 'vue-router'
import Home from '../views/Home.vue'

Vue.use(VueRouter);

const routes = [
    {
        path: '/',
        name: 'home',
        component: Home
    },
];

const router = new VueRouter({
    mode: 'history',
    base: process.env.BASE_URL,
    routes
});

export default router
Home.vue
<template>
    <div class="home">
    </div>
</template>

<script>
    export default {
        name: 'home',
        components: {
        },
    }
</script>
全局配置:全局样式、配置文件
global.css
/* 声明全局样式和项目的初始化样式 */
body, h1, h2, h3, h4, p, table, tr, td, ul, li, a, form, input, select, option, textarea {
    margin: 0;
    padding: 0;
    font-size: 15px;
}

a {
    text-decoration: none;
    color: #333;
}

ul {
    list-style: none;
}

table {
    border-collapse: collapse; /* 合并边框 */
}
settings.js
export default {
    base_url: 'http://127.0.0.1:8000'
}
main.js
// 配置全局样式
import '@/assets/css/global.css'

// 配置全局自定义设置
import settings from '@/assets/js/settings'
Vue.prototype.$settings = settings;
// 在所有需要与后台交互的组件中:this.$settings.base_url + '再拼接具体后台路由'
8.luffy前台配置
axios前后台交互
安装:前端项目目录下的终端
>: cnpm install axios
配置:main.js
import axios from 'axios'
Vue.prototype.$axios = axios;
cookies操作
安装:前端项目目录下的终端
>: cnpm install vue-cookies
配置:main.js
import cookies from 'vue-cookies'
Vue.prototype.$cookies = cookies;
element-ui页面组件框架
安装:前端项目目录下的终端
>: cnpm install element-ui
配置:main.js
import ElementUI from 'element-ui';
import 'element-ui/lib/theme-chalk/index.css';
Vue.use(ElementUI);
bootstrap页面组件框架
安装:前端项目目录下的终端
>: cnpm install jquery
>: cnpm install bootstrap@3
配置jquery:vue.config.js
const webpack = require("webpack");

module.exports = {
    configureWebpack: {
        plugins: [
            new webpack.ProvidePlugin({
                $: "jquery",
                jQuery: "jquery",
                "window.jQuery": "jquery",
                "window.$": "jquery",
                Popper: ["popper.js", "default"]
            })
        ]
    }
};
配置bootstrap:main.js
import 'bootstrap'
import 'bootstrap/dist/css/bootstrap.min.css'
9.luffy前台主页
前端主页
图片准备
将提供的资料中的图片移植到项目的img文件夹下
页头组件:components/Header.vue
<template>
<div class="header-box">
<div class="header">
<div class="content">
<div class="logo full-left">
<router-link to="/"><img @click="jump('/')" src="@/assets/img/logo.svg" alt=""></router-link>
</div>
<ul class="nav full-left">
<li><span @click="jump('/course')" :class="this_nav=='/course'?'this':''">免费课</span></li>
<li><span @click="jump('/light-course')" :class="this_nav=='/light-course'?'this':''">轻课</span></li>
<li><span>学位课</span></li>
<li><span>题库</span></li>
<li><span>老男孩教育</span></li>
</ul>
<div class="login-bar full-right">
<div class="shop-cart full-left">
<img src="@/assets/img/cart.svg" alt="">
<span><router-link to="/cart">购物车</router-link></span>
</div>
<div class="login-box full-left">
<span>登录</span>
|
<span>注册</span>
</div>
</div>
</div>
</div>
</div>
</template>
<script>
export default {
name: "Header",
data() {
return {
this_nav: "",
}
},
created() {
this.this_nav = localStorage.this_nav;
},
methods: {
jump(location) {
localStorage.this_nav = location;
// vue-router除了提供router-link标签跳转页面以外,还提供了js跳转的方式
this.$router.push(location);
}
}
}
</script>
<style scoped>
.header-box {
height: 80px;
}
.header {
100%;
height: 80px;
box-shadow: 0 0.5px 0.5px 0 #c9c9c9;
position: fixed;
top: 0;
left: 0;
right: 0;
margin: auto;
z-index: 99;
background: #fff;
}
.header .content {
max- 1200px;
100%;
margin: 0 auto;
}
.header .content .logo {
height: 80px;
line-height: 80px;
margin-right: 50px;
cursor: pointer;
}
.header .content .logo img {
vertical-align: middle;
}
.header .nav li {
float: left;
height: 80px;
line-height: 80px;
margin-right: 30px;
font-size: 16px;
color: #4a4a4a;
cursor: pointer;
}
.header .nav li span {
padding-bottom: 16px;
padding-left: 5px;
padding-right: 5px;
}
.header .nav li span a {
display: inline-block;
}
.header .nav li .this {
color: #4a4a4a;
border-bottom: 4px solid #ffc210;
}
.header .nav li:hover span {
color: #000;
}
.header .login-bar {
height: 80px;
}
.header .login-bar .shop-cart {
margin-right: 20px;
border-radius: 17px;
background: #f7f7f7;
cursor: pointer;
font-size: 14px;
height: 28px;
88px;
margin-top: 30px;
line-height: 32px;
text-align: center;
}
.header .login-bar .shop-cart:hover {
background: #f0f0f0;
}
.header .login-bar .shop-cart img {
15px;
margin-right: 4px;
margin-left: 6px;
}
.header .login-bar .shop-cart span {
margin-right: 6px;
}
.header .login-bar .login-box {
margin-top: 33px;
}
.header .login-bar .login-box span {
color: #4a4a4a;
cursor: pointer;
}
.header .login-bar .login-box span:hover {
color: #000000;
}
.full-left {
float: left !important;
}
.full-right {
float: right !important;
}
.el-carousel__arrow {
120px;
height: 120px;
}
.el-checkbox__input.is-checked .el-checkbox__inner,
.el-checkbox__input.is-indeterminate .el-checkbox__inner {
background: #ffc210;
border-color: #ffc210;
border: none;
}
.el-checkbox__inner:hover {
border-color: #9b9b9b;
}
.el-checkbox__inner {
16px;
height: 16px;
border: 1px solid #9b9b9b;
border-radius: 0;
}
.el-checkbox__inner::after {
height: 9px;
5px;
}
</style>
轮播图组件:components/Banner.vue
<template>
    <el-carousel height="520px" :interval="3000" arrow="always">
        <el-carousel-item>
            <img src="@/assets/img/banner1.png" alt="">
        </el-carousel-item>
        <el-carousel-item>
            <img src="@/assets/img/banner2.png" alt="">
        </el-carousel-item>
        <el-carousel-item>
            <img src="@/assets/img/banner3.png" alt="">
        </el-carousel-item>
    </el-carousel>
</template>
<script>
    export default {
        name: "Banner",
    }
</script>

<style scoped>
    .el-carousel__item h3 {
        color: #475669;
        font-size: 18px;
        opacity: 0.75;
        line-height: 300px;
        margin: 0;
    }

    .el-carousel__item:nth-child(2n) {
        background-color: #99a9bf;
    }

    .el-carousel__item:nth-child(2n+1) {
        background-color: #d3dce6;
    }
    .el-carousel__item img {
        text-align: center;
        height: 520px;
        margin: 0 auto;
        display: block;
    }
</style>
页脚组件:components/Footer.vue
<template>
    <div class="footer">
        <ul>
            <li>关于我们</li>
            <li>联系我们</li>
            <li>商务合作</li>
            <li>帮助中心</li>
            <li>意见反馈</li>
            <li>新手指南</li>
        </ul>
        <p>Copyright © luffycity.com版权所有 | 京ICP备17072161号-1</p>
    </div>
</template>

<script>
    export default {
        name: "Footer"
    }
</script>

<style scoped>
    .footer {
         100%;
        height: 128px;
        background: #25292e;
        color: #fff;
    }

    .footer ul {
        margin: 0 auto 16px;
        padding-top: 38px;
         810px;
    }

    .footer ul li {
        float: left;
         112px;
        margin: 0 10px;
        text-align: center;
        font-size: 14px;
    }

    .footer ul::after {
        content: "";
        display: block;
        clear: both;
    }

    .footer p {
        text-align: center;
        font-size: 12px;
    }
</style>
主页组件:views/Home.vue
<template>
    <div class="home">
        <Header />
        <Banner />
        <Footer />
    </div>
</template>

<script>
    import Header from '@/components/Header'
    import Banner from '@/components/Banner'
    import Footer from '@/components/Footer'

    export default {
        name: 'home',
        components: {
            Header,
            Banner,
            Footer
        },
    }
</script>
10.后台主页模块设计
home模块
创建home模块
前提:在 luffy 虚拟环境下

1.终端从项目根目录进入apps目录
>: cd luffyapi & cd apps

2.创建app
>: python ../../manage.py startapp home
路由分发
主路由:luffyapi/urls.py
from django.urls import path, re_path, include
urlpatterns = [
	# ...
    path('user/', include('home.urls')),
    # ...
]
子路由:home/urls.py
from django.urls import path, re_path
urlpatterns = [

]
Banner数据表model设计
utils/model.py
from django.db import models

class BaseModel(models.Model):
    orders = models.IntegerField(verbose_name='显示顺序')
    is_show = models.BooleanField(verbose_name="是否上架", default=False)
    is_delete = models.BooleanField(verbose_name="逻辑删除", default=False)

    class Meta:
        abstract = True
home/models.py
from django.db import models
from utils.model import BaseModel

class Banner(BaseModel):
    image = models.ImageField(upload_to='banner', verbose_name='轮播图', null=True, blank=True)
    name = models.CharField(max_length=150, verbose_name='轮播图名称')
    note = models.CharField(max_length=150, verbose_name='备注信息')
    link = models.CharField(max_length=150, verbose_name='轮播图广告地址')

    class Meta:
        db_table = 'luffy_banner'
        verbose_name = '轮播图'
        verbose_name_plural = verbose_name

    def __str__(self):
        return self.name
数据迁移:在大luffyapi路径下的终端
>: python manage.py makemigrations
>: python manage.py migrate
注册home模块:dev.py
INSTALLED_APPS = [
    # ...
    'rest_framework',
    'home',
]
设计Banner数据接口
home/serializers.py
from rest_framework.serializers import ModelSerializer
from . import models
class BannerModelSerializer(ModelSerializer):
    class Meta:
        model = models.Banner
        fields = ('name', 'note', 'image', 'link')
home/views.py
from rest_framework.generics import ListAPIView
from utils.response import APIResponse
from . import models, serializers
class BannerListAPIView(ListAPIView):
    queryset = models.Banner.objects.filter(is_delete=False, is_show=True).order_by('-orders')
    serializer_class = serializers.BannerModelSerializer
home/urls.py
from django.urls import path, re_path
from . import views
urlpatterns = [
    path('banners/', views.BannerListAPIView.as_view())
]
接口
http://api.luffy.cn:8000/home/banner/
11.前后台分离跨域交互
分离的前后台交互
后台处理跨域
安装插件
>: pip install django-cors-headers

插件参考地址:https://github.com/ottoyiu/django-cors-headers/
项目配置:dev.py
# 注册app
INSTALLED_APPS = [
	...
	'corsheaders'
]

# 添加中间件
MIDDLEWARE = [
	...
	'corsheaders.middleware.CorsMiddleware'
]

# 允许跨域源
CORS_ORIGIN_ALLOW_ALL = True
前台请求Banner数据
修订Banner.vue
<template>
    <el-carousel height="520px" :interval="3000" arrow="always">
        <!-- 渲染后台数据 -->
        <el-carousel-item v-for="banner in banner_list" :key="banner.name">
            <a :href="banner.link">
                <img :src="banner.image" alt="" :title="banner.note">
            </a>
        </el-carousel-item>

    </el-carousel>
</template>
<script>
    export default {
        name: "Banner",
        data() {
            return {
                banner_list: []
            }
        },
        created() {
            // 请求后台数据
            this.$axios({
                url: this.$settings.base_url + '/home/banners/',
                method: 'get',
            }).then(response => {
                // window.console.log(response.data);
                this.banner_list = response.data;
            }).catch(errors => {
                window.console.log(errors)
            })
        }
    }
</script>

<style scoped>
    .el-carousel__item h3 {
        color: #475669;
        font-size: 18px;
        opacity: 0.75;
        line-height: 300px;
        margin: 0;
    }

    .el-carousel__item:nth-child(2n) {
        background-color: #99a9bf;
    }

    .el-carousel__item:nth-child(2n+1) {
        background-color: #d3dce6;
    }
    .el-carousel__item img {
        text-align: center;
        height: 520px;
        margin: 0 auto;
        display: block;
    }
</style>
12.xadmin后台管理
安装:luffy虚拟环境下
# >: pip install https://codeload.github.com/sshwsfc/xadmin/zip/django2
注册app:dev.py
INSTALLED_APPS = [
    # ...
    # xamin主体模块
    'xadmin',
    # 渲染表格模块
    'crispy_forms',
    # 为模型通过版本控制,可以回滚数据
    'reversion',
]
xadmin:需要自己的数据库模型类,完成数据库迁移
python manage.py makemigrations
python manage.py migrate
设置主路由替换掉admin:主urls.py
# xadmin的依赖
import xadmin
xadmin.autodiscover()
# xversion模块自动注册需要版本控制的 Model
from xadmin.plugins import xversion
xversion.register_models()

urlpatterns = [
    # ...
    path(r'xadmin/', xadmin.site.urls),
]
创建超级用户:大luffyapi路径终端
# 在项目根目录下的终端
python manage.py createsuperuser
# 账号密码设置:admin | Admin123
完成xadmin全局配置:新建home/adminx.py
# home/adminx.py
# xadmin全局配置
import xadmin
from xadmin import views

class GlobalSettings(object):
    """xadmin的全局配置"""
    site_title = "路飞学城"  # 设置站点标题
    site_footer = "路飞学城有限公司"  # 设置站点的页脚
    menu_style = "accordion"  # 设置菜单折叠

xadmin.site.register(views.CommAdminView, GlobalSettings)
在adminx.py中注册model:home/adminx.px
from . import models
# 注册
xadmin.site.register(models.Banner)
修改app:home的名字:xadmin页面上的显示效果
# home/__init__.py
default_app_config = "home.apps.HomeConfig"

# home/apps.py
from django.apps import AppConfig
class HomeConfig(AppConfig):
    name = 'home'
    verbose_name = '我的首页'