在3.0以前,动画效果主要为补间动画(TweenAnimation)和帧动画(FrameAnimation),从3.0开始加入了属性动画,其本质就是不断地改变控件的属性,从而达到复杂的动画效果,其效果也优于之前的动画效果,而且真正的实现了View动画
补间动画(Tween Animation)
- 渐变动画支持四种类型:平移(Translate)、旋转(Rotate)、缩放(Scale)、不透明度(Alpha)
- 只是显示的位置变动,View的实际位置未改变,表现为View移动到其他地方,点击事件仍在原处才能响应
- 组合使用步骤较复杂
- View Animation 也是指此动画
帧动画(Frame Animation)
- 用于生成连续的Gif效果图
- DrawableAnimation也是指此动画
属性动画(Property Animation)
- 支持对所有View能更新的属性的动画(需要属性的setXxx()和getXxx())
- 更改的是View实际的属性,所以不会影响其在动画执行后所在位置的正常使用
- Android 3.0(API11)及以后出现的功能,3.0之前的版本可使用github第三方开源库nineoldandroids.jar进行支持
错误重现
首先编辑anim动画
<?xml version="1.0" encoding="utf-8"?>
<translate xmlns:android="http://schemas.android.com/apk/res/android"
    android:duration="2000"
    android:fillAfter="true"
    android:fromXDelta="0"
    android:fromYDelta="0"
    android:toXDelta="300"
    android:toYDelta="500" />
意思是从(0,0)到(300,500),在2000ms完成,完成以后不再复位
然后顺便贴出布局
<?xml version="1.0" encoding="utf-8"?>
<android.support.constraint.ConstraintLayout xmlns:android="http://schemas.android.com/apk/res/android"
    xmlns:app="http://schemas.android.com/apk/res-auto"
    xmlns:tools="http://schemas.android.com/tools"
    android:layout_width="match_parent"
    android:layout_height="match_parent"
    tools:context=".MainActivity">

    <ImageButton
        android:layout_width="wrap_content"
        android:layout_height="wrap_content"
        android:src="@mipmap/ic_launcher"
        android:onClick="startAnimation"/>

</android.support.constraint.ConstraintLayout
按下时执行动画
public class MainActivity extends AppCompatActivity {

    @Override
    protected void onCreate(Bundle savedInstanceState) {
        super.onCreate(savedInstanceState);
        setContentView(R.layout.activity_main);
    }

    public void startAnimation(View view) {
        Animation animation = AnimationUtils.loadAnimation(this, R.anim.translate);
        view.startAnimation(animation);
    }
}
得到的效果如下
可以看到在执行完动画以后,再点击以前ImageButton所在的位置时,又开始了动画,也就是说View本身是没有变动的
属性动画使用
属性动画是真实改变了View的状态,将上面的错误重现使用属性动画,则没有刚才那样的情况发生了
public void startAnimation(View view) {
//	Animation animation = AnimationUtils.loadAnimation(this, R.anim.translate);
//	view.startAnimation(animation);
	view.setTranslationX(20);
}
一般会使用动画执行类去设置参数,然后执行
public void startAnimation(View view) {
	ObjectAnimator animator = ObjectAnimator.ofFloat(view, "translationX", 0F, 300F);
	animator.setDuration(2000);
	animator.start();
}
要实现多个动画同时执行,有三种常见方式,一种是使用动画监听,设置一个没有的动画属性
public void startAnimation(final View view) {
    ObjectAnimator animator = ObjectAnimator.ofFloat(view, "", 0F, 200F);
    animator.setDuration(2000);
    animator.addUpdateListener(new ValueAnimator.AnimatorUpdateListener() {
        @Override
        public void onAnimationUpdate(ValueAnimator animation) {
            float value = (float) animation.getAnimatedValue();
            view.setAlpha(value/200);
            view.setScaleX(value/200);
            view.setScaleY(value/200);
        }
    });
    animator.start();
}
上述代码等价于
public void startAnimation(final View view) {
    ValueAnimator animator = ValueAnimator.ofFloat(0F,200F);
    animator.setDuration(2000);
    animator.addUpdateListener(new ValueAnimator.AnimatorUpdateListener() {
        @Override
        public void onAnimationUpdate(ValueAnimator animation) {
            float value = (float) animation.getAnimatedValue();
            view.setAlpha(value/200);
            view.setScaleX(value/200);
            view.setScaleY(value/200);
        }
    });
    animator.start();
}
另一种是使用PropertyValuesHolder使得多个动画可以同时执行
public void startAnimation(final View view) {
PropertyValuesHolder holderAlpha = PropertyValuesHolder.ofFloat("alpha",
            1F, 0.5F, 1F, 0.5F, 1F);
    PropertyValuesHolder holderScaleX = PropertyValuesHolder.ofFloat("scaleX",
            1F, 0.5F, 1F, 0.5F, 1F, 0.5F, 1F);
    PropertyValuesHolder holderScaleY = PropertyValuesHolder.ofFloat("scaleY",
            1F, 0.5F, 1F, 0.5F, 1F, 0.5F, 1F);
    PropertyValuesHolder holderTranslationX = PropertyValuesHolder.ofFloat("translationX",
            0F, 800F);
    PropertyValuesHolder holderTranslationY = PropertyValuesHolder.ofFloat("translationY",
            0F, 1200F);
    ObjectAnimator animator = ObjectAnimator.ofPropertyValuesHolder(view, holderAlpha,
            holderScaleX, holderScaleY, holderTranslationX, holderTranslationY);
    animator.setDuration(5000);
    animator.start();
}
这种动画效果还是挺棒的
还有一个是使用动画集
AnimatorSet主要有三个执行方式,单个动画(play(anim)),多个动画同时(playTogether(anim1, anim2, anim3))和多个动画依次执行(playSequentially(anim1, anim2, anim3))
public void startAnimation(final View view) {
    ObjectAnimator animatorAlpha = ObjectAnimator.ofFloat(view, "alpha", 1f, 0.7f, 1f);
    ObjectAnimator animatorScaleX = ObjectAnimator.ofFloat(view, "scaleX", 1f, 0.7f, 1f);
    ObjectAnimator animatorScaleY = ObjectAnimator.ofFloat(view, "scaleY", 1f, 0.7f, 1f);
    AnimatorSet animatorSet = new AnimatorSet();
    animatorSet.setDuration(500);
    animatorSet.playSequentially(animatorAlpha, animatorScaleX, animatorScaleY);
    animatorSet.start();
}
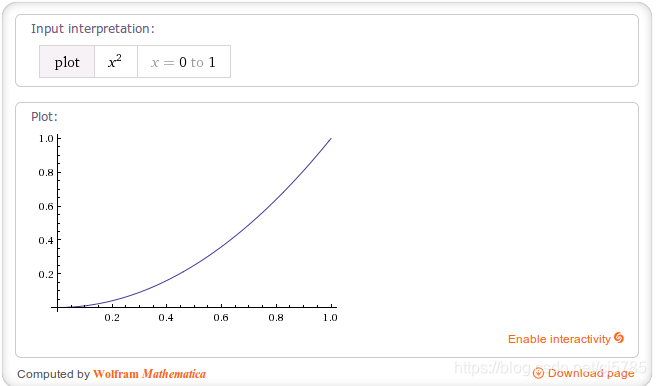
实现一个y=x2效果
用windows画图工具做出的草图如下
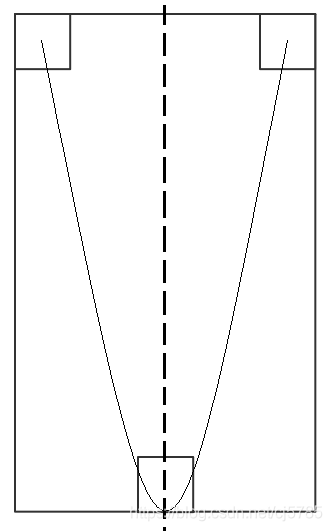
分析:
要实现如图所示轨迹,那么在图像移动的中心位置形成一条二次函数,那么平移以后其抛物线的形状也不会变
所以选择图像左上角为轨迹点,那么与x轴的交点就为0和父控件宽度减去图像宽度,设为width
其最低点的位置为父控件高度减去图像高度,设为height
那么得到其关系式为:y=a(x-x1)(x-x2),即为y = a * x(x - width)
height = a * (width / 2)(width / 2 - width) 得到 a = -(4 * height) / (width * width)
即y = (4 * height) / (width * width) * x * (width - x)
public class MainActivity extends AppCompatActivity {

    private static final String TAG = "MainActivity";
    private LinearLayout linearLayout;

    @Override
    protected void onCreate(Bundle savedInstanceState) {
        super.onCreate(savedInstanceState);
        setContentView(R.layout.activity_main);
        linearLayout = (LinearLayout) findViewById(R.id.linear_layout);
    }

    public void startAnimation(final View view) {
        final float width = (float)(linearLayout.getWidth() - view.getWidth()) ;
        final float height = (float)(linearLayout.getHeight() - view.getHeight());
        final int durtime = 5000;
        Log.d(TAG, "startAnimation: width = " + width + ",height = " + height + ",viewH="+view.getHeight());
        ValueAnimator animator = new ValueAnimator();
        animator.setDuration(durtime);
        animator.setObjectValues(new PointF(0, 0));
        //估值器,定义计算规则
        animator.setEvaluator(new TypeEvaluator<PointF>() {
            @Override
            public PointF evaluate(float fraction, PointF startValue, PointF endValue) {
                PointF pointF = new PointF();
                //每个百分点x移动的距离
                pointF.x = width * fraction;
                pointF.y = ((4 * height) / (width * width)) * pointF.x * (width - pointF.x);
                return pointF;
            }
        });
        animator.addUpdateListener(new ValueAnimator.AnimatorUpdateListener() {
            @Override
            public void onAnimationUpdate(ValueAnimator animation) {
                PointF pointF = (PointF) animation.getAnimatedValue();
                view.setX(pointF.x);
                view.setY(pointF.y);
            }
        });
        animator.start();
    }
}
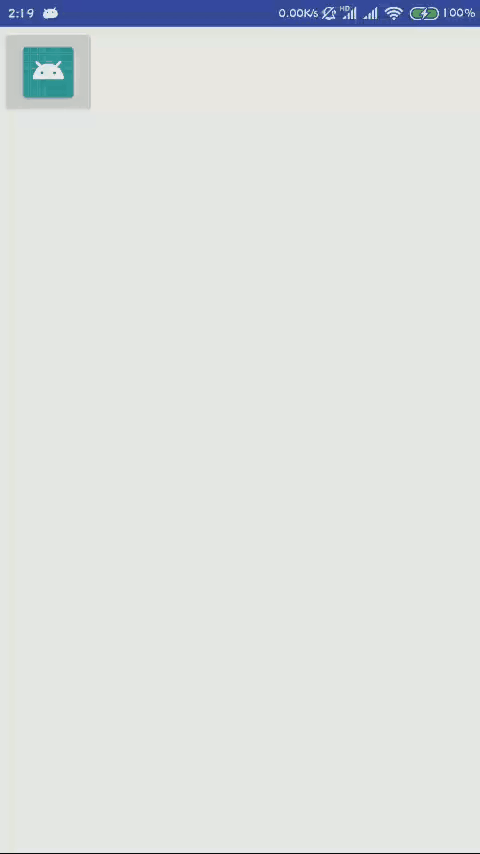
实现效果如下图
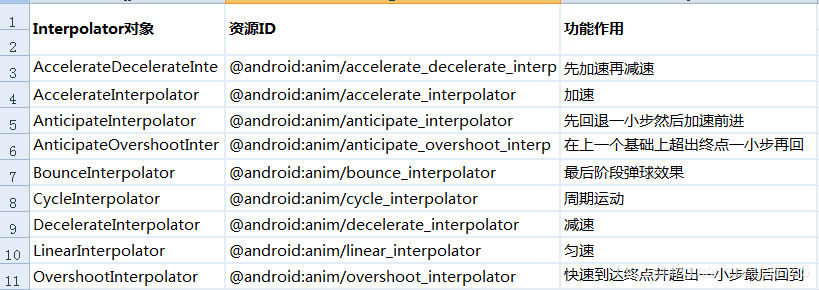
常见的加速器
animator.setInterpolator(new AccelerateInterpolator(5));
animator.setInterpolator(new AccelerateDecelerateInterpolator());
animator.setInterpolator(new AnticipateInterpolator(8));
animator.setInterpolator(new OvershootInterpolator());
animator.setInterpolator(new CycleInterpolator(4));
animator.setInterpolator(new BounceInterpolator());
···
AnticipateInterpolator
CycleInterpolator
OvershootInterpolator

DecelerateInterpolator
AccelerateInterpolator
AnticipateOvershootInterpolator
BounceInterpolator
AccelerateDecelerateInterpolator
常用API
ObjectAnimator:对象动画执行类
PropertyValuesHolder: 属性存储器,为两个执行类提供更新多个属性的功能
AnimatorListener:动画执行监听,在动画开始、重复、结束、取消时进行回调
Keyframe:为PropertyValuesHolder提供多个关键帧的操作值
AnimatorSet:一组动画的执行集合类:设置执行的先后顺序,时间等
TimeInterpolator:时间插值,用于控制动画执行过程
ValueAnimator:值动画执行类,常配合AnimatorUpdateListener使用
AnimatorUpdateListener:动画更新监听
TypeEvaluator:类型估值,用于设置复杂的动画操作属性的值
translationX和translationY:这两个属性控制了View所处的位置,它们的值是由layout容器设置的,是相对于坐标原点(0,0左上角)的一个偏移量rotation,rotationX和rotationY:控制View绕着轴点(pivotX和pivotY)旋转scaleX和scaleY:控制View基于pivotX和pivotY的缩放pivotX和pivotY:旋转的轴点和缩放的基准点,默认是View的中心点x和y:描述了view在其父容器中的最终位置,是左上角左标和偏移量(translationX,translationY)的和aplha:透明度,1是完全不透明,0是完全透明