Backup and Recovery: Configuration
Objectives
After completing this lesson, you should be able to:
• Configure the fast recovery area
• Multiplex the control file
• Multiplex redo log files
• Configure ARCHIVELOG mode
目标
完成本课程后,您应该能够:
•配置快速恢复区域
•多路传输控制文件
•多路重做日志文件
•配置ARCHIVELOG模式,归档模式配置

Configuring for Recoverability
Configure your database for maximum recoverability by:
• Scheduling regular backups
• Multiplexing control files
• Multiplexing redo log groups
• Retaining archived copies of redo logs
配置可恢复性
通过以下方式配置数据库以获得最大的可恢复性:
•安排定期备份
•多路传输控制文件
•多路复用重做日志组
•保留重做日志的存档副本
Configuring the Fast Recovery Area
• Fast recovery area:
– Strongly recommended for simplified backup storage
management
– Storage space (separate from working database files)
– Location specified by the DB_RECOVERY_FILE_DEST
parameter
– Size specified by the DB_RECOVERY_FILE_DEST_SIZE
parameter
– Large enough for backups, archived logs, flashback logs,
multiplexed control files, and multiplexed redo logs
– Automatically managed according to your retention policy
• Configuration of the fast recovery area includes specifying the location, size, and retention policy.
配置快速恢复区域
•快速恢复区:
–强烈建议简化备份存储
管理
–存储空间(与工作数据库文件分开)
–由DB_RECOVERY_文件指定的位置
参数
–由DB_RECOVERY_FILE_DEST_Size指定的大小
参数
–足够大,可用于备份、存档日志、闪回日志,
多路传输控制文件和多路传输重做日志
–根据您的保留策略自动管理
•快速恢复区域的配置包括指定
位置、大小和保留策略。
SQL> show user
USER is "SYS"
SQL> show parameter recovery 查询参数 recovery
NAME TYPE VALUE
------------------------------------ ----------- ------------------------------
db_recovery_file_dest string /u01/app/oracle/fast_recovery_
area/ORCL
db_recovery_file_dest_size big integer 8106M
recovery_parallelism integer 0
remote_recovery_file_dest string
SQL> show parameter control 查询参数control
NAME TYPE VALUE
------------------------------------ ----------- ------------------------------
control_file_record_keep_time integer 7
control_files string /u01/app/oracle/oradata/ORCL/c
ontrol01.ctl, /u01/app/oracle/
fast_recovery_area/ORCL/contro
l02.ctl
control_management_pack_access string DIAGNOSTIC+TUNING
当控制文件01和02存储在不同的物理磁盘上时两磁盘互为备份(控制文件损坏是,数据库不可工作),可尝试制作3个控制文件
[oracle@yf ORCL]$ pwd
/u01/app/oracle/fast_recovery_area/ORCL/ORCL
[oracle@yf ORCL]$ ls
archivelog onlinelog
[oracle@yf ORCL]$

Monitoring the Fast Recovery Area
监控快速恢复区域
Multiplexing Control Files
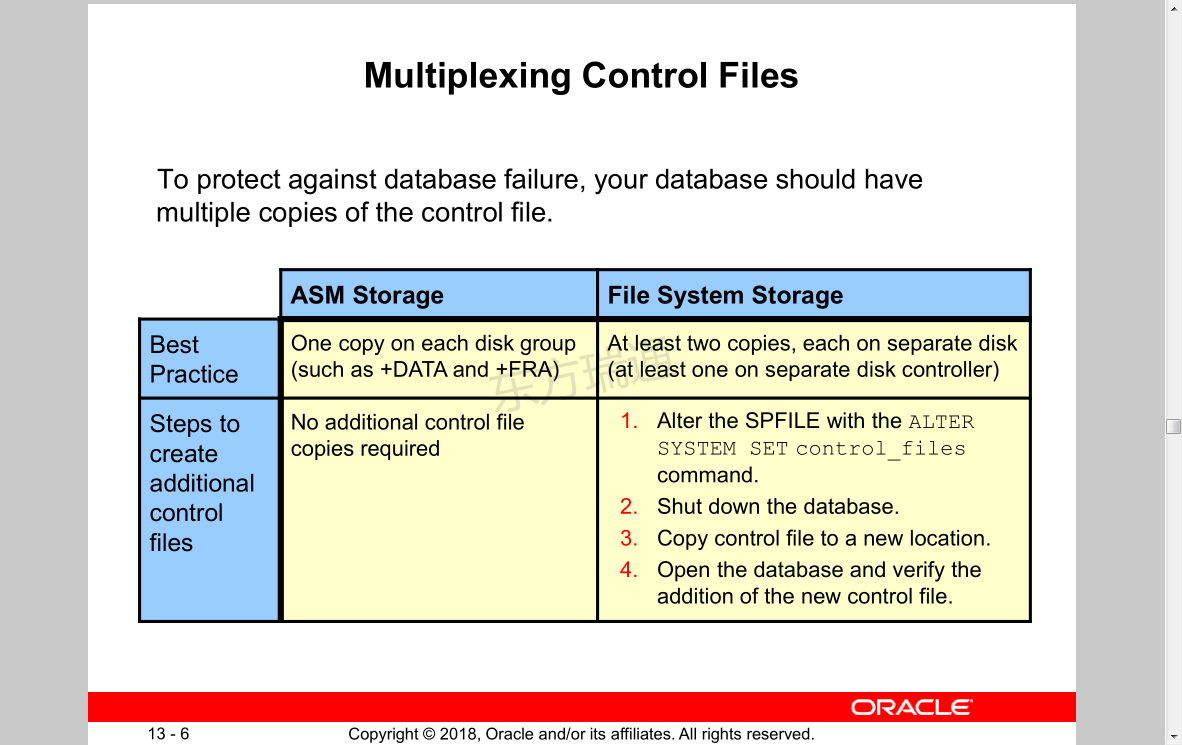
To protect against database failure, your database should have multiple copies of the control file.
多路传输控制文件
为了防止数据库失败,数据库应该有控制文件的多个副本
Best Practice
Steps to create additional control files
ASM Storage
One copy on each disk group (such as +DATA and +FRA)
No additional control file copies required
File System Storage
At least two copies, each on separate disk (at least one on separate disk controller)
1. Alter the SPFILE with the ALTER SYSTEM SET control_files command. 控制文件多路复制
2. Shut down the database.
3. Copy control file to a new location.
4. Open the database and verify the addition of the new control file.
最佳实践
创建其他控制文件的步骤
ASM存储
每个磁盘组上有一个副本(例如+DATA和+FRA)
不需要额外的控制文件副本
文件系统存储
至少两个拷贝,每个拷贝在单独的磁盘上(至少一个拷贝在单独的磁盘控制器上)
1使用Alter SYSTEM SET control_files命令更改SPFILE。
2关闭数据库。
3将控制文件复制到新位置。
4打开数据库并验证是否添加了新的控制文件。
控制文件多路复制
SQL> show parameter control
NAME TYPE VALUE
------------------------------------ ----------- ------------------------------
control_file_record_keep_time integer 7
control_files string /u01/app/oracle/oradata/ORCL/c
ontrol01.ctl, /u01/app/oracle/
fast_recovery_area/ORCL/contro
l02.ctl
control_management_pack_access string DIAGNOSTIC+TUNING
SQL> alter system set control_files='/u01/app/oracle/oradata/ORCL/control01.ctl','/u01/app/oracle/fast_recovery_area/ORCL/control02.ctl','/home/oracle/control03.ctl' scope=spfile; 更改控制文件路径,此处配置control03.ctl 但是该文件尚未存在,下面还需要拷贝
System altered.
SQL> shut immediate; 关闭数据库,准备拷贝u01,u02
Database closed.
Database dismounted.
ORACLE instance shut down.
[oracle@yf ORCL]$ cp /u01/app/oracle/fast_recovery_area/ORCL/control02.ctl /home/oracle/contrlo03.ctl 拷贝02,到03 (拷贝前要确保数据库关闭)
SQL> startup 拷贝后重启服务器
ORACLE instance started.
Total System Global Area 1828716448 bytes
Fixed Size 8658848 bytes
Variable Size 553648128 bytes
Database Buffers 1258291200 bytes
Redo Buffers 8118272 bytes
ORA-00205: error in identifying control file, check alert log for more info 重启数据库报错,准备排错
SQL> show parameter control 查看03.ctl是否存在
NAME TYPE VALUE
------------------------------------ ----------- ------------------------------
control_file_record_keep_time integer 7
control_files string /u01/app/oracle/oradata/ORCL/c
control01.ctl, /u01/app/oarcle
/fast_recovery_area/ORCL/contr
ol02.ctl, /u01/app/oracle/prod
uct/18c/dbs/home/oracle/contro
l03.ctl
control_management_pack_access string DIAGNOSTIC+TUNING

[oracle@yf ORCL]$ cd /u01/app/oracle/diag/rdbms/orcl/orcl/trace 查看当前alert文件
[oracle@yf trace]$ tail alert_orcl.log
Linux-x86_64 Error: 2: No such file or directory
Additional information: 7
ORA-00210: cannot open the specified control file
ORA-00202: control file: '/u01/app/oracle/oradata/ORCL/ccontrol01.ctl' 上面配置
ORA-27037: unable to obtain file status
Linux-x86_64 Error: 2: No such file or directory
Additional information: 7
Checker run found 3 new persistent data failures
2020-06-25T21:32:58.817756+08:00
Using default pga_aggregate_limit of 2048 MB
[oracle@yf trace]$

Redo Log Files
Multiplex redo log groups to protect against media failure and loss of data. This increases database I/O. It is suggested that redo log groups have:
• At least two members (files) per group
• Each member:
– On a separate disk or controller if using file system storage
– In a separate disk group (such as +DATA and +FRA) if using ASM
Note: Multiplexing redo logs may impact overall database performance.
重做日志文件
多路重做日志组以防止媒体故障和数据丢失。这会增加数据库I/O。建议重做日志组具有:
•每组至少两名成员(文件)
•每个成员:
–如果使用文件系统存储,则在单独的磁盘或控制器上
–如果使用ASM,则在单独的磁盘组(如+DATA和+FRA)中
注意:多路复用重做日志可能会影响总体数据库性能
Multiplexing the Redo Log

假如说一共有三个重做日志组,当三个日志组全部写满之后将从第一个日志组开始循环记录,并且第一个日志组中的内容将被彻底覆盖,这样,如果数据库崩溃了,想要恢复很早之前的数据,那就坑了
Creating Archived Redo Log Files 将数据库从归档模式转换为非归档模式(归档模式可灵活修复)
To preserve redo information, create archived copies of redo log files by performing the following steps:
1. Specify archived redo log file-naming convention.
2. Specify one or more archived redo log file locations.
3. Place the database in ARCHIVELOG mode.
创建存档的重做日志文件
要保留重做信息,请执行以下步骤创建重做日志文件的存档副本:
1指定已存档的重做日志文件命名约定。
2指定一个或多个已存档的重做日志文件位置。
3将数据库置于ARCHIVELOG模式
Archiver (ARCn) Process
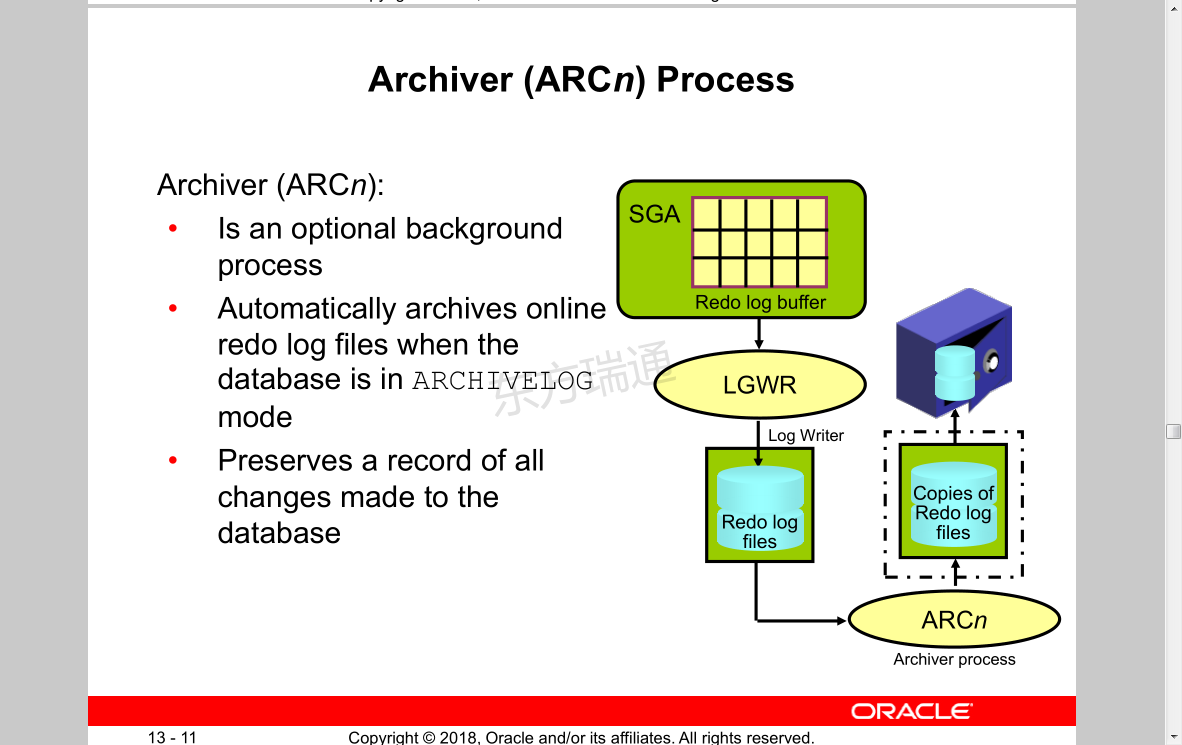
Archiver (ARCn):
• Is an optional background process
• Automatically archives online redo log files when the database is in ARCHIVELOG mode
• Preserves a record of all changes made to the database
Archiver(ARCn)过程
阿基弗(ARCn):
•是一个可选的后台进程
•当数据库处于存档模式时,自动存档联机重做日志文件
•保留对数据库所做的所有更改的记录
Archived Redo Log Files:
Naming and Destinations
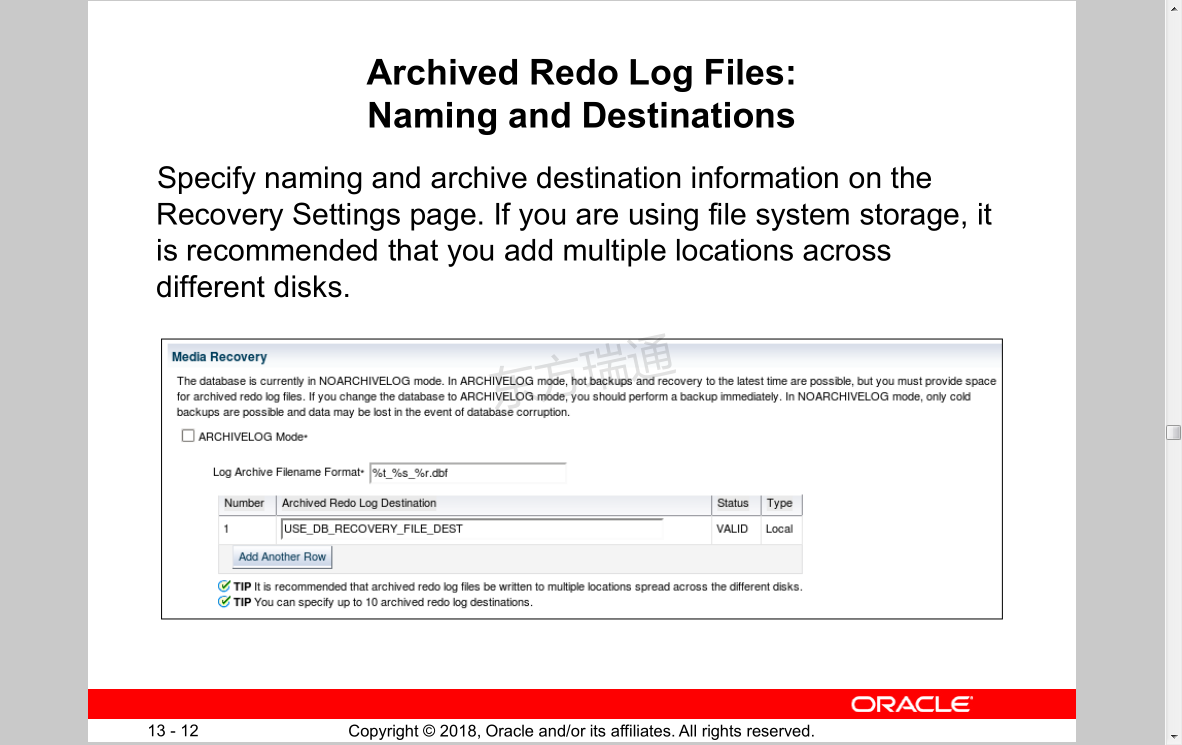
Specify naming and archive destination information on the Recovery Settings page. If you are using file system storage, it is recommended that you add multiple locations across different disks.
已存档的重做日志文件:
命名和目的地
在“恢复设置”页上指定命名和存档目标信息。如果您使用的是文件系统存储,建议您跨不同的磁盘添加多个位置。
SQL> show parameter format 显示格式化参数
NAME TYPE VALUE
------------------------------------ ----------- ------------------------------
log_archive_format string %t_%s_%r.dbf 此为归档日志参数的格式
nls_date_format string
nls_time_format string
nls_time_tz_format string
nls_timestamp_format string
nls_timestamp_tz_format string
permit_92_wrap_format boolean TRUE
star_transformation_enabled string FALSE
uniform_log_timestamp_format boolean TRUE
SQL> archive log list 检查当前数据库是在归档模式下,还是在非归档模式下
Database log mode No Archive Mode 当前为非归档模式
Automatic archival Disabled
Archive destination USE_DB_RECOVERY_FILE_DEST 归档日志默认路径,当前格式不符合格式%t_%s_%r.dbf
Oldest online log sequence 24
Current log sequence 26
将数据库从非归档模式转换为归档模式
Configuring ARCHIVELOG Mode
To place the database in ARCHIVELOG mode, perform the following steps:
• Using Enterprise Manager Cloud Control:
1. On the Recovery Settings page, select “ARCHIVELOG Mode” and click Apply. The database can be set to ARCHIVELOG mode only from the MOUNT state.
2. Restart the database instance by clicking “Yes” when prompted.
• Using SQL commands:
– Mount the database.
– Issue the ALTER DATABASE ARCHIVELOG command.
– Open the database.
配置ARCHIVELOG模式
要将数据库置于ARCHIVELOG模式,请执行以下步骤:
•使用Enterprise Manager云控制:
1在“恢复设置”页面上,选择“ARCHIVELOG模式”,然后单击“应用”。只能从装载状态将数据库设置为ARCHIVELOG模式。
2在提示时单击“是”重新启动数据库实例。
•使用SQL命令:
–装载数据库。
–发出ALTER DATABASE ARCHIVELOG命令。
–打开数据库。
SQL> show parameter log_archive_dest
SQL> shut immediate
Database closed.
Database dismounted.
ORACLE instance shut down.
SQL> startup mount; 用mount状态打开数据库
ORACLE instance started.
Total System Global Area 1828716448 bytes
Fixed Size 8658848 bytes
Variable Size 553648128 bytes
Database Buffers 1258291200 bytes
Redo Buffers 8118272 bytes
Database mounted.
SQL> alter database archivelog; 将数据库转换为归档模式(SQL> alter database noarchivelog; 转换为非归档模式)
Database altered.
SQL> archive log list
Database log mode Archive Mode 当前为归档模式
Automatic archival Enabled
Archive destination USE_DB_RECOVERY_FILE_DEST
Oldest online log sequence 24
Next log sequence to archive 26
Current log sequence 26
SQL> alter database open; 将数据库从mount状态打开
Database altered.
[oracle@yf ORCL]$ pwd
/u01/app/oracle/fast_recovery_area/ORCL/ORCL 归档日志文件存储位置
[oracle@yf ORCL]$ rm -fr archivelog/ 删除归档日志文件(正常情况下没有这个文件)
SQL> alter system switch logfile; 手工切换归档日志,切换后被删除的archivelog归档日志文件会被重新建立
System altered.
[oracle@yf ORCL]$ pwd
/u01/app/oracle/fast_recovery_area/ORCL/ORCL
[oracle@yf ORCL]$ cd archivelog/
[oracle@yf archivelog]$ ls
2020_06_26
[oracle@yf archivelog]$ cd 2020_06_26/
[oracle@yf 2020_06_26]$ ls
o1_mf_1_26_hhcxmfx1_.arc 此为新建立的归档日志
Quiz
Which parameters configure the fast recovery area? 哪些参数配置快速恢复区域?
a. FLASH_RECOVERY_AREA_SIZE
b. DB_RECOVERY_FILE_DEST 指定fra的物理路径
c. FLASH_RECOVERY_AREA_LOC
d. DB_RECOVERY_FILE_DEST_SIZE 设定fra的大小