本章目标
- 理解Spring IoC的原理
- 掌握Spring IoC的配置
Spring的结构图
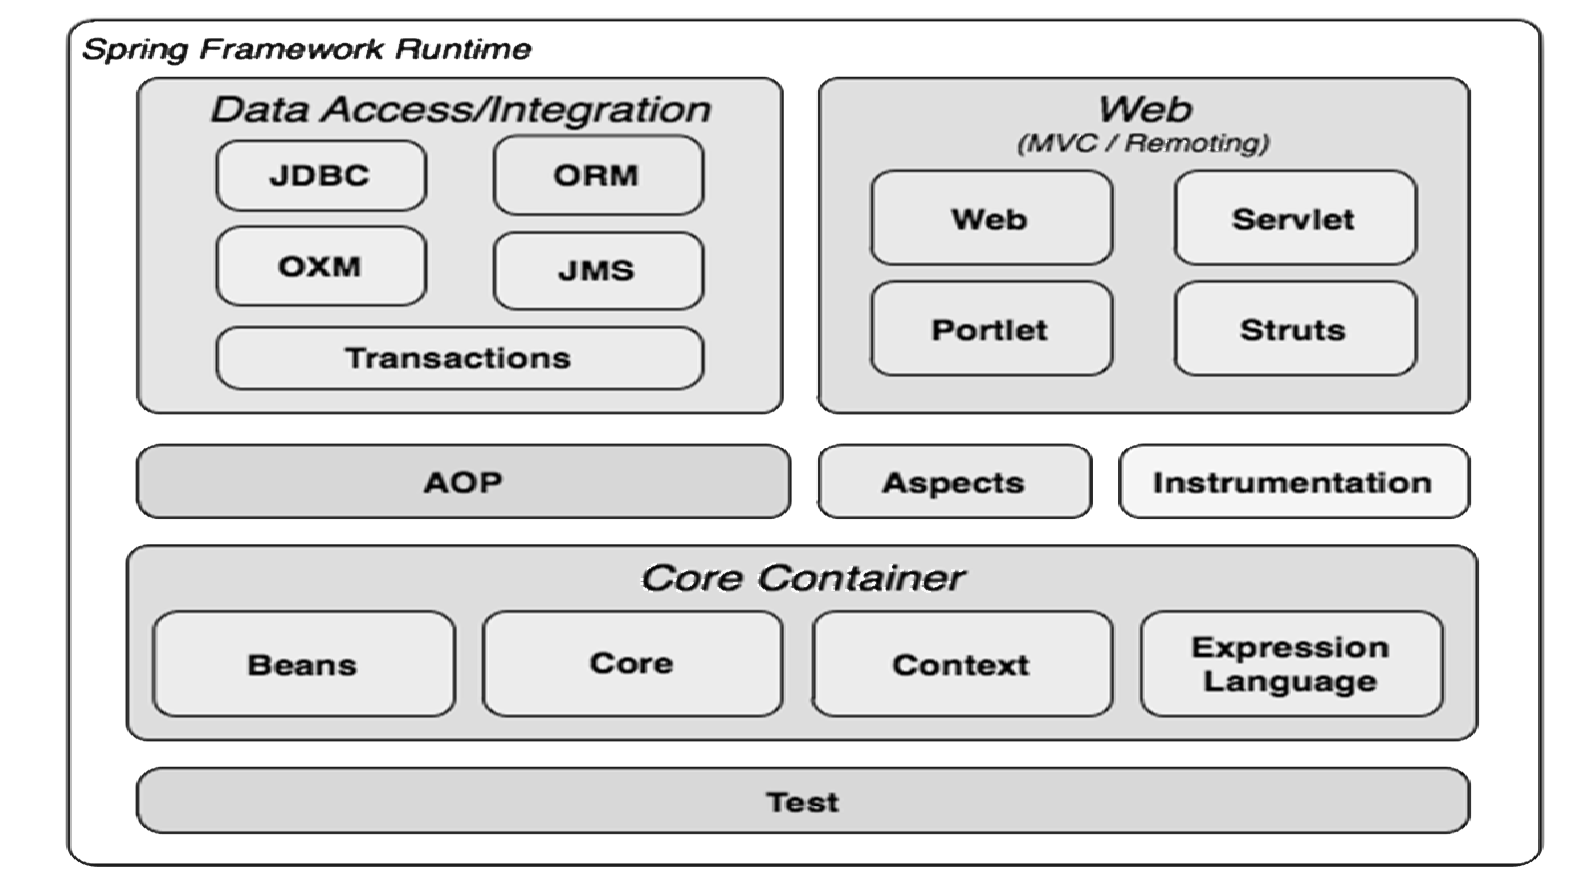
Spring设计理念
Springs是面向Bean的编程
Spring两大核心技术
- 控制反转(IoC:Inversion of Contorl)/ 依赖注入(DI:Dependency Injection)
- 面向切面编程(AOP:Aspect Oriented Programming)
Spring的优点
- 抵侵入式设计
- 独立于各种应用服务器
- 依赖注入特性将组件关系透明化,降低了耦合度
- 面向切面编程特性允许将通用任务进行集中式处理
- 与第三方框架的良好整合
操作:Spring依赖注入
- 需求说明
- 控制台输出
- 陈大大说:"要有趣的灵魂和智慧的大脑,继续加油!“
- Rod说:“世界上有10种人,认识二进制的和不认识二进制的。 ”
- 控制台输出
-
要求:说话人和说话内容都通过Spring实现依赖注入
演示:
步骤1:配置pom.xml,要加入Spring的依赖
(注:可在官网下载:https://spring.io/)
 1 <dependencies>
 2         <!-- https://mvnrepository.com/artifact/org.springframework/spring-core -->
 3         <dependency>
 4             <groupId>org.springframework</groupId>
 5             <artifactId>spring-core</artifactId>
 6             <version>4.1.9.RELEASE</version>
 7         </dependency>
 8
 9         <!-- https://mvnrepository.com/artifact/org.springframework/spring-beans -->
10         <dependency>
11             <groupId>org.springframework</groupId>
12             <artifactId>spring-beans</artifactId>
13             <version>4.1.9.RELEASE</version>
14         </dependency>
15
16         <!-- https://mvnrepository.com/artifact/org.springframework/spring-context -->
17         <dependency>
18             <groupId>org.springframework</groupId>
19             <artifactId>spring-context</artifactId>
20             <version>4.1.9.RELEASE</version>
21         </dependency>
22
23         <dependency>
24             <groupId>junit</groupId>
25             <artifactId>junit</artifactId>
26             <version>4.12</version>
27             <scope>test</scope>
28         </dependency>
29     </dependencies>
步骤2:在resources中加入applicationContext.xml,并加入以下代码
 1 <!-- 定义bean,该bean的id是cmf(陈大大),class指定该bean实例的实现类 -->
 2     <bean id="cmf" class="cn.service.Greeting">
 3         <!-- property元素用来指定需要容器注入的属性,person属性需要容器注入,Greeting类必须拥有setPerson()方法 -->
 4         <property name="person">
 5             <!-- 为person属性注入值 -->
 6             <value>陈大大</value>
 7         </property>
 8         <!-- words属性需要容器注入,Greeting类必须拥有setWords()方法 -->
 9         <property name="words">
10             <!-- 为words属性注入值 -->
11             <value>有有趣的灵魂和智慧的大脑,继续加油!</value>
12         </property>
13     </bean>
14
15     <bean id="rodSay" class="cn.service.Greeting">
16         <property name="person">
17             <value>Rod</value>
18         </property>
19         <property name="words">
20             <value>世界上有10种人,认识二进制和不认识二进制的。</value>
21         </property>
22     </bean>
步骤3:在Greeting类中加入以下代码
 1 package cn.service;
 2
 3 /**
 4  * 依赖注入范例:Greeting
 5  * @author cmf
 6  * @version 1.0
 7  */
 8 public class Greeting {
 9     /**
10      * 说话的人
11      */
12     private String person = "Nobody";
13
14     /**
15      * 说话的内容
16      */
17     private String words = "nothing";
18
19     /**
20      * 获得说话的人
21      * @return 说话的人
22      */
23     public String getPerson(){
24         return person;
25     }
26
27     /**
28      * 设置说话的人
29      * @param person 说话的人
30      */
31     public void setPerson(String person){
32         this.person = person;
33     }
34
35     /**
36      * 获得说话的内容
37      * @return 说话的内容
38      */
39     public String getWords(){
40         return words;
41     }
42
43     /**
44      * 设置说话的内容
45      * @param words 说话的内容
46      */
47     public void setWords(String words){
48         this.words = words;
49     }
50
51     /**
52      * 定义说话方法
53      */
54     public void sayGreeting(){
55         System.out.println(person + "说:"+ words + "");
56     }
57 }
步骤四:最后进行测试
 1 package cn.service.test;
 2
 3 import cn.service.Greeting;
 4 import org.springframework.context.ApplicationContext;
 5 import org.springframework.context.support.ClassPathXmlApplicationContext;
 6
 7 /**
 8  * @author cmf
 9  * @version 1.0
10  */
11 public class Test {
12     @org.junit.Test
13     public void test(){
14         //通过ClassPathXmlApplicationContext显式实例化Spring的上下文
15         ApplicationContext applicationContext = new ClassPathXmlApplicationContext("applicationContext.xml");
16
17         //通过Greeting bean的id来获取bean的实例
18         Greeting cmf = (Greeting) applicationContext.getBean("cmf");
19
20         Greeting rodSay = (Greeting)applicationContext.getBean("rodSay");
21
22         //执行sysGreeting()方法
23         cmf.sayGreeting();
24
25         rodSay.sayGreeting();
26     }
27 }
步骤五:输出结果

最后
这句话送给自己也送给成长路上的每一位追梦人:
每一次的失败都是一次成长的机会,要有屡战屡败屡败屡战的精神,不断去反思和总结自身,直到达到心中的那个目标 ! !