一、环境说明
1.操作系统:centos 7.5 x86_64
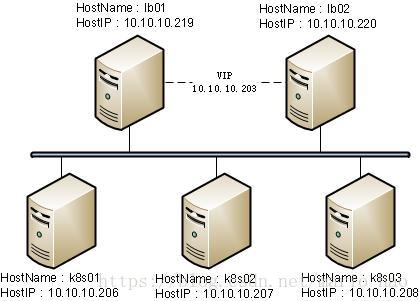
2.三台k8s-master 3.两台lvs
k8s01:10.10.10.206 lb01:10.10.10.219
k8s02:10.10.10.207 lb02:10.10.10.220
k8s03:10.10.10.208 vipIP:10.10.10.203
二、系统配置
1.三台Kubernetes配置,配置参考“Kubernetes+Docker+Calico集群安装配置”中k8s-master配置文档
三台k8s-master
1)创建生成K8S csr的JSON配置文件,然后生成kubernetes*.pem
# cd /root/ssl
# cat > kubernetes-csr.json <<EOF
{
  "CN": "kubernetes",
  "hosts": [
    "127.0.0.1",
    "10.10.10.206",
    "10.10.10.207",
    "10.10.10.208",
    "10.10.10.203"
    "10.1.0.1"
    "10.2.0.1",
    "localhost",
    "kubernetes",
    "kubernetes.default",
    "kubernetes.default.svc",
    "kubernetes.default.svc.cluster",
    "kubernetes.default.svc.cluster.local"
  ],
  "key": {
    "algo": "rsa",
    "size": 2048
  },
  "names": [
    {
      "C": "CN",
      "ST": "BeiJing",
      "L": "BeiJing",
      "O": "k8s",
      "OU": "System"
    }
  ]
}
EOF
注:10.1.0.1地址为service-cluster网段中第一个ip,10.2.0.1地址为cluster-cidr网段中第一个ip
2)在“Kubernetes+Docker+Calico集群安装配置”文档中master和各node节点所有配置连接时使用https://192.168.168.2:6443部分都替换为https://10.10.10.203:6443
3)LVS部分配置
a.配置Linux内核参数
# vi /etc/sysctl.conf
net.ipv4.ip_forward = 1
net.ipv4.conf.lo.arp_ignore = 1
net.ipv4.conf.lo.arp_announce = 2
net.ipv4.conf.all.arp_ignore = 1
net.ipv4.conf.all.arp_announce = 2
net.bridge.bridge-nf-call-iptables=1
net.bridge.bridge-nf-call-ip6tables=1
net.ipv4.ip_local_port_range = 30000 60999
net.netfilter.nf_conntrack_max = 26214400
net.netfilter.nf_conntrack_tcp_timeout_established = 86400
net.netfilter.nf_conntrack_tcp_timeout_close_wait = 3600

# sysctl -p
b.配置VIP地址绑定在lo网卡上
# mkdir /opt/scripts/lvs_real.sh
# vi /opt/scripts/lvs_real.sh
#!/bin/bash
#description: Config realserver

VIP=10.10.10.203

. /etc/rc.d/init.d/functions

case "$1" in

start)
       ifconfig lo:0 $VIP netmask 255.255.255.255 broadcast $VIP
       /sbin/route add -host $VIP dev lo:0
       echo "1" >/proc/sys/net/ipv4/conf/lo/arp_ignore
       echo "2" >/proc/sys/net/ipv4/conf/lo/arp_announce
       echo "1" >/proc/sys/net/ipv4/conf/all/arp_ignore
       echo "2" >/proc/sys/net/ipv4/conf/all/arp_announce
       sysctl -p >/dev/null 2>&1
       echo "RealServer Start OK"
       ;;

stop)
       ifconfig lo:0 down
       route del $VIP >/dev/null 2>&1
       echo "0" >/proc/sys/net/ipv4/conf/lo/arp_ignore
       echo "0" >/proc/sys/net/ipv4/conf/lo/arp_announce
       echo "0" >/proc/sys/net/ipv4/conf/all/arp_ignore
       echo "0" >/proc/sys/net/ipv4/conf/all/arp_announce
       echo "RealServer Stoped"
       ;;

status)
        #Status of LVS-DR real server.
        islothere=`/sbin/ifconfig lo:0 | grep $VIP`
        isrothere=`netstat -rn | grep "lo:0" | grep $VIP`
        if [ ! "$islothere" -o ! "isrothere" ];then
            # Either the route or the lo:0 device
            # not found.
            echo "LVS-DR real server Stopped."
        else
            echo "LVS-DR Running."
        fi
        ;;

*)
        #Invalid entry.
        echo "$0: Usage: $0 {start|status|stop}"
        exit 1
        ;;
esac
exit 0

# chmod +x /opt/scripts/lvs_real.sh
# /opt/scripts/lvs_real.sh start
4)查看lo网口绑定VIP状态
# ip a
1: lo: <LOOPBACK,UP,LOWER_UP> mtu 65536 qdisc noqueue state UNKNOWN group default qlen 1000
    link/loopback 00:00:00:00:00:00 brd 00:00:00:00:00:00
    inet 127.0.0.1/8 scope host lo
       valid_lft forever preferred_lft forever
    inet 10.10.10.203/32 brd 10.10.10.203 scope global lo:0
       valid_lft forever preferred_lft forever
    inet6 ::1/128 scope host
       valid_lft forever preferred_lft forever
5)配置lvs_real.sh脚本开机自动执行
# vi /etc/rc.d/rc.local
#!/bin/bash
# THIS FILE IS ADDED FOR COMPATIBILITY PURPOSES
#
# It is highly advisable to create own systemd services or udev rules
# to run scripts during boot instead of using this file.
#
# In contrast to previous versions due to parallel execution during boot
# this script will NOT be run after all other services.
#
# Please note that you must run 'chmod +x /etc/rc.d/rc.local' to ensure
# that this script will be executed during boot.

#touch /var/lock/subsys/local

bash /opt/scripts/lvs_real.sh start
chmod +x /etc/rc.d/rc.local
6)编辑rc-local.service在末尾添加[Install]部分
# vi /usr/lib/systemd/system/rc-local.service
#  This file is part of systemd.
#
#  systemd is free software; you can redistribute it and/or modify it
#  under the terms of the GNU Lesser General Public License as published by
#  the Free Software Foundation; either version 2.1 of the License, or
#  (at your option) any later version.

# This unit gets pulled automatically into multi-user.target by
# systemd-rc-local-generator if /etc/rc.d/rc.local is executable.
[Unit]
Description=/etc/rc.d/rc.local Compatibility
ConditionFileIsExecutable=/etc/rc.d/rc.local
After=network.target

[Service]
Type=forking
ExecStart=/etc/rc.d/rc.local start
TimeoutSec=0
RemainAfterExit=yes

[Install]
WantedBy=multi-user.target
设置开机启动
systemctl daemon-reload
systemctl enable rc-local.service
systemctl start rc-local.service
2.lvs+keepalived配置,配置前关闭selinux和firewalld
在lb01和lb02主机上yum -y install ipvsadm keepalived
1)lb01 keepalived配置文件
# vi /etc/keepalived/keepalived.conf
! Configuration File for keepalived

global_defs {
   router_id LVS_k8s
}

vrrp_script CheckKeepalived {
    script "/etc/keepalived/chk_keepalived.sh"
    interval 3
    weight -10
    fall 2
    rise 2
}

vrrp_instance VI_1 {
    state MASTER
    interface ens32
    virtual_router_id 66
    priority 100
    advert_int 1
    vrrp_garp_master_repeat 5
    vrrp_garp_master_refresh 10
    authentication {
        auth_type PASS
        auth_pass 6666
    }
    virtual_ipaddress {
        10.10.10.203 dev ens32 label ens32:vip
    }
    track_script {
        CheckKeepalived
    }
}

virtual_server 10.10.10.203 6443 {
    delay_loop 6
    lb_algo rr
    lb_kind DR
#    persistence_timeout 0
    protocol TCP

    real_server 10.10.10.206 6443 {
        weight 10
        TCP_CHECK {
            connect_timeout 10
        }
    }
    real_server 10.10.10.207 6443 {
        weight 10
        TCP_CHECK {
            connect_timeout 10
        }
    }
    real_server 10.10.10.208 6443 {
        weight 10
        TCP_CHECK {
            connect_timeout 10
        }
    }
}
注:此例lvs绑定网卡号为ens32
2)lb02 keepalived配置文件
# vi /etc/keepalived/keepalived.conf
! Configuration File for keepalived

global_defs {
   router_id LVS_k8s
}

vrrp_script CheckKeepalived {
    script "/etc/keepalived/chk_keepalived.sh"
    interval 3
    weight -10
    fall 2
    rise 2
}

vrrp_instance VI_1 {
    state BACKUP
    interface ens32
    virtual_router_id 66
    priority 95
    advert_int 1
    authentication {
        auth_type PASS
        auth_pass 6666
    }
    virtual_ipaddress {
        10.10.10.203 dev ens32 label ens32:vip
    }
    track_script {
        CheckKeepalived
    }
}

virtual_server 10.10.10.203 6443 {
    delay_loop 6
    lb_algo rr
    lb_kind DR
    persistence_timeout 0
    protocol TCP

    real_server 10.10.10.206 6443 {
        weight 10
        TCP_CHECK {
            connect_timeout 10
        }
    }
    real_server 10.10.10.207 6443 {
        weight 10
        TCP_CHECK {
            connect_timeout 10
        }
    }
    real_server 10.10.10.208 6443 {
        weight 10
        TCP_CHECK {
            connect_timeout 10
        }
    }
}
3)keepalived故障检测文件
# vi /etc/keepalived/chk_keepalived.sh
#!/bin/bash
keepalived_counter=$(ps -C keepalived --no-heading|wc -l)

if [ "${keepalived_counter}" = "0" ]; then
  /usr/sbin/keepalived
fi

# chmod +x /etc/keepalived/chk_keepalived.sh
4)Linux 内核参数配置
# vi /etc/sysctl.conf
net.ipv4.ip_forward = 1
net.ipv4.ip_nonlocal_bind = 1

# sysctl -p
5)启动keepalived后查看网卡绑定和ipvsadm状态
# ip a
1: lo: <LOOPBACK,UP,LOWER_UP> mtu 65536 qdisc noqueue state UNKNOWN group default qlen 1000
    link/loopback 00:00:00:00:00:00 brd 00:00:00:00:00:00
    inet 127.0.0.1/8 scope host lo
       valid_lft forever preferred_lft forever
    inet6 ::1/128 scope host
       valid_lft forever preferred_lft forever
2: ens32: <BROADCAST,MULTICAST,UP,LOWER_UP> mtu 1500 qdisc pfifo_fast state UP group default qlen 1000
    link/ether 00:50:56:b7:3f:e5 brd ff:ff:ff:ff:ff:ff
    inet 10.10.10.219/24 brd 10.10.10.255 scope global noprefixroute ens32
       valid_lft forever preferred_lft forever
    inet 10.10.10.203/32 scope global ens32:vip
       valid_lft forever preferred_lft forever
    inet6 fe80::250:56ff:feb7:3fe5/64 scope link
       valid_lft forever preferred_lft forever
# ipvsadm -L -n
IP Virtual Server version 1.2.1 (size=4096)
Prot LocalAddress:Port Scheduler Flags
  -> RemoteAddress:Port           Forward Weight ActiveConn InActConn
TCP  10.10.10.203:6443 rr
  -> 10.10.10.206:6443            Route   10     0          0
  -> 10.10.10.207:6443            Route   10     0          0
  -> 10.10.10.208:6443            Route   10     0          0