《深入浅出WPF》学习笔记
第6章 深入浅出话Binding
6.2 Binding基础
如果把Binding比作数据的桥梁,那么它的两端分别是Binding的源(Source)和目标(Target)。一般源是逻辑层对象,目标是UI层控件对象.
我们可以控制源与目标是双向通行还是单向,还可以控制对数据放行的时机,还可以设置“关卡”转换数据类型或校验数据的正确性。
class Student
{
    public string Name {get;set;}
    public string Age {get;set;}
}
Path:如上所示,一个对象有多个属性,UI上关心哪个属性值的变化呢?这个属性就称为Binding的路径(Path)
PropertyChanged:让属性具备通知Binding值已变化的能力。作为数据源的类实现INotifyPropertyChanged接口。
        using System.ComponentModel;
        class Student : INotifyPropertyChanged
        {
            public event PropertyChangedEventHandler PropertyChanged;
            private string name;
            public string Name
            {
                get { return name; }
                set
                {
                    name = value;
                    //激发事件
                    if (this.PropertyChanged != null)
                    {
                        this.PropertyChanged.Invoke(this, new PropertyChangedEventArgs("Name"));
                    }
                }
            }
        }
Binding的过程:
Student stu = new Student();
Binding binding = new Binding();
binding.Source = stu;
binding.Path = new PropertyPath("Name");

BindingOperations.SetBinding(this.textBoxName,TextBox.TextProperty,binding);
主要是 源、路径、设置绑定
实际工作中,实施Binding的代码可能与上面不太一样,因为TextBox这类UI元素的基类FramewordElement对BindingOperation.SetBinding(...)方法进行了封装,封装的结果也叫SetBinding,只是参数列表发送了变化
        public BindingExpressionBase SetBinding(DependencyProperty dp, BindingBase binding)
        {
            return BindingOperations.SetBinding(this, dp, binding);
        }
借助Binding类的构造器及C#3.0的对象初始化器语法简化上述代码
this.textBoxName.SetBinding(TextBox.TextProperty, new Binding("Name") { Source = stu = new Student() });
6.3 Binding的源与路径
源:只要是一个对象,并行通过属性(Property)公开自己的数据,它就能作为Binding的源
如果想让作为Binding源的对象具有自动通知Binding属性已改变的能力,就需要让类实现InotifyPropertyChanged接口并在熟悉的set语句中激发PropertyChanged事件。
除了对象作为数据源外,还可以有很多选择,控件自己或自己的容器或子集元素、集合作为ItemsControl的数据源、XML作为TreeView或Menu的数据源、把多个控件关联到一个“数据制高点”上、甚至干脆不给Binding指定数据源,让它自己去找
6.3.1 把控件作为Binding源与Binding标记拓展
大多数情况下Binding的源是逻辑层对象,但有时候为了让UI元素产生联动效果也会使用Binding在控件间建立关联。
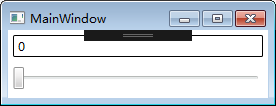
如把TextBox的Text属性关联在Slider的Value属性上
    <StackPanel>
        <TextBox x:Name="textBox1" Text="{Binding Path=Value,ElementName=slider1}" BorderBrush="Black" Margin="5"/>
        <Slider x:Name="slider1" Maximum="100" Minimum="0" Margin="5"/>
    </StackPanel>
<TextBox x:Name="textBox1" Text="{Binding Path=Value,ElementName=slider1}" BorderBrush="Black" Margin="5"/>
与下面C#代码等价,且上面Path=可以省略
this.textBox1.SetBinding(TextBox.TextProperty, new Binding("Value") { ElementName = "slider1" });
wpf数据绑定Source和ElementName的区别
Source 用于指定数据源为后台数据对象、集合
ElementName 用于指定“数据源”为界面上某个控件的某个属性
注意:
在C#代码中可以访问XAML代码中声明的变量,但XAML代码中无法访问C#代码中声明的变量。
因此,要想在XAML中建立UI元素与逻辑层对象的Binding还要颇费些周折,把逻辑层对象声明为XAML代码中的资源(Resource),见资源一章。
6.3.2 控制Bangding的方向及数据更新
有时候数据只需要展示给用户、不允许用户修改,这时候可以把Binding模式更改为从源向目标的单向沟通 (源→目标:OneWay)
Mode:属性Mode控制绑定方向。BindingMode类型的枚举值:TwoWay、OneWay、OnTime、OneWayToSource和Default。
-
TwoWay 源↔目标 无论是目标属性还是源属性,只要发生了更改,TwoWay 就会更新目标属性或源属性。
-
OneWay 源→目标 仅当源属性发生更改时更新目标属性。
-
OneTime 仅当应用程序启动时或 DataContext 进行更改时更新目标属性。
-
OneWayToSource 目标→源 在目标属性更改时更新源属性。
-
Default 使用目标属性的默认 Mode 值。(这里的Default指的是Binding的模式会根据目标是实际情况来确定,如果是可以编辑的(TextBox的Text属性),Default就采用双向模式。如果是TextBlock,不可编辑,就使用单向模式。)
上述Slider示例中,在TextBox输入一个值,然后按Tab键(TextBox丢失焦点),Slider的手柄会自动跳到相应的位置。
this.textBox1.SetBinding(TextBox.TextProperty, new Binding("Value") { ElementName = "slider1" , Mode = BindingMode.OneWay});
为什么一定要丢失焦点后Slider的值才变呢?
UpdateSourceTrigger:属性控制值改变时机。枚举值PropertyChanged、LostFocus、Explicit和Default


Explicit,源不会更新除非你手动来操作
LostFocus,一旦目标控件失去焦点,源就会被更新。
PropertyChanged,一旦绑定的属性值改变,源会立即更新。
6.3.3 Binding的路径(Path)
即绑定到底需要关注哪个属性的值。前面例子是把Slider控件当做源,它的Value作为路径
Path属性对应c#的实际类型是PropertyPath
Binding binding = new Binding(){Path=new PropertyPath("Value"),Source=this.slidr1};
Path支持多级路径(即一路“点”下去)
如 {Binding Path=Text.Length}
如果集合作为源,想把集合中的元素当做Path可以使用多级斜杠的方式
如 new Binding("/Name") new Binding("/ProvinceList.Name")
6.3.4 没有Path的Binding
有点时候Path是一个. 或者干脆没有Path
这是一种特殊的情况——Binding源本身就是数据且不需要Path来指明
如string、int等基本类型,可以将Path设置为".",XAML中.可以省略,C#代码中不可以省
6.3.5 为Binding指定源(Source)的几种方式
Binding的源是数据的来源,只要一个对象包含数据并能通过属性获取到,它就能当作Binding的源
*普通CLR类型对象,只要改对象实现了INotifyPropertyChanged接口即可当作源
*普通CLR集合类型对象: 数组、List<T>、ObservableCollection<T>
经常把集合作为ItemsControl派生类的数据源
*ADO.NET数据对象:DataTable和DataView等
*XML,使用XmlDataProvider
*依赖对象(Dependency Object)
*容器的DataContext (WPF默认使用的源)
*ElementName指定源:在C#代码中把对象的Name作为源赋给Binding
*RelativeSource指定源:当控件需要关注自己的、自己容器的或者自己内部元素的某个值时
*ObjectDataProvider:当数据源的数据不是通过属性而是通过方法暴露给外界时
*LINQ检索得到的数据对象
下面通过实例分述每种情况
6.3.6 没有Source的Binding——使用DataContext作为Binding的源
所有WPF控件(包括容器控件)都具备DataContext属性
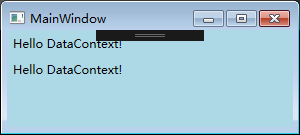
在UI元素树的每个节点都有DataContext
    public class Student
    {
        public int Id { get; set; }
        public string Name { get; set; }
        public int Age { get; set; }
    }
       <StackPanel Background="LightBlue" >
            <StackPanel.DataContext>
                <local:Student Id="6" Age="29" Name="tim"/>
            </StackPanel.DataContext>
            <Grid >
                <StackPanel>
                    <TextBox Text="{Binding Path=Id}" Margin="5"/>
                    <TextBox Text="{Binding Path=Name}" Margin="5" />
                    <TextBox Text="{Binding Path=Age}" Margin="5"/>
                </StackPanel>
            </Grid>
        </StackPanel>
UI布局如下
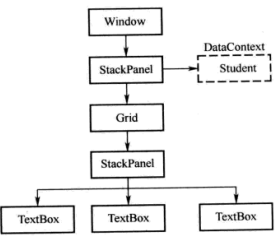
在XAML中为外层StackPanel的DataContext赋了值,内层TextBox的Binding只指定了Path,没有指定Source,这时TextBox的Binding会自动向UI元素树的上层寻找可用的DataContext对象
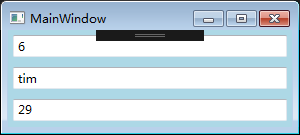
如果Source本身就是数据,Binding的Path可以设置为"."或不写
xmlns:sys="clr-namespace:System;assembly=mscorlib"

<StackPanel Background="LightBlue" >
            <StackPanel.DataContext>
                <sys:String >Hello DataContext!</sys:String>
            </StackPanel.DataContext>
            <Grid >
                <StackPanel>
                    <TextBlock Text="{Binding}" Margin=" 5"/>
                    <TextBlock Text="{Binding .}" Margin=" 5"/>
                </StackPanel>
            </Grid>
</StackPanel>
此处使用TextBlock,如果使用TextBox提示 双向绑定需要Path或Xpath
其实,“Binding沿着UI元素树网上找”只是WPF给我们的一个错觉,实际是因为DataContext是一个“依赖属性”,当控件的依赖属性没有显式赋值时,依赖属性值会沿UI元素树向下传递。
DataContext的用法:
*当UI上多个控件Binding同一个对象时
*当Source对象不能被直接访问时——比如B窗体内的控件想把A窗体内的控件当做Binding源,但A窗体内的控件是private访问级别,这时可以把该控件作为窗体A的DataContext
6.3.7 使用集合作为列表控件的ItemsSource
WPF中的列表控件派生自ItemsControl类,自然继承了ItemsSource属性。ItemsSource属性可以接收IEnumerable接口派生类的实例作为自己的值。
每个ItemsControl的派生类都有自己对应的条目容器(Item Container)。例如 ListBox -> ListBoxItem ComboBox -> ComboBoxItem
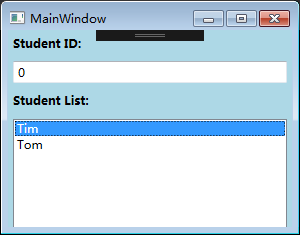
  <StackPanel x:Name="stackPanel" Background="LightBlue" >
    <TextBlock Text="Student ID:" FontWeight="Bold" Margin="5" />
    <TextBox x:Name="textBoxId" Margin="5"/>
    <TextBlock Text="Student List:" FontWeight="Bold" Margin="5"/>
    <ListBox x:Name="listBoxStudents" Height=" 110" Margin=" 5" />
  </StackPanel>
  List<Student> stuList = new List<Student>()
  {
    new Student() { Id=0,Name="Tim",Age=29},
    new Student() { Id=1,Name="Tom",Age=28},
  };
    //为ListBox设置Binding
  this.listBoxStudents.ItemsSource = stuList;
  this.listBoxStudents.DisplayMemberPath = "Name";

    //为TextBox设置Binding
  Binding binding = new Binding("SelectedItem.Id") { Source = this.listBoxStudents };
  this.textBoxId.SetBinding(TextBox.TextProperty, binding);
注意:DisplayMemberPath属性赋值后,ListBox就以ItemsSource源下ListBoxItem变量的Path为Binding
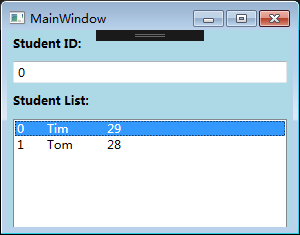
<StackPanel x:Name="stackPanel" Background="LightBlue" >
  <TextBlock Text="Student ID:" FontWeight="Bold" Margin="5" />
  <TextBox x:Name="textBoxId" Margin="5"/>
  <TextBlock Text="Student List:" FontWeight="Bold" Margin="5"/>
  <ListBox x:Name="listBoxStudents" Height=" 110" Margin=" 5" >
    <ListBox.ItemTemplate >
      <DataTemplate >
        <StackPanel Orientation="Horizontal">
          <TextBlock Text="{Binding Path=Id}" Width="30" />
          <TextBlock Text="{Binding Path=Name}" Width="60" />
          <TextBlock Text="{Binding Path=Age}" Width="30" />
        </StackPanel>
      </DataTemplate>
    </ListBox.ItemTemplate>
  </ListBox>
</StackPanel>
List<Student> stuList = new List<Student>()
{
    new Student() { Id=0, Name="Tim", Age=29 },
    new Student() { Id=1, Name="Tom", Age=28 },
};
this.listBoxStudents.ItemsSource = stuList;
//this.listBoxStudents.DisplayMemberPath = "Name";

this.textBoxId.SetBinding(TextBox.TextProperty, new Binding("SelectedItem.Id"){Source = this.listBoxStudents});
去掉DisplayMemberPath赋值,显示的为数据设置DataTemplate后,结果如上右图所示
6.3.8 使用ADO.NET对象作为Binding的源
尽管流行的架构中先通过Linq等手段把DataTable里的数据转换成用户自定义类型集合,但WPF也可以让列表控件和DataTable直接建立Binding
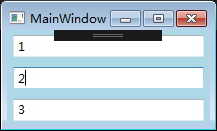
<StackPanel x:Name="stackPanel" Background="LightBlue" >
    <ListBox x:Name="listBoxStudents" Height=" 110" Margin=" 5" />
</StackPanel>
DataTable dt = new DataTable();
dt.Columns.Add("Id", Type.GetType("System.String"));
dt.Columns.Add("Name", Type.GetType("System.String"));
dt.Columns.Add("Age", Type.GetType("System.String"));

dt.Rows.Add(new object[] { "1", "Tim", "29" });
dt.Rows.Add(new object[] { "2", "Tom", "28" });
dt.Rows.Add(new object[] { "3", "Tony", "27" });
dt.Rows.Add(new object[] { "4", "Kyle", "26" });

this.listBoxStudents.ItemsSource = dt.DefaultView;
this.listBoxStudents.DisplayMemberPath = "Name";
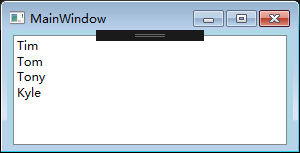
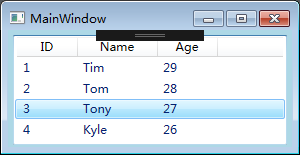
上面采用DefaultView,多数情况下,我们会选择ListView控件来显示DataTable,结果如上图右
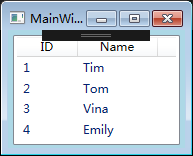
<StackPanel x:Name="stackPanel" Background="LightBlue" >
    <ListView x:Name="listViewStudents" Height=" 110" Margin="5" >
        <ListView.View>
            <GridView>
                <GridViewColumn Header="ID" Width="60" DisplayMemberBinding="{Binding Id}" />
                <GridViewColumn Header="Name" Width="80" DisplayMemberBinding="{Binding Name}" />
                <GridViewColumn Header="Age" Width="60" DisplayMemberBinding="{Binding Age}" />
            </GridView>
        </ListView.View>
    </ListView>
</StackPanel>
注意:ListView和GridView看着像同一级别的控件,实际并非如此。ListView是一个控件,GridView是ListView的View(目前ListView只有此唯一的一个View 2010年)
GridViewColumn 属于 <GridView.Columns> 节点下,此处可以省略此节点
我们把DataTable.DefaultView作为ItemsSource,如果直接用DataTable作为源会报错,但可以把DataTable对象赋给DataContext,然后设置一个无源无路径的绑定
this.listViewStudents.DataContext = dt;
this.listViewStudents.SetBinding(ListView.ItemsSourceProperty, new Binding());
6.3.9 使用XML数据作为Binding的源
XML文本是树形结构,可以方便表示线性集合(Array、List等)和树形结构数据
当使用XML作为源时,路径使用XPath而不是Path
<?xml version="1.0" encoding="utf-8" ?>   //RawData.xml
<StudentList>
    <Student Id="1">
      <Name>Tim</Name>
    </Student>
    <Student Id="2">
      <Name>Tom</Name>
    </Student>
    <Student Id="3">
      <Name>Vina</Name>
    </Student>
    <Student Id="4">
      <Name>Emily</Name>
    </Student>
</StudentList>
<StackPanel x:Name="stackPanel" Background="LightBlue" >
    <ListView x:Name="listViewStudents" Height=" 110" Margin=" 5" >
        <ListView.View>
            <GridView >
            //加@表示属性,不加@表示子级元素
                <GridViewColumn Header="ID" Width="60" DisplayMemberBinding="{Binding XPath=@Id}" />
                <GridViewColumn Header="Name" Width="80" DisplayMemberBinding="{Binding XPath=Name}" />
            </GridView>
        </ListView.View>
    </ListView>
</StackPanel>
//方法1
//XmlDocument doc = new XmlDocument();
//doc.Load(@"D:RawData.xml");
//XmlDataProvider xdp = new XmlDataProvider();
//xdp.Document = doc;
//xdp.XPath = @"/StudentList/Student"; //使用Xpath选择需要暴露的数据

//方法2
XmlDataProvider xdp = new XmlDataProvider();
xdp.Source = new Uri(@"D:RawData.xml");
xdp.XPath = @"/StudentList/Student";

this.listViewStudents.DataContext = xdp;
this.listViewStudents.SetBinding(ListView.ItemsSourceProperty, new Binding());
6.3.10 使用Linq检索结果作为Binding的源
使用Linq我们可以方便地操作集合、DataTable和XML对象而不必动辄好几层foreach循环嵌套只是为了完成一个简单的任务
Linq查询的结果是IEnumerable<T>类型对象,它派生自IEnumerable,所以它可以作为列表控件的ItemsSource来使用
List<Student> stuList = new List<Student>()
{
    new Student() { Id=0, Name="Tim", Age=29 },
    new Student() { Id=1, Name="Tom", Age=28 },
    new Student() { Id=2, Name="Kyle", Age=27 },
    new Student() { Id=3, Name="Tony", Age=26 },
    new Student() { Id=4, Name="Vina", Age=25 },
    new Student() { Id=5, Name="Mike", Age=24 },
};

this.listViewStudents.ItemsSource = from stu in stuList where stu.Name.StartsWith("T") select stu;
//数据在XML
this.listViewStudents.ItemsSource = from element in xdoc.Descendants("Student")
                                    where element.Attribute("Name").Value.StartsWith("T")
                                    select new Student()
                                    {
                                        Id = int.Parse(element.Attribute("Id").Value),
                                        Name = element.Attribute("Name").Value,
                                        Age = int.Parse(element.Attribute("Age").Value)
                                    };
6.3.11 使用ObjectDataProvider对象作为Binding的Source
ObjectDataProvider顾名思义就是把对象作为数据源提供给Binding
<StackPanel Background="LightBlue" >
    <TextBox x:Name="textBoxArg1" Margin="5"></TextBox>
    <TextBox x:Name="textBoxArg2" Margin="5"></TextBox>
    <TextBox x:Name="textBoxResult" Margin="5"></TextBox>
</StackPanel>
//创建并配置ObjectDataProvider对象
ObjectDataProvider odp = new ObjectDataProvider();
odp.ObjectInstance = new Calculator();
odp.MethodName = "Add";
odp.MethodParameters.Add("0");
odp.MethodParameters.Add("0");

//以ObjectDataProvider对象为Source创建Binding
Binding bindingToArg1 = new Binding("MethodParameters[0]")
{
    Source = odp,
    BindsDirectlyToSource = true, //把UI接收到的数据写入其直接Source(即ObjectDataProvider)而不是Calculator对象
    UpdateSourceTrigger = UpdateSourceTrigger.PropertyChanged //有更新立刻将值传回Source
};

Binding bindingToArg2 = new Binding("MethodParameters[1]")
{
    Source = odp,
    BindsDirectlyToSource = true,
    UpdateSourceTrigger = UpdateSourceTrigger.PropertyChanged
};
//把ObjectDataProvider对象当做Source时,这个对象本身就是数据,所以Path可以省略用.代替
Binding bindingToResult = new Binding(".") { Source = odp };

this.textBoxArg1.SetBinding(TextBox.TextProperty, bindingToArg1);
this.textBoxArg2.SetBinding(TextBox.TextProperty, bindingToArg2);
this.textBoxResult.SetBinding(TextBox.TextProperty, bindingToResult);
6.3.12 使用Binding的RelativeSource
当一个Binding有明确的数据来源时,我们可以通过为Source或ElementName赋值的办法进行Binding
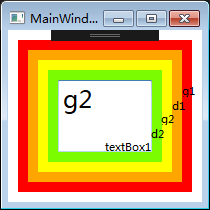
有时候我们不确定Source对象叫什么,但知道它与Binding对象在UI布局上有相对关系,(比如控件自己关联自己的某个数据、关联自己某级容器的数据),这时我们就要使用RelativeSource属性。
<Grid x:Name="g1" Background="Red" Margin="10">
    <DockPanel x:Name="d1" Background="Orange" Margin="10">
        <Grid x:Name="g2" Background="Yellow" Margin="10">
            <DockPanel x:Name="d2" Background="LawnGreen" Margin="10">
                <TextBox x:Name="textBox1" FontSize="24" Margin="10"
                Text="{Binding RelativeSource={RelativeSource FindAncestor,AncestorType={x:Type Grid},AncestorLevel=1 },Path=Name}"/>
            </DockPanel>
        </Grid>
    </DockPanel>
</Grid>
//TextBox 绑定 等效代码
RelativeSource rs = new RelativeSource(RelativeSourceMode.FindAncestor); //引用元素绑定元素父链上级   //
rs.AncestorLevel = 1; //以Binding目标控件为起点的层级偏移量 d2是1 g2是2 d1是3 g1是4
rs.AncestorType = typeof(Grid); //源的类型,不是则跳过
Binding binding = new Binding("Name") { RelativeSource = rs };
this.textBox1.SetBinding(TextBox.TextProperty, binding);
//显示d1
Text="{Binding RelativeSource={RelativeSource FindAncestor,AncestorType={x:Type Dockpanel},AncestorLevel=2},Path=Name}"
如果TextBox关联自身的Name属性,则代码如下:
//显示textBox1
RelativeSource rs = new RelativeSource(RelativeSourceMode.Self);
Binding binding = new Binding("Name") { RelativeSource = rs };
this.textBox1.SetBinding(TextBox.TextProperty, binding);
6.4 Binding对数据的转换与校验
Binding的作用是Source与Target之间的桥梁,当Binding两端要求使用不同的数据类型时,我们可以为数据设置转换器。
ValidationRules属性:数据有效性校验
Converter属性:数据类型转换
6.4.1 Binding的数据校验
需要创建抽象类ValidationRule的派生类并实现它的Validate方法。
<StackPanel>
    <TextBox x:Name="textBox1" Margin="5" />
    <Slider x:Name="slider1" Minimum="0" Maximum="100" Margin="5" />
</StackPanel>
public class RangeValidationRule : ValidationRule
{
    //需要实现Validate 方法
    public override ValidationResult Validate(object value, CultureInfo cultureInfo)
    {
        double d = 0;
        if (double.TryParse(value.ToString(), out d))
        {
            if (d >= 0 && d <= 100)
            {
                return new ValidationResult(true, null);
            }
        }

        return new ValidationResult(false, "Validation Failed");
    }
}


private void Window_Loaded(object sender, RoutedEventArgs e)
{
    Binding binding = new Binding("Value") { Source = this.slider1 };
    binding.UpdateSourceTrigger = UpdateSourceTrigger.PropertyChanged;

    RangeValidationRule rvr = new RangeValidationRule();
    binding.ValidationRules.Add(rvr);

    this.textBox1.SetBinding(TextBox.TextProperty, binding);
}
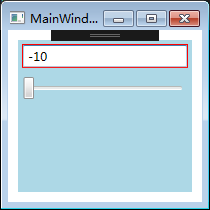
以Slider为源,TextBox为目标
当TextBox输入超出范围时,边框会显示为红色
Binding默认只校验Target->Source,不校验Source->Target的数据,如果想校验需要设置 ValidatesOnTargetUpdated = true;
6.4.2 Binding的数据转换
上面例子中,Slider控件作为Source(Path是Value属性),TextBox控件作为Target(目标属性为Text)。但Slider的Value是double,TextBox的Text是string,当Source端Path所关联的数据与Target端目标属性数据类型不一致时,我们可以添加数据转换器。像double与string这种简单的转换,WPF类库已经做好了。
手动写Converter,方法是创建一个类并让这个类实现IValueConverter接口。
public interface IValueConverter
{
    object Convert(object vale, Type outputType, object parameter, CultureInfo cultrue);
    object ConvertBack(object value, Type outputType, object parameter, CultureInfo culture);
}
当数据从Source到Target时,Convert方法将被调用;反之,ConvertBack方法将被调用。
实现过程如下:
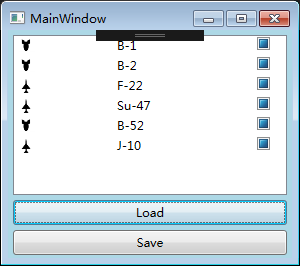
<Window x:Class="WpfApp1.MainWindow"
        xmlns="http://schemas.microsoft.com/winfx/2006/xaml/presentation"
        xmlns:x="http://schemas.microsoft.com/winfx/2006/xaml"
        xmlns:d="http://schemas.microsoft.com/expression/blend/2008"
        xmlns:mc="http://schemas.openxmlformats.org/markup-compatibility/2006"
        xmlns:local="clr-namespace:WpfApp1"
        mc:Ignorable="d"
        Title="MainWindow" Height="266" Width="300" >

    <Window.Resources >
        <local:CategoryToSourceConverter x:Key="cts"/>
        <local:StateToNullableBoolConverter x:Key="stnb" />
    </Window.Resources>
    <StackPanel Background="LightBlue" >
        <ListBox x:Name="listBoxPlane" Height="160" Margin="5" >
            <ListBox.ItemTemplate >
                <DataTemplate>
                    <StackPanel Orientation="Horizontal">
                        <Image Width="20" Height="20" Source="{Binding Path=Category,Converter={StaticResource cts}}" />
                        <TextBlock Text="{Binding Path=Name}" Width="60" Margin="80,0" />
                        <CheckBox IsThreeState="True" IsChecked="{Binding Path=State,Converter={StaticResource stnb} }" />
                    </StackPanel>
                </DataTemplate>
            </ListBox.ItemTemplate>
        </ListBox>
        <Button x:Name="buttonLoad" Content="Load" Height="25" Margin="5,0" Click="buttonLoad_Click" />
        <Button x:Name="buttonSave" Content="Save" Height="25" Margin="5,5" Click="buttonSave_Click" />
    </StackPanel>
</Window>
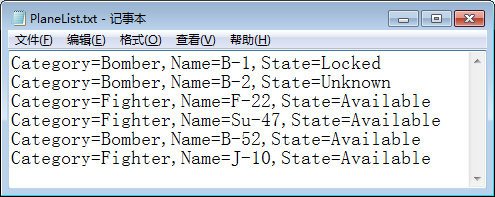
using System;
using System.Collections.Generic;
using System.Text;
using System.Windows;
using System.Windows.Data;
using System.Globalization;
using System.IO;

namespace WpfApp1
{
    public enum Category
    {
        Bomber,
        Fighter
    }

    public enum State
    {
        Available,
        Locked,
        Unknown
    }

    public class Plane
    {
        public Category Category { get; set; }
        public string Name { get; set; }
        public State State { get; set; }
    }
    /// <summary>
    /// MainWindow.xaml 的交互逻辑
    /// </summary>
    public partial class MainWindow : Window
    {
        public MainWindow()
        {
            InitializeComponent();
        }

        private void buttonLoad_Click(object sender, RoutedEventArgs e)
        {
            List<Plane> planeList = new List<Plane>()
            {
                new Plane() {Category =Category.Bomber,Name="B-1",State=State.Unknown },
                new Plane() {Category=Category.Bomber,Name="B-2",State=State.Unknown },
                new Plane() {Category=Category.Fighter,Name="F-22",State=State.Unknown },
                new Plane() {Category=Category.Fighter,Name="Su-47",State=State.Unknown },
                new Plane() {Category=Category.Bomber,Name="B-52",State=State.Unknown },
                new Plane() {Category=Category.Fighter,Name="J-10",State=State.Unknown },
            };
            this.listBoxPlane.ItemsSource = planeList;
        }

        private void buttonSave_Click(object sender, RoutedEventArgs e)
        {
            StringBuilder sb = new StringBuilder();
            foreach(Plane p in listBoxPlane.Items)
            {
                sb.AppendLine(string.Format("Category={0},Name={1},State={2}", p.Category, p.Name, p.State));
            }
           File.WriteAllText(@"D:PlaneList.txt", sb.ToString());
        }
    }

    public class CategoryToSourceConverter:IValueConverter
    {
        public object Convert(object value,Type targerType,object parameter,CultureInfo cultrue)
        {
            Category c = (Category)value;
            switch (c)
            {
                case Category.Bomber:
                    return @"Bomber.png";
                case Category.Fighter:
                    return @"Fighter.png";
                default:
                    return null;
            }
        }
        //不会被调用
        public object ConvertBack(object value, Type targetType,object parameter,CultureInfo culture)
        {
            throw new NotImplementedException();
        }
    }

    public class StateToNullableBoolConverter:IValueConverter
    {
        //将State转换为bool?
        public object Convert(object value,Type targetType,object parameter,CultureInfo culture)
        {
            State s = (State)value;
            switch(s)
            {
                case State.Locked:
                    return false;
                case State.Available:
                    return true;
                case State.Unknown:
                default:
                    return null;
            }
        }
     //将bool?转换为State
        public object ConvertBack(object value,Type targetType,object parameter,CultureInfo culture)
        {
            bool? nb = (bool?)value;
            switch (nb)
            {
                case true:
                    return State.Available;
                case false:
                    return State.Locked;
                case null:
                default:
                    return State.Unknown;
            }
        }
    }
}
 =>
=> 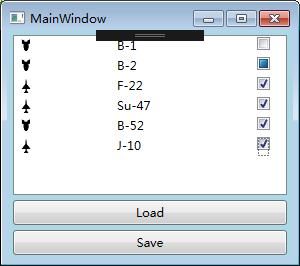
Load后效果如上左,修改状态后如上右,Save后如下
6.5 MultiBinding(多路Binding)
有时UI显示的信息由不止一个数据来源决定,这时就需要使用MultiBinding
