0. 小试牛刀
首先,激活tensorflow环境( source activate tensorflow ),随后在ipython里:
1 import tensorflow as tf
2 sess = tf.Session()
创建常量格式如下:
1 tf.constant(value, dtype=None, shape=None, name='Const', verify_shape=False)
例1:
1 node1 = tf.constant(3.0, dtype=tf.float32)
2 node2 = tf.constant(4.0)
3 print(sess.run([node1, node2]))
输出:
[3.0, 4.0]
例2:
1 a = tf.constant([2, 2], name="vector")
2 print(sess.run(a))
输出:
[2 2]
拓展:http://web.stanford.edu/class/cs20si/lectures/notes_02.pdf
1. 张量(Tensor)
1.1 基本概念
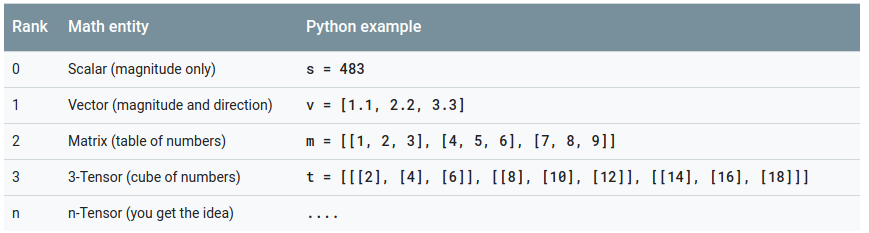
在TensorFlow里,张量这种数据类型用来表示一切数据,我们可以把它看成n维数组或列表。我们通常用Ranks, Shapes, and Types来描述张量。
(a) Ranks
Ranks用来表示张量的维度。
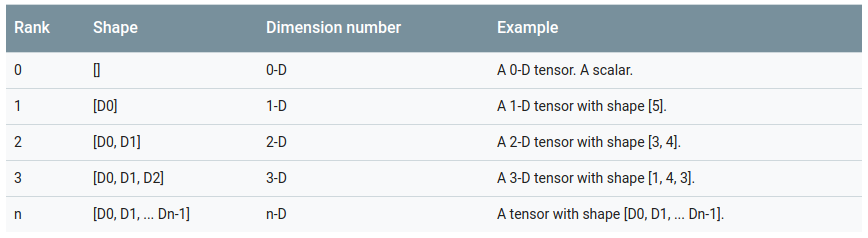
(b) Shape
Shape也用来表示维度,下表展示了Shape和Rank的联系。
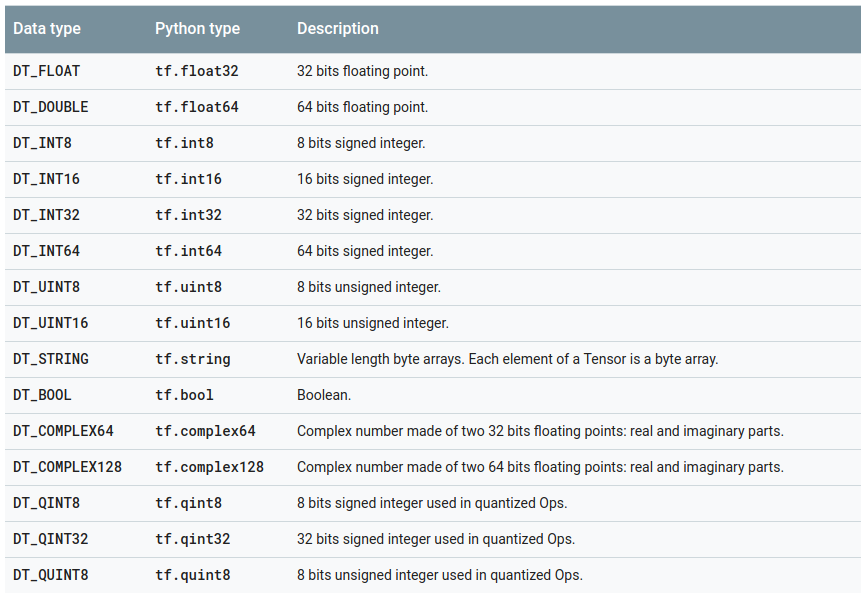
(c) Data types
1.2 常量 (Constants)
0. 小试牛刀里便是创建常量形式的张量,这个比较简单,就参见本文的第0节吧!如果想了解更多,就请点击第0节拓展里的链接。
1.3 变量 (Variables)
变量这个就有点小小复杂了。。。。
Anyway,Let's go!!!
1.3.1 创建
1 # Create two variables.
2 weights = tf.Variable(tf.random_normal([784, 200], stddev=0.35),
3                       name="weights")
4 biases = tf.Variable(tf.zeros([200]), name="biases")
创建张量时需要指明张量的Shape,当然,TensorFlow存在更改Shape的机制(这个嘛,以后再聊)
仅仅是创建完还不行哦,还需要初始化!
1.3.2 初始化
初始化的命令为: tf.global_variables_initializer()
 1 # Create two variables.
 2 weights = tf.Variable(tf.random_normal([784, 200], stddev=0.35),
 3                       name="weights")
 4 biases = tf.Variable(tf.zeros([200]), name="biases")
 5 ...
 6 # Add an op to initialize the variables.
 7 init_op = tf.global_variables_initializer()
 8
 9 # Later, when launching the model
10 with tf.Session() as sess:
11   # Run the init operation.
12   sess.run(init_op)
13   ...
14   # Use the model
15   ...
tf.global_variables_initializer() 是并行地初始化所有变量,那么,如果我们只是想初始化所有变量的某个子集该怎么办呢?使用 tf.variables_initializer() !
废话少说,上例子:
1 a = tf.Variable(2, name="scalar")
2 b = tf.Variable([2, 3], name="vector")
3 init_ab = tf.variables_initializer([a, b], name="init_ab")
4
5 with tf.Session() as sess:
6     sess.run(init_ab)
当然,你也可以利用 tf.Variable.initializer 一个一个地初始化变量。
1 # create variable W as 784 x 10 tensor, filled with zeros
2 W = tf.Variable(tf.zeros([784,10]))
3 with tf.Session() as sess:
4     sess.run(W.initializer)
5     print(W)
6     print(W.eval())
输出:
<tf.Variable 'Variable:0' shape=(784, 10) dtype=float32_ref>
[[ 0.  0.  0. ...,  0.  0.  0.]
 [ 0.  0.  0. ...,  0.  0.  0.]
 [ 0.  0.  0. ...,  0.  0.  0.]
 ...,
 [ 0.  0.  0. ...,  0.  0.  0.]
 [ 0.  0.  0. ...,  0.  0.  0.]
 [ 0.  0.  0. ...,  0.  0.  0.]]
你有时候会需要用另一个变量的初始化值给当前变量初始化。由于 tf.initialize_all_variables() 是并行地初始化所有变量,所以在有这种需求的情况下需要小心。
用其它变量的值初始化一个新的变量时,可以使用其它变量的 initialized_value() 属性。你可以直接把已初始化的值作为新变量的初始值,或者把它当做 tensor 计算得到一个值赋予新变量。
1 # Create a variable with a random value.
2 weights = tf.Variable(tf.random_normal([784, 200], stddev=0.35),
3                       name="weights")
4 # Create another variable with the same value as 'weights'.
5 w2 = tf.Variable(weights.initialized_value(), name="w2")
6 # Create another variable with twice the value of 'weights'
7 w_twice = tf.Variable(weights.initialized_value() * 2.0, name="w_twice")
1.3.3 保存和恢复变量
通常我们训练完一个网络后,需要保存的是训练后得到的参数变量,于是,一个问题出现了——如何保存变量呢?
最简单的保存和恢复模型的方法是使用 tf.train.Saver 对象。请看例子:
 1 # Create some variables.
 2 v1 = tf.Variable(..., name="v1")
 3 v2 = tf.Variable(..., name="v2")
 4 ...
 5 # Add an op to initialize the variables.
 6 init_op = tf.global_variables_initializer()
 7
 8 # Add ops to save and restore all the variables.
 9 saver = tf.train.Saver()
10
11 # Later, launch the model, initialize the variables, do some work, save the
12 # variables to disk.
13 with tf.Session() as sess:
14   sess.run(init_op)
15   # Do some work with the model.
16   ..
17   # Save the variables to disk.
18   save_path = saver.save(sess, "/tmp/model.ckpt")
19   print("Model saved in file: %s" % save_path)
1.3.4 恢复变量
用同一个 Saver 对象来恢复变量。注意, 当你从文件中恢复变量时, 不需要事先对它们做初始化。请看例子:
 1 # Create some variables.
 2 v1 = tf.Variable(..., name="v1")
 3 v2 = tf.Variable(..., name="v2")
 4 ...
 5 # Add ops to save and restore all the variables.
 6 saver = tf.train.Saver()
 7
 8 # Later, launch the model, use the saver to restore variables from disk, and
 9 # do some work with the model.
10 with tf.Session() as sess:
11   # Restore variables from disk.
12   saver.restore(sess, "/tmp/model.ckpt")
13   print("Model restored.")
14   # Do some work with the model
15   ...
注意啦!注意啦!用 tf.train.Saver() 创建的 Saver 是用来管理模型中的所有变量。More details?OK!如果你不给 tf.train.Saver() 传入任何参数,那么 saver 将处理 graph 中的所有变量。其中每一个变量都以变量创建时传入的名称被保存。
你可以通过给 tf.train.Saver() 构造函数传入 Python 字典,很容易地定义需要保持的变量及对应名称:键对应使用的名称,值对应被管理的变量。
太抽象?ok,看例子:
1 # Create some variables.
2 v1 = tf.Variable(..., name="v1")
3 v2 = tf.Variable(..., name="v2")
4 ...
5 # Add ops to save and restore only 'v2' using the name "my_v2"
6 saver = tf.train.Saver({"my_v2": v2})
7 # Use the saver object normally after that.
8 ...
so easy!!!isn't it ?
2. 简单数学运算
1 a = tf.constant([3, 6])
2 b = tf.constant([2, 2])
3 tf.add(a, b) # >> [5 8]
4 tf.add_n([a, b, b]) # >> [7 10]. Equivalent to a + b + b
5 tf.multiply(a, b) # >> [6 12] because mul is element wise Attention:tf.mul已经在新版本中被移除,请使用 tf.multiply 代替
6 tf.matmul(a, b) # >> ValueError
7 tf.matmul(tf.reshape(a, shape=[1, 2]), tf.reshape(b, shape=[2, 1])) # >> [[18]]
8 tf.div(a, b) # >> [1 3]
9 tf.mod(a, b) # >> [1 0]