1.分析

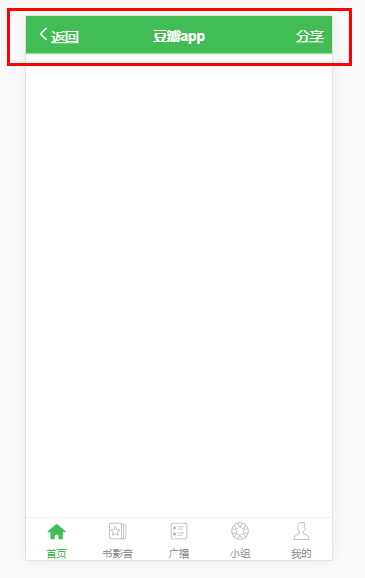
首页的header背景是绿色的,并且有一个搜索框,其他页面都是灰色的背景,在header的左侧,是一个返回按钮,右侧,有分享或者评论等图标,中间就是header的标题。我们先不做有搜索框的header。
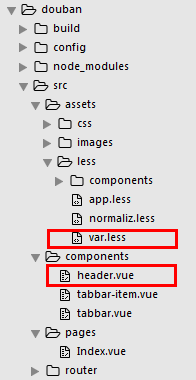
我们先在components文件中创建一个header.vue文件,并且在less文件里新建一个颜色变量var.less(统一管理app的颜色,保持统一),我们先将有其他元素的组件的大致框架,以及样式先写出来。然后在Index.vue里面引入。
var.less
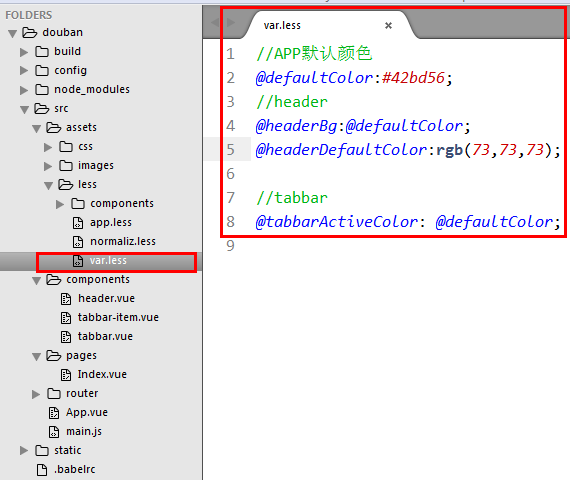
//APP默认颜色
@defaultColor:#42bd56;
//header
@headerBg:@defaultColor;
@headerDefaultColor:rgb(73,73,73);

//tabbar
@tabbarActiveColor: @defaultColor;
header.vue
<template>
  <header class="m-header is-bg is-fixed" >
    <div class="m-header-button is-left">
      <a href="javascript:;"><img class="m-icon-img" src="../assets/images/ic_bar_back_white.png"/>返回</a>
    </div>

    <h1 class="m-header-title">豆瓣app</h1>

    <div class="m-header-button is-right">
      <a href="javascript:;">分享</a>
    </div>
  </header>
</template>
<script>

</script>
<style lang="less">
/*导入颜色变量*/
@import "../assets/less/var.less";
.m-header{
  display: flex;
  align-items: center;
  height: 44px;
  padding: 0 10px;
  background: #fff;
  color: @headerDefaultColor;
  border-bottom:1px solid #eee;
  a{
    color: @headerDefaultColor;
  }
  .m-header-button{
     70px;
    align-items:stretch;
    &.is-left{
      text-align: left;
    }
    &.is-right{
      text-align: right;
    }
    .m-icon-img{
       20px;
      height: 20px;
    }
    .margin-right-10{
      margin-right: 10px;
    }
  }
  .m-header-title{
    flex: 1;
    text-align: center;
    font-size: 16px;
    text-overflow: ellipsis;
    white-space: nowrap;
    overflow: hidden;
  }
  &.is-bg{
    background:@headerBg;
    color: #fff;
    a{color: #fff;}
    .m-header-title{
      color: #fff;
    }
  }
  &.is-fixed{
    position: fixed;
    left: 0;
    right: 0;
    top: 0;
    z-index: 9;
  }
}
</style>
Index.vue 引入

效果图:
2.接下来我们就来把header改造成可以配置属性的组件,可以传递props(title,fixed,bg)
header.vue
<template>
  <header class="m-header" :class="{'is-bg':bg,'is-fixed':fixed}">
    <div class="m-header-button is-left">
      <slot name="left"></slot>
    </div>

    <h1 class="m-header-title" v-text="title"></h1>

    <div class="m-header-button is-right">
      <slot name="right"></slot>
    </div>
  </header>
</template>

<script>
  export default{
    props:{
      title:{
        type:String,
        default:''
      },
      bg:{
        type:Boolean,
        default:false
      },
      fixed:{
        type:Boolean,
        default:false
      }
    }
  }
</script>

<style lang="less">
/*导入颜色变量*/
@import "../assets/less/var.less";
.m-header{
  display: flex;
  align-items: center;
  height: 44px;
  padding: 0 10px;
  background: #fff;
  color: @headerDefaultColor;
  border-bottom:1px solid #eee;
  a{
    color: @headerDefaultColor;
  }
  .m-header-button{
     70px;
    align-items:stretch;
    &.is-left{
      text-align: left;
    }
    &.is-right{
      text-align: right;
    }
    .m-icon-img{
       20px;
      height: 20px;
    }
    .margin-right-10{
      margin-right: 10px;
    }
  }
  .m-header-title{
    flex: 1;
    text-align: center;
    font-size: 16px;
    text-overflow: ellipsis;
    white-space: nowrap;
    overflow: hidden;
  }
  &.is-bg{
    background:@headerBg;
    color: #fff;
    a{color: #fff;}
    .m-header-title{
      color: #fff;
    }
  }
  &.is-fixed{
    position: fixed;
    left: 0;
    right: 0;
    top: 0;
    z-index: 9;
  }
}
</style>
3.改造tabbar,完成路由跳转
我们先新建底部tabbar的路由页面,豆瓣app这个项目说大不大说小也不小,为了规划好结构,我们将每一个路由都新建一个文件夹,然后在文件夹里面,新建这个页面。在每个页面都添加不同的header组件,如图所示:

然后在每一个路由页面里面,我们都添加上header组件.
Index.vue
<template>
  <div>
    <m-header title="豆瓣app" fixed :bg="true">
    </m-header>
  </div>
</template>

<script>
  import mHeader from '../../components/header'

  export default {
    name: 'mine',
    components: {
      mHeader
    }
  }
</script>
AudioBook.vue
<template>
  <div>
    <m-header title="书影音" fixed>
      <a href="javascript:;" slot="right"><img class="m-icon-img margin-right-10" src="../../assets/images/ic_actionbar_search_icon.png"/></a>
      <a href="javascript:;" slot="right"><img class="m-icon-img" src="../../assets/images/ic_chat_green.png"/></a>
    </m-header>
  </div>
</template>

<script>
  import mHeader from '../../components/header'

  export default {
    name: 'mine',
    components: {
      mHeader
    }
  }
</script>
Broadcast.vue
<template>
  <div>
    <m-header title="广播" fixed>
      <a href="javascript:;" slot="right"><img class="m-icon-img margin-right-10" src="../../assets/images/ic_actionbar_search_icon.png"/></a>
      <a href="javascript:;" slot="right"><img class="m-icon-img" src="../../assets/images/ic_chat_green.png"/></a>
    </m-header>
  </div>
</template>

<script>
  import mHeader from '../../components/header'

  export default {
    name: 'mine',
    components: {
      mHeader
    }
  }
</script>
Group.vue
<template>
  <div>
    <m-header title="小组" fixed>
      <a href="javascript:;" slot="right"><img class="m-icon-img margin-right-10" src="../../assets/images/ic_actionbar_search_icon.png"/></a>
      <a href="javascript:;" slot="right"><img class="m-icon-img" src="../../assets/images/ic_chat_green.png"/></a>
    </m-header>
  </div>
</template>

<script>
  import mHeader from '../../components/header'

  export default {
    name: 'mine',
    components: {
      mHeader
    }
  }
</script>
Mine.vue
<template>
  <div>
    <m-header title="我的" fixed>
      <a href="javascript:;" slot="right"><img class="m-icon-img margin-right-10" src="../../assets/images/ic_actionbar_search_icon.png"/></a>
      <a href="javascript:;" slot="right"><img class="m-icon-img" src="../../assets/images/ic_chat_green.png"/></a>
    </m-header>
  </div>
</template>

<script>
  import mHeader from '../../components/header'

  export default {
    name: 'mine',
    components: {
      mHeader
    }
  }
</script>
路由的页面完成后我们就需要在router文件夹下面的index.js里面,来配置页面路由。如下:
index.js
import Vue from 'vue'
import Router from 'vue-router'
import Index from '../pages/Index/Index'
import Broadcast from '../pages/Broadcast/Broadcast'
import AudioBook from '../pages/AudioBook/AudioBook'
import Group from '../pages/Group/Group'
import Mine from '../pages/Mine/Mine'

Vue.use(Router)

// 路由配置
export default new Router({
  routes: [
    // 默认首页
    {
      path: '/',
      name: 'Index',
      component: Index
    },
    // 广播
    {
      path: '/broadcast',
      name: 'Broadcast',
      component: Broadcast
    },
    // 书影音
    {
      path: '/audioBook',
      name: 'AudioBook',
      component: AudioBook
    },
    // 小组
    {
      path: '/group',
      name: 'Group',
      component: Group
    },
    // 我的
    {
      path: '/mine',
      name: 'Mine',
      component: Mine
    },
    {
      path: '/Index',
      redirect: '/'
    },
    {
      path: '*',
      redirect: '/'
    },
  ]
})
接下来我们就来改造tabbar实现路由跳转。我们先将index.vue里的tabbar组件移入到app.vue里面,并且将每一个id改成对应的路由,添加一个isRouter属性,来判断当前item是否是路由跳转。然后在tabbar-item.vue里我们在props添加isRouter,click点击跳转的方法放到methods里面,并且根据传递的isRouter判断当前是否通过路由跳转
App.vue
<template>
  <div id="app">
    <router-view></router-view>
    <m-tabbar v-model="select">
     <m-tabbar-item id='Index' isRouter>
        <img src="./assets/images/ic_tab_home_normal.png" alt="" slot="icon-normal">
        <img src="./assets/images/ic_tab_home_active.png" alt="" slot="icon-active">
        首页
      </m-tabbar-item>
      <m-tabbar-item id='AudioBook' isRouter>
        <img src="./assets/images/ic_tab_subject_normal.png" alt="" slot="icon-normal">
        <img src="./assets/images/ic_tab_subject_active.png" alt="" slot="icon-active">
        书影音
      </m-tabbar-item>
      <m-tabbar-item id='Broadcast' isRouter>
        <img src="./assets/images/ic_tab_status_normal.png" alt="" slot="icon-normal">
        <img src="./assets/images/ic_tab_status_active.png" alt="" slot="icon-active">
        广播
      </m-tabbar-item>
      <m-tabbar-item id='Group' isRouter>
        <img src="./assets/images/ic_tab_group_normal.png" alt="" slot="icon-normal">
        <img src="./assets/images/ic_tab_group_active.png" alt="" slot="icon-active">
        小组
      </m-tabbar-item>
       <m-tabbar-item id='Mine' isRouter>
        <img src="./assets/images/ic_tab_profile_normal.png" alt="" slot="icon-normal">
        <img src="./assets/images/ic_tab_profile_active.png" alt="" slot="icon-active">
        我的
      </m-tabbar-item>
    </m-tabbar>
  </div>
</template>

<script>
import mTabbar from './components/tabbar'
import mTabbarItem from './components/tabbar-item'
export default {
  name: 'app',
  components:{
    mTabbar,
    mTabbarItem
  },
  data() {
    return {
      select:"Index"
    }
  }
}
</script>

<style>

</style>
tabbar-item.vue
<template>
  <a class="m-tabbar-item" :class="{'is-active':isActive}" @click="goToRouter">
    <span class="m-tabbar-item-icon" v-show="!isActive"><slot name="icon-normal"></slot></span>
    <span class="m-tabbar-item-icon" v-show="isActive"><slot name="icon-active"></slot></span>
    <span class="m-tabbar-item-text"><slot></slot></span>
  </a>
</template>
<script>
  export default{
    props: {
      id:{
        type:String
      },
      isRouter:{
        type:Boolean,
        default:false
      }
    },
    computed: {
      isActive(){
        if(this.$parent.value===this.id){
          return true;
        }
      }
    },
    methods:{
      goToRouter(){
        this.$parent.$emit('input',this.id)
        //判断是否为路由跳转
        if(this.isRouter){
          //根据id跳转到对应的路由页面
          this.$router.push(this.id)
        }
      }
    }
  }
</script>
<style lang="less">
@import "../assets/less/var.less";
.m-tabbar-item{
  flex: 1;
  text-align: center;
  .m-tabbar-item-icon{
    display: block;
    padding-top: 2px;
    img{
       28px;
      height: 28px;
    }

  }
  .m-tabbar-item-text{
    display: block;
    font-size: 10px;
    color:#949494;
  }
  &.is-active{
    .m-tabbar-item-text{
      color: @tabbarActiveColor;
    }
  }
}
</style>
tabbar.vue
通过计算返回当前路由的值
<template>
  <div class="m-tabbar">
    <slot></slot>
  </div>
</template>
<script>
  import mTabbarItem from './tabbar-item';
  export default {
    computed:{
      value(){
        return this.$route.matched[0].name
      }
    }
  }
</script>
<style lang="less">
.m-tabbar{
  display: flex;
  flex-direction: row;
  position: fixed;
  bottom: 0;
  left: 0;
  right: 0;
   100%;
  overflow: hidden;
  height: 50px;
  background: #fff;
  border-top: 1px solid #e4e4e4;
}
</style>
效果图
