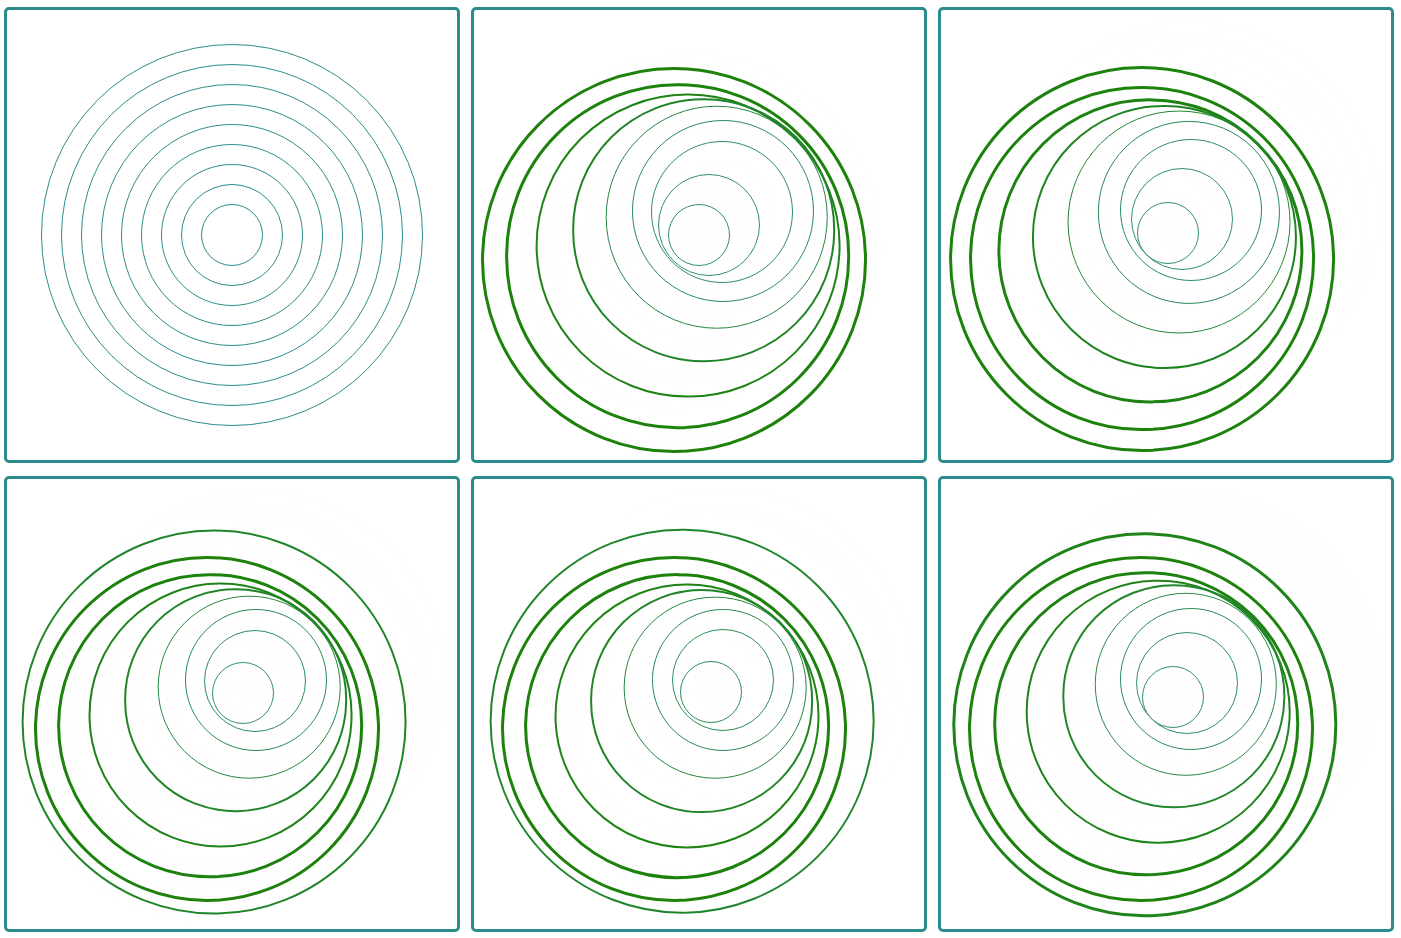
在页面中放置9个<div class=” circle”></div>,定义每个.circle的样式规则,使得9个圆在页面中显示为半径依次相差20px的同心圆。定义关键帧anim,使得9个圆各自按给定的延迟沿左下角到右上角的直线移动,形成圆与圆碰撞的效果,碰撞后改变移动方向,从而保证里面的小圆一定在其外面的大圆中移动,不会超出。
编写的HTML文件如下。
<!DOCTYPE html>
<html>
<head>
<title>圆与圆的碰撞</title>
<style>
.container
{
margin: 0 auto;
450px;
height: 450px;
border: 3px solid DarkCyan;
border-radius: 5px;
position: relative;
}
.circle
{
position: absolute;
top: 50%;
left: 50%;
transform: translate(-50%, -50%);
border: 1px solid #008b8b;
border-radius: 50%;
animation: anim 2.75s ease-in-out infinite;
}
.one
{
380px;
height:380px;
animation-delay:2s;
}
.two
{
340px;
height:340px;
animation-delay:1.75s;
}
.three
{
300px;
height:300px;
animation-delay:1.5s;
}
.four
{
260px;
height:260px;
animation-delay:1.25s;
}
.five
{
220px;
height:220px;
animation-delay:1s;
}
.six
{
180px;
height:180px;
animation-delay:0.75s;
}
.seven
{
140px;
height:140px;
animation-delay:0.5s;
}
.eight
{
100px;
height:100px;
animation-delay:0.25s;
}
.nine
{
60px;
height:60px;
animation-delay:0s;
}
@keyframes anim
{
25%
{
left: calc(50% - 25px);
top: calc(50% + 25px);
border-color: green;
border- 3px;
}
75%
{
left: calc(50% + 25px);
top: calc(50% - 25px);
border- 1px;
}
}
</style>
</head>
<body>
<div class="container">
<div class="circle one"></div>
<div class="circle two"></div>
<div class="circle three"></div>
<div class="circle four"></div>
<div class="circle five"></div>
<div class="circle six"></div>
<div class="circle seven"></div>
<div class="circle eight"></div>
<div class="circle nine"></div>
</div>
</body>
</html>
在浏览器中打开包含这段HTML代码的html文件,可以呈现出如图1所示的动画效果。

图1 圆与圆的碰撞
上面文件中,表示9个同心圆的每个<div>指定了两个选择器,一个.circle用于定义圆的共同属性设置,另外一个选择器(one、two、…或nine)用于表示各自不同的属性设定。当然也可以只定义选择器circle,各自不同属性的设置用选择器: :nth-child()来设定。可改写上面的HTML文件如下,但本质上没多大不同。
<!DOCTYPE html>
<html>
<head>
<title>圆与圆的碰撞</title>
<style>
.container
{
margin: 0 auto;
450px;
height: 450px;
border: 3px solid DarkCyan;
border-radius: 5px;
position: relative;
}
.circle
{
position: absolute;
top: 50%;
left: 50%;
transform: translate(-50%, -50%);
border: 1px solid #008b8b;
border-radius: 50%;
animation: anim 2.75s ease-in-out infinite;
}
.circle:nth-child(1)
{
380px;
height:380px;
animation-delay:2s;
}
.circle:nth-child(2)
{
340px;
height:340px;
animation-delay:1.75s;
}
.circle:nth-child(3)
{
300px;
height:300px;
animation-delay:1.5s;
}
.circle:nth-child(4)
{
260px;
height:260px;
animation-delay:1.25s;
}
.circle:nth-child(5)
{
220px;
height:220px;
animation-delay:1s;
}
.circle:nth-child(6)
{
180px;
height:180px;
animation-delay:0.75s;
}
.circle:nth-child(7)
{
140px;
height:140px;
animation-delay:0.5s;
}
.circle:nth-child(8)
{
100px;
height:100px;
animation-delay:0.25s;
}
.circle:nth-child(9)
{
60px;
height:60px;
animation-delay:0s;
}
@keyframes anim
{
25%
{
left: calc(50% - 25px);
top: calc(50% + 25px);
border-color: green;
border- 3px;
}
75%
{
left: calc(50% + 25px);
top: calc(50% - 25px);
border- 1px;
}
}
</style>
</head>
<body>
<div class="container">
<div class="circle"></div>
<div class="circle"></div>
<div class="circle"></div>
<div class="circle"></div>
<div class="circle"></div>
<div class="circle"></div>
<div class="circle"></div>
<div class="circle"></div>
<div class="circle"></div>
</div>
</body>
</html>
在浏览器中打开包含这段HTML代码的html文件,同样可以呈现出如图1所示的动画效果。
在上面给出的HTML文件中,我们会发现.circle:nth-child(1)~ .circle:nth-child(9)的样式规则定义中,都涉及width、height和animation-delay这3个属性,只是3个属性的属性值设定不同而已。虽然在编写文件时,采用简单的复制粘贴后略作修改即可。但文件的代码毕竟产生了冗余,导致文件大小变大。
能否将它们统一书写呢?采用CSS中的自定义变量可以实现这一要求。
自定义变量也称为自定义属性,在CSS3中采用“--*”的方式定义,其中“*”表示变量名称。例如,定义:--example-variable:20px; 是一个CSS声明,使用自定义“--*”属性将CSS变量--example-variable的值设置为20px。
定义了自定义变量后,在CSS3中可以采用函数var()引用这个自定义变量的值。
var() 函数用于插入自定义变量的值,其调用格式为:
var(custom-property-name, value)
其中,参数custom-property-name必需,表示自定义变量的名称,必需以 -- 开头。参数value可选,备用值,在自定义变量的值不存在的时候使用。
这样,在上面圆与圆碰撞的HTML文件中,我们可以将width、height和animation-delay这3个属性的设置用自定义变量的方式来完成。width和height的属性值取值相同,值为圆外接正方形的边长,可用自定义变量—length表示,animation-delay属性表示各个圆的动画执行延迟时间,可用自定义变量—delay表示。由此,改写上面的HTML文件如下。
<!DOCTYPE html>
<html>
<head>
<title>圆与圆的碰撞</title>
<style>
.container
{
margin: 0 auto;
450px;
height: 450px;
border: 3px solid DarkCyan;
border-radius: 5px;
position: relative;
}
.circle
{
position: absolute;
top: 50%;
left: 50%;
var(--length);
height:var(--length);
transform: translate(-50%, -50%);
border: 1px solid #008b8b;
border-radius: 50%;
animation: anim 2.75s var(--delay) ease-in-out infinite;
}
@keyframes anim
{
25%
{
left: calc(50% - 25px);
top: calc(50% + 25px);
border-color: green;
border- 3px;
}
75%
{
left: calc(50% + 25px);
top: calc(50% - 25px);
border- 1px;
}
}
</style>
</head>
<body>
<div class="container">
<div class="circle" style="--length:380px;--delay:2s;"></div>
<div class="circle" style="--length:340px;--delay:1.75s;"></div>
<div class="circle" style="--length:300px;--delay:1.5s;"></div>
<div class="circle" style="--length:260px;--delay:1.25s;"></div>
<div class="circle" style="--length:220px;--delay:1s;"></div>
<div class="circle" style="--length:180px;--delay:0.75s;"></div>
<div class="circle" style="--length:140px;--delay:0.5s;"></div>
<div class="circle" style="--length:100px;--delay:0.25s;"></div>
<div class="circle" style="--length:60px;--delay:0s;"></div>
</div>
</body>
</html>
在浏览器中打开包含这段HTML代码的html文件,同样可以呈现出如图1所示的动画效果。
通过这个实例,大家可以体会自定义变量在CSS3中的使用方法。关于自定义变量的更多知识,比如调用calc() 函数让自定义变量的值参与运算,就不展开了,大家可以在网上搜索相关的资料学习。