1.操作属性
| 方法 | 示例 | 说明 |
| attr() | elem.attr('属性名'); | 获取属性 |
| elem.attr('属性名','属性值'); elem.attr({属性名1:'属性值1',属性名2:'属性值2',属性名3:'属性值3'}); | 设置属性 | |
| removeAttr() | elem.removeAttr('属性名'); elem.removeAttr('属性名1 属性名2 属性名3'); | 删除属性 |
示例
<!DOCTYPE html>
<html>
<head>
  <title></title>
  <style type="text/css">
  </style>
</head>
<body>
<input type="button" value="获取属性" id="btn1" />
<input type="button" value="设置属性" id="btn2" />
<input type="button" value="移除属性" id="btn3" /><br><br>
<img src="cat.gif" alt="机器猫" title="机器猫" aaa="aaa" />

</body>
</html>
<script type="text/javascript" src="jquery-3.4.1.js"></script>
<script type="text/javascript">
  $(function(){
    $('#btn1').click(function(){
      console.log($('img').attr('src'));//再带的属性
      console.log($('img').attr('aaa'));//自定义的属性
      console.log($('img').attr('hhh'));//未定义的属性,返回undefined
    });

    $('#btn2').click(function(){
      // $('img').attr('src','zhuangtai.gif');//更改已有属性
      // $('img').attr('aaa','哈哈哈');//更改自定义属性
      // $('img').attr('bbb','bbb');//如果元素没有这个属性,就添加
      $('img').attr({src:'zhuangtai.gif',aaa:'哈哈哈',bbb:'bbb'});//一次设置多个属性
    });

    $('#btn3').click(function(){
      // $('img').removeAttr('alt');//移除自带属性
      // $('img').removeAttr('aaa');//移除自定义属性
      // $('img').removeAttr('bbb');//移除不存在的属性
      $('img').removeAttr('alt aaa bbb');//移除多个
    });
  });
</script>
1.1示例:相册
<!DOCTYPE html>
<html>
<head>
  <title></title>
  <style type="text/css">
    li{float: left;list-style-type: none;margin-right:10px;}
    div.clear{clear:both;}
    div.defaultImg{ 450px;height: 450px;background-color: #acacac;margin-left:40px;}
    img#image{margin-left:40px;}
  </style>
</head>
<body>
<h2>汽车画廊</h2>
<ul id="imagellery">
  <li>
    <a href="https://timgsa.baidu.com/timg?image&quality=80&size=b9999_10000&sec=1597750497226&di=0da325d14a5b0099a9a504ef516aece3&imgtype=0&src=http%3A%2F%2Fwww2.autoimg.cn%2Fchejiahaodfs%2Fg30%2FM03%2FAD%2F9F%2Fautohomecar__ChsEf12nD7KAUmDYAACo1VeiDMM591.png" title="五菱宏光">
      <img src="https://timgsa.baidu.com/timg?image&quality=80&size=b9999_10000&sec=1597750497226&di=0da325d14a5b0099a9a504ef516aece3&imgtype=0&src=http%3A%2F%2Fwww2.autoimg.cn%2Fchejiahaodfs%2Fg30%2FM03%2FAD%2F9F%2Fautohomecar__ChsEf12nD7KAUmDYAACo1VeiDMM591.png" width="100" alt="五菱宏光">
    </a>
  </li>
  <li>
    <a href="https://timgsa.baidu.com/timg?image&quality=80&size=b9999_10000&sec=1597750915191&di=e36aaec6f73d8225eb5b027adbdd8d6a&imgtype=0&src=http%3A%2F%2Fcar0.autoimg.cn%2Fcar%2Fupload%2F2015%2F3%2F13%2Fv_201503131743573193686112.jpg" title="陆风X8">
      <img src="https://timgsa.baidu.com/timg?image&quality=80&size=b9999_10000&sec=1597750915191&di=e36aaec6f73d8225eb5b027adbdd8d6a&imgtype=0&src=http%3A%2F%2Fcar0.autoimg.cn%2Fcar%2Fupload%2F2015%2F3%2F13%2Fv_201503131743573193686112.jpg" width="100" alt="陆风X8">
    </a>
  </li>
  <li>
    <a href="https://timgsa.baidu.com/timg?image&quality=80&size=b9999_10000&sec=1597750988071&di=d87d8b941c5a6ea8c3020a1e92d3f6bf&imgtype=0&src=http%3A%2F%2Fcar3.autoimg.cn%2Fcardfs%2Fproduct%2Fg4%2FM12%2FF5%2F56%2Fautohomecar__wKgHy1ZZDj6AK9OEAAcmnVMfbeA833.jpg" title="哈弗H5">
      <img src="https://timgsa.baidu.com/timg?image&quality=80&size=b9999_10000&sec=1597750988071&di=d87d8b941c5a6ea8c3020a1e92d3f6bf&imgtype=0&src=http%3A%2F%2Fcar3.autoimg.cn%2Fcardfs%2Fproduct%2Fg4%2FM12%2FF5%2F56%2Fautohomecar__wKgHy1ZZDj6AK9OEAAcmnVMfbeA833.jpg" width="100" alt="哈弗H5">
    </a>
  </li>
  <li>
    <a href="https://timgsa.baidu.com/timg?image&quality=80&size=b9999_10000&sec=1597751281169&di=f286ccac8ef17362d1e4a1c8ff053d4a&imgtype=0&src=http%3A%2F%2Fimg.pcauto.com.cn%2Fimages%2Fwxauto%2F4361DC646DEA232074E13B303B6015EA%2Fmmbiz_jpg%2FD0BWW7ia8rCPhfMPHGLejY6pEJ4NMVyzTCzc4ia09l1ZyQCubOEqIUGKscbA8IWrHQkXNia9P2aCMZ3fM0xSh4CWw_640x480.jpg" title="瓦兹猎人">
      <img src="https://timgsa.baidu.com/timg?image&quality=80&size=b9999_10000&sec=1597751281169&di=f286ccac8ef17362d1e4a1c8ff053d4a&imgtype=0&src=http%3A%2F%2Fimg.pcauto.com.cn%2Fimages%2Fwxauto%2F4361DC646DEA232074E13B303B6015EA%2Fmmbiz_jpg%2FD0BWW7ia8rCPhfMPHGLejY6pEJ4NMVyzTCzc4ia09l1ZyQCubOEqIUGKscbA8IWrHQkXNia9P2aCMZ3fM0xSh4CWw_640x480.jpg" width="100" alt="瓦兹猎人">
    </a>
  </li>
</ul>
<div class="clear"></div>
<img id="image" src="" alt="" width="450px" />
<div class="defaultImg"></div>
<p id="des">选择一个图片</p>
</body>
</html>
<script type="text/javascript" src="jquery-3.4.1.js"></script>
<script type="text/javascript">
  $(function(){
    $('li>a').click(function(){
      //给小图片a标签设置一个单击事件。让id为image的img标签修改src属性为当前点击的a标签的href值。让id为des的p标签文本设置为a标签title属性值。
      //获取当前点击的a标签的href属性值和title属性值
      var $desImg = $(this).attr('href');
      var $desTitle = $(this).attr('title');
      $('#image').attr('src',$desImg);
      $('#des').text($desTitle);
      $('.defaultImg').hide();
      //阻止a标签跳转
      return false;
    })
  });
</script>
2.操作布尔类型的属性prop
在jQuery1.6以后,对于checked,selected,disable这类boolean属性来说,不能用attr方法,只能用prop方法。
prop也可以获取和设置属性值
<!DOCTYPE html>
<html>
<head>
  <title></title>
  <style type="text/css">
    li{float: left;list-style-type: none;margin-right:10px;}
    div.clear{clear:both;}
    div.defaultImg{ 450px;height: 450px;background-color: #acacac;margin-left:40px;}
    img#image{margin-left:40px;}
  </style>
</head>
<body>
<input type="button" value="按钮" id="btn1"><br><br>
<input type="checkbox" id="ckb1"><br>
</body>
</html>
<script type="text/javascript" src="jquery-3.4.1.js"></script>
<script type="text/javascript">
  $(function(){
    //对于checked属性,使用原生js来操作
    /* document.getElementById('btn1').onclick = function(){
      //设置操作
      // document.getElementById("ckb1").checked = false;
      //获取操作
      console.log(document.getElementById("ckb1").checked);
    }*/
    //在jQuery1.6之后,对于checked、selected、disable这类boolean类型的属性来说,不能用attr方法,只能用prop方法。
    $('#btn1').click(function(){
      console.log($('#ckb1').prop("checked"));
    });

  });
</script>
2.1示例:复选框全选与取消全选
<!DOCTYPE html>
<html>
<head>
  <title></title>
  <style type="text/css">
    li{float: left;list-style-type: none;margin-right:10px;}
    div.clear{clear:both;}
    div.defaultImg{ 450px;height: 450px;background-color: #acacac;margin-left:40px;}
    img#image{margin-left:40px;}
  </style>
</head>
<body>
<input type="button" value="按钮" id="btn1"><br><br>

  <table id="table" cellspacing="0" cellpadding="5px" border="1">
    <thead>
      <tr bgcolor="skyblue">
        <th><input type="checkbox" id="j_cbAll"></th>
        <th>课程</th>
        <th>所属学院</th>
      </tr>
    </thead>
    <tbody id="j_tb">
      <tr>
        <td><input type="checkbox"></td>
        <td>JavaScript</td>
        <td>传智播客-前端与移动开发学院</td>
      </tr>
      <tr>
        <td><input type="checkbox"></td>
        <td>CSS</td>
        <td>传智播客-前端与移动开发学院</td>
      </tr>
      <tr>
        <td><input type="checkbox"></td>
        <td>html</td>
        <td>传智播客-前端与移动开发学院</td>
      </tr>
      <tr>
        <td><input type="checkbox"></td>
        <td>jQuery</td>
        <td>传智播客-前端与移动开发学院</td>
      </tr>
    </tbody>
  </table>
</body>
</html>
<script type="text/javascript" src="jquery-3.4.1.js"></script>
<script type="text/javascript">
  $(function(){
    //需求1:上面的多选框选中,下面的多选框跟着选中,上面的多选框取消选中,下面的多选框跟着不选中
    //需求2:下面的多选框,都有单击事件。
    //如果下面的多选框都选中了,那么上面的那个多选框跟着选中;如果下面的多选框有一个没有选中,那么上面的多选框就不选中
   $('#j_cbAll').click(function(){
    var $checkValue = $(this).prop('checked');
    console.log($('#j_tb input'));
    $('#j_tb input').prop('checked',$checkValue);
   });
   $('#j_tb input').click(function(){
    //判断下面的那四个多选框是否都被选中了
    var numOfAll = $('#j_tb input').length;
    var numOfSelect = $('#j_tb input:checked').length;
    // if(numOfAll == numOfSelect){
    //   $('#j_cbAll').prop('checked',true);
    // }else{
    //   $('#j_cbAll').prop('checked',false);
    // }
    //上面的这个判断可以优化
    $('#j_cbAll').prop('checked',numOfAll == numOfSelect);
   });
  });
</script>

3.宽高
| 方法 | 说明 |
|---|---|
| elem.css('width'); elem.css('height'); | 获取元素的宽度和高度,带单位。不包括内边距、边框、外边距。 |
| elem.width(); elem.height(); elem.width(200); elem.height(250); | 不带参数是获取;带参数是设置。 获取元素的宽度和高度,不带单位,不包括内边距、边框、外边距。 |
| elem.innerWidth(); elem.innerHeight(); | 方法返回元素的宽度和高度,包括内边距 |
| elem.outerWidth(); elem.outerHeight(); | 方法返回元素的宽度和高度,包括内边距、边框 |
| elem.outerWidth(true); elem.outerHeight(true); | 方法返回元素的宽度和高度,包括内边距、边框、外边距 |
| $(window).width();$(window).height() | 方法返回网页科室区的宽高 |
<!DOCTYPE html>
<html>
<head>
<title></title>
<style type="text/css">
*{margin: 0;padding: 0;}
.one{ 200px;height: 200px;border: 10px solid red;padding:20px;margin: 30px;}
</style>
</head>
<body>
<input type="button" value="按钮" id="btn" />
<div id="one" class="one" ></div>
</body>
</html>
<script type="text/javascript" src="jquery-3.4.1.js"></script>
<script type="text/javascript">
$(function(){
//
$('#btn').click(function(){
//1.1 获取id为one的这个div的宽和高
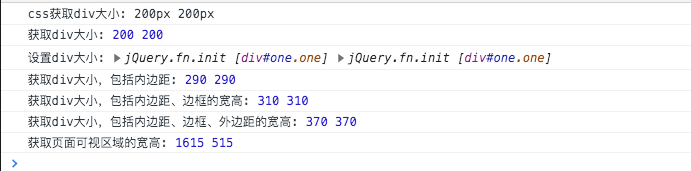
console.log('css获取div大小:',$('#one').css('height'),$('#one').css('width'));
//1.2 获取宽高
console.log('获取div大小:',$('#one').width(),$('#one').height());
//1.3 设置宽高
console.log('设置div大小:',$('#one').width(250),$('#one').height(250));
//1.4 获取包括内边距的宽高
console.log('获取div大小,包括内边距:',$('#one').innerWidth(),$('#one').innerHeight());
//1.5 获取包括内边距、边框的宽高
console.log('获取div大小,包括内边距、边框的宽高:',$('#one').outerWidth(),$('#one').outerHeight());
//1.6 获取包括内边距、边框、外边距的宽高
console.log('获取div大小,包括内边距、边框、外边距的宽高:',$('#one').outerWidth(true),$('#one').outerHeight(true));
//1.7 获取页面可视区域的宽高
console.log('获取页面可视区域的宽高:',$(window).width(),$(window).height());
});
});
</script>
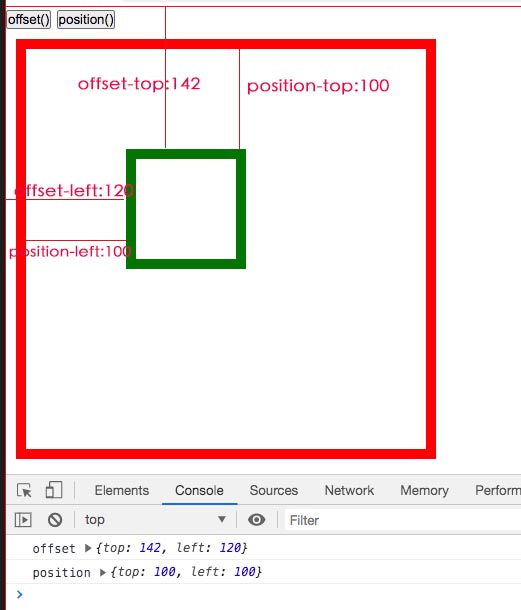
4.offset()和position()
offset方法获取元素距离document的位置。document可以认为是坐标为(0, 0)的点
position方法获取的是元素距离有定位的副元素的位置。
<!DOCTYPE html>
<html>
<head>
  <title></title>
  <style type="text/css">
    *{margin: 0;padding: 0;}
    .father{ 400px;height: 400px;border: 10px solid red;position: relative;top: 10px;left: 10px;}
    .son{ 100px;height: 100px;border: 10px solid green;position: absolute;top: 100px;left: 100px; }
  </style>
</head>
<body>
<table></table>
<input type="button" value="offset()" id="btn1" />
<input type="button" value="position()" id="btn2" />
<div id="father" class="father" >
  <div id="son" class="son"></div>
</div>
</body>
</html>
<script type="text/javascript" src="jquery-3.4.1.js"></script>
<script type="text/javascript">
  $(function(){
    //
    $('#btn1').click(function(){
      console.log("offset",$('#son').offset());
    });
    $('#btn2').click(function(){
      console.log("position",$('#son').position());
    });
  });
</script>
5.scrollTop与scrollLeft方法
用来设置或者获取垂直滚动条的位置。有值设置,无值获取。
文档上描述是页面被卷曲的高度。个人觉得可以理解为该内容移出去的部分。
<!DOCTYPE html>
<html>
<head>
  <title></title>
  <style type="text/css">
    *{margin: 0;padding: 0;}
    body{ 2000px;height: 2000px;}
    div{ 200px;height: 200px;border: 1px solid red;overflow: auto;}
    img{vertical-align: top; 400px;height: 400px;}
  </style>
</head>
<body>
<table></table>
<input type="button" value="按钮" id="btn" />
<div>
  <img src="https://timgsa.baidu.com/timg?image&quality=80&size=b9999_10000&sec=1597751281169&di=f286ccac8ef17362d1e4a1c8ff053d4a&imgtype=0&src=http%3A%2F%2Fimg.pcauto.com.cn%2Fimages%2Fwxauto%2F4361DC646DEA232074E13B303B6015EA%2Fmmbiz_jpg%2FD0BWW7ia8rCPhfMPHGLejY6pEJ4NMVyzTCzc4ia09l1ZyQCubOEqIUGKscbA8IWrHQkXNia9P2aCMZ3fM0xSh4CWw_640x480.jpg" alt="越野车" />
</div>
</body>
</html>
<script type="text/javascript" src="jquery-3.4.1.js"></script>
<script type="text/javascript">
  $(function(){
    $('#btn').click(function(){
      console.log('{left:'+$('div').scrollLeft()+',top:'+$('div').scrollTop()+'}');
      $('div').scrollLeft(100);
      $('div').scrollTop(100);
      $(window).scrollLeft(1000);
      $(window).scrollTop(1000);
    });
  });
</script>
5.1 示例-固定导航栏
<!DOCTYPE html>
<html>
<head>
  <title></title>
  <style type="text/css">
    *{margin: 0;padding: 0;}
    .top{height: 100px;background-color: #acacac;}
    .nav{height: 50px;background-color: orange;line-height: 50px; 100%;}
    .main{height: 1500px;background-color: green;}
  </style>
</head>
<body>
<div class="top"></div>
<div class="nav">首页 国产 日系 德系 美系 其他</div>
<div class="main">法国车沦为其他,是不是要退出中国了</div>
</body>
</html>
<script type="text/javascript" src="jquery-3.4.1.js"></script>
<script type="text/javascript">
  $(function(){
    //计算第一部分的高度
    var $topHeight = $('.top').height();
    //计算第二部分的高度
    var $navHeight = $('.nav').height();
    //给页面设置一个滚动事件
    $(window).scroll(function(){
      if($(window).scrollTop() >= $topHeight){
        //让第二部分布丁定位
        $('.nav').css({position:"fixed",top:0,left:0});
        //设置第三部分的margin-top的值为第二部分的高度
        $('.main').css('margin-top',$navHeight);
      }else{
        $('.nav').css({position:"static"});
        //设置第三部分的margin-top为原来的值
        $('.main').css('margin-top',0);
      }
    });

  });
</script>
6.jQuery事件发展历程(了解)
简单事件绑定-->bind事件绑定-->delegate事件绑定-->on事件绑定(推荐)
<!DOCTYPE html>
<html>
<head>
  <title></title>
  <style type="text/css">
    *{margin: 0;padding: 0;}
    div{ 200px;height: 200px;margin-top: 10px;}
    .one{border: 1px solid red;}
    .two{border:1px solid green;}
  </style>
</head>
<body>
<input type="button" value="按钮" id="btn" /><br><br>
<div class="one" id="one"></div>
</body>
</html>
<script type="text/javascript" src="jquery-3.4.1.js"></script>
<script type="text/javascript">
  $(function(){
    $('#btn').click(function(){
      var $newDiv = $('<div class="two"></div>');
      $('body').append($newDiv);
    });
     /* 后面的js代码放在这里*/
</script>
使用原生js给div注册单击事件VS 使用jQuery
//用原生的js给div注册单击事件
//  原声js注册相同的事件,后面的会把前面的给覆盖
    document.getElementById("one").onclick = function(){
      alert("单击事件");
    }
    document.getElementById("one").onclick = function(){
      alert("单击事件,lalala");
    }

//给同一个元素注册同样的事件,后面的不会把前面的给覆盖
    $('.one').click(function(){
      alert("单击事件");
    });
    $('.one').click(function(){
      alert("单击事件,lalala");
    });
jQuery对javascript事件进行了封装,增加并扩展了事件处理机制。jQuery不仅提供了更加优雅的事件处理预发,而且极大的增强了事件的处理能力。
6.1 简单事件绑定 click(handle) mouseenter(handle) mouseleave(handle) (了解)
缺点:
- 1.不支持同时注册。如果要给div添加点击和移除事件,需要分别注册
- 2.也不支持动态注册。如页面加载完毕后,点击按钮新增div,此时div将没有注册点击和移入事件
 $('div').click(function(){
      alert("单击事件");
    });
    $('div').mouseenter(function(){
      alert("进入事件,lalala");
    });
6.2 bind方式注册事件 支持同时注册,也不支持动态注册(了解)
      $(selector).bind('click mouseenter', function(){});
      //参数1:事件类型
      //参数2:事件处理程序
   $('div').bind({
      mouseenter:function(){
        console.log("鼠标移入事件");
      },
      click:function(){
        console.log("鼠标单击事件");
      }
    });
6.3 delegate注册委托事件-原理:事件冒泡(了解)
支持同时注册,也支持动态注册。
缺点:只能注册委托事件,因此注册事件需要记的方法太多了
      $(selector).delegate(子元素, 'click' function(){});
      //参数1:selector要绑定事件的元素
      //参数2:事件类型
      //参数3:事件处理函数
      //为所有的div绑定事件
    $('body').delegate('div',{
      mouseenter:function(){
        console.log("鼠标移入事件");
      },
      click:function(){
        console.log("单击事件");
      }
    })
6.4 on注册事件(重点)
jQuery1.7之后,jQuery用on同意了所有事件的处理方法。
最现代的方式,兼容zepto(移动端蕾丝jQuery的一个库),强烈建议使用。
| 简单注册 | $('div').on('click',function(){}); 给自己注册,参数1-事件名称 参数2-方法 |
| 委托注册 | $('body').on('click','div',function(){}; 委托父元素注册,参数1-事件名称 参数2-子元素 参数3-方法 |
      //4.1 on简单注册事件是不支持动态注册的
    $('div').on('click',function(){
      console.log("这是单击事件...");
    });

    //4.2 委托注册 原理:给body注册一个事件,点击div就会有一个事件冒泡(点击这个元素,就会触发这个元素的所有父元素同样的点击操作)
    $('body').on('click','div',function(){
      console.log("这是单击事件...");
    });
6.5 动态添加和删除表格
<!DOCTYPE html>
<html>
<head>
  <title></title>
  <style type="text/css">
    table,input#btn-add{margin-left: 100px;margin-top: 20px;}
    div.mask{position:absolute;left:0;top:0;opacity: 0.5; 100%;height: 100%;background: black;z-index: 2;display: none;}
    div.form-add{position:absolute;margin:auto auto;left:0;right:0;top:0;bottom:0;border: 2px solid #acacac; 400px;height: 200px;z-index: 5;background: white;display: none;}
    div.form-add-title{background-color: #d9dbe1;height: 30px;}
    span{color:#898b8f;font-size: 20px;}
    div#j_hideFormAdd{float: right; 20px;overflow: hidden;cursor: pointer;}
    div.form-item{height: 30px;margin:10px;}
    input.txt{230px;}
    input#j_btnAdd{position:relative;left: 150px; 100px;}

  </style>
</head>
<body>
<div class="wrap">
  <div>
    <input type="button" value="添加数据" id="btn-add" /><br><br>
  </div>
  <table id="table" cellspacing="0" cellpadding="5px" border="1">
    <thead>
      <tr bgcolor="skyblue">
        <th>课程</th>
        <th>所属学院</th>
        <th>操作</th>
      </tr>
    </thead>
    <tbody id="j_tb">
      <tr>
        <td>JavaScript</td>
        <td>传智播客-前端与移动开发学院</td>
        <td><a href="javaScript:;" class="get">DELETE</a></td>
      </tr>
      <tr>
        <td>CSS</td>
        <td>传智播客-前端与移动开发学院</td>
        <td><a href="javaScript:;" class="get">DELETE</a></td>
      </tr>
      <tr>
        <td>html</td>
        <td>传智播客-前端与移动开发学院</td>
        <td><a href="javaScript:;" class="get">DELETE</a></td>
      </tr>
      <tr>
        <td>jQuery</td>
        <td>传智播客-前端与移动开发学院</td>
        <td><a href="javaScript:;" class="get">DELETE</a></td>
      </tr>
    </tbody>
  </table>
  <!-- 遮罩层 -->
  <div id="j_mask" class="mask"></div>
  <!-- 添加数据的表单 -->
  <div id="j_formAdd" class="form-add">
    <div class="form-add-title">
      <span>添加数据</span>
      <div id="j_hideFormAdd">x</div>
    </div>
    <div class="form-item">
      <label class="lb" for="j_txtLesson">课程名称:</label>
      <input class="txt" type="text" id="j_txtLesson" placeholder="请输入课程名称">
    </div>
    <div class="form-item">
      <label class="lb" for="j_txtBelSch">所属学院:</label>
      <input class="txt" type="text" id="j_txtBelSch" placeholder="传智播客-前端与移动开发学院">
    </div>
    <div class="form-submit">
      <input type="button" value="添加" id="j_btnAdd">
    </div>
  </div>
</div>
</body>
</html>
<script type="text/javascript" src="jquery-3.4.1.js"></script>
<script type="text/javascript">
  $(function(){
    //需求1:点击 添加数据 按钮,显示添加面板和遮罩层
    //需求2:点击添加面板里的关闭按钮,隐藏添加面板和遮罩层
    //需求3:点击添加面板里的添加按钮,会把输入的内容生成一个tr,这个tr添加到tbody中
    //需求4:点击delete这些a标签,删除对应的tr。

    //需求1
    $('#btn-add').click(function(){
      $('.mask').show();
      $('.form-add').show();
    });
    //需求2
    $('#j_hideFormAdd').click(function(){
      $('.mask').hide();
      $('.form-add').hide();
    });

    //需求3
    $('#j_btnAdd').click(function(){
      //3.1 获取到用户输入的所属学院和课程名称
      var $course = $('#j_txtLesson').val();
      var $school = $('#j_txtBelSch').val()!='' ? $('#j_txtBelSch').val() : '传智播客-前端与移动开发学院';
      //3.2 把用户输入的课程名称和所属学院,创建一个tr
      if($course != '' ){
        var $tampHtml = $('<tr><td>'+ $course +'</td><td>'+$school+'</td><td><a href="javaScript:;" class="get">DELETE</a></td></tr>');
        //此处去除了追加事件的代码
        $('#j_tb').append($tampHtml);
        $('#j_hideFormAdd').click();
      }else{
          alert('课程名称不可为空');
        }
      //清空课程和学院值
      $('#j_txtLesson').val('');
      $('#j_txtBelSch').val('');
    });
    //需求4
    $('#j_tb').on('click','a.get',function(){
      //正常来说,this应该是j_tb。但jQuery为了使用方便,修改了this为子元素
      $(this).parent().parent().remove();
    });
  });
</script>
7.事件解绑
| unbind(不用) | $(selector).unbind();解绑所有的事件 $(selector).unbind('click');解绑指定的事件 |
| undelegate(不用) | $(selector).undelegate();解绑所有的事件 $(selector).undelegate('click');解绑指定的事件 |
| off(推荐) | (selector).off();解绑所有的事件 $(selector).off('click');解绑指定的事件 |
<!DOCTYPE html>
<html>
<head>
  <title></title>
  <style type="text/css">
    .one{ 200px;height: 200px;border: 1px solid red;}

  </style>
</head>
<body>
<input type="button" value="注册事件" id="btn1">
<input type="button" value="解绑事件" id="btn2">
<div class="one" id="one"></div>
</body>
</html>
<script type="text/javascript" src="jquery-3.4.1.js"></script>
<script type="text/javascript">
  $(function(){
    $('#btn1').on('click',function(){
      $('#one').on({
        'click':function(){
          console.log("鼠标点击事件");
        },
        'mouseenter':function(){
          console.log("鼠标移入事件");
        }
      });
    });

    $('#btn2').on('click',function(){
      // $('#one').off();//解绑所有事件
      $('#one').off('click');//解绑click事件
    });
  });
</script>
8. 触发事件trigger()
作用:
- 1.以代码的方式来触发事件
- 2.可以用来触发自定义事件
<!DOCTYPE html>
<html>
<head>
  <title></title>
  <style type="text/css">
    .one{ 200px;height: 200px;border: 1px solid red;}

  </style>
</head>
<body>
<input type="button" value="按钮" id="btn1">
<input type="button" value="按钮2" id="btn2">
<div class="one" id="one"></div>
</body>
</html>
<script type="text/javascript" src="jquery-3.4.1.js"></script>
<script type="text/javascript">
  $(function(){
    $('#one').on({
      'click':function(){
        console.log('单击事件...');
      },
      'luxun':function(){
        console.log('鲁迅说过');
      }

    });
    var i = 1;
    $('#btn1').on('click',function(){
      if(i==3){
        //1.以代码的方式来触发事件
        //条件满足,触发div的单击事件
        // $('#one').click();
        $('#one').trigger('click');
      }
      i++;
    });

    $('#btn2').on('click',function(){
      var res = confirm("鲁迅说:good study,day day up");//返回true,false
      if(res){
        //2.可以用来触发自定义事件
        $('#one').trigger('luxun');
      }
    });
  });
</script>
9.jQuery事件对象
jQuery事件对象其实就是js事件对象的一个封装,处理了兼容性。
什么是事件对象?
注册一个事件,系统就会帮我们生成一个对象,记录这个事件触发时候的一些信息,比如触发事件的时候,有没有按住alt键。
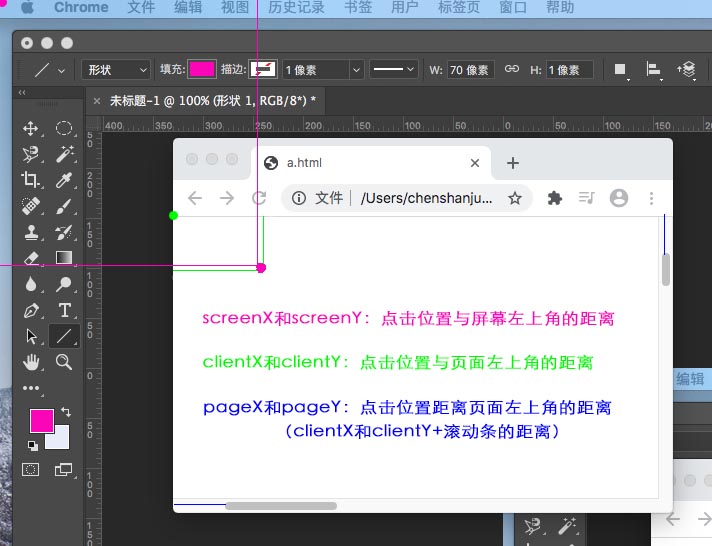
      //screenX和screenY: 触发事件的位置,与屏幕左上角的距离
      //clientX和clientY: 触发事件的位置,与可视区域左上角的距离
      //pageX和pageY:触发事件的位置,与页面左上角的距离(clientX和clientY+滚动条的距离)
      //event.stopPropgation(): 阻止事件冒泡行为
      //event.preventDefault(): 阻止浏览器默认行为,如跳转
      //event.keyCode: 按下的键盘代码
9.1示例 距离
<!DOCTYPE html>
<html>
<head>
  <title></title>
  <style type="text/css">
  	*{margin: 0;padding: 0;}
  	body{ 2000px;height: 2000px;}
    .one{ 200px;height: 200px;border: 1px solid red;position: relative;top: 100px;left: 100px;}

  </style>
</head>
<body>
<div id="one" class="one">
  <input type="button" value="我是按钮" id="btn" />
  <br><br>
  <a href="https://www.baidu.com">百度一下,你就知道</a>
</div>
</body>
</html>
<script type="text/javascript" src="jquery-3.4.1.js"></script>
<script type="text/javascript">
  $(function(){

    $('#one').on('click',function(e){
    	// console.log(e);
    	console.log('screenX:'+e.screenX+' screenY:'+e.screenY);
    	console.log('clientX:'+e.clientX+' clientY:'+e.clientY);
    	console.log('pageX:'+e.pageX+' pageY:'+e.pageY);
    });
  });
</script>
9.2 示例:阻止冒泡和阻止跳转
给div注册一个单击事件,由于事件冒泡,点击按钮,按钮的单击事件会执行,它父亲div的单击事件也会被触发。
阻止事件冒泡:点击按钮,不想让div的单击事件也被触发,就传递事件对象参数,调用事件对象的stopPropagation()方法
阻止浏览器默认行为:调用事件对象的preventDefault()方法,可以阻止页面跳转
return false是上面两个方法的合并。
<!DOCTYPE html>
<html>
<head>
  <title></title>
  <style type="text/css">
  	*{margin: 0;padding: 0;}
  	body{ 2000px;height: 2000px;}
    .one{ 200px;height: 200px;border: 1px solid red;position: relative;top: 100px;left: 100px;}

  </style>
</head>
<body>
<div id="one" class="one">
  <input type="button" value="我是按钮" id="btn" />
  <br><br>
  <a href="https://www.baidu.com">百度一下,你就知道</a>
</div>
</body>
</html>
<script type="text/javascript" src="jquery-3.4.1.js"></script>
<script type="text/javascript">
  $(function(){

    $('#one').on('click',function(){
    	alert("我是div的单击事件");
    });
    $('a').on('click',function(e){
    	alert('我是a标签的单击事件');
    	//阻止事件冒泡,div单击事件不再执行
    	// e.stopPropagation();
    	//阻止浏览器默认行为,不再跳转到百度
    	// e.preventDefault();
    	//阻止事件冒泡和浏览器默认行为
    	return false;
    });
  });
</script>
9.3 keycode
  $(function(){
    //给页面注册键盘按下事件
    $(document).on('keydown',function(e){
    	console.log(e.keyCode);
    });
  });
示例:通过按键改变颜色
<!DOCTYPE html>
<html>
<head>
	<title></title>
	<style type="text/css">
		*{padding: 0;margin: 0;text-align: center;}
		div.wrap{ 400px;margin: 0 auto;}
		div#bgChange{background-color: blue;height: 200px;line-height: 200px;font-size: 32px;}
	</style>
</head>
<body>
<div class="wrap">
	<h1>按键改变颜色</h1>
	<div id="bgChange">
		keyCode为:<span id="keyCodeSpan"></span>
	</div>
</div>
</body>
</html>
<script type="text/javascript" src="jquery-3.4.1.js"></script>
<script type="text/javascript">
  $(function(){
    //给页面注册键盘按下事件
    $(document).on('keydown',function(e){
    	//r:82 g:71 b:66 p:80 y:89

    	switch(e.keyCode){
    		case 82:
    			$('div#bgChange').css('background-color','red');
    			$('#keyCodeSpan').text(82);
    			break;
    		case 71:
    			$('div#bgChange').css('background-color','green');
    			$('#keyCodeSpan').text(71);
    			break;
    		case 66:
    			$('div#bgChange').css('background-color','blue');
    			$('#keyCodeSpan').text(66);
    			break;
    		case 80:
    			$('div#bgChange').css('background-color','purple');
    			$('#keyCodeSpan').text(80);
    			break;
    		case 89:
    			$('div#bgChange').css('background-color','yellow');
    			$('#keyCodeSpan').text(89);
    			break;
    		default:
    			$('div#bgChange').css('background-color','pink');
    			$('#keyCodeSpan').text('查无此键');
    			break;

    	}
    });
  });
</script>
