背景
最近对snowflake比较感兴趣,就看了一些分布式唯一ID生成器(发号器)的开源项目的源码,例如百度的uid-generator,美团的leaf。大致看了一遍后感觉uid-generator代码写的要更好一些,十分的精炼,短小精悍。
正好手头有个任务要搞个发号器,百度的这个源码是不能直接运行起来提供服务的,为了练练手,就把百度的uid-generator迁移到spring boot上重写了一遍。
代码基本一模一样,就做了一些工程化的东西,让uid-generator能以服务的形式跑起来,通过http接口对外提供服务。
可运行的代码地址:点这里
SnowFlake数据结构
这里借用一下uid-generator的图:

这一个结构就是一个snowflake算法里的id,共计64位,就是一个long。
- sign是一个恒为0的值,是为了保证算出的id恒为正数。
- delta seconds (28 bits)
当前时间,相对于时间基点"2016-05-20"的增量值,单位:秒,最多可支持约8.7年。时间基点是自己配置的。28位即最大表示2^28的数值的秒数,换算一下就是8.7年左右。
- worker id (22 bits)
机器id,最多可支持约420w次机器启动。内置实现为在启动时由数据库分配。420w = 2^22
- sequence (13 bits)
每秒下的并发序列,13 bits可支持每秒8192个并发,即2^13个并发
这些位数都是可以改变的,对于很多公司来说,28位 delta seconds带来的8.7年的最大支持时间是可预期的不够用的,而22bit的worker id和13bit的sequence则是远远超出可预期的业务场景的,那么就可以自由的根据自己的需求,对这三个参数进行调整。
例如,{"workerBits":20,"timeBits":31,"seqBits":12}这样的配置可以68年,100W次重启,单机每秒4096个并发的情况,个人感觉还是比较合适的。
snowflake的实现有很多种方式,不过思想上都是一样的。
SnowFlake发号实现
在了解SnowFlake的数据结构后,就可以来看看具体是如何生成ID的了。
其实这个过程,就是往delta seconds,sequence,worker id三个结构里填充数据的过程。
整体类图如下:
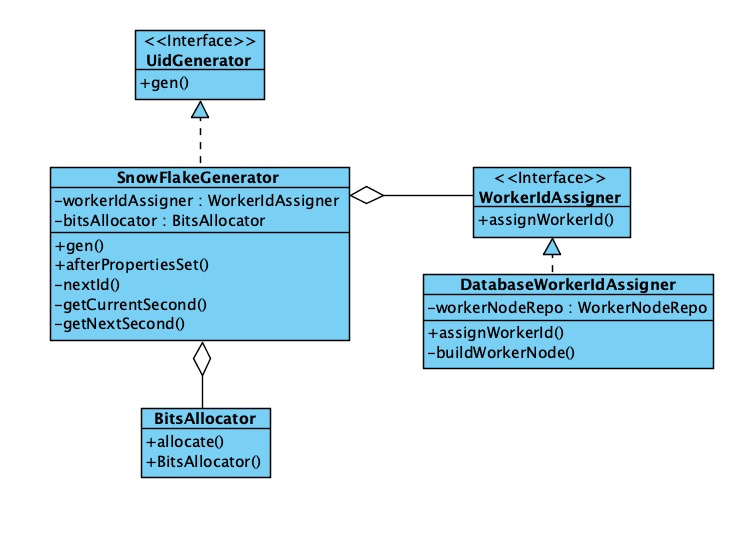
SnowFlakeGenerator就是基于SnowFlake算法的UidGenerator的实现类,SnowFlake的实现就是在这个类里;
BitsAllocator就是对SnowFlake 的ID进行位操作的共聚类;
DatabaseWorkerIdAssigner就是一个基于DB自增的worker id 分配器的实现。
BitsAllocator
这个类是进行一些位操作的工具类,给每一个id 的delta seconds,sequence,worker id赋值就是通过这个类来实现的。这个类有以下成员变量:
/**
     * Total 64 bits
     */
    public static final int TOTAL_BITS = 1 << 6;

    /**
     * Bits for [sign-> second-> workId-> sequence]
     */
    private int signBits = 1;
    private final int timestampBits;
    private final int workerIdBits;
    private final int sequenceBits;

    /**
     * Max value for workId & sequence
     */
    private final long maxDeltaSeconds;
    private final long maxWorkerId;
    private final long maxSequence;

    /**
     * Shift for timestamp & workerId
     */
    /**
     * timestamp需要位移多少位
     */
    private final int timestampShift;
    /**
     * workerId需要位移多少位
     */
    private final int workerIdShift;
其他字段都好说,看名称和注释都能明白。最下面俩shift,可能现在看着有些摸不着头脑,不过看后面的赋值过程就知道什么叫“shift”了
构造器:
    /**
     * Constructor with timestampBits, workerIdBits, sequenceBits<br>
     * The highest bit used for sign, so <code>63</code> bits for timestampBits, workerIdBits, sequenceBits
     */
    public BitsAllocator(int timestampBits, int workerIdBits, int sequenceBits) {
        // make sure allocated 64 bits
        int allocateTotalBits = signBits + timestampBits + workerIdBits + sequenceBits;
        Assert.isTrue(allocateTotalBits == TOTAL_BITS, "allocate not enough 64 bits");

        // initialize bits
        this.timestampBits = timestampBits;
        this.workerIdBits = workerIdBits;
        this.sequenceBits = sequenceBits;

        // initialize max value
        //-1 是111111111(64个1)
        //先将-1左移timestampBits位,得到111111100000(timestampBits个零)
        //然后取反,得到00000....1111...(timestampBits)个1
        //等价于2的timestampBits次方-1
        this.maxDeltaSeconds = ~(-1L << timestampBits);
        this.maxWorkerId = ~(-1L << workerIdBits);
        this.maxSequence = ~(-1L << sequenceBits);

        // initialize shift
        this.timestampShift = workerIdBits + sequenceBits;
        this.workerIdShift = sequenceBits;
    }
也很简单,重点就在 “~(-1L << timestampBits) ”这样一坨操作,可能理解起来会有些困难。这是一连串的位操作,这里进行一下分解:
-
- -1 左移 timestampBits 位,实际的二进制看起来是11111111......00000...(最前面的1是最高位,表示负数;后面有timestampBits个0)
- 对-(2^timestampBits)进行取反操作,的到了2的timestampBits次方-1。实际的二进制看起来就是1111(timestampBits个1)
这一通操作其实也就相当于2的timestampBits次方-1,也就是timestampBits位二进制最大能表示的数字,不过是用位运算来做的。如果不懂二进制的位移和取反,可以百度“位操作”补充一下基础,这里就不展开了。
分配操作:
    /**
     * Allocate bits for UID according to delta seconds & workerId & sequence<br>
     * <b>Note that: </b>The highest bit will always be 0 for sign
     *
     * 这里就是把不同的字段放到相应的位上
     * id的总体结构是:
     * sign (fixed 1bit) -> deltaSecond -> workerId -> sequence(within the same second)
     * deltaSecond 左移(workerIdBits + sequenceBits)位,workerId左移sequenceBits位,此时就完成了字节的分配
     * @param deltaSeconds
     * @param workerId
     * @param sequence
     * @return
     */
    public long allocate(long deltaSeconds, long workerId, long sequence) {
        return (deltaSeconds << timestampShift) | (workerId << workerIdShift) | sequence;
    }
这里就是对delta seconds,sequence,worker id三个结构进行赋值的地方了,核心代码之一。可以再看一下最上面的图,sequence是在最右侧(最低位),所以sequence不用做位移,直接就是在对的位置;
而workerId,需要左移workerIdShift才能到正确的位置。workerIdShift看上面的构造器,就是sequenceBits,就是sequence的位数;
deltaSeconds 左移timestampShift位,也就是workerIdBits + sequenceBits;
然后对这三个位移后的值进行“或”操作,就把正确的值赋到正确的位数上了。
DatabaseWorkerIdAssigner
SnowFlake中,deltaSeconds依赖时间戳,可以通过系统获取;sequence可以通过自增来控制;这俩字段都是项目可以自给自足的,而WorkerId则必须还有一个策略来提供。
这个策略要保证每次服务启动的时候拿到的WorkerId都能不重复,不然就有可能集群不同的机器拿到不同的workerid,会发重复的号了;
而服务启动又是个相对低频的行为,也不影响发号性能,所以可以用DB自增ID来实现。
DatabaseWorkerIdAssigner就是依赖DB自增ID实现的workerId分配器。
代码就不贴了,就是个简单的save然后取到DB的自增ID。
SnowFlakeGenerator
这里就是控制发号逻辑的地方了。
先看看成员变量和初始化部分:
@Value("${snowflake.timeBits}")
    protected int timeBits = 28;

    @Value("${snowflake.workerBits}")
    protected int workerBits = 22;

    @Value("${snowflake.seqBits}")
    protected int seqBits = 13;

    @Value("${snowflake.epochStr}")
    /** Customer epoch, unit as second. For example 2016-05-20 (ms: 1463673600000)*/
    protected String epochStr = "2016-05-20";
    protected long epochSeconds = TimeUnit.MILLISECONDS.toSeconds(1463673600000L);

    @Autowired
    @Qualifier(value = "dbWorkerIdAssigner")
    protected WorkerIdAssigner workerIdAssigner;

    /** Stable fields after spring bean initializing */
    protected BitsAllocator bitsAllocator;


    protected long workerId;


    /** Volatile fields caused by nextId() */
    protected long sequence = 0L;
    protected long lastSecond = -1L;


    @PostConstruct
    public void afterPropertiesSet() throws Exception {
        bitsAllocator = new BitsAllocator(timeBits,workerBits,seqBits);
        // initialize worker id
        workerId = workerIdAssigner.assignWorkerId();

        if(workerId > bitsAllocator.getMaxWorkerId()){
            throw new RuntimeException("Worker id " + workerId + " exceeds the max " + bitsAllocator.getMaxWorkerId());
        }

        if (StringUtils.isNotBlank(epochStr)) {
            this.epochSeconds = TimeUnit.MILLISECONDS.toSeconds(DateUtils.parseByDayPattern(epochStr).getTime());
        }

        log.info("Initialized bits(1, {}, {}, {}) for workerID:{}", timeBits, workerBits, seqBits, workerId);
    }
@Value注入的都是配置文件里读取的值。
afterPropertiesSet里,将配置文件读取到的值传递给BitsAllocator,够造出一个对应的BitsAllocator;
然后生成一个workerId(插入一条DB记录),初始化过程就完成了。
再看核心发号控制逻辑:
/**
     * Get UID
     *
     * @return UID
     * @throws UidGenerateException in the case: Clock moved backwards; Exceeds the max timestamp
     */
    protected synchronized long nextId() {
        long currentSecond = getCurrentSecond();

        // Clock moved backwards, refuse to generate uid
        //todo 时钟回拨问题待解决
        if (currentSecond < lastSecond) {
            long refusedSeconds = lastSecond - currentSecond;
            throw new UidGenerateException("Clock moved backwards. Refusing for %d seconds", refusedSeconds);
        }

        // At the same second, increase sequence
        //同一秒内的,seq加一
        if (currentSecond == lastSecond) {
            //seq 加一,如果大于MaxSequence,就变成0
            //如果大于MaxSequence 就是seq能取到的最大值,二进制(seqBits -1)位全是1
            sequence = (sequence + 1) & bitsAllocator.getMaxSequence();
            // Exceed the max sequence, we wait the next second to generate uid
            //号发完了,等到下一秒
            if (sequence == 0) {
                currentSecond = getNextSecond(lastSecond);
            }

            // At the different second, sequence restart from zero
        } else {
            //新的一秒,重新开始发号
            sequence = 0L;
        }
        lastSecond = currentSecond;
        // Allocate bits for UID
        return bitsAllocator.allocate(currentSecond - epochSeconds, workerId, sequence);
    }
注意这是个synchronized方法,这是关键。
getCurrentSecond就是获取当前以秒为单位的时间戳;
sequence计算逻辑
如果currentSecond和lastSecond一样,那说明本次发号请求不是本秒的第一次,只要将sequence直接+1即可;如果+1后大于了MaxSequence(这里会用& bitsAllocator.getMaxSequence()设置为0),那说明本秒的sequence已经用完了,此时请求已经超出了本秒系统的最大吞吐量,这里需要调用getNextSecond(详见github),来等待到下一秒;
如果currentSecond和lastSecond不一样,说名本次请求是全新的一秒,这时候sequence设置为0即可。
deltaSecond计算逻辑
就是currentSecond - epochSeconds,当前时间减去初始时间的秒数。
此时,workerId,deltaSecond,sequence都已经确定了具体的值,然后调用bitsAllocator.allocate方法,就可以生成一个全新的ID了,至此发号完成。