1、概述
superset大数据可视化的利器,深度集成durid,结合kylin、presto完成强大的大数据可视化功能,曾用名Panoramix、caravel。相比caravel它有个比较抢眼的功能SQL lab。具体可参考官方文档
2、安装
提前在10.0.2.245服务器上面部署好redis。参考我的另一文章:http://www.cnblogs.com/cuishuai/p/8033672.html
使用docker进行安装,首先要先安装docker,采用的是centos7直接使用yum安装即可。docker安装完成后还需要安装docker-compose
#yum -y install docker docker-compose
#yum -y install git
找到最新的superset的docker:https://github.com/amancevice/superset,git clone到服务器上。
#cd /data
#git clone https://github.com/amancevice/superset
修改docker-compose.yml文件
#cat docker-compose.yml
version: '2'
services:
image: amancevice/superset
container_name: superset
volumes:
- /data/superset/conf/superset_config.py:/etc/superset/superset_config.py
ports:
- 8088:8088
注:必须要做hosts映射,因为要使用hive或presto填写地址必须使用主机名不能使用ip地址,由于pyhive0.5不支持ip,新版本已修复。utils.py很重要,主要是为了消除sql lab的timeout,
文件路径:/usr/local/lib/python3.5/dist-packages/superset/utils.py
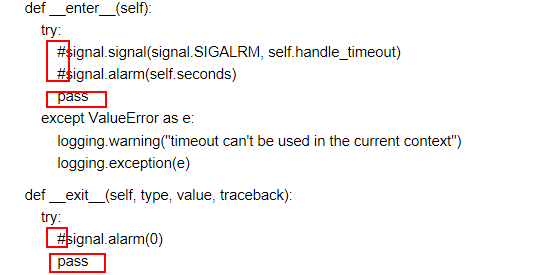
将上述的signal注释掉,新加两个pass。这种方法把控制超时发送信号的代码注掉了,这样查询超过30s的时候就不会把进程kill掉。
默认docker是没有安装vim的修改很不方便,可以按如下步骤安装vim:
1)首先cd到docker-compose.yml的目录下启动容器:docker-compose up -d
2)进入容器:docker exec -it -u 0 superset /bin/bash
3)修改debian的源:
#cd /etc/apt/
# cat >>sources.list<< EOF
deb http://mirrors.aliyun.com/debian wheezy main contrib non-free
deb-src http://mirrors.aliyun.com/debian wheezy main contrib non-free
deb http://mirrors.aliyun.com/debian wheezy-updates main contrib non-free
deb-src http://mirrors.aliyun.com/debian wheezy-updates main contrib non-free
deb http://mirrors.aliyun.com/debian-security wheezy/updates main contrib non-free
deb-src http://mirrors.aliyun.com/debian-security wheezy/updates main contrib non-free
EOF
#apt-get update && apt-get install vim
#vim /usr/local/lib/python3.5/dist-packages/superset/utils.py
def __enter__(self):
try:
#signal.signal(signal.SIGALRM, self.handle_timeout)
#signal.alarm(self.seconds)
pass
except ValueError as e:
logging.warning("timeout can't be used in the current context")
logging.exception(e)
def __exit__(self, type, value, traceback):
try:
#signal.alarm(0)
pass
添加如上两个注释,并使用pass代替。
配置文件:
#cat superset_config.py
#---------------------------------------------------------
# Superset specific config
#---------------------------------------------------------
ROW_LIMIT = 5000
SUPERSET_WORKERS = 4
SUPERSET_WEBSERVER_TIMEOUT = 3000
SUPERSET_WEBSERVER_PORT = 8088
#---------------------------------------------------------
#---------------------------------------------------------
# Flask App Builder configuration
#---------------------------------------------------------
# Your App secret key
SECRET_KEY = '21thisismyscretkey12eyyh'
# The SQLAlchemy connection string to your database backend
# This connection defines the path to the database that stores your
# superset metadata (slices, connections, tables, dashboards, ...).
# Note that the connection information to connect to the datasources
# you want to explore are managed directly in the web UI
#SQLALCHEMY_DATABASE_URI = 'sqlite:////data/superset.db'
SQLALCHEMY_DATABASE_URI = 'sqlite:////home/superset/superset.db'
# Flask-WTF flag for CSRF
WTF_CSRF_ENABLED = True
# Add endpoints that need to be exempt from CSRF protection
WTF_CSRF_EXEMPT_LIST = []
# Set this API key to enable Mapbox visualizations
MAPBOX_API_KEY = ''
CACHE_DEFAULT_TIMEOUT = 60*60*6
CACHE_CONFIG = {
'CACHE_TYPE': 'redis',
'CACHE_REDIS_HOST': '10.0.2.245',
'CACHE_REDIS_PORT': '6379',
'CACHE_REDIS_URL': 'redis://10.0.2.245:6379'
}
class CeleryConfig(object):
BROKER_URL = 'redis://10.0.2.245:6379/0'
CELERY_IMPORTS = ('superset.sql_lab',)
CELERY_RESULT_BACKEND = 'redis://10.0.2.245:6379/0'
# CELERY_ANNOTATIONS = {'tasks.add':{'rate_limit':'10/s'}}
CELERY_CONFIG = CeleryConfig
from werkzeug.contrib.cache import RedisCache
RESULTS_BACKEND = RedisCache(
host='10.0.2.245', port=6379, key_prefix='superset_results')
进入到存放docker-compose.yml的目录下面:
#docker-compose up -d
#docker exec -it superset superset db upgrade
#docker exec -it superset superset load_examples
#docker exec -it superset superset-init
启动superset worker
#docker exec -it superset /bin/bash
$nohup superset worker &
默认是superset用户,如果想获取root用户权限
#docker exec -it -u 0 superset /bin/bash
3、打开浏览器访问
宿主机ip:port
http://192.168.1.100:8088
输入上面初始化设置的用户名密码
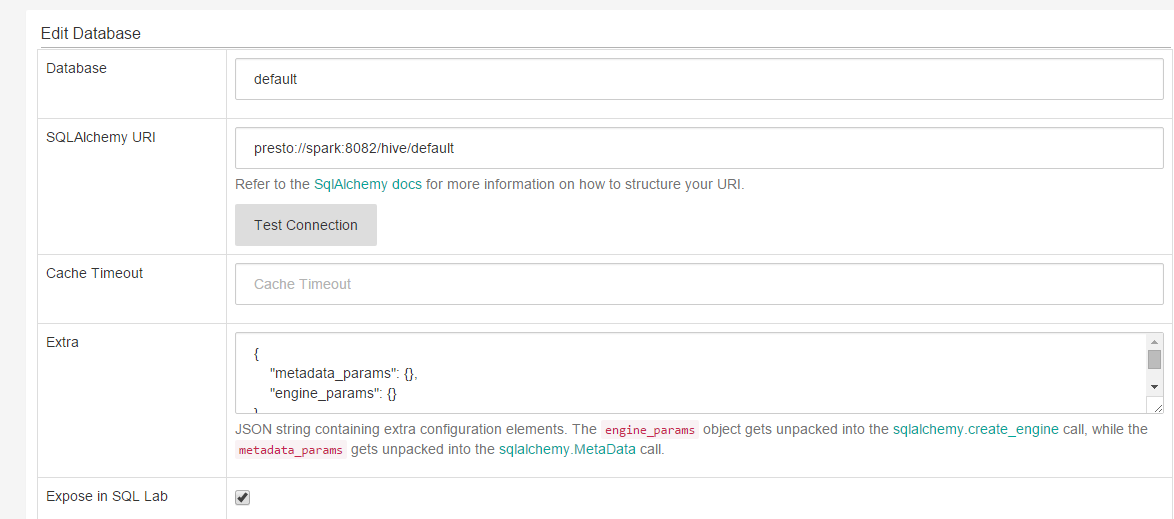
4、连接presto,spark是10.0.2.245,由于之前的老版本不支持ip,现在新版本已经修改。可以直接是用ip