uboot 下更改NAND的分区 fdisk
分类: S5PXX(三星)2012-07-01 18:59 8946人阅读 评论(7) 收藏 举报
关键词:android 4.0 nand 分区 userdata 大小 fdisk
平台信息:
内核:linux3.0
系统:android4.0.3
INAND:SDIN5C2-8G-L(SanDisk)
平台:S5PV310(samsung exynos 4210)
一、NAND分区大小:
我们的机器用的是8G的INAND,三星平台一般把它分为四个区:
(1)、fat分区,作为sd卡用;
(2)、系统分区,相当为电脑c 盘,用来安装android系统;
(3)、userdata分区;
(4)、cache分区。
二、分区更改操作过程
1, 更改uboot中代码/common/cmd_mmc_fdisk.c
在这个文件中我们可以看到对四个分区大小的定义:
[cpp] view plaincopy
- #define SYSTEM_PART_SIZE (300*1024*1024)
- #define USER_DATA_PART_SIZE (600*1024*1024)
- #define CACHE_PART_SIZE (300*1024*1024)

2,编译uboot 、烧录
#sudo fastboot flash bootloader u-boot.bin(三星平台的命令,不同平台也许不同)
重启,进入uboot命令行模式,一定要重启。
3,重新分区 fdisk -c 0
#fdisk –c 0 //重新把INAND分区
#fdisk –p 0 //查看INAND分区信息
如下所示,600MB为我们新分的空间。
[html] view plaincopy
- SMDKV310 # fdisk -c 0
- Count: 10000
- fdisk is completed
- partion # size(MB) block start # block count partition_Id
- 1 6233 2610960 12766380 0x0C //fat分区,作为sd卡用
- 2 303 136620 622380 0x83 //系统分区,相当为电脑c 盘
- 3 600 759000 1229580 0x83 //userdata分区
- 4 303 1988580 622380 0x83 //cache分区
4,把整个系统区重新格式化
系统重重分区后,原来烧录程序位置发生改变,系统分区(相当于电脑的c盘)也变化,所以要重新格式化。(下面的命令是三星平台下的,因平台而不同)
[html] view plaincopy
- fatformat mmc 0:1
- ext4fromat mmc 0:2
- ext4fromat mmc 0:3
- ext4fromat mmc 0:4
5、把整个系统重新烧录
[html] view plaincopy
- sudo fastboot flash fwbl1 v310N.nbl1.bin
- sudo fastboot flash bootloader u-boot.bin
- sudo fastboot flash zImage
- sudo fastboot flash ramdisk-uboot.img
- sudo fastboot flash system.img
6,打开机器,如下图所示,查看更改结果

三、fdisk 命令分析
1、命令定义
[cpp] view plaincopy
- U_BOOT_CMD(
- fdisk, 6, 0, do_fdisk,
- "fdisk - fdisk for sd/mmc. ",
- "-c <device_num> - create partition. "
- "fdisk -p <device_num> [<sys. part size(MB)> <user data part size> <cache part size>] - print partition information "
- );
2、do_fdisk的实现函数
我们平时用的fdisk -c 0 格式化inand ,fdisk -p 0 查看分区信息,在这里可以看到对这两条命令的解析:
[cpp] view plaincopy
- int do_fdisk(cmd_tbl_t *cmdtp, int flag, int argc, char *argv[])
- {
- if ( argc == 3 || argc ==6 )
- {
- if ( strcmp(argv[1], "-c") == 0 )
- return create_mmc_fdisk(argc, argv); //格式化分区
- else if ( strcmp(argv[1], "-p") == 0 )
- return print_mmc_part_info(argc, argv); //打印出分区的信息
- }
- else //如果不满足argc条件,打印出帮助信息
- {
- printf("Usage: fdisk <-p> <device_num> ");
- printf("fdisk <-c> <device_num> [<sys. part size(MB)> <user data part size> <cache part size>] ");
- }
- return 0;
- }
3、如果为fdisk -c 0进,进入 create_mmc_fdisk,我们再分析这个函数
[cpp] view plaincopy
- int create_mmc_fdisk(int argc, char *argv[])
- {
- int rv;
- int total_block_count;
- unsigned char mbr[512];
- memset(mbr, 0x00, 512);
- total_block_count = get_mmc_block_count(argv[2]); //获得块信息,以512 为单位
- if (total_block_count < 0)
- return -1;
- //格式化INAND
- make_mmc_partition(total_block_count, mbr, (argc==6?1:0), argv);
- rv = put_mmc_mbr(mbr, argv[2]);
- if (rv != 0)
- return -1;
- printf("fdisk is completed "); //分区成功,打印信息
- argv[1][1] = 'p';
- print_mmc_part_info(argc, argv); //和fdisk –p 0 作用一样,打印出分区信息
- return 0;
- }
4、我们看下格式化函数make_mmc_partition是怎么实现的吧。
这里面有两上参考比较重要:block_start 、block_offset;每个区块的开始和大小(偏移量),我们画个图来更好的表示这个吧。
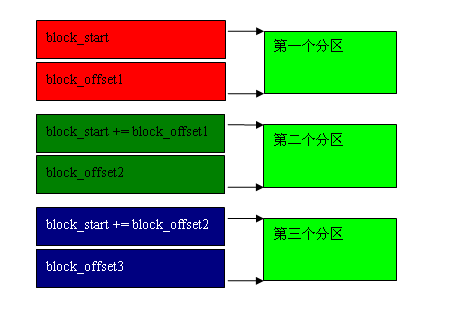
在这里我们可以看到
[cpp] view plaincopy
- #define SYSTEM_PART_SIZE (300*1024*1024)
- #define USER_DATA_PART_SIZE (600*1024*1024)
- #define CACHE_PART_SIZE (300*1024*1024)
这几宏的应用,block_start= calc_unit(CFG_PARTITION_START, sdInfo),计算分区大小
[cpp] view plaincopy
- int make_mmc_partition(int total_block_count, unsigned char *mbr, int flag, char *argv[])
- {
- int block_start = 0, block_offset;
- SDInfo sdInfo;
- PartitionInfo partInfo[4];
- memset((unsigned char *)&sdInfo, 0x00, sizeof(SDInfo));
- get_SDInfo(total_block_count, &sdInfo);
- ///////////////////////////////////////////////////////////
- block_start = calc_unit(CFG_PARTITION_START, sdInfo); //得到第一分区的开始地址
- if (flag)
- block_offset = calc_unit((unsigned long long)simple_strtoul(argv[3], NULL, 0)*1024*1024, sdInfo);
- else
- block_offset = calc_unit(SYSTEM_PART_SIZE, sdInfo);//计算分区大小,这里面的值是不是很熟悉,就是我们开始改那些地方,这个是系统分区的
- partInfo[0].bootable = 0x00;
- partInfo[0].partitionId = 0x83;
- make_partitionInfo(block_start, block_offset, sdInfo, &partInfo[0]);//开始分区
- ///////////////////////////////////////////////////////////
- block_start += block_offset;//更改下一个分析的开始地址,这样可以保证分区连续
- if (flag)
- block_offset = calc_unit((unsigned long long)simple_strtoul(argv[4], NULL, 0)*1024*1024, sdInfo);
- else
- block_offset = calc_unit(USER_DATA_PART_SIZE, sdInfo);
- partInfo[1].bootable = 0x00;
- partInfo[1].partitionId = 0x83;
- make_partitionInfo(block_start, block_offset, sdInfo, &partInfo[1]);
- ///////////////////////////////////////////////////////////
- block_start += block_offset;
- if (flag)
- block_offset = calc_unit((unsigned long long)simple_strtoul(argv[5], NULL, 0)*1024*1024, sdInfo);
- else
- block_offset = calc_unit(CACHE_PART_SIZE, sdInfo);
- partInfo[2].bootable = 0x00;
- partInfo[2].partitionId = 0x83;
- make_partitionInfo(block_start, block_offset, sdInfo, &partInfo[2]);
- ///////////////////////////////////////////////////////////
- block_start += block_offset;
- block_offset = BLOCK_END;
- partInfo[3].bootable = 0x00;
- partInfo[3].partitionId = 0x0C;
- make_partitionInfo(block_start, block_offset, sdInfo, &partInfo[3]);
- ///////////////////////////////////////////////////////////
- memset(mbr, 0x00, sizeof(mbr));
- mbr[510] = 0x55; mbr[511] = 0xAA;
- encode_partitionInfo(partInfo[0], &mbr[0x1CE]);
- encode_partitionInfo(partInfo[1], &mbr[0x1DE]);
- encode_partitionInfo(partInfo[2], &mbr[0x1EE]);
- encode_partitionInfo(partInfo[3], &mbr[0x1BE]);
- return 0;
- }
5、fidsk – p 0的实现函数也很简单
[cpp] view plaincopy
- int print_mmc_part_info(int argc, char *argv[])
- {
- int rv;
- PartitionInfo partInfo[4];
- rv = get_mmc_part_info(argv[2], 1, &(partInfo[0].block_start), &(partInfo[0].block_count),
- &(partInfo[0].partitionId) );
- rv = get_mmc_part_info(argv[2], 2, &(partInfo[1].block_start), &(partInfo[1].block_count),
- &(partInfo[1].partitionId) );
- rv = get_mmc_part_info(argv[2], 3, &(partInfo[2].block_start), &(partInfo[2].block_count),
- &(partInfo[2].partitionId) );
- rv = get_mmc_part_info(argv[2], 4, &(partInfo[3].block_start), &(partInfo[3].block_count),
- &(partInfo[3].partitionId) );
- printf(" ");
- printf("partion # size(MB) block start # block count partition_Id ");
- if ( (partInfo[0].block_start !=0) && (partInfo[0].block_count != 0) )
- printf(" 1 %6d %8d %8d 0x%.2X ",
- (partInfo[0].block_count / 2048), partInfo[0].block_start,
- partInfo[0].block_count, partInfo[0].partitionId);
- if ( (partInfo[1].block_start !=0) && (partInfo[1].block_count != 0) )
- printf(" 2 %6d %8d %8d 0x%.2X ",
- (partInfo[1].block_count / 2048), partInfo[1].block_start,
- partInfo[1].block_count, partInfo[1].partitionId);
- if ( (partInfo[2].block_start !=0) && (partInfo[2].block_count != 0) )
- printf(" 3 %6d %8d %8d 0x%.2X ",
- (partInfo[2].block_count / 2048), partInfo[2].block_start,
- partInfo[2].block_count, partInfo[2].partitionId);
- if ( (partInfo[3].block_start !=0) && (partInfo[3].block_count != 0) )
- printf(" 4 %6d %8d %8d 0x%.2X ",
- (partInfo[3].block_count / 2048), partInfo[3].block_start,
- partInfo[3].block_count, partInfo[3].partitionId);
- return 1;
- }