Detectron2之ROIAlign
以前一直只是泛泛的了解了下ROIAlign,最近发现了detectron2蛮适合我这个菜鸟学习的,也经过摸索在自己只能装windows10系统的菜鸟笔记本上跑通了,那就正好来好好学习下一些细节把。一直看理论总是懵懵的状态,这篇就主要记录下学习的过程,作为一个备忘,也算立功FLAG努力写清楚。
ROI Pooling理论&代码流程
提到ROIAlign就简单回顾一下ROI Pooling原理然后分析下代码流程
理论
在fasterrcnn中RPN网络输出的多个不同大小的roi, 然后根据featrue map(RPN和box分类回归的share_conv)输出固定大小的特征进行box的分类和回归 所有总结ROI Pooling的输入输出为:
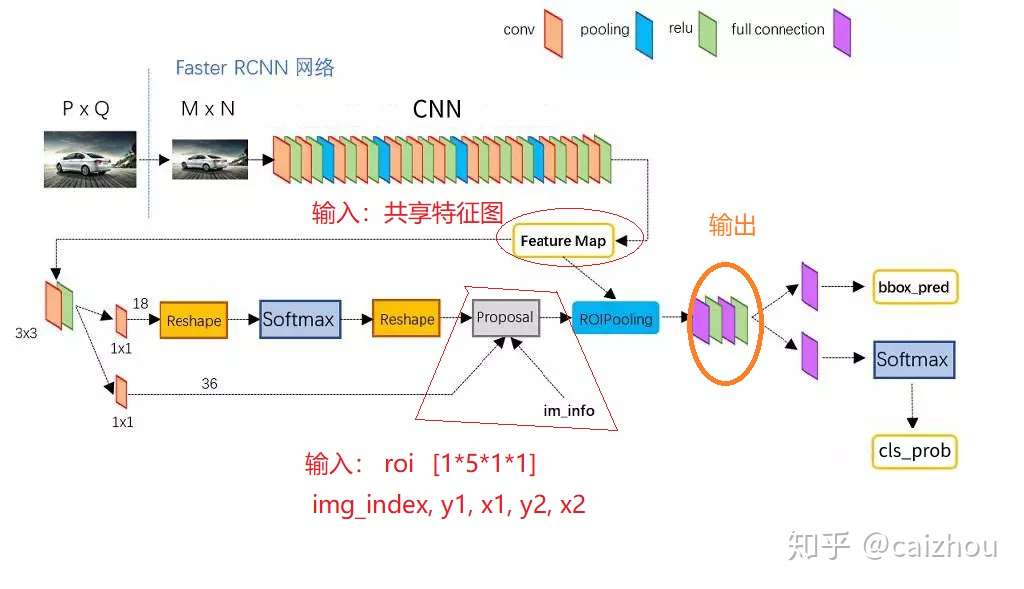
- 输入
- 特征图: 在FasterRCNN中,它是和RPN共享的那个特征图
- rois: FasterRCNN中就是RPN输出的一堆候选框,形状为
(4个坐标+索引index)特别注意:坐标的参考系是针对原图而不是featuremap
- 输出:batch 个vector, 其中batch为rois的个数, vector是
,即将rois映射为固定大小
便于理解这里可以参考tensorflow roi-pooling解释,图文代码并茂。
代码流程
前面知道了ROI Pooling的原理和输入输出,下面简单撸一撸代码实现的流程这里主要参考一个c++ caffe实现,也参考了csdn博客
参数:
- pooled_height_: roi_pool后特征的高如: 7
- pooled_width_: roi_pool后特征的宽如: 7
- spatial_scale_: 共享特征图相对原图缩小的尺寸如:1/16
- channels_: 共享特征图特征的通道数
- Blob<int>max_idx_: roi_pool后特征中每个值在共享卷积层输出特征图中的位置索引用于反向传
- width_: 共享特征图的宽
- height_: 共享特征图的高
- LayerSetUp: 根据caffe.proto文件设置参数1,2,3的值
template<typename Dtype>
void ROIPoolingLayer<Dtype>::LayerSetUp(const vector<Blob<Dtype>*>& bottom,
                                        const vector<Blob<Dtype>*>& top)
{
   pooled_height_ = roi_pool_param.pooled_h();
   pooled_width_  = roi_pool_param.pooled_w();
   spatial_scale_ = roi_pool_param.spatial_scale();
}- 定义输出变量: Reshape
template <typename Dtype> void ROIPoolingLayer<DType>::Reshape(const vector<Blob<Dtype>*>& bottom,
                                                               const vector<Blob<Dtype>*>& top)
{
    channels_ = bottom[0]->channels();
    height_   = bottom[0]->height();
    width_    = bottom[0]->width();
    // bottom[0] 为共享特征图输入
   // bottom[1] 为rois
   top[0]->Reshape(bottom[1]->num(), channels_, pooled_height_, pooled_width_);
   // top[0]为pool过后的特征,第一维度为roi数量
   max_idx_.Reshape(bottom[1]->num(). channels_, pooled_height_, pooled_width_);
   // max_idx_为pool后特征中每一个值在原共享特征图上的索引,【num_rois, channels, pooled_height, pooled_width_】

}
- cpu 前传函数
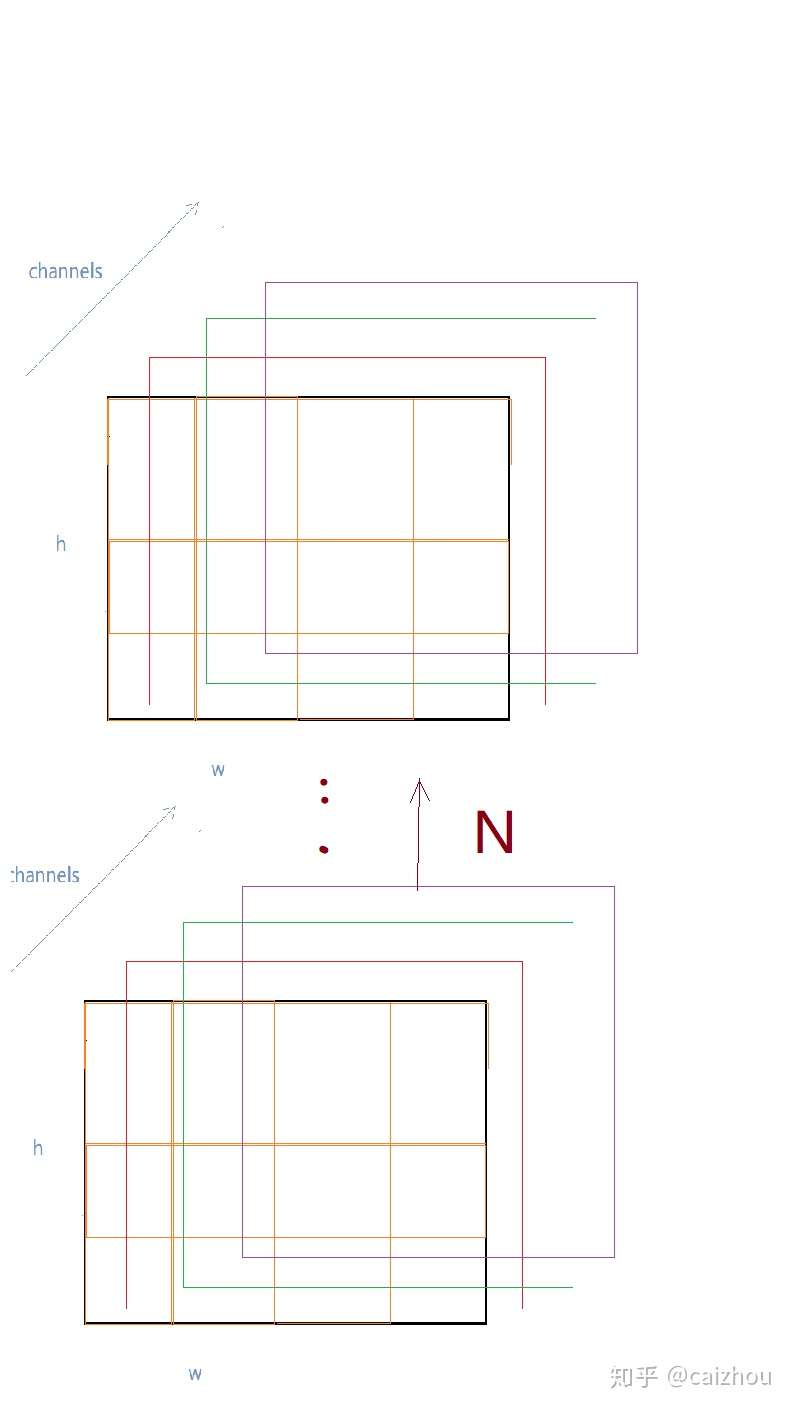 pooled输出结构示意图(勿吐槽图丑)
template<typename Dtype>
void ROIPoolingLayer<Dtype>::Forward_cpu(const vector<Blob<Dtype>*>& bottom,
const vector<Blob<Dtype>*>& top)
{
const Dtype* bottom_data = bottom[0]->cpu_data();// bottom_data表示共享特征图【B*C*H*W】
const Dtype* bottom_rois = bottom[1]->cpu_data();//bottom_rois表示rois信息,一共5维,第一维度
// rois在训练batch中图片索引,后四维表示rois的坐标信息 【B*5*1*1】
int num_rois = bottom[1]->num(); // rois的总数N
int batch_size = bottom[0]->num(); // batch_size表示一次训练中输入的图片数量,因为roi并不是
//都存在于同一张图片上
int top_count = top[0]->count(); // top_count表示top[0]的全部容量【N*C*H*W】
Dtype* top_data = top[0]->mutable_cpu_data(); //使用top_data指针索引top[0]
caffe_set(top_count, Dtype(-FLT_MAX), top_data); // 初始化top_data(即top[0],使其初始值为最小值
int* argmax_data = max_idx_.mutalbe_cpu_data(); //使用argmax_data指针索引max_idx_
caffe_set(top_count, -1, argmax_data);//初始化argmax_data(即max_idx_)初始值设置为-1
// top[0]和max_idx_大小都为top_cont即(N*C*H*W)如上图所示
//////////////////////////////////////////////////////////////////////////
// 下面开始进行每个roi的池化操作
///////////////////////////////////////////////////////////////////////////
for(int n=0; n<num_rois; ++n) // 第一个循环 N维度上进行遍历[batch_index, x1, y1, x2, y2]
{
// index
int roi_batch_ind = bottom_rois[0] //找到roi对应的训练图片在训练batch的索引
// x1,y1,x2,y2 round 【第一次量化】
int roi_start_w = round(bottom_rois[1]*spatial_scale_); // roi的x1(左上x坐标)在共享特征图上的位置
int roi_start_h = round(bottom_rois[2]*spatial_scale_); // y1(左上y坐标)
int roi_end_w = round(bottom_rois[3]*spatial_scale_); // x2(右下x坐标)
int roi_end_h = round(bottom_rois[4]*spatial_scale_); // y2(右下y坐标)
// check
CHECK_GE(roi_batch_ind, 0)
CHECK_LT(roi_batch_ind, batch_size)
// w, h
int roi_height = max(roi_end_h-roi_start_h+1, 1) // roi在共享特征图上的高
int roi_width = max(roi_end_w-roi_star_w+1, 1) // roi在共享特征图上的宽
// 【第二次量化】得到在roi_pool时候在高方向上划分的段数
const Dtype bin_size_h = static_cast<Dtype>(roi_height)/static_cast<Dtype>(pooled_heihgt_)
const Dtype bin_size_w = static_cast<Dtype>(roi_width)/static_cast<Dtye>(pooled_width_);
for(int c=0; c<channels_; ++c) // 第二个循环,遍历channels
{
for(int ph=0; ph<pooled_height_; ++ph) // 第三个循环, 遍历pooled_hegiht_
{
for(int pw=0; pw<pooled_width_; ++pw) // 第四个循环, 遍历pooled_width_
{
//将pooled的输出分别对应共享特征图的区域【如下图】
int hstart = static_cast<int>(floor(static_cast<Dtype>(ph)*bin_size_h));
int wstart = static_cast<int>(floor(static_cast<Dtype>(pw)*bin_size_w));
int hend = static_cast<int>(ceil(static_cast<Dtype>(ph + 1)*bin_size_h));
int wend = static_cast<int>(ceil(static_cast<Dtype>(pw + 1)*bin_size_w));
hstart = min(max(hstart + roi_start_h, 0), height_);
hend = min(max(hend + roi_start_h, 0), height_);
wstart = min(max(wstart + roi_start_w, 0), width_);
wend = min(max(wend + roi_start_w, 0), width_);
// check
bool is_empty - (hend<=hstart)||(wend<=wstart);
const int pool_index = ph*pooled_width_+pw; //找到对应pool_index
if(is_empty)
{
top_data[pool_index]=0;
argmax_data[pool_index]=-1;
}// if
for(int h=hstart; h<hend; ++h)//第五个循环
{
for(int w=wstart; w<wstart; +=w)//第六个循环
{ //找最大值
const int index = h*width_+w;
if (batch_data[index] > top_data[pool_index])
{
top_data[pool_index] = batch_data[index];//该值对应检索区域中的最大值
argmax_data[pool_index] = index;//记录该值对应的共享特征图上面的位置
}
}// 第六个循环end
} // 第五个循环end
}// 第四个循环 pool_width end
} // 第三个循环for pooled_heihgt end
batch_data += bottom[0]0>offset(0,1); //做完一个通道,将输出索引指针移动到下一个索引
top_data += top[0]->offset(0,1)
argmax_data += max_idx_.offset(0,1);
}// for 第二个循环channels_ end
bottom_rois += bottom[1]->offset(1); //处理完一个roi,接着处理下一个roi
} //for 第一个循环 num_rois end
}// 函数end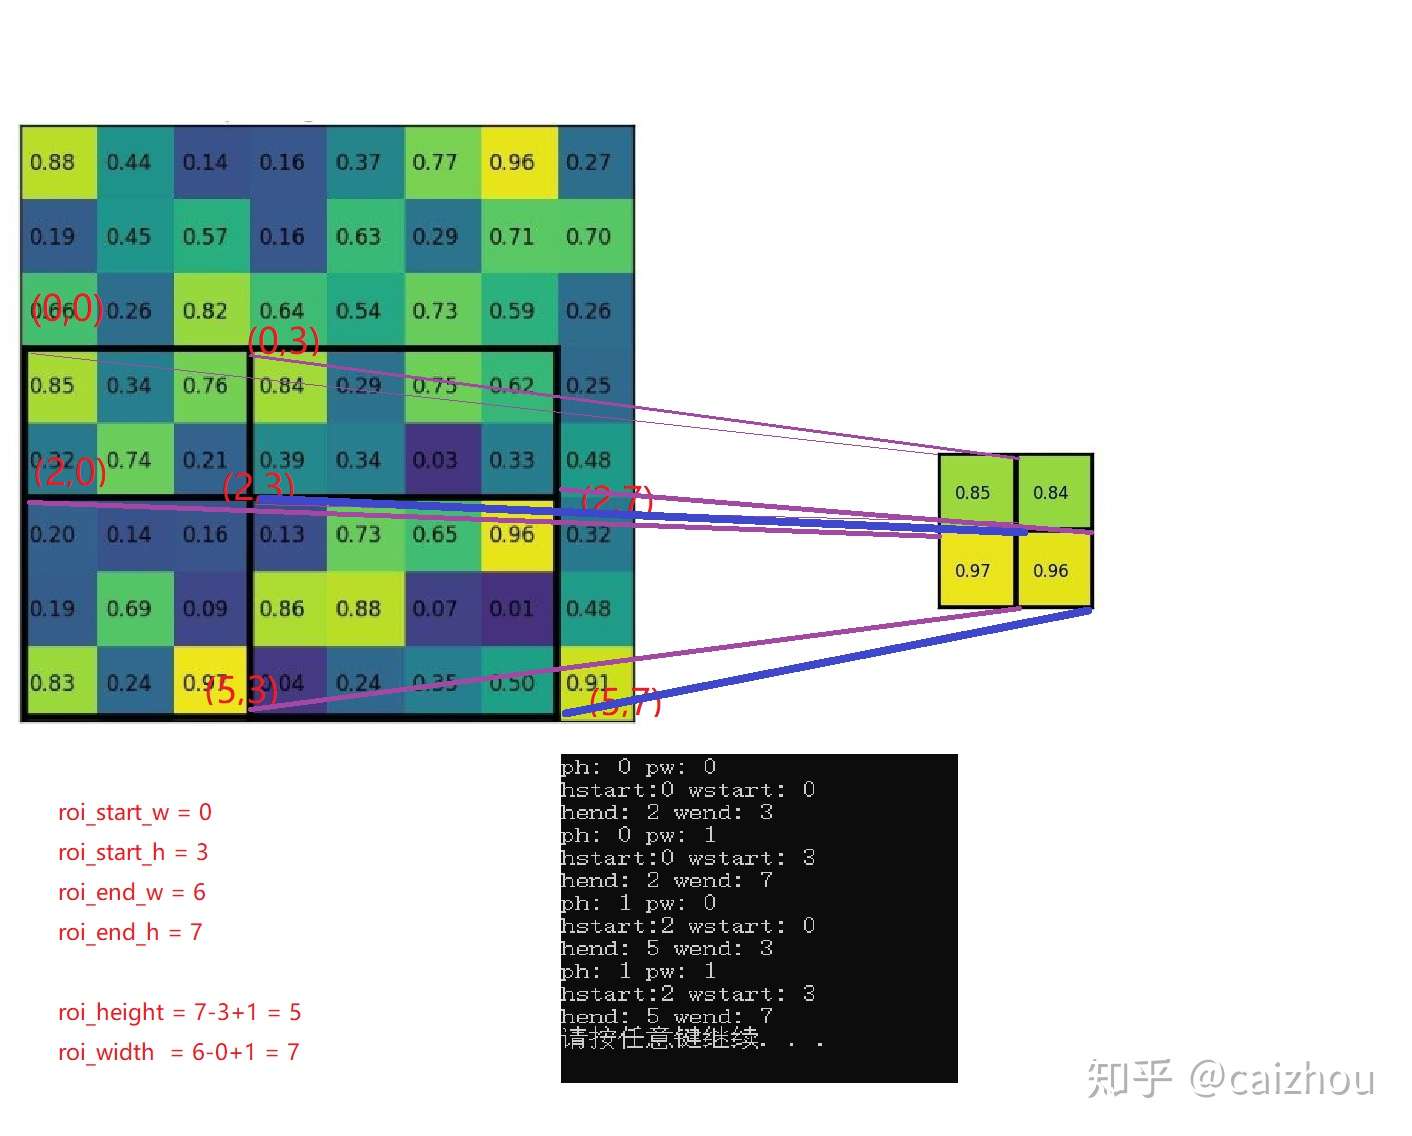 第三个和第四个循环的目的
- 总结
- 依次对每个ROI(第一个for循环)得到ROI的信息之后,找到ROI对应的训练batch中的图片特征在bottom[0]中的位置,即batch_data
- 对逐个通道(第二个循环)将每一个通道上的ROI区域划分pool_height, pool_width_份,将每一份中(hstart, hend, wsart, wend)的最大值填入该通道的输出区域(第五和第六循环找最大值)同时还有记录最大值的 索引
ROI Align原理
在fasterrcnn中使用了ROI Pooling,在maskRCNN中使用了ROI Align,看了好多大神都在说这个非常牛,是MaskRCNN的灵魂,而且都说了针对ROIPooling两次量化的缺点所提出的。这里也盗用两张图进行说明
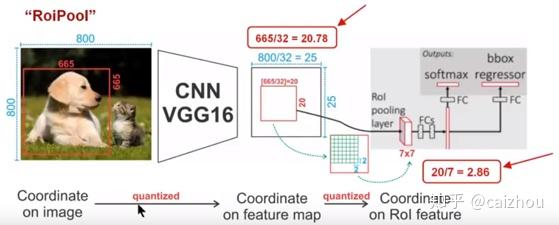
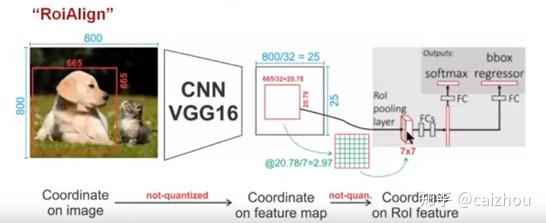
一个800x800的图片上有一个665x665大小的框,经过主干网络提取特征之后,特征图缩放不长为32,所以特征图变为25x25,而框则变为20.78x20.78,所以roi pooling将其量化为20,接下来池化7x7的大小则需要bin大小(20/7=2.86)又包含了小数,再一次量化到2,所以讲过两次量化之后候选区域就发生了很明显的偏差,在特征图0.1的误差在原图就为3.2倍,0.8的偏差在原图则有将近30个像素偏差。而对比上图ROIAlign(下图)则取消量化操作,使用双线性插值。
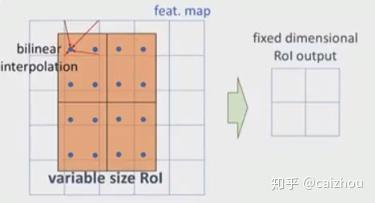
具体流程可以如下参考下图
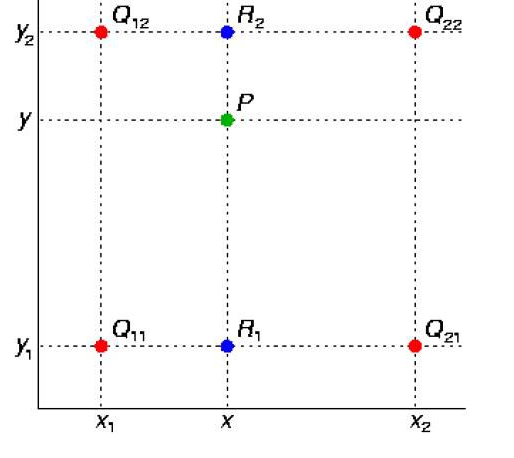
双线性插值
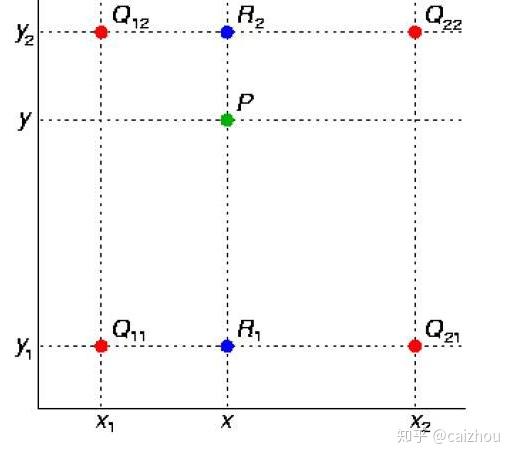
使用四个已知坐标(0,0),(0,1),(1,0),(1,1)简化上面公式:
在实际代码中核心模块对应:
int y_low = (int)y
int x_low = (int)x
y_high = y_low+1;
x_high = y_high+1;
//////////////////////
   pos1 +   + pos2                 (x_low,y_low)        (1+x_low, y_low)
          -                 =>
   pos3 +   + pos4                 (x_low,1+y_low)      (1+x_low,1+y_low)
//////////////////////
pos1 = y_low*width+x_low;
pos2 = y_low*width+x_high;
pos3 = y_high*width+x_low;
pos3 = y_high*width+x_high;
简化公式中
w1 = (1-x)(1-y)
w2 =  x (1-y)
w3 = (1-x) y
w4=  x y
这是在简化y_low=0; y_hgih=1;x_low=0, x_high=1的情况下
所以在这里我们的x,y分别为:
lx=  x-x_low;
ly = y-y_low
hy = 1-ly
hx = 1-lx
w1=  hy*hx =>(1-x)(1-y)=>((1+x_low)-x)((1+y_low)-y)=>(1-(x-x_low))((1-(y-y_low))=>hy*hx
w2=hy*lx
w3=ly*hx
w4